API Usage Instructions
Algo SDK is a software development kit designed specifically for evs devices. It provides algorithmic functions and simple operation methods to help developers easily integrate various functions.
Environment Configuration
Make sure that the following prerequisites are installed in your development environment:
- Operating System: Windows 10 64-bit
- Compiler: A C/C++ compiler compatible with your operating system
- Dependency Libraries: Ensure the necessary libraries (including OpenCV) are installed. We will provide the corresponding OpenCV version for the SDK; you only need to configure the environment variables yourself.
- Development Tools: Such as IDEs (e.g., Visual Studio 2019, etc.)
Suggestion: Use only English characters for the development path.
Algo Module Description
The Algo library is mainly divided into three modules:
OpticalFlow
- Function: This API is based on the optical flow implementation of EVS.
HandDetector
- Function: This API is implemented based on the hand shape detector of EVS.
HumanDetector
- Function: This API is based on the human detector implementation of EVS.
Algo Directory Description
- bin directory: contains all core libraries and dependent libraries
- docs directory: contains interface description documents
- include directory: contains interface header files
- lib directory: contains lib files of all development libraries
- models directory: contains training model data
- samples_cpp directory: contains simple samples of operating devices. Running the samples requires the OpenCV environment.
Note: After compiling the sample, you need to copy the dynamic libraries in the models directory and bin directory to the same directory as the .exe executable file.
1.OpticalFlow
This API is based on the optical flow implementation of EVS.
Of Function
Of function is the initialization constructor of the optical flow class. The parameters are explained as follows:
    Of(
    uint16_t width,
    uint16_t height,
    uint8_t scale,
    uint8_t search_radius,
uint8_t block_dimension);- width:The width of the EVS image.
- height:The height of the EVS image.
- scale:EVS downsampling factor.
- search_radius:represents the size of the optical flow search radius, and 4 is usually recommended.
- block_dimension:It indicates the image size used for optical flow calculation related features. It is usually recommended to be 21. The larger the size, the more accurate but the lower the efficiency.
Run Function
The run function is the core function for running the optical flow algorithm. The parameters are explained as follows:
    int run(
    const cv::Mat& in_img,
    cv::Mat& out_img,
uint8_t stack_nums = 1);- in_img:represents the EVS input image used to calculate the optical flow. Usually 0 means no event, 1 and 2 represent positive and negative events respectively.
- out_img:represents the calculated optical flow image, represented by CV_8SC2 type. The values of the two channels of each pixel represent the optical flow size of x and y respectively, and the sign represents the direction
- stack_nums:The number of EVS stacked frames. The default value is 1, which means no stacking. Usually, stacking is required when events are sparse.
showOf Function
The showOf function visualizes the optical flow image obtained by the run function using HVS space arrows. The parameters are explained as follows:
    int showOf(
    cv::Mat& of_result,
    cv::Mat& of_mask,
	uint8_t ratio = 2,
uint8_t step = 2);- of_result:represents the optical flow image calculated by the run function.
- of_mask:represents the result of the optical flow after visualizing of_result.
- ratio:indicates how many times the visualized optical flow arrows will be magnified year-on-year.
- step:Indicates how many times the visualized optical flow arrows are sparsely sampled.
Use Cases
// Use the optical flow algorithm
#include <AlpOpticalFlow/Of.h>
#include <iostream>
#include <iomanip>
#include <sstream>
#include <chrono>
#include <thread>
#include <ctime>
#include <regex>
#include <filesystem>
#include <fstream>
namespace fs = std::filesystem;
using namespace ALP;
/**
* @brief Stores and manages various variables required during program runtime
*
* This structure contains member variables necessary for processing EVS data frames, along with associated threads and locks.
*/
struct SampleVar
{
// Mutex to protect the EVS data frame list
std::mutex evs_mutex_;
// Flag indicating whether to close data processing
bool is_close_ = false;
// Thread for playing EVS data
std::unique_ptr<std::thread > evs_thread_;
// Flag indicating whether to enable EVS data storage
bool is_evs_show_ = false;
// Width of the EVS image
int evs_width_ = 768;
// Height of the EVS image
int evs_height_ = 608;
std::string evs_image_dir_ = "C:/Users/SMTPC-0430/Desktop/Pic/EVS_RAW";//D:/TestData/Human/20250115161806780/evs_raw
// Create an optical flow class instance
std::shared_ptr<Of> optical_flow_ = nullptr;
};
std::shared_ptr<SampleVar> var_ = std::make_shared<SampleVar>();
/*
* @brief readRawImage Read the .raw file in binary mode and convert it to a cv::Mat, parsing the data in 8-bit grayscale format.
*
* Using cv::imread directly to read a .raw file will fail because it is not a standard image format.
*
*/
cv::Mat readRawImage(const std::string& filename, int width, int height)
{
std::ifstream file(filename, std::ios::binary);
if (!file) {
std::cerr << "ERROR: Cannot open file: " << filename << std::endl;
return cv::Mat();
}
cv::Mat image(height, width, CV_8UC1); // 8-bit single-channel grayscale image
image *= 100;
file.read(reinterpret_cast<char*>(image.data), width * height);
if (file.gcount() != width * height) {
std::cerr << "WARNING: File size mismatch: " << filename << std::endl;
return cv::Mat();
}
return image;
}
/**
* @brief EVS Image Display Interface (Local File Version)
*
* This function creates a new thread to process and display locally stored EVS image files.
* The image files will be read cyclically in filesystem order, and optical flow information will be calculated/displayed.
*/
void displayEVS()
{
var_->evs_thread_ = std::make_unique<std::thread>([&]()
{
var_->is_evs_show_ = true;
std::vector<std::string> image_files;
for (const auto& entry : fs::directory_iterator(var_->evs_image_dir_)) {
if (entry.path().extension() == ".raw") {
image_files.push_back(entry.path().string());
}
}
if (image_files.empty()) {
std::cerr << "ERROR: No image files found in " << var_->evs_image_dir_ << std::endl;
var_->is_evs_show_ = false;
return;
}
std::sort(image_files.begin(), image_files.end()); // Ensure sequential processing
size_t frame_index = 0;
const int frame_delay = 30;
while (!var_->is_close_) {
cv::Mat tem = readRawImage(image_files[frame_index], var_->evs_width_, var_->evs_height_);
if (tem.empty()) {
frame_index = (frame_index + 1) % image_files.size();
continue;
}
cv::Mat out;
if (!var_->optical_flow_->run(tem, out, 10)) {
cv::Mat of_mask;
var_->optical_flow_->showOf(out, of_mask, 10, 3);
cv::namedWindow("of", cv::WINDOW_FREERATIO);
cv::imshow("of", of_mask);
cv::waitKey(1);
}
frame_index = (frame_index + 1) % image_files.size();
std::this_thread::sleep_for(std::chrono::milliseconds(frame_delay));
}
var_->is_evs_show_ = false;
});
}
/**
* @brief Power off the device
*
* This function is used to shut down the Eiger device, stop all data streams, and release related resources.
*/
void closeDevice()
{
// Wait for the EVS display thread to terminate
if (var_->evs_thread_)
{
var_->evs_thread_->join();
var_->evs_thread_ = nullptr;
}
}
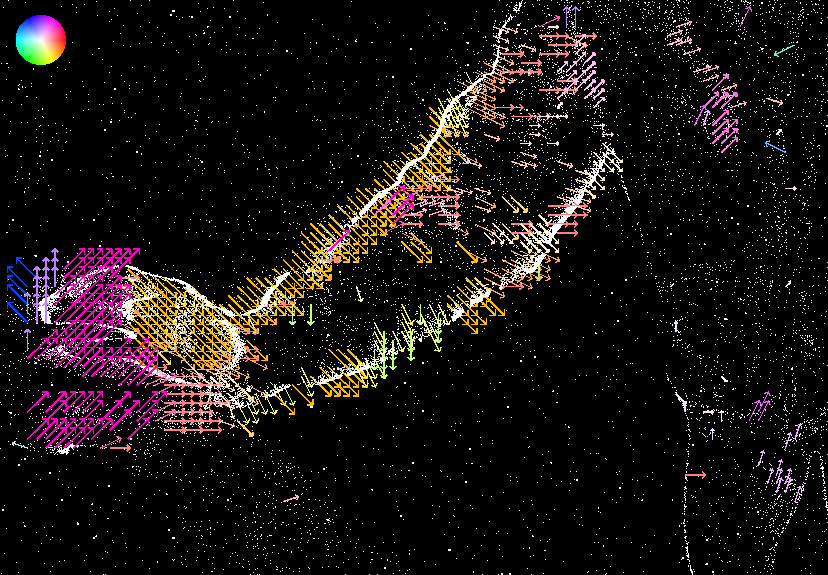
int main(int argc, char* argv[])
{
// Create the optical flow class
var_->optical_flow_ = std::make_shared<Of>(var_->evs_width_, var_->evs_height_, 6, 4, 31);
displayEVS();
closeDevice();
return 0;
}Effect
2.HandDetector
HandDetector Function
This function is used to construct a HandDetector object with an initial hand detector type. The parameters are explained as follows:
HandDetector(HandDetectorType type);- type: aps or evs Currently only supports HumanDetectorType::evs
detect function
Input image for detection, and then get the results from boxes and landmarks. The parameters are explained as follows:
int detect  ( const cv::Mat & image,
  std::vector< cv::Rect > & boxes,
std::vector< std::vector< cv::Point2f > > & landmarks ) ;- image:Input image
- boxes:indicates the detected hand box results
- landmarks:Key points representing the hand
init function
Initialization function, the parameters are explained as follows:
int init(const std::string& device="cpu");- cpu" or "cuda", defalut is "cpu"
Use Cases
#pragma execution_character_set("utf-8")
/**********************************************
* This example is for playing back saved EVS raw data. *
***********************************************/
//Gesture detection
#include <ALPML/HandDetector/hand_detector.h>
#include <iostream>
#include <iomanip>
#include <sstream>
#include <chrono>
#include <thread>
#include <ctime>
#include <regex>
#include <filesystem>
#include <fstream>
namespace fs = std::filesystem;
using namespace ALP;
/**
* @brief Stores and manages various variables required during program runtime.
*
* This structure contains member variables necessary for processing APS and EVS data frames, along with associated threads and locks.
*/
struct SampleVar
{
// Mutex to protect the EVS data frame list
std::mutex evs_mutex_;
// Flag indicating whether to close data processing
bool is_close_ = false;
// Thread for playing EVS data
std::unique_ptr<std::thread > evs_thread_;
// Flag indicating whether to enable EVS data storage
bool is_evs_show_ = false;
// Width of the EVS image
int evs_width_ = 768;
// Height of the EVS image
int evs_height_ = 608;
// Smart pointer to the WriterFile class
const int play_evs_ = 2;
// Create gesture detection
std::shared_ptr<HandDetector> detector_ = nullptr;
std::string evs_image_dir_ = "C:/Users/SMTPC-0430/Desktop/Pic/EVS_RAW";
};
std::shared_ptr<SampleVar> var_ = std::make_shared<SampleVar>();
/*
* @brief The readRawImage function reads a .raw file in binary mode, converts it into a cv::Mat object, and parses the data in 8-bit grayscale format.
*
* Directly using cv::imread to read a .raw file will fail because it is not a standard image format.
*
*/
cv::Mat readRawImage(const std::string& filename, int width, int height)
{
std::ifstream file(filename, std::ios::binary);
if (!file) {
std::cerr << "ERROR: Cannot open file: " << filename << std::endl;
return cv::Mat();
}
cv::Mat image(height, width, CV_8UC1); // 8-bit single-channel grayscale image
image *= 100;
file.read(reinterpret_cast<char*>(image.data), width * height);
if (file.gcount() != width * height) {
std::cerr << "WARNING: File size mismatch: " << filename << std::endl;
return cv::Mat();
}
return image;
}
/**
* @brief Display the EVS image interface
*
* This function creates a new thread to process and display EVS data frames.
* In this thread, the latest EVS data frame will be retrieved from the `var_->evs_frames_` list,
* and then converted into an OpenCV Mat object for display.
*/
void displayEVS()
{
// Create a new thread to handle the display of EVS data frames
var_->evs_thread_ = std::make_unique<std::thread>([&]()
{
// Start storing EVS data
var_->is_evs_show_ = true;
std::vector<std::string> image_files;
for (const auto& entry : fs::directory_iterator(var_->evs_image_dir_)) {
if (entry.path().extension() == ".raw") {
image_files.push_back(entry.path().string());
}
}
if (image_files.empty()) {
std::cerr << "ERROR: No image files found in " << var_->evs_image_dir_ << std::endl;
var_->is_evs_show_ = false;
return;
}
std::sort(image_files.begin(), image_files.end()); // Ensure sequential processing
size_t frame_index = 0;
const int frame_delay = 15;
// Main loop, continuously process EVS data until the close flag is set
while (!var_->is_close_)
{
// Acquire the mutex to protect the EVS data frame list
std::unique_lock<std::mutex> locker(var_->evs_mutex_);
const cv::Mat tem = readRawImage(image_files[frame_index], var_->evs_width_, var_->evs_height_);
if (tem.empty()) {
frame_index = (frame_index + 1) % image_files.size();
continue;
}
if (var_->detector_) {
std::vector<cv::Rect> box;
std::vector<std::vector<cv::Point2f>> landmarks;
cv::Mat image = tem;
var_->detector_->detect(image, box, landmarks);
cv::cvtColor(image, image, cv::COLOR_GRAY2BGR);
image *= 100;
for (size_t i = 0; i < box.size(); i++) {
cv::rectangle(image, box[i], cv::Scalar(0, 0, 255), 2);
}
for (auto& landmark : landmarks) {
for (auto& point : landmark) {
cv::circle(image, point, 2, cv::Scalar(0, 0, 255), 2);
}
}
cv::imshow("image", image);
cv::waitKey(25);
}
frame_index = (frame_index + 1) % image_files.size();
}
// Stop storing EVS data
var_->is_evs_show_ = false;
});
}
/**
* @brief Shutdown the device
*
* This function is used to shutdown the Eiger device, stop all data streams, and release related resources.
*/
void closeDevice()
{
// Wait for the EVS display thread to finish
if (var_->evs_thread_)
{
var_->evs_thread_->join();
var_->evs_thread_ = nullptr;
}
}
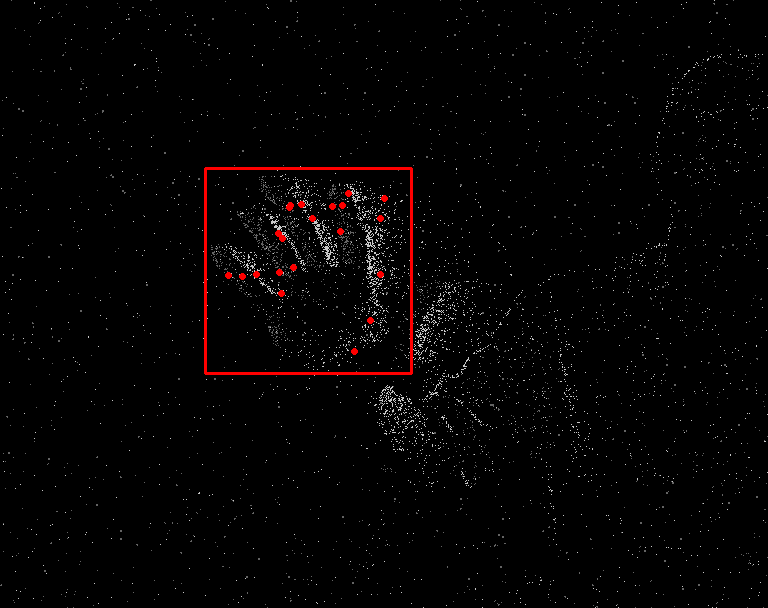
int main(int argc, char* argv[])
{
// Create gesture detection
var_->detector_ = std::make_shared<HandDetector>(HandDetectorType::evs);
var_->detector_->init("cpu");
// Start the thread to display EVS images
displayEVS();
closeDevice();
return 0;
}Effect
3.HumanDetector
HumanDetector Function
This function is used to construct a HumanDetector object with an initial hand detector type. The parameters are explained as follows:
HumanDetector(HumanDetectorType type);- type: aps or evs Currently only supports HumanDetectorType::evs
detect function
Enter the image to be detected, and then get the result from the box. The parameters are explained as follows:
int detect(const cv::Mat& image, std::vector<cv::Rect>& boxes);- image:Input image
- boxes:Output detection box
init function
Initialization function, the parameters are explained as follows:
int init ( const std::string & device = "cpu" )- device type:"cpu" or "cuda", defalut is "cpu"
Use Cases
#pragma execution_character_set("utf-8")
/**********************************************
* This example is for playing back saved EVS raw data. *
***********************************************/
// Human detection
#include <AlpML/HumanDetector/human_detector.h>
#include <iostream>
#include <iomanip>
#include <sstream>
#include <chrono>
#include <thread>
#include <ctime>
#include <regex>
#include <filesystem>
#include <fstream>
namespace fs = std::filesystem;
using namespace ALP;
/**
* @brief Stores and manages various variables required during program runtime
*
* This structure contains member variables necessary for processing APS and EVS data frames, along with associated threads and locks.
*/
struct SampleVar
{
// Mutex to protect the EVS data frame list
std::mutex evs_mutex_;
// Flag indicating whether to close data processing
bool is_close_ = false;
// Thread for playing EVS data
std::unique_ptr<std::thread > evs_thread_;
// Flag indicating whether to enable EVS data storage
bool is_evs_show_ = false;
// Width of the EVS image
int evs_width_ = 768;
// Height of the EVS image
int evs_height_ = 608;
const int play_evs_ = 2;
std::string evs_image_dir_ = "C:/Users/SMTPC-0430/Desktop/Pic/human/EVS_RAW";//D:/TestData/Human/20250115161806780/evs_raw C:/Users/SMTPC-0430/Desktop/Pic/human/EVS_RAW
// Instance of the human detection class
std::shared_ptr<ALP::HumanDetector> detector_ = nullptr;
};
std::shared_ptr<SampleVar> var_ = std::make_shared<SampleVar>();
/*
* @brief readRawImage The `readRawImage` function reads a .raw file in binary mode and converts it to a `cv::Mat`, parsing the data in 8-bit grayscale format.
*
* Directly using `cv::imread` to read a .raw file will fail because it is not a standard image format.
*
*/
cv::Mat readRawImage(const std::string& filename, int width, int height)
{
std::ifstream file(filename, std::ios::binary);
if (!file) {
std::cerr << "ERROR: Cannot open file: " << filename << std::endl;
return cv::Mat();
}
cv::Mat image(height, width, CV_8UC1); // 8-bit single-channel grayscale image
image *= 100;
file.read(reinterpret_cast<char*>(image.data), width * height);
if (file.gcount() != width * height) {
std::cerr << "WARNING: File size mismatch: " << filename << std::endl;
return cv::Mat();
}
return image;
}
/**
* @brief Display the EVS image interface
*
* This function creates a new thread to process and display EVS data frames.
* Within this thread, the latest EVS data frame is retrieved from the `var_->evs_frames_` list,
* converted into an OpenCV Mat object, and then displayed.
*/
void displayEVS()
{
// Create a new thread to handle the display of EVS data frames
var_->evs_thread_ = std::make_unique<std::thread>([&]()
{
// Start storing EVS data
var_->is_evs_show_ = true;
var_->is_evs_show_ = true;
std::vector<std::string> image_files;
for (const auto& entry : fs::directory_iterator(var_->evs_image_dir_)) {
if (entry.path().extension() == ".raw") {
image_files.push_back(entry.path().string());
}
}
if (image_files.empty()) {
std::cerr << "ERROR: No image files found in " << var_->evs_image_dir_ << std::endl;
var_->is_evs_show_ = false;
return;
}
std::sort(image_files.begin(), image_files.end()); // Ensure sequential processing
size_t frame_index = 0;
const int frame_delay = 15;
// Main loop, continuously process EVS data until the close flag is set
while (!var_->is_close_)
{
// Acquire the mutex to protect the EVS data frame list
std::unique_lock<std::mutex> locker(var_->evs_mutex_);
const cv::Mat tem = readRawImage(image_files[frame_index], var_->evs_width_, var_->evs_height_);
if (tem.empty()) {
frame_index = (frame_index + 1) % image_files.size();
continue;
}
if (var_->detector_)
{
std::vector<cv::Rect> box;
cv::Mat image = tem;
var_->detector_->detect(image, box);
cv::cvtColor(image, image, cv::COLOR_GRAY2BGR);
image *= 100;
for (size_t i = 0; i < box.size(); i++)
{
cv::rectangle(image, box[i], cv::Scalar(0, 0, 255), 2);
}
cv::imshow("image", image);
cv::waitKey(25);
}
frame_index = (frame_index + 1) % image_files.size();
}
// Stop storing EVS data
var_->is_evs_show_ = false;
});
}
/**
* @brief Shutdown the device
*
* This function is used to shutdown the Eiger device, stop all data streams, and release related resources.
*/
void closeDevice()
{
// Wait for the EVS display thread to complete
if (var_->evs_thread_)
{
var_->evs_thread_->join();
var_->evs_thread_ = nullptr;
}
}
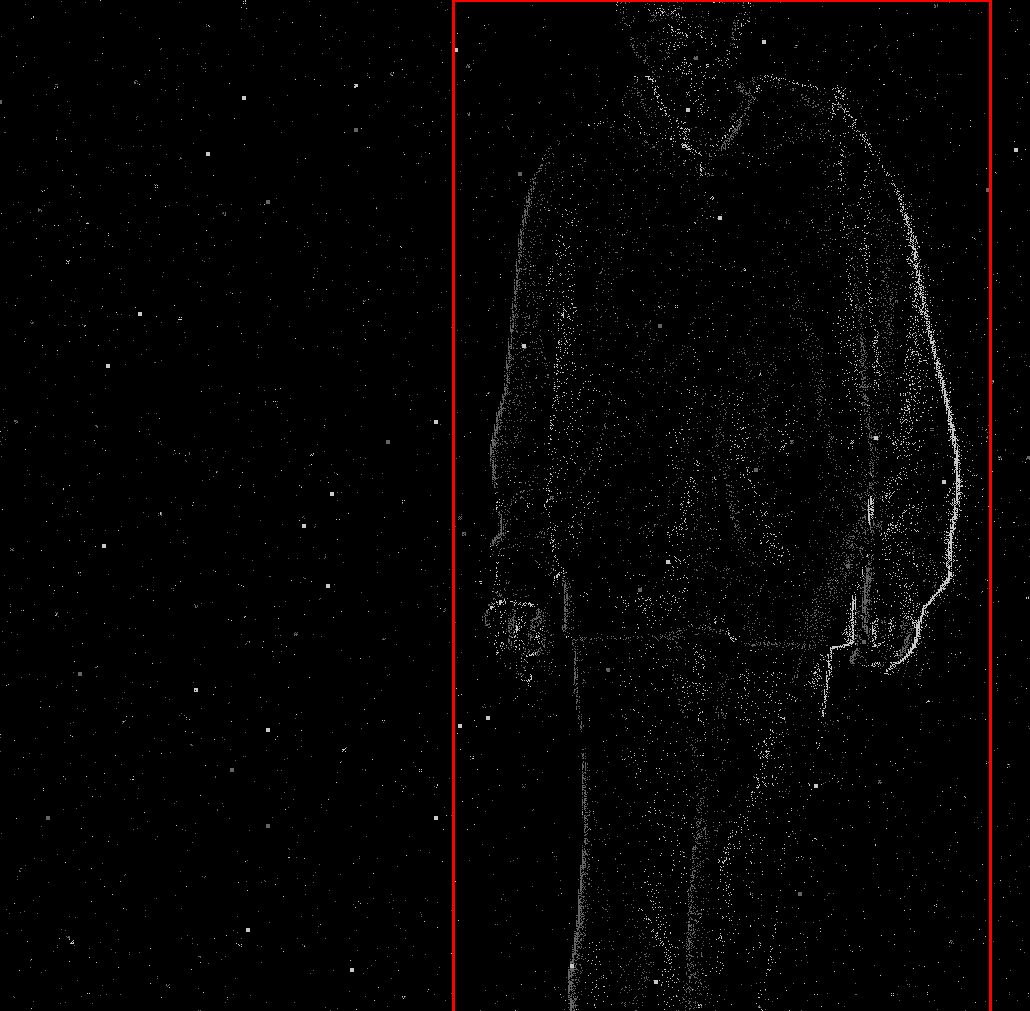
int main(int argc, char* argv[])
{
// Initialize human detection
var_->detector_ = std::make_shared<HumanDetector>(HumanDetectorType::evs);
var_->detector_->init("cpu");
// Start the thread for displaying EVS images
displayEVS();
closeDevice();
return 0;
}Effect