M-K1HSE Introduction
Chapter 1 Product Overview
1.1 Scope of application
M-K1HSE V1.0 is an advanced space-time octa-core RISC-V AI motherboard, which is widely used in smart display terminal products, video terminal products, and industrial automation terminal products, such as advertising machines, digital signage, smart self-service terminals, smart retail terminals, O2O smart devices, industrial control hosts, robotic equipment, etc.
1.2 Product Overview
The M-K1HSE V1.0 development board uses the RISC-V SpacemiT X60 octa-core processor, equipped with the Harmony system, with a main frequency of up to 1.6GHz, super performance, and rich interfaces. It uses IMG BXE-2-32@819MHz GPU, 32KB SLC, supports 4K, H.265/H.264 hardware decoding, and is first-class in both running points and decoding. It is your new choice for human-computer interaction and industrial control projects.
1.3 Product Features
High integration. Integrates HDMI/MIPI/Ethernet/WIFI/BT in one, simple and ultra-thin, outstanding.
Built-in PCI-E 3/4G module interface. Supports multiple PCI-E 3G/4G modules such as Huawei and Longshang to access the Internet.
Built-in M.2 SSD/computing power module interface. Supports SSD hard drive storage expansion or computing power module computing power expansion.
Rich expansion interfaces. 5 USB ports (1 USB3.0, 3 standard USB ports, 1 type-C OTG), 5 serial ports (3 TTL, 1 RS232, 1 RS485) and multiple GPIOs can meet the requirements of various peripherals on the market.
Supports dual-screen display. HDMI supports a maximum resolution of 1920 1080, and MIPI supports a maximum resolution of 1920 1080.
High performance. It comes with a deep neural network unit (NPU) with a performance of up to 2.0 TOPS, which can meet the needs of deep learning projects.
Support system customization, provide system call interface API reference code, and perfectly support customer upper-level application APP development.
It perfectly supports various mainstream touch screens such as infrared, optical, capacitive, resistive, touch film, etc. It also supports HID configuration of driver-free touch screens without debugging.
1.4 Appearance and interface diagram
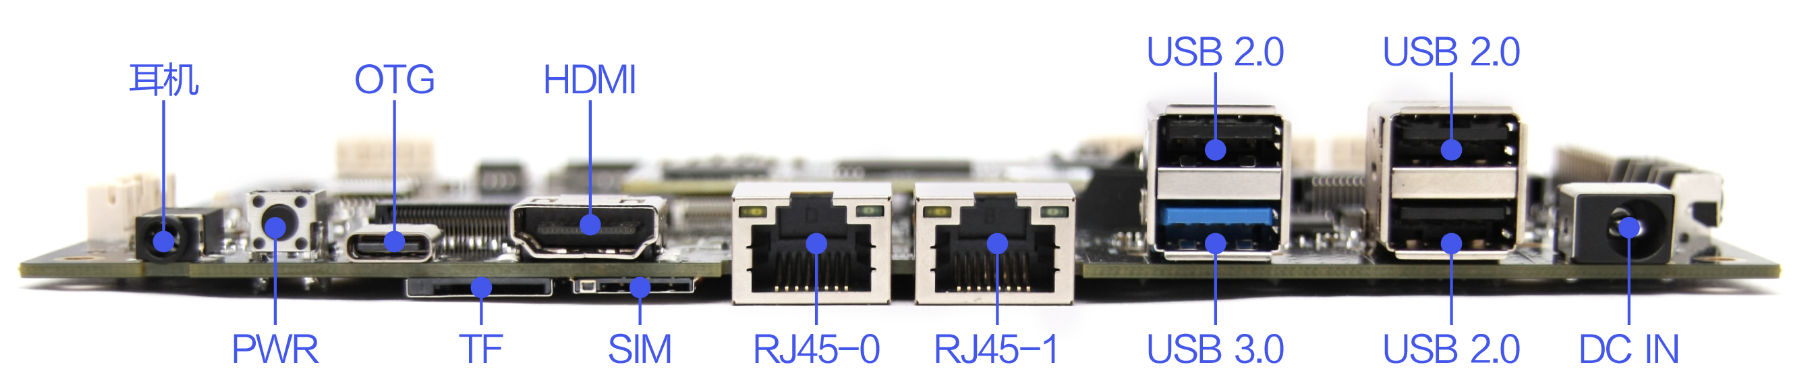
front:

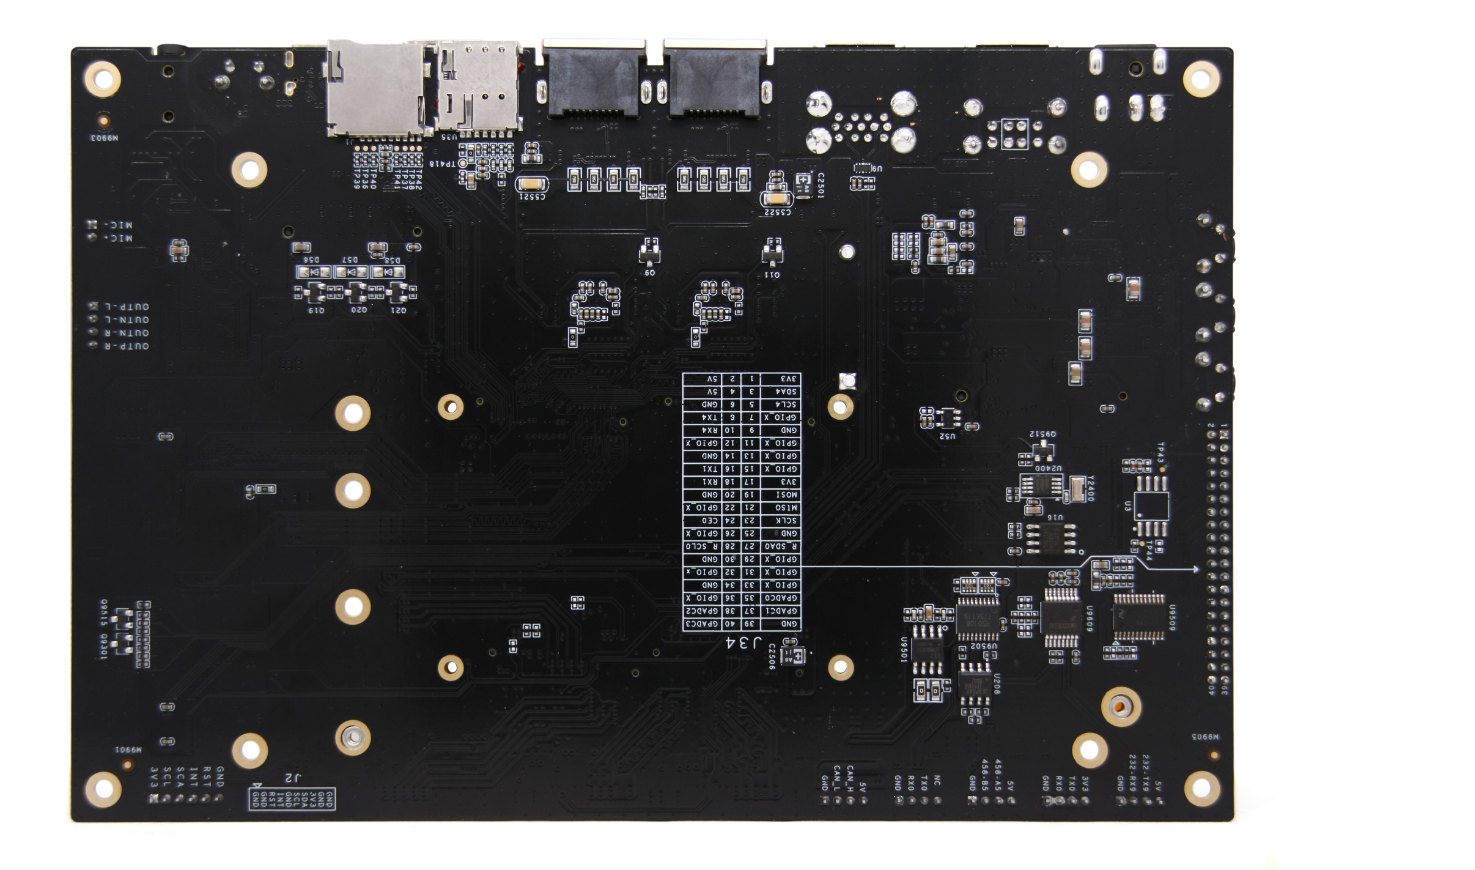
back:
Front view:
PCB size drawing:
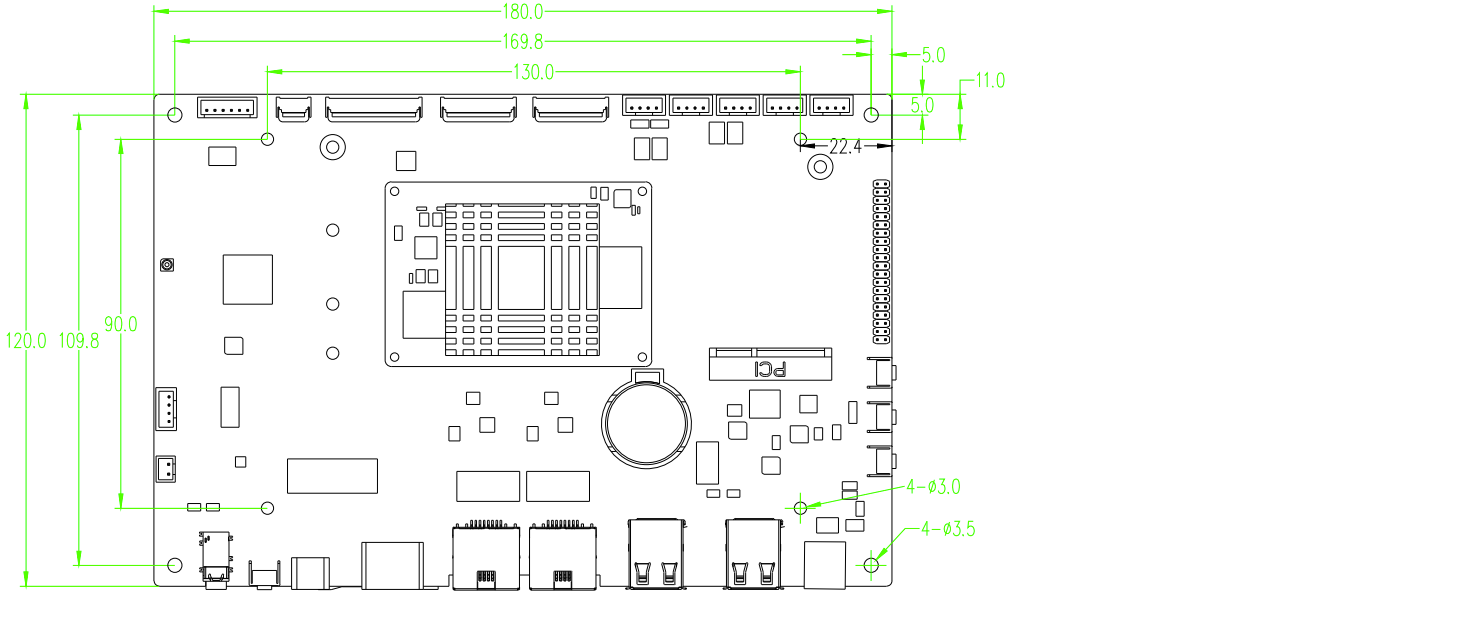
Photo Statement
The above photos were taken from a batch of boards produced by our company. Due to the continuous maintenance of the products, the boards actually shipped may not be consistent with the photos.
Chapter 2 Basic Function List
| Function | Describe |
|---|---|
| Board size | 180*120mm |
| CPU | K1, RISC-V SpacemiT X60 octa-core processor, maximum frequency 1.6GHz |
| operating system | Harmony OS |
| Memory/Storage | Standard 4G/ Standard 32G |
| HDMI output | 1, standard Type-A female connector, supports up to 1080P@60Hz resolution |
| *MIPI output | 1, can drive MIPI LCD screens with various resolutions, supporting a maximum resolution of 1920*1080 |
| Audio Input/Output | Speaker output (supports left and right channel output, maximum support dual 20W / 4R, 10W / 8R), MIC IN*1 |
| Headphone output | Support one-way three/four-band headphone insertion |
| USB interface | 1 USB2.0 OTG, 1 USB3.0 HOST, 3 USB HOST |
| Serial Port | 5: 1 232, 3 TTL, 1 485 |
| Network support | 1. Support dual-channel 10/100/1000M adaptive Ethernet 2. Built-in WiFi6 3. Built-in MINI PCI-E interface, supports 3/4G Internet access, does not support analog or digital calls |
| storage | Support U disk, TF card expansion storage |
| RTC Real Time Clock | Support low power consumption |
| System Upgrade | Support local USB upgrade |
| CAN interface | 1 CAN interface |
| button | 1 reset button, 1 POWER ON button, 1 Uboot burning button |
| LED | 2-way, user programmable indicator lights |
Copyright Notice
This user manual, including but not limited to all the information contained therein, is protected by copyright law. Without the permission of ShiMetaPi, no imitation, copying, excerpting, translating, distributing or other use is allowed.
Disclaimer
The ownership and intellectual property rights of third-party product names or contents mentioned in this user manual belong to the respective product or content owners and are protected by current intellectual property laws and international treaties.