HOME
Shop
  • English
  • 简体中文
HOME
Shop
  • English
  • 简体中文
  • Product Series

    • FPGA+ARM

      • GM-3568JHF

        • 1. Introduction

          • GM-3568JHF Introduction
        • 2. Quick Start

          • 01 Environment Construction
          • 02 Compilation Instructions
          • 03 Burning Guide
          • 04 Debugging Tools
          • 05 Software Update
          • 06 View information
          • 07 Test Command
          • 08 Application Compilation
          • 09 Source code acquisition
        • 3. Peripherals and Interfaces

          • USB
          • Display and touch
          • Ethernet
          • WIFI
          • Bluetooth
          • TF-Card
          • Audio
          • Serial Port
          • CAN
          • RTC
        • 4. Application Development

          • 01 UART read and write case
          • 02 Key detection case
          • 03 LED light flashing case
          • 04 MIPI screen detection case
          • 05 Read USB device information example
          • 06 FAN Detection Case
          • 07 FPGA FSPI Communication Case
          • 08 FPGA DMA read and write case
          • 09 GPS debugging case
          • 10 Ethernet Test Cases
          • 11 RS485 reading and writing examples
          • 12 FPGA IIC read and write examples
          • 13 PN532 NFC card reader case
          • 14 TF card reading and writing case
        • 5. QT Development

          • 01 ARM64 cross compiler environment construction
          • 02 QT program added automatic startup service
        • 6. Others

          • 01 Modification of the root directory file system
          • 02 System auto-start service
    • ShimetaPi

      • M4-R1

        • Introduction

          • M4-R1 Introduction
        • Get started quickly

          • OpenHarmony概述
          • 镜像烧录
          • 开发环境准备
          • Hello World应用以及部署
        • Application Development

          • getting Started

            • 第一章 ArkTS语言简介
            • 第二章 UI组件介绍和实际应用(上)
            • 第三章 UI组件介绍和实际应用(中)
            • 第四章 UI组件介绍和实际应用(下)
          • Advanced

            • 第一章 入门指引
            • 第二章 三方库的引用和使用
            • 第三章 应用编译以及部署
            • 第四章 命令行恢复出厂设置
            • 第五章 系统调试--HDC调试
            • 第六章 APP 稳定性测试
            • 第七章 应用测试
        • Equipment Development

          • 第一章 环境搭建
          • 第二章 下载源码
          • 第三章 编译源码
        • Peripherals and interfaces

          • 树莓派接口
          • GPIO 接口
          • I2C 接口
          • SPI通信
          • PWM控制
          • 串口通讯
          • TF Card
          • 屏幕
          • 触摸
          • 音频
          • RTC
          • Ethernet
          • M.2
          • MINI-PCIE
          • Camera
          • WIFI&BT
          • 树莓派拓展板
        • Frequently asked questions

          • 资源下载
      • M5-R1

        • Introduction

          • Introduction to ShimetaPi M5-R1
    • OpenHarmony

      • SC-3568HA

        • Introduction

          • SC-3568HA Overview
        • Quick Start Guide

          • OpenHarmony Overview
          • Image Flashing
          • Setting Up the Development Environment
          • Hello World Application and Deployment
        • Application Development

          • ArkUI

            • Chapter 1 Introduction to ArkTS Language
            • Chapter 2 Introduction to UI Components and Practical Applications (Part 1)
            • Chapter 3 Introduction to UI Components and Practical Applications (Part 2)
            • Chapter 4 Introduction to UI Components and Practical Applications (Part 3)
          • Expand

            • Chapter 1 Getting Started Guide
            • Chapter 2 Referencing and Using Third-Party Libraries
            • Chapter 3: Application Compilation and Deployment
            • Chapter 4: Command-Line Factory Reset
            • Chapter 5: System Debugging -- HDC (Huawei Device Connector) Debugging
            • Chapter 6 APP Stability Testing
            • Chapter 7 Application Testing
        • Device Development

          • Chapter 1 Environment Setup
          • Chapter 2 Download Source Code
          • Chapter 3 Compiling Source Code
        • Peripheral And Iinterface

          • Raspberry Pi interface
          • GPIO Interface
          • I2C Interface
          • SPI communication
          • PWM (Pulse Width Modulation) control
          • Serial port communication
          • TF Card
          • Display Screen
          • Touch
          • Audio
          • RTC
          • Ethernet
          • M.2
          • MINI-PCIE
          • Camera
          • WIFI&BT
          • Raspberry Pi expansion board
        • Frequently Asked Questions

          • Resource Downloads
      • M-K1HSE

        • Introduction

          • M-K1HSE Introduction
        • Quick Start

          • Development environment construction
          • Source code acquisition
          • Compilation Notes
          • Burning Guide
        • Peripherals and interfaces

          • 01 Audio
          • 02 RS485
          • 03 Display
        • System customization development

          • System transplant
          • System customization
          • Driver Development
          • System Debugging
          • OTA Update
    • EVS-Camera

      • CF-NRS1

        • 1. Introduction

          • Event Camera Technical Documentation
        • 2. Quick Start

          • Host driver and software installation
        • 3. SDK application development

          • API Usage Instructions
      • CF-CRA2

        • Introduction

          • About CF-NRS1
    • AI-model

      • 1684XB-32T

        • Introduction

          • AIBOX-1684XB-32 Introduction
        • Get started quickly

          • First time use
          • Network Configuration
          • Disk usage
          • Memory allocation
          • Fan Strategy
          • Firmware Upgrade
        • Deployment Tutorial

          • Algorithm deployment
          • Deploy Llama3 Example
        • Application Development

          • Sophgo SDK Development
          • Sophon LLM_api_server development
          • Deploy MiniCPM-V-2_6
          • Qwen-2-5-VL Image and Video Recognition DEMO
          • Qwen3-chat-DEMO
          • Qwen3-Qwen Agent-MCP-Demo
          • Qwen3-langchain-AI Agent
      • 1684X-416T

        • Introduction

          • AIBOX-1684X-416 Introduction
        • Demo simple operation guide

          • Simple instructions for using shimeta smart monitoring demo
    • Core-Board

      • C-3568BQ

        • Introduction

          • C-3568BQ Overview
      • C-3588LQ

        • Introduction

          • C-3588LQ Introduction
      • GC-3568JBAF

        • Introduction

          • GC-3568JBAF Introduction
      • C-K1BA

        • Introduction

          • C-K1BA Introduction

Qwen3-Qwen Agent-MCP-Demo

一、Introduction

Qwen Agent is Alibaba's Qwen 3 based agent development framework, which supports tool invocation and MCP access, helping developers build AI applications with task planning capabilities; MCP is a standardized protocol for decoupling large models from external tools.Qwen-Agent .

1、Characteristics

  • Strengthen tool invocation capability : Support agents to automatically invoke built-in tools (code interpreter, browser assistant) and user-defined tools, and expand function boundaries through Function Calling.
  • Standardized MCP access : integrate the MCP tool access process, and only configure MCP parameters to call external tools (such as databases and APIs) to reduce development costs.
  • Task planning and context memory .
  • Long text processing and RAG integration : relying on the search enhancement generation mechanism, it supports 8K to 1 million tokens long document processing, and improves the efficiency of context understanding through block retrieval.
  • UI front-end interaction support : provide visual interface components, optimize human-computer interaction experience, and facilitate multiple rounds of dialogue and result display.

二、Operation steps

**1、**Qwen-Agent accesses mcp-server-sqlite

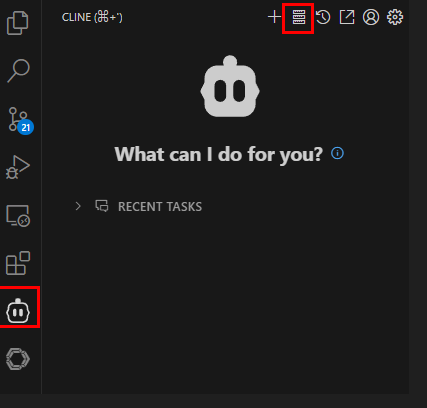
1.1 Import the related package and initialize the Assistant class. At the same time, access the mcp server sqliteMCP server. The process of accessing the mcp needs to first define a tools array to store the mcp server configuration in the JSON schema format. We need to install the Cline plug-in in VsCode. In Cline, check * _ Use MCP servers _ * to ensure that the MCP Server service functions normally and that node.js has been installed. The latest version needs to be installed.

1.2 Cline connects to MCP Server. First click Cline in Vs Code, then click the small icon of MCP Servers, and then click the small icon next to the plus sign in the upper right corner. After entering the new interface, click Edit MCP Servers Configuration File. The process is shown in the following figure:

1751608043422

1751608069481

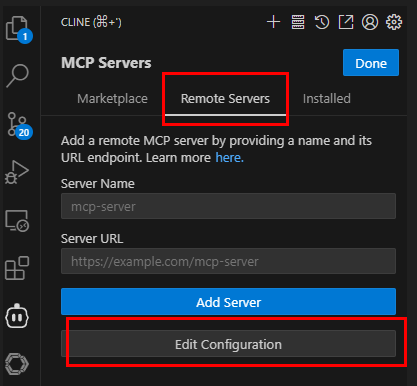
1.3 Import related configuration files at the configuration file of MCP Servers在MCP Servers

from qwen_agent.agents import Assistant
from qwen_agent.utils.output_beautify import typewriter_print

def init_agent_service():
    # Configuration for the language model backend
    llm_cfg = {
        'model': 'qwen3-235b-a22b',
        'model_server': 'dashscope',
        'api_key': 'your_api_key',
        'generate_cfg': {
            'top_p': 0.8
        }
    }

    # Define MCP service configuration (similar to Function Calling JSON Schema)
    tools = [{
        "mcpServers": {
            "sqlite": {
                "command": "uvx",
                "args": [
                    "mcp-server-sqlite",
                    "--db-path",
                    "test.db"
                ]
            }
        }
    }]

    # Initialize the database assistant with specified capabilities
    bot = Assistant(
        llm=llm_cfg,
        name='Database Administrator',
        description='You are a database administrator capable of CRUD operations on a local database',
        system_message='You act as a database assistant with SQL query execution capabilities',
        function_list=tools,
    )

    return bot

def run_query(query=None):
    # Initialize the database assistant
    bot = init_agent_service()

    # Setup conversation context
    messages = []
    messages.append({'role': 'user', 'content': [{'text': query}]})

    # Track previous output for incremental printing
    previous_text = ""

    print('Database Administrator: ', end='', flush=True)

    # Stream and print the response incrementally
    for response in bot.run(messages):
        previous_text = typewriter_print(response, previous_text)

if __name__ == '__main__':
    # Example query: Create a students table and insert sample data
    query = '帮我创建一个学生表,表名是students,包含id, name, age, gender, score字段,然后插入一条数据,id为1,name为张三,age为20,gender为男,score为95'
    run_query(query)

2、Python routinepython

2.1 Define database assistant in VS Code, and construct prompt words for Qwen Agent to help us create a student table and add some data.

from qwen_agent.agents import Assistant
from qwen_agent.utils.output_beautify import typewriter_print

def init_agent_service():
    """
    Initialize the database assistant service with specified configurations.

    Returns:
        Assistant: Configured database assistant instance.
    """
    # Configuration for the large language model backend
    llm_cfg = {
        'model': 'qwen3-235b-a22b',
        'model_server': 'dashscope',
        'api_key': 'your_api_key',
        'generate_cfg': {
            'top_p': 0.8  # Probability threshold for nucleus sampling
        }
    }

    # Tool configuration using MCP service schema (similar to OpenAI Function Calling)
    tools = [{
        "mcpServers": {
            "sqlite": {
                "command": "uvx",
                "args": [
                    "mcp-server-sqlite",
                    "--db-path",
                    "test.db"  # SQLite database file path
                ]
            }
        }
    }]

    # Initialize database assistant with LLM and toolchain
    bot = Assistant(
        llm=llm_cfg,
        name='Database Administrator',
        description='Professional database administrator capable of performing CRUD operations on local SQLite databases.',
        system_message='You are a database assistant specialized in generating and executing SQL queries.',
        function_list=tools,  # Toolchain for database operations
    )

    return bot

def run_query(query: str = None) -> None:
    """
    Execute a database query using the initialized assistant.

    Args:
        query (str): Natural language query to be translated into SQL.
    """
    # Initialize database assistant
    bot = init_agent_service()

    # Prepare conversation messages
    messages = [
        {
            'role': 'user',
            'content': [{'text': query}]
        }
    ]

    # Track previous output for incremental display
    previous_text = ""

    # Print response incrementally
    print('Database Administrator: ', end='', flush=True)
    for response in bot.run(messages):
        previous_text = typewriter_print(response, previous_text)

if __name__ == '__main__':
    # Example usage: Create students table and insert sample data
    sample_query = '帮我创建一个学生表,表名是students,包含id, name, age, gender, score字段,然后插入一条数据,id为1,name为张三,age为20,gender为男,score为95'
    run_query(sample_query)

After the code is executed, UVX detects that some dependent libraries are not installed, and the dependencies required for automatic installation. After completing the related dependency installation, Qwen Agent detects that a student table needs to be created and data inserted in the user's request. Qwen 3 model understands the generation thinking process of the mcp server sqlite server's functions, uses sqlite-create_table to create a table, and uses sqlite-write_query to insert data.

2.2 After executing the program, it is found that there is an additional database file named 'test. db' in the local directory.

1751596102109

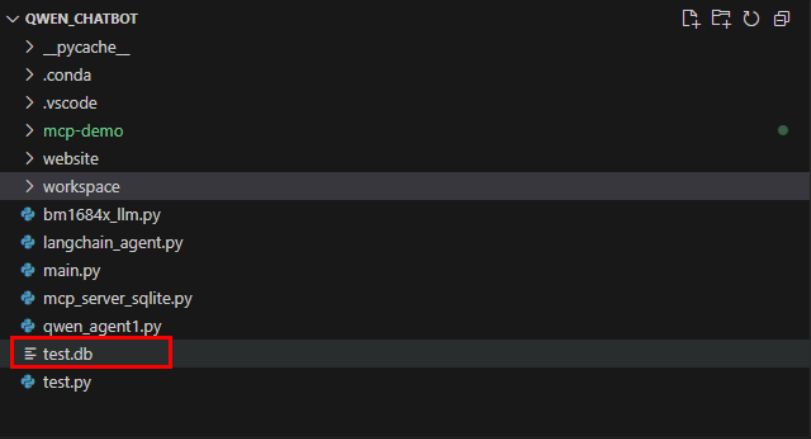
It can be seen that Qwen Agent successfully created the data table and inserted the data. The practice of using Qwen3 series of large models and Qwen Agent tools to quickly access the MCP server and develop AI Agent agent has been completed.

Edit this page on GitHub
Last Updated:
Contributors: LiShenghui
Prev
Qwen3-chat-DEMO
Next
Qwen3-langchain-AI Agent