HOME
Shop
  • English
  • 简体中文
HOME
Shop
  • English
  • 简体中文
  • Product Series

    • FPGA+ARM

      • GM-3568JHF

        • 1. Introduction

          • GM-3568JHF Introduction
        • 2. Quick Start

          • 01 Environment Construction
          • 02 Compilation Instructions
          • 03 Burning Guide
          • 04 Debugging Tools
          • 05 Software Update
          • 06 View information
          • 07 Test Command
          • 08 Application Compilation
          • 09 Source code acquisition
        • 3. Peripherals and Interfaces

          • USB
          • Display and touch
          • Ethernet
          • WIFI
          • Bluetooth
          • TF-Card
          • Audio
          • Serial Port
          • CAN
          • RTC
        • 4. Application Development

          • 01 UART read and write case
          • 02 Key detection case
          • 03 LED light flashing case
          • 04 MIPI screen detection case
          • 05 Read USB device information example
          • 06 FAN Detection Case
          • 07 FPGA FSPI Communication Case
          • 08 FPGA DMA read and write case
          • 09 GPS debugging case
          • 10 Ethernet Test Cases
          • 11 RS485 reading and writing examples
          • 12 FPGA IIC read and write examples
          • 13 PN532 NFC card reader case
          • 14 TF card reading and writing case
        • 5. QT Development

          • 01 ARM64 cross compiler environment construction
          • 02 QT program added automatic startup service
        • 6. Others

          • 01 Modification of the root directory file system
          • 02 System auto-start service
    • ShimetaPi

      • M4-R1

        • Introduction

          • M4-R1 Introduction
        • Get started quickly

          • OpenHarmony概述
          • 镜像烧录
          • 开发环境准备
          • Hello World应用以及部署
        • Application Development

          • getting Started

            • 第一章 ArkTS语言简介
            • 第二章 UI组件介绍和实际应用(上)
            • 第三章 UI组件介绍和实际应用(中)
            • 第四章 UI组件介绍和实际应用(下)
          • Advanced

            • 第一章 入门指引
            • 第二章 三方库的引用和使用
            • 第三章 应用编译以及部署
            • 第四章 命令行恢复出厂设置
            • 第五章 系统调试--HDC调试
            • 第六章 APP 稳定性测试
            • 第七章 应用测试
        • Equipment Development

          • 第一章 环境搭建
          • 第二章 下载源码
          • 第三章 编译源码
        • Peripherals and interfaces

          • 树莓派接口
          • GPIO 接口
          • I2C 接口
          • SPI通信
          • PWM控制
          • 串口通讯
          • TF Card
          • 屏幕
          • 触摸
          • 音频
          • RTC
          • Ethernet
          • M.2
          • MINI-PCIE
          • Camera
          • WIFI&BT
          • 树莓派拓展板
        • Frequently asked questions

          • 资源下载
      • M5-R1

        • Introduction

          • Introduction to ShimetaPi M5-R1
    • OpenHarmony

      • SC-3568HA

        • Introduction

          • SC-3568HA Overview
        • Quick Start Guide

          • OpenHarmony Overview
          • Image Flashing
          • Setting Up the Development Environment
          • Hello World Application and Deployment
        • Application Development

          • ArkUI

            • Chapter 1 Introduction to ArkTS Language
            • Chapter 2 Introduction to UI Components and Practical Applications (Part 1)
            • Chapter 3 Introduction to UI Components and Practical Applications (Part 2)
            • Chapter 4 Introduction to UI Components and Practical Applications (Part 3)
          • Expand

            • Chapter 1 Getting Started Guide
            • Chapter 2 Referencing and Using Third-Party Libraries
            • Chapter 3: Application Compilation and Deployment
            • Chapter 4: Command-Line Factory Reset
            • Chapter 5: System Debugging -- HDC (Huawei Device Connector) Debugging
            • Chapter 6 APP Stability Testing
            • Chapter 7 Application Testing
        • Device Development

          • Chapter 1 Environment Setup
          • Chapter 2 Download Source Code
          • Chapter 3 Compiling Source Code
        • Peripheral And Iinterface

          • Raspberry Pi interface
          • GPIO Interface
          • I2C Interface
          • SPI communication
          • PWM (Pulse Width Modulation) control
          • Serial port communication
          • TF Card
          • Display Screen
          • Touch
          • Audio
          • RTC
          • Ethernet
          • M.2
          • MINI-PCIE
          • Camera
          • WIFI&BT
          • Raspberry Pi expansion board
        • Frequently Asked Questions

          • Resource Downloads
      • M-K1HSE

        • Introduction

          • M-K1HSE Introduction
        • Quick Start

          • Development environment construction
          • Source code acquisition
          • Compilation Notes
          • Burning Guide
        • Peripherals and interfaces

          • 01 Audio
          • 02 RS485
          • 03 Display
        • System customization development

          • System transplant
          • System customization
          • Driver Development
          • System Debugging
          • OTA Update
    • EVS-Camera

      • CF-NRS1

        • 1. Introduction

          • Event Camera Technical Documentation
        • 2. Quick Start

          • Host driver and software installation
        • 3. SDK application development

          • API Usage Instructions
      • CF-CRA2

        • Introduction

          • About CF-NRS1
    • AI-model

      • 1684XB-32T

        • Introduction

          • AIBOX-1684XB-32 Introduction
        • Get started quickly

          • First time use
          • Network Configuration
          • Disk usage
          • Memory allocation
          • Fan Strategy
          • Firmware Upgrade
        • Deployment Tutorial

          • Algorithm deployment
          • Deploy Llama3 Example
        • Application Development

          • Sophgo SDK Development
          • Sophon LLM_api_server development
          • Deploy MiniCPM-V-2_6
          • Qwen-2-5-VL Image and Video Recognition DEMO
          • Qwen3-chat-DEMO
          • Qwen3-Qwen Agent-MCP-Demo
          • Qwen3-langchain-AI Agent
      • 1684X-416T

        • Introduction

          • AIBOX-1684X-416 Introduction
        • Demo simple operation guide

          • Simple instructions for using shimeta smart monitoring demo
    • Core-Board

      • C-3568BQ

        • Introduction

          • C-3568BQ Overview
      • C-3588LQ

        • Introduction

          • C-3588LQ Introduction
      • GC-3568JBAF

        • Introduction

          • GC-3568JBAF Introduction
      • C-K1BA

        • Introduction

          • C-K1BA Introduction

Qwen3-langchain-AI Agent

一、Introduction

LangChain is a framework specially designed for developing large-scale language model (LLM) applications. It supports the integration of external tools, data resources and management of interaction logic, and helps build complex AI applications such as intelligent dialogue and document analysis. The main goal of this project is to simplify the interaction with documents and extract valuable information by using natural languages. This project uses LangChain and Qwen3-7b to provide users with a smooth and natural conversation experience.

1、Characteristics

  • Complete local reasoning.
  • Support multiple document formats PDF, DOCX, TXT.
  • Chat with the document content, ask questions and get relevant answers according to the document.
  • User friendly interface to ensure smooth interaction.

2、Project directory

Project directory for personal demonstration

 |-- ChatDoc-TPU
    |-- data
        |-- db_tpu        -- Knowledge base persistence directory
        |-- uploaded      -- uploaded file directory
    |-- models
        |-- bert_model    -- BERT model
        |-- qwen_model    -- qwen-7B model
    |-- chat
        |-- chatbot.py    --  ChatDoc business logic script
        |-- charglm3      -- charglm3 code
        |-- qwen          --  qwen code
    |-- embedding         -- text embedding model
    |-- docs              -- environment installation document
    |-- static            -- Image file in README
    |-- README.md         -- README
    |-- config.ini        -- inference model configuration file
    |-- requirements.txt  -- project dependency
    |-- run.sh            -- Start script
    |-- web_demo_st.py    -- Page interaction script

二、Operation steps

1、Prepare Python environment, data and model

1.1 First confirm that python>3.8, create and enter the virtual environment

    sudo apt update
    #Check the python version. If not, upgrade it
    python3 --version

    # Create virtual environment (excluding pip package)
    # !!! Every time you run, you should switch the virtual environment according to the steps!!!
    cd /data
    # Create virtual environment (excluding pip)
    python3.10 -m venv --without-pip myenv

    # Enter the virtual environment
    source myenv/bin/activate

1.2 Copy the official ChatDoc - TPU project directory (or upload the file to/data in the box after copying)

    git clone https://github.com/wangyifan2018/ChatDoc-TPU
    cd ChatDoc-TPU
    # Install the relevant pip package
    pip3 install -r requirements.txt -i https://pypi.tuna.tsinghua.edu.cn/simple
    #Check the pip package
    pip list

1.3 Install the oil

This routine ` depends on the new version of sail ', and the old version needs to be updated.Sail_Install_Guide

2 Start

Return to the ChatDoc TPU home directory and start the program

# Start Qwen-7b using the default path, and the model and configuration file will be downloaded automatically
./run.sh --model qwen7b --dev\_id 0

Of course, other models can also be selected. The reference template is as follows:


usage: ./run.sh [--model MODEL]  [--dev_id DEV_ID] [--server_address SERVER_ADDRESS] [--server_port SERVER_PORT]
--model: select a model, and the optional value is chatglm3/qwen. The default is chatglm3.
--dev_id: The TPU device ID used for inference. The default is 0.
--server_address:  web server address. The default is 0.0.0.0.
--server_port:web sever port. If it is not set, it will be automatically allocated from 8501.

3、Operating instructions

1751598731765

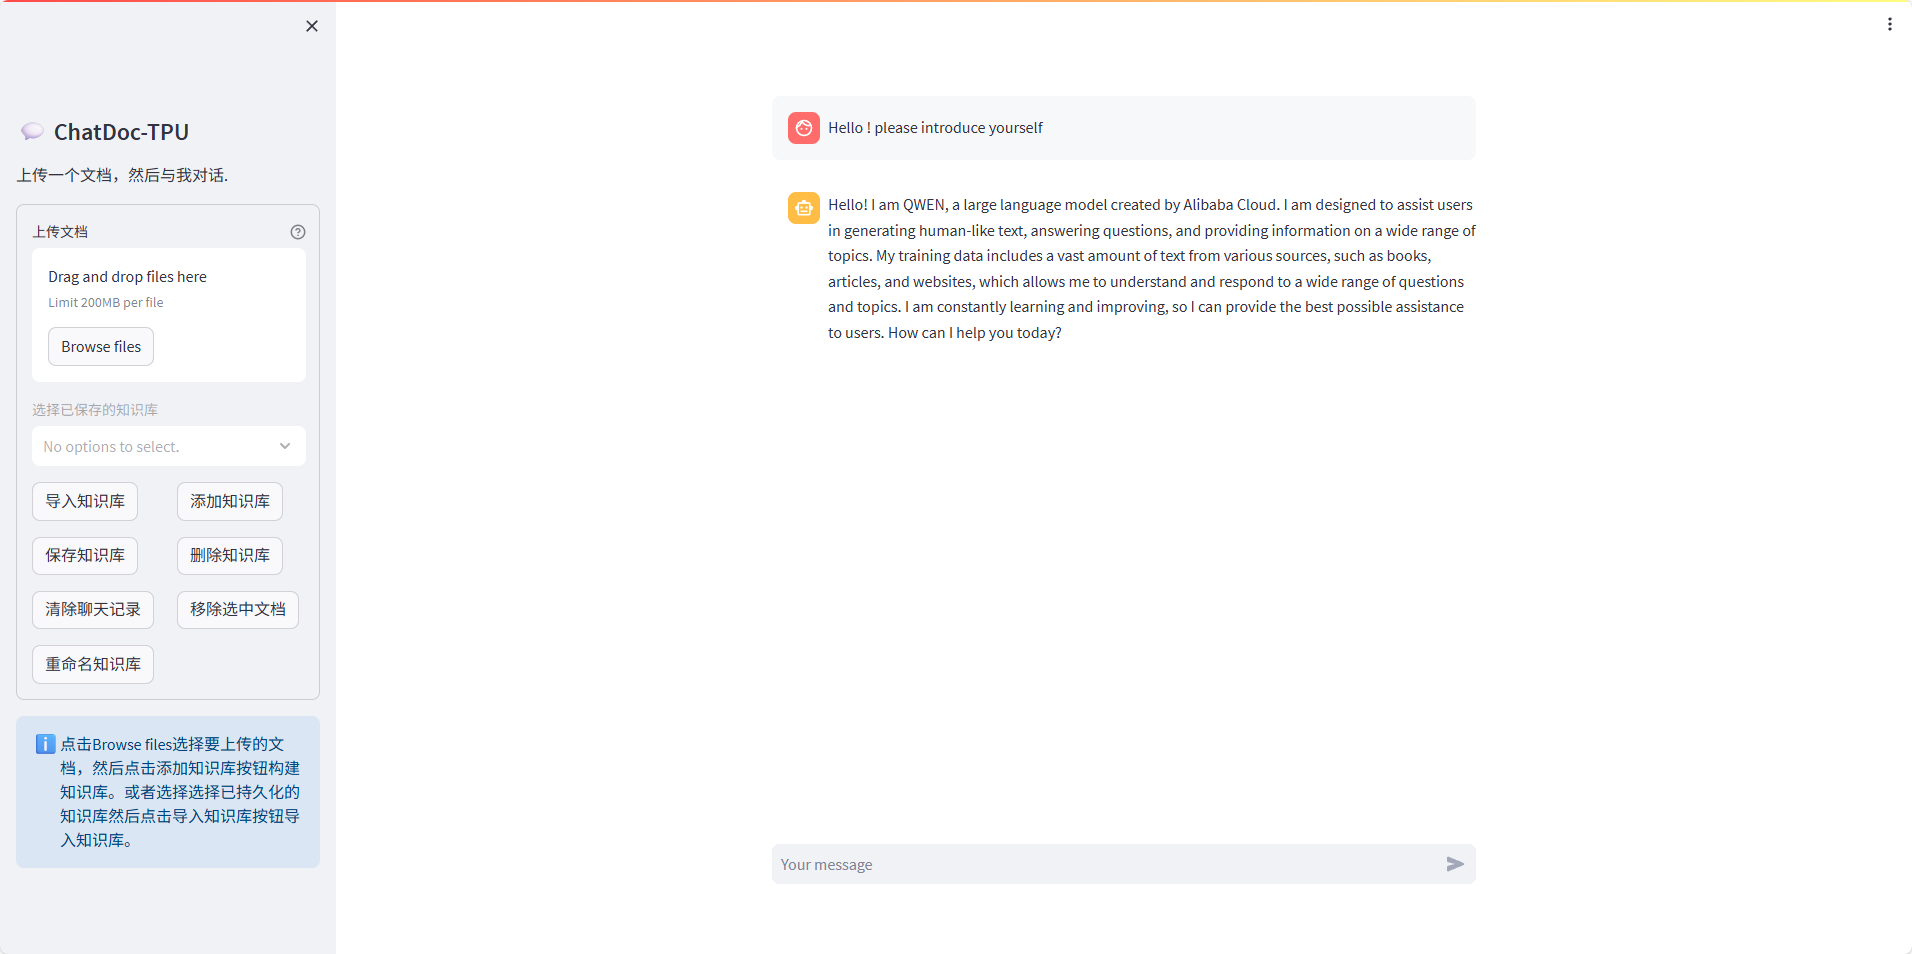
3.1 Interface Introduction

ChatDoc consists of a control area and a chat conversation area. The control area is used to manage documents and knowledge base, and the chat dialog area is used to enter and accept messages.

Area 10 in the above figure is the currently selected document of ChatDoc. If Area 10 is empty, that is, ChatDoc is still talking with ChatDoc in the chat conversation area without any document selected, then ChatDoc is a ChatBot relying solely on LLM.

3.2 Uploading documents

Click '1' to select the document to upload, and then click '4' to build the knowledge base. Then the embedding document will be selected and displayed in the No. 10 area, and then the dialogue can be started. We can upload documents repeatedly. Documents successfully embedded will enter the No. 10 area.

3.3 Persistent Knowledge Base

The selected document in area 10 will be cleared when the user refreshes or closes the page. If users need to save these embedded documents, they can choose to persist the knowledge base. The knowledge base can be loaded without embedding calculation when entering next time. The specific method is to click the button '5' when Area 10 is not empty. The name of the knowledge base is all document names connected by commas.

3.4 Import Knowledge Base

Users can view the current persistent knowledge base from the selection box '2'. After selecting the knowledge base we need to load, click the button '3' to import the knowledge base. When you are finished, you can start the conversation. Note that the knowledge base of the cpu version and the knowledge base of the tpu version cannot be mixed. If the tpu version program is started, the persistent knowledge base of the cpu version cannot be loaded; If you start the cpu version program, you cannot load the persistent tpu version knowledge base.

3.5 Deleting Knowledge Base

When the user needs to delete the local persistent knowledge base, he can select the knowledge base to delete from the selection box '2', and then click the button '6' to delete the knowledge base.

3.6 Rename the knowledge base

1751598565460

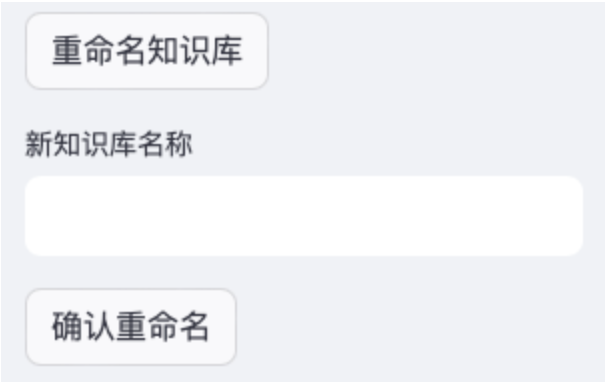
Because the name of the knowledge base is a combination of the names of its documents, it inevitably causes the problem that the name of the knowledge base is too long. ChatDoc provides a function to modify the name of the knowledge base. Select the knowledge base we want to modify in the selection box '2', and then click the button '9' to rename the knowledge base. Then ChatDoc will pop up an input box and a confirmation button, as shown in the above figure. Enter the modified name in the output box, and then click the Confirm Rename button.

3.7 Clear chat record

Click the button '7' to clear the chat record in the chat dialog area. Others will not be affected.

3.8 Remove Selected Documents

Click the button '8' to clear Area 10 and clear the chat record.

Edit this page on GitHub
Last Updated:
Contributors: LiShenghui
Prev
Qwen3-Qwen Agent-MCP-Demo