Chapter 1 Getting Started Guide
1. OpenHarmony 5.0 (Release Version) Official Documentation
OpenHarmony Official Website APP Development Homepage Address (including comprehensive API references and demos):
[https://docs.openharmony.cn/pages/v5.0/zh-cn/application-dev/application-dev-guide.md/]
2. OpenHarmony App Development Tools Download Link:
[https://developer.harmonyos.com/cn/develop/deveco-studio/]
For installation and configuration, please refer to the official documentation:
3. OpenHarmony Application Examples
Official example demos for typical app use cases are available at the URL below - refer to them for implementation guidance based on your project requirements.
[OpenHarmony/applications_app_samples] https://gitee.com/openharmony/applications_app_samples?_from=gitee_search
4. OpenHarmony Standard SDK Download Link:
4.1 Standard SDK Path
Manual download is typically unnecessary - Step 2's IDE/tools will auto-fetch the latest Release SDK.
5. OpenHarmony Full SDK Replacement Guide
The Full-SDK is the complete SDK package containing all OpenHarmony interfaces (including privileged system APIs), intended for OEMs/developers to build applications requiring advanced system-level access.
Reference Guide for Self-Compiling and Replacing Full-SDK:
https://docs.openharmony.cn/pages/v5.0/zh-cn/application-dev/faqs/full-sdk-switch-guide.md/
6. OS Firmware Flashing Guide for [Hardware Platform/Device Model]
e.g. Flashing tools/workflows for Android devices (Snapdragon/MediaTek/Kirin platforms)
7. USB Debugging Guide for Android/OpenHarmony App Development
1.  Use a standard USB-A to USB-C/Micro-USB cable to connect the computer to the device's OTG port (for USB host mode).

2.  On your computer, add the hdc tool to the system's PATH environment variable with the path: your OpenHarmony SDK/10/toolchains/

	Example: D:\\SDK\\OpenHarmony\\sdk\\10\\toolchains (Windows path format)

3.  On the target device, navigate to Settings > System > Developer options (if hidden, tap 'Build number' 7 times to unlock) and toggle USB debugging to 'On'

4.  On your computer, open a command-line tool and execute hdc list targets. If connected successfully, it will list the connected devices as shown below:
	hdc list targets
    150100414a54443452069035fa308800
8. Common Issues & Solutions
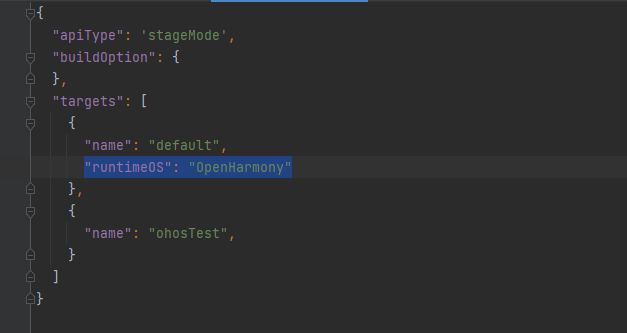
8.1 Select OpenHarmony SDK as the Development Environment
In build-profile.json5, declare "runtimeOS": "OpenHarmony"
8.2 Upgrade the app to system privileges
Calling system-related APIs such as power.reboot('reboot_test') requires system privileges. Relevant documentation is relatively fragmented, and you may encounter issues during implementation. Below are the steps to configure system privileges:
Upgrading an app to system privileges requires modifications in two areas: first, adding requestPermissions in DevEco Studio, and second, configuring the system settings in the OpenHarmony SDK. Below is an example using the reboot interface power.reboot('reboot_test').
A. Utilizing interfaces in DevEco Studio's business-related code:
	try {
	  console.info('onPageShow reboot start.');
	  // @ts-ignore
	  power.reboot('reboot_test');
	} catch(err) {
	  console.error('reboot failed, err: ' + err);
	}
B. Add the permission ohos.permission.REBOOT in module.json5
"module": {
-----
"requestPermissions":[
{
"name" : "ohos.permission.REBOOT"
}
]
----
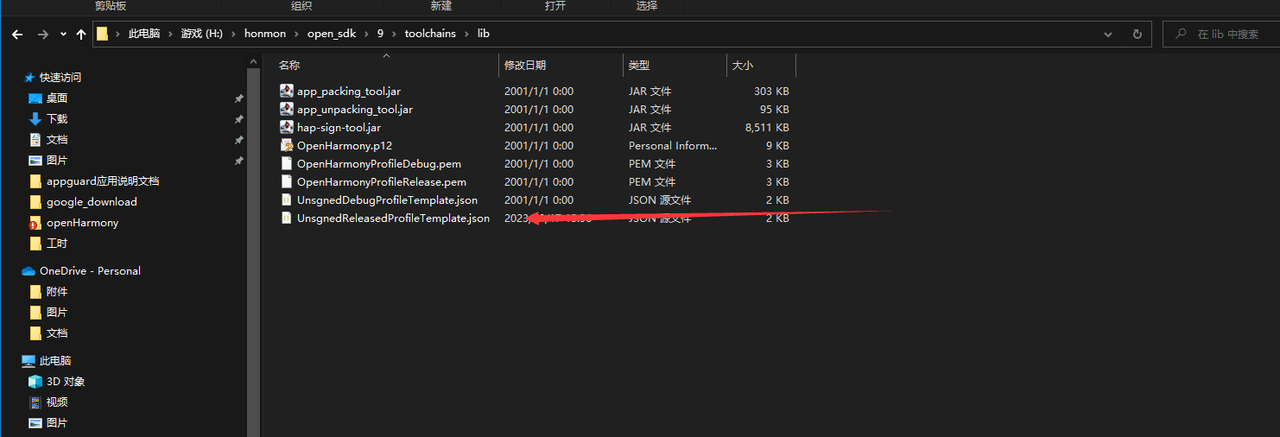
}C. Modify the 'UnsignedReleasedProfileTemplate.json' file in the OpenHarmony SDK, for example, the file path is:
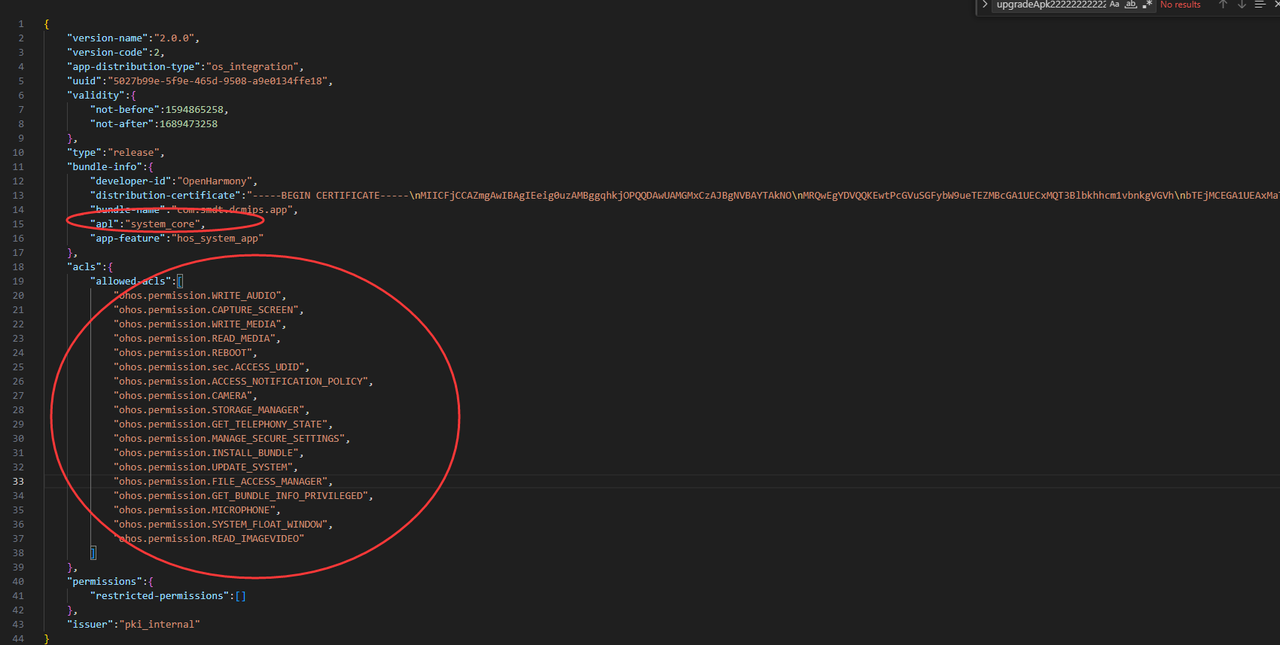
D:\SDKs\OpenHarmony\sdk\10\toolchains\libModify the 'bundle-name' field to the application's package name, and set the 'apl' (Application Permission Level) to 'system_core'
"bundle-name":"com.smdt.ostools.agingtest",
"apl":"system_core",
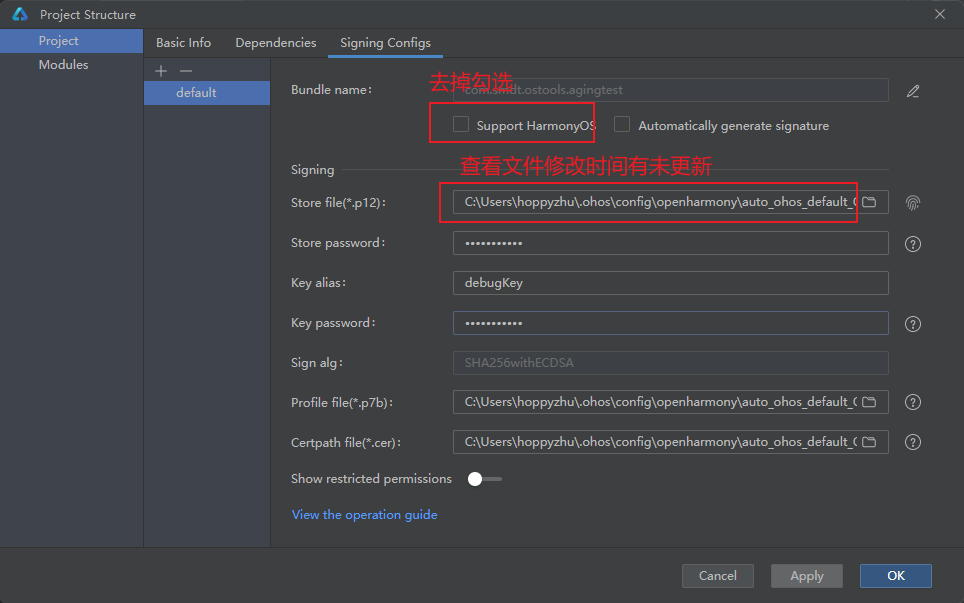
"app-feature":"hos_system_app"D. Regenerate the key as follows: Navigate to DevEco Studio → Project Structure → Project → Signing Configs. Important: Uncheck 'Support HarmonyOS' in the configuration. After generating the new key, check the modification timestamp in the associated folder to confirm successful regeneration. If the new key isn't generated: First delete the existing key, then regenerate it.
E. Run the app. If the installation is successful and no 'reboot failed, err' message is logged in the console, the reboot will succeed, confirming that the system privilege upgrade has been completed.
F. System signature
Locate the aforementioned file in the SDK directory and modify it as described below
9. Note
- Refer to the official documentation frequently, conduct online research (e.g., via Baidu), and perform rigorous testing