WIFI&BT
1. Introduction to WIFI&BT module
Take SC-3568HA as an example. This board has WIFI & Bluetooth module and uses AP6275S module (SDIO interface)
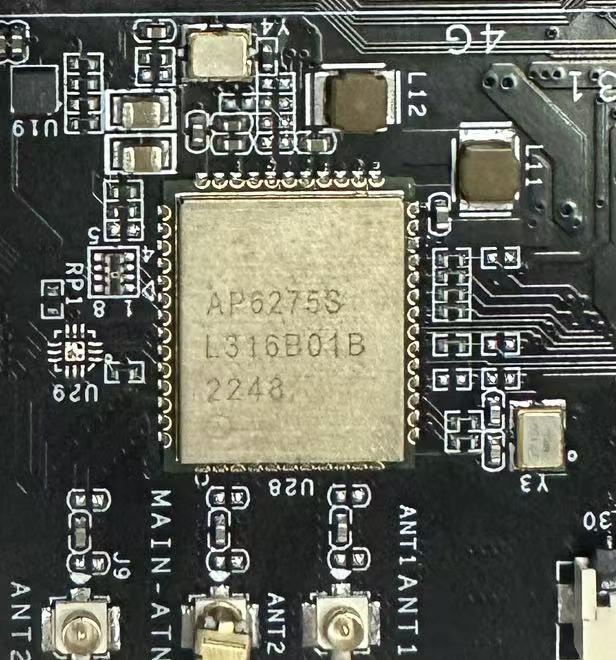
AP6275S is a highly integrated wireless communication chip, mainly used for Wi-Fi and Bluetooth connections. It supports dual-band Wi-Fi (2.4GHz and 5GHz) and has Bluetooth 5.0 function, suitable for Internet of Things (IoT), smart home and other wireless applications.
2. WIFI connection test
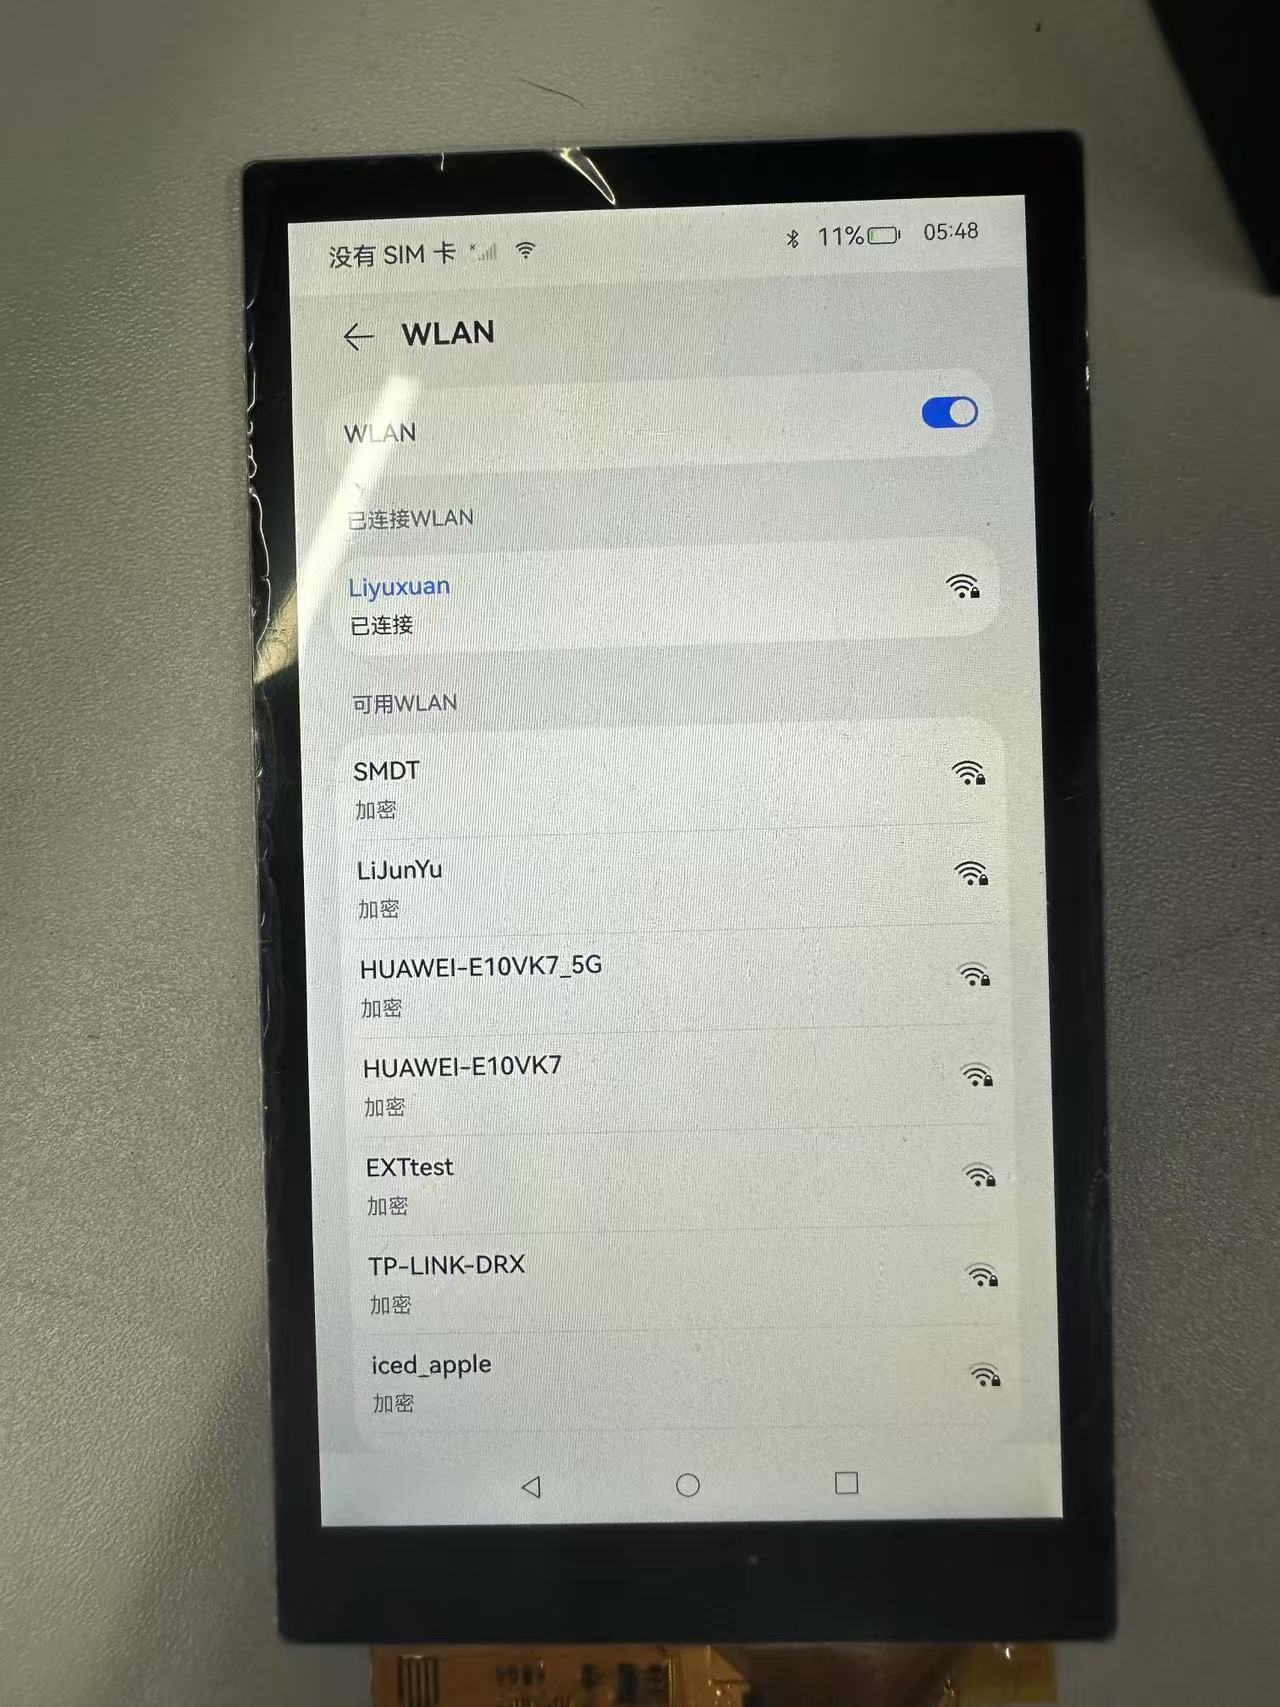
Go to System Settings -> WLAN -> Turn on WIFI
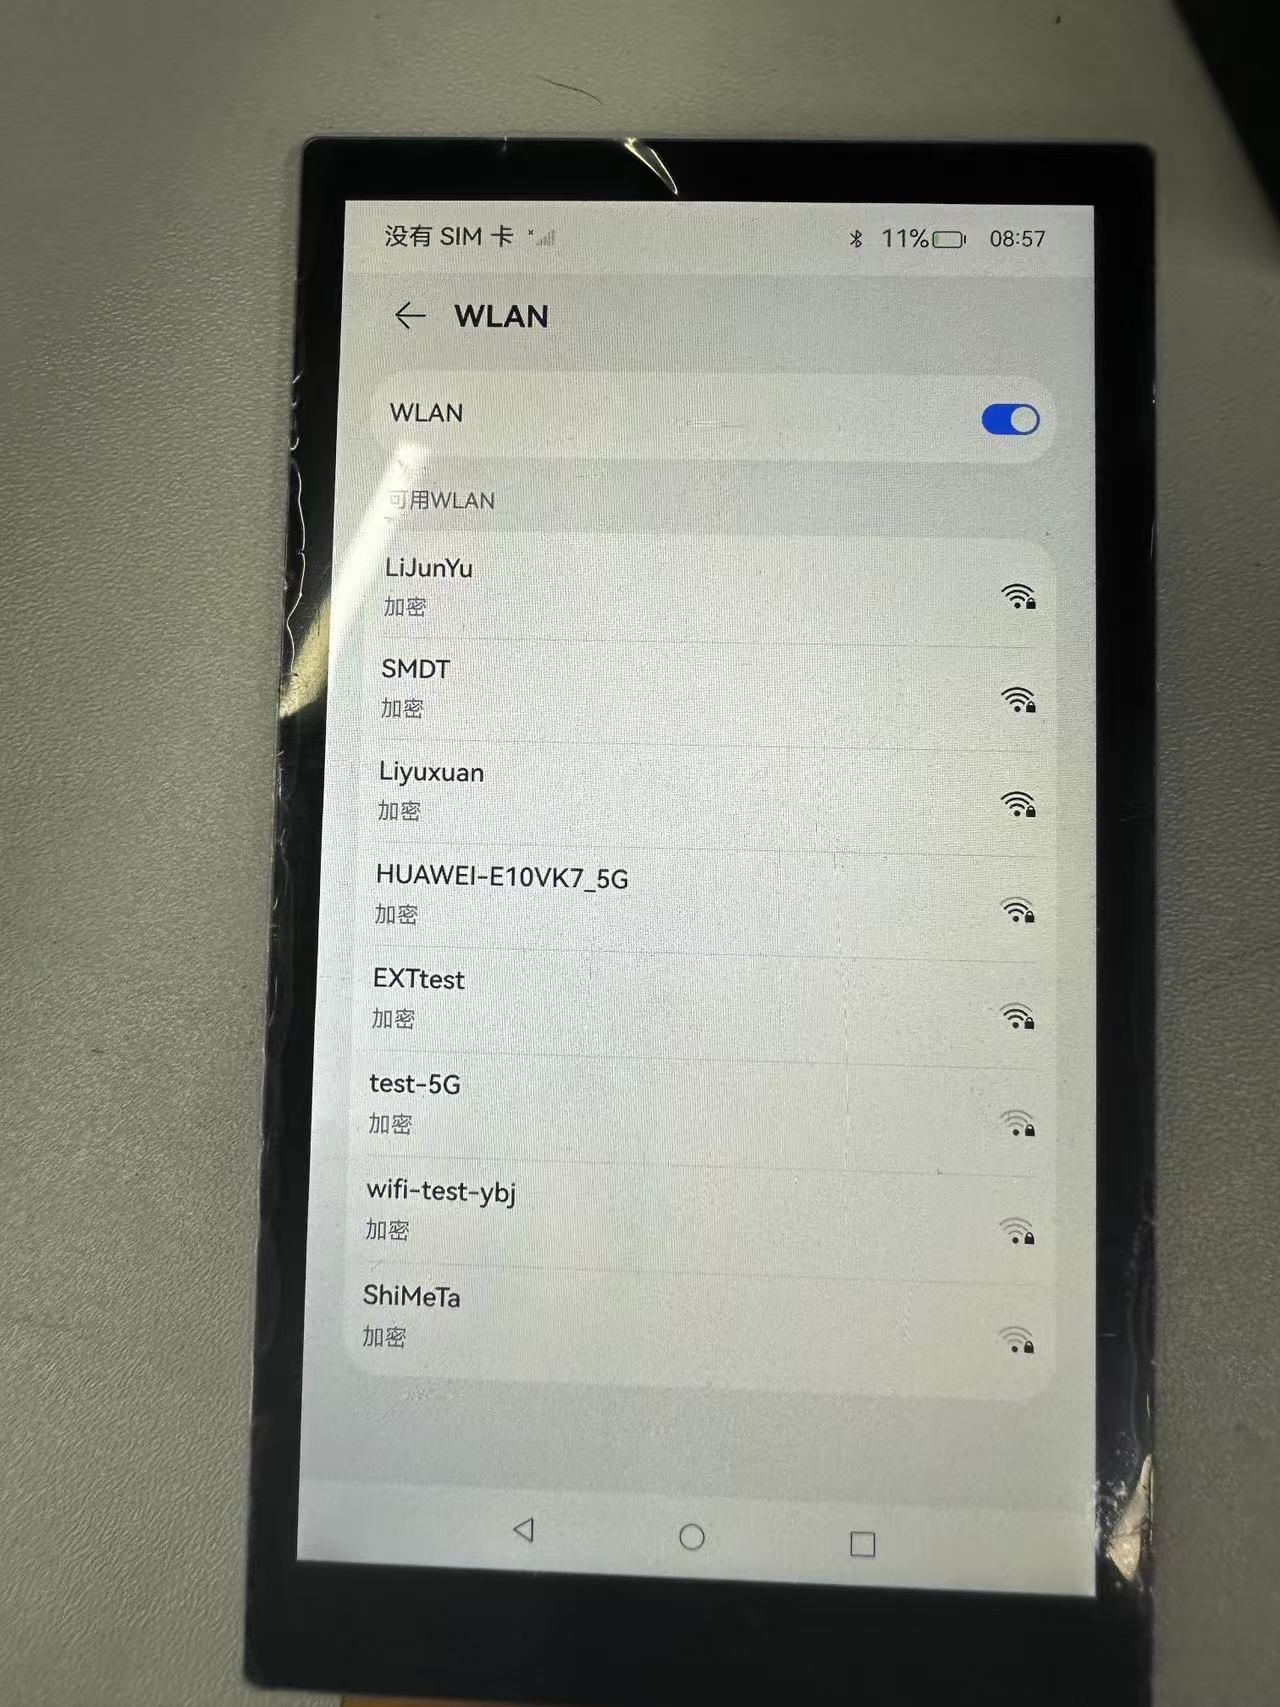
Enter password to connect

Connection successful
The command can be used to query the WIFI IP address and other information
    ~# ifconfig wlan0
    wlan0     Link encap:Ethernet  HWaddr 50:41:1c:0f:1d:e6  Driver bcmsdh_sdmmc
            inet addr:192.168.137.192  Bcast:192.168.137.255  Mask:255.255.255.0
            inet6 addr: fe80::5241:1cff:fe0f:1de6/64 Scope: Link
            UP BROADCAST RUNNING MULTICAST  MTU:1500  Metric:1
            RX packets:106 errors:0 dropped:0 overruns:0 frame:0
            TX packets:121 errors:0 dropped:0 overruns:0 carrier:0
            collisions:0 txqueuelen:1000
            RX bytes:27235 TX bytes:12641
3. Bluetooth connection test
Go to System Settings -> Bluetooth -> Turn on Bluetooth
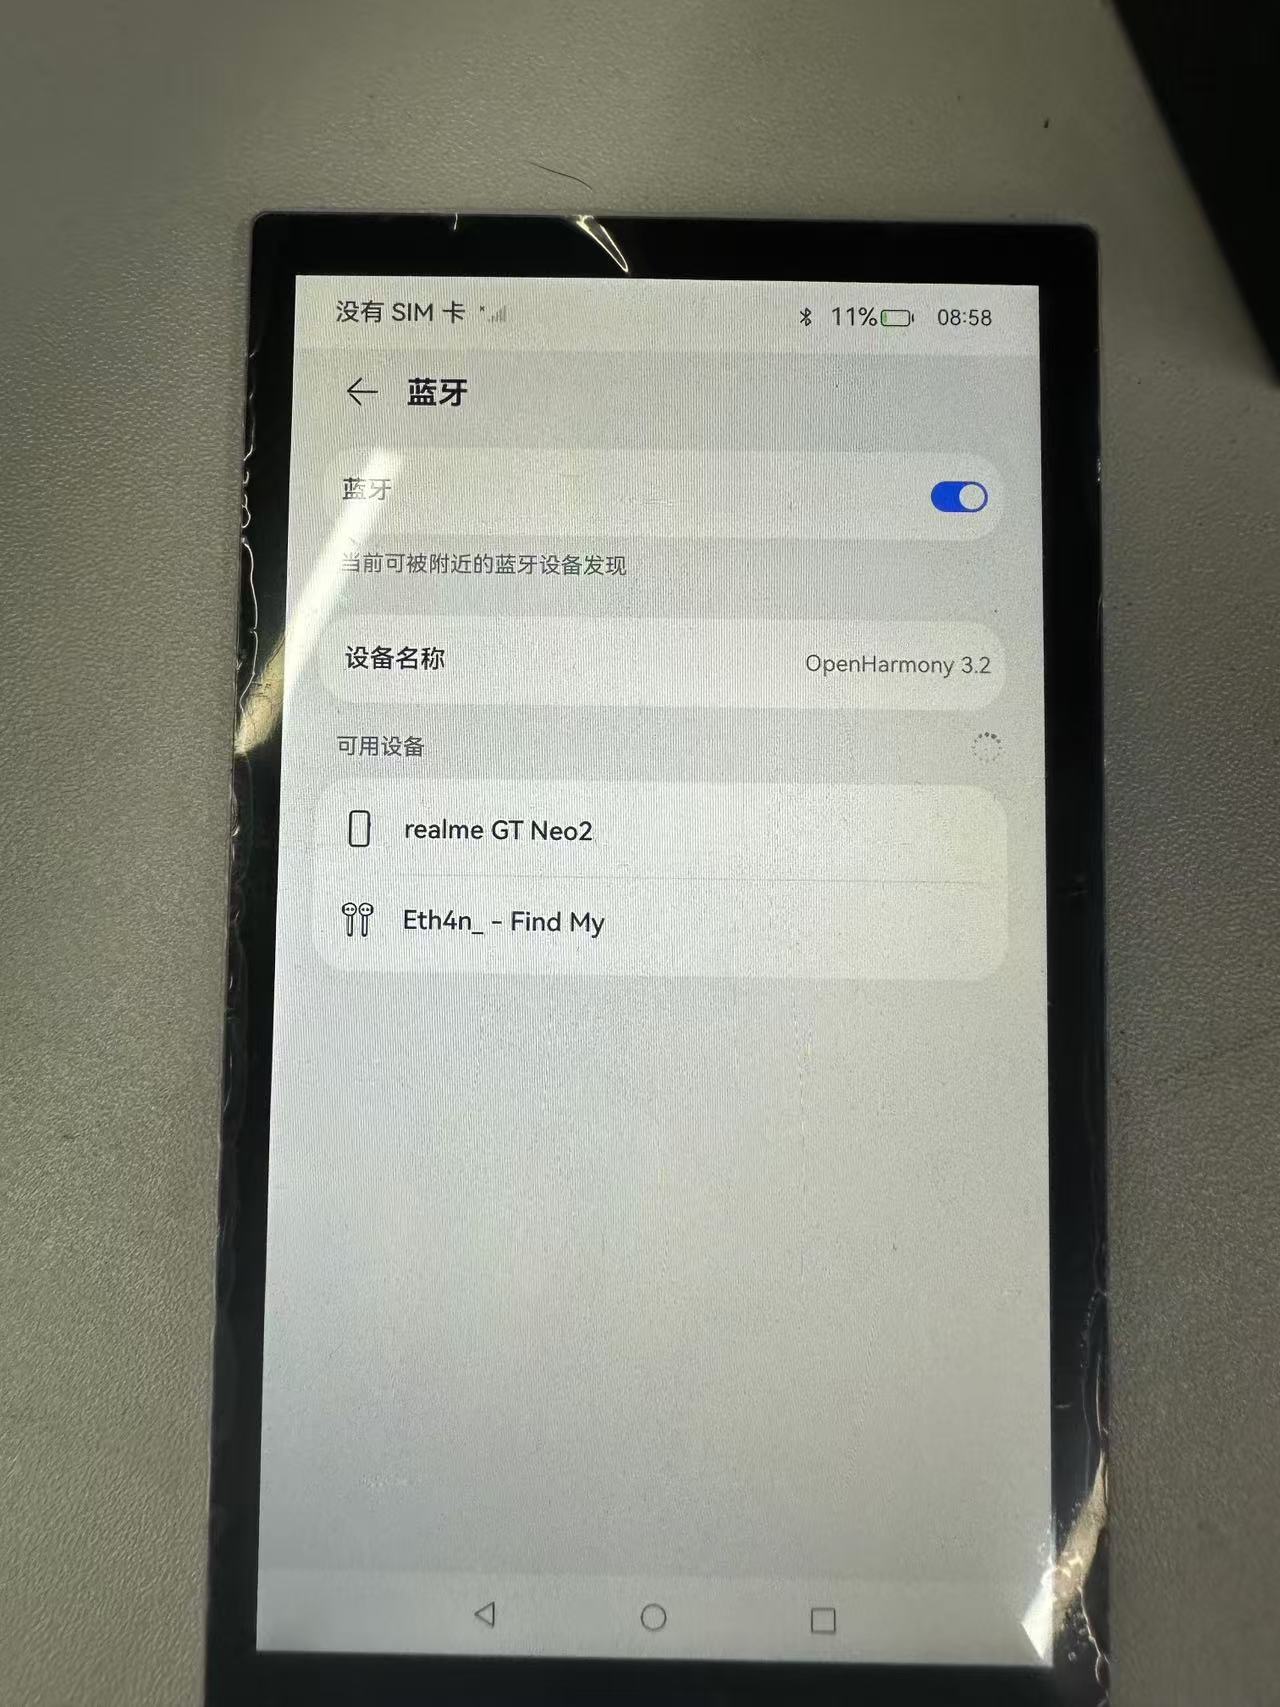
Select paired device
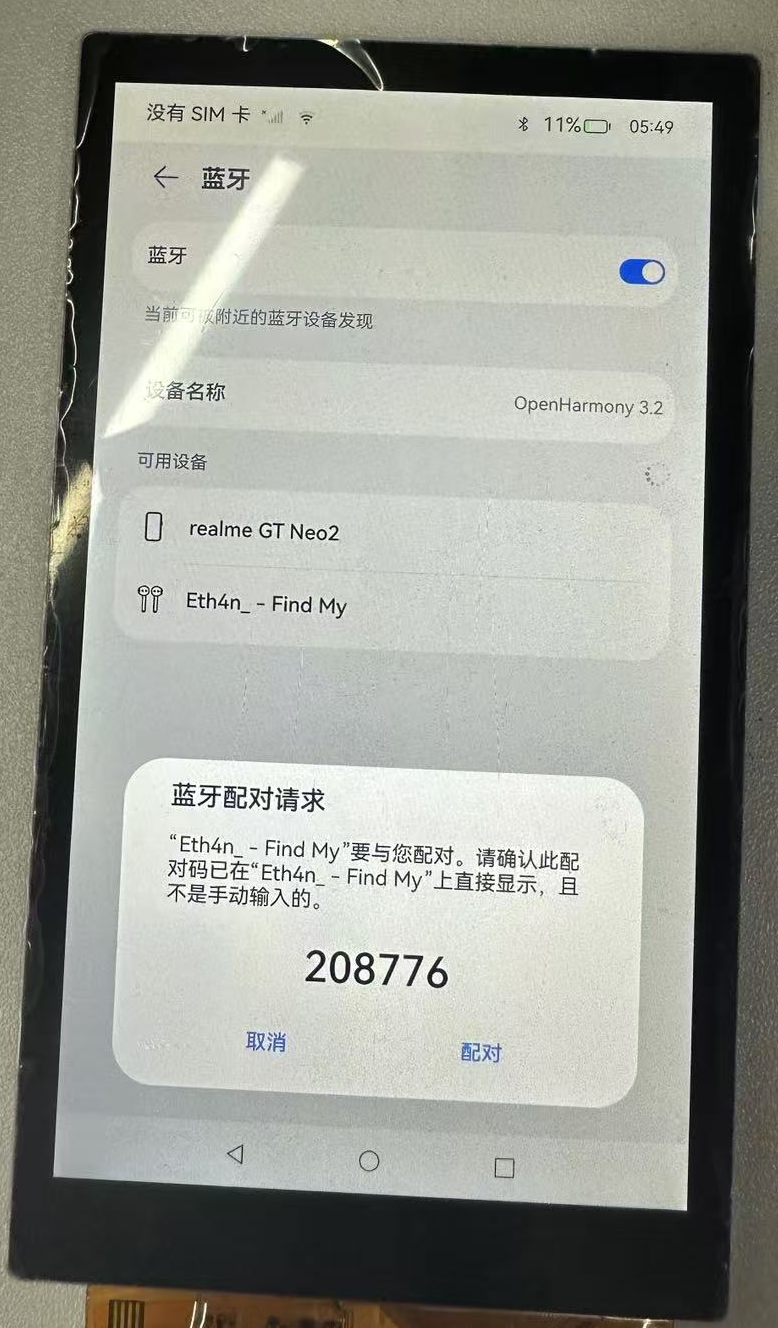
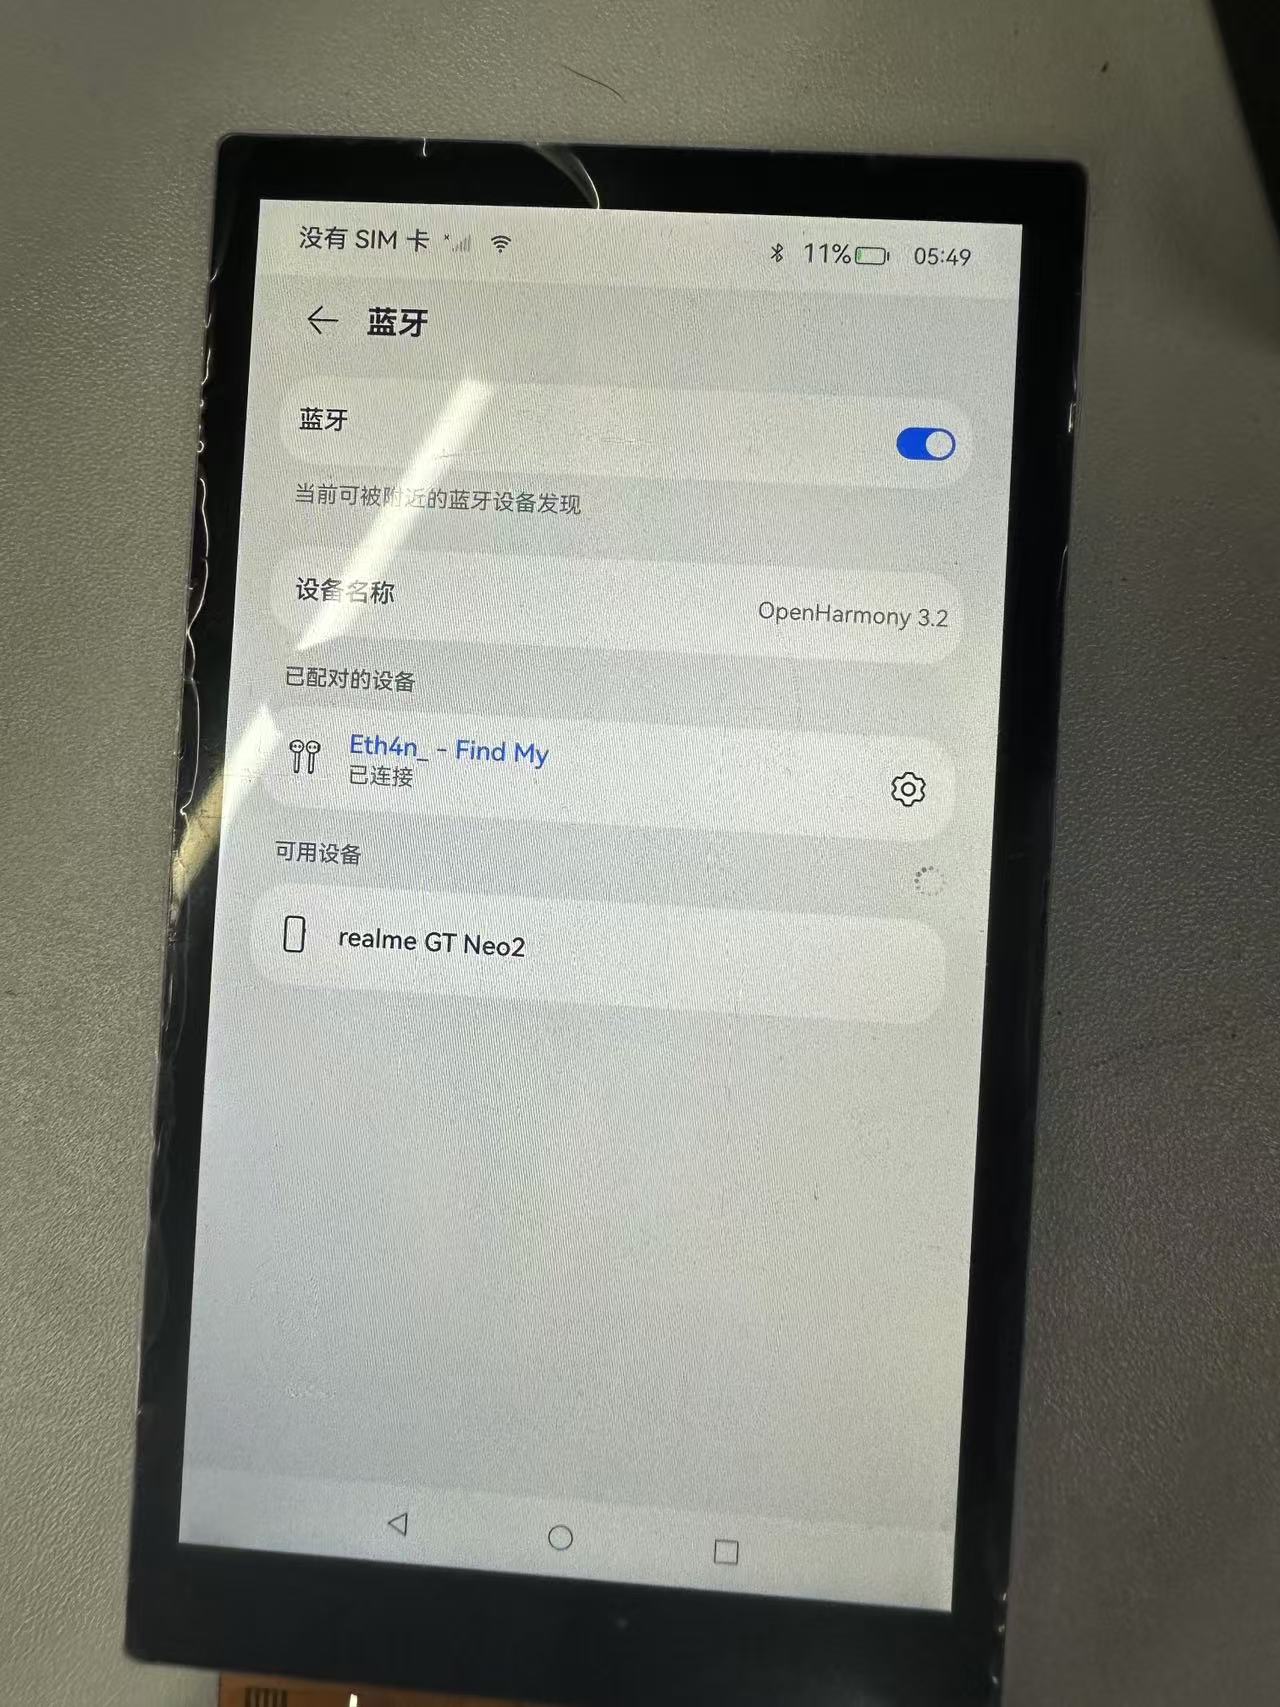
Pairing successful
4. Bluetooth API usage and practice
4.1 How to use the standard API
Warning
This module provides methods for Bluetooth operation and management. The first batch of interfaces is supported starting from API version 10. For newly added interfaces in subsequent versions, the starting version of each interface is separately marked with a superscript.
- Bluetooth standard interface
When developing with Bluetooth APIs, you need to first understand how to create your first open Harmony project. Related documents: Hello World application and deployment
When using an API, you need to pay attention to the following points:
- API permission description
- Parameters and return values of the API
- When an error occurs during API calls, refer to the API error codes and general error codes
- Correct use of API examples
As shown in the figure below, this is the standard API document

- Official standard development documents
Bluetooth official standard API development documentation
4.2 Community Demo
- Introduction
In order to help developers develop and learn more quickly using the board, we have provided a Bluetooth-related usage example on gitee. Each project is an independent DevEco Studio project. Developers can import the project into DevEco Studio and understand the usage of the API involved in the application example by browsing the code, compiling the project, installing and running the application example.
Warning
When importing the community Demo project, developers need to pay attention to whether the local development environment is consistent with that of the project, that is, whether the local SDK is the same as the project SDK.
- Importing modules
When using the Bluetooth standard API, the most important step is to import the Bluetooth module to use the corresponding Bluetooth API interface. Usually the module is imported in the file header, and the import module is as follows:
import blueToothManager from '@ohos.bluetooth.ble'
- API Introduction
The implementation of the community demo references the following API to implement the basic implementation of how to turn on Bluetooth, Bluetooth scanning, and Bluetooth connection.
Tips
The following introductions are all brief introductions to the system capabilities of the APIs and the corresponding functions. Please refer to the Gitee Bluetooth Example and the Official Bluetooth Standard API Development Documentation to get familiar with the development.
- ble.createGattServer (create a GattServer instance)
createGattServer(): GattServer- ble.createGattClientDevice (creates a usable GattClientDevice instance)
createGattClientDevice(deviceId: string): GattClientDevice- ble.getConnectedBLEDevices (get the BLE device connected to the current device)
    getConnectedBLEDevices(): Array<string>
Permission required: ohos.permission.ACCESS_BLUETOOTH- ble.startBLEScan (initiate BLE scanning process)
    startBLEScan(filters: Array<ScanFilter>, options?: ScanOptions): void
Permission required: ohos.permission.ACCESS_BLUETOOTH- ble.stopBLEScan (stop BLE scanning process)
    stopBLEScan(): void
Permission required: ohos.permission.ACCESS_BLUETOOTH- ble.startAdvertising (start sending BLE broadcast)
    startAdvertising(setting: AdvertiseSetting, advData: AdvertiseData, advResponse?: AdvertiseData): void
Permission required: ohos.permission.ACCESS_BLUETOOTH- ble.stopAdvertising (start sending BLE broadcasts)
    stopAdvertising(): void
	Permission required: ohos.permission.ACCESS_BLUETOOTH
Demo mainly implements source code
BT.ets
	import ble from "@ohos.bluetooth.ble"
	import { BusinessError } from '@ohos.base'
	// import access from '@ohos.bluetooth.access';

	const minRssi = -100
	@Entry
	@Component
	struct Index {
	@State message: string = 'Hello BLE'
	@State availableDevices: Array<ble.ScanResult> = [];

	addData(data:ble.ScanResult):void {
	   let bFind = false
	   this.availableDevices.forEach(element => {
		  if (!bFind && element.deviceId == data.deviceId) {
		  console.info('BLE scan update ' + data.deviceId + ' rssi:' + element.rssi +' ==> '+ data.rssi)
		  element.rssi = data.rssi
		  bFind = true
		  }
	   })
	   if (!bFind) {
		  console.info('BLE scan add ' + data.deviceId + ' count:' + this.availableDevices.length)
		  this.availableDevices.push(data)
		  this.message='BLE count:' + this.availableDevices.length
	   }
	}

	dataToString(data:ArrayBuffer) :String {
	   let str = ''
	   let v = new Uint8Array(data);
	   v.forEach(element => {
		  let s = ''
		  s =  element.toString(16)
		  if (s.length == 1) {
		  s = '0'+s
		  }
		  str+=s+' '
	   });
	   return str
	}

	openBle():void {
	   try {
		  ble.on("BLEDeviceFind", (data:Array<ble.ScanResult>) => {
		  // console.info('BLE scan device find result = '+ JSON.stringify(data));
		  let i = 0
		  data.forEach(element => {
			 console.info('BLE scan device[' + i + '] deviceId = '+ element["deviceId"] +
				' name = ' + element["deviceName"]  +
				' rssi = ' + element["rssi"] +
				' data['+element["data"].byteLength+'] = ' +
			 this.dataToString(element["data"]))
			 if (element.rssi > minRssi && element.deviceName != '' ) {
				this.addData(element)
			 }
			 i++
		  });
		  });

		  ble.startBLEScan(
		  null,
		  {
			 interval: 500,
			 dutyMode: ble.ScanDuty.SCAN_MODE_LOW_POWER,
			 matchMode: ble.MatchMode.MATCH_MODE_AGGRESSIVE,
		  }
		  );
	   } catch (err) {
		  console.error("ble errCode:" + (err as BusinessError).code + ",errMessage:" + (err as BusinessError).message);
	   }

	}

	//   onAccessEvent(data: access.BluetoothState):void {
	//   console.info('bluetooth state = '+ JSON.stringify(data));
	//   if (data == access.BluetoothState.STATE_ON) {
	//     this.openBle()
	//   }
	// }

	build() {
	   Row() {
		  Column() {

		  Text(this.message)
			 .fontSize(30)
			 .fontWeight(FontWeight.Bold)

		  // 添加按钮,开启ble扫描
		  Button() {
			 Text('ble start')
				.fontSize(30)
				.fontWeight(FontWeight.Bold)
		  }
		  .type(ButtonType.Capsule)
		  .margin({
			 top: 20
		  })
		  .backgroundColor('#0D9FFB')
		  .width('30%')
		  .height('10%')
		  // 跳转按钮绑定onClick事件,点击时跳转到第二页
		  .onClick(() => {
			 console.info("onClick")
			 try {
				this.openBle()
				// }
			 } catch (err) {
				console.error('ble errCode: ' + (err as BusinessError).code + ', errMessage: ' + (err as BusinessError).message);
			 }
		  })

		  // 添加按钮,停止ble扫描
		  Button() {
			 Text('ble stop')
				.fontSize(30)
				.fontWeight(FontWeight.Bold)
		  }
		  .type(ButtonType.Capsule)
		  .margin({
			 top: 20
		  })
		  .backgroundColor('#0D9FFB')
		  .width('30%')
		  .height('10%')
		  .onClick(() => {
			 this.availableDevices = []
			 this.message = 'Hello BLE'
			 // AppStorage.setOrCreate('bluetoothAvailableDevices', this.availableDevices);
			 try {
				ble.off('BLEDeviceFind')
				ble.stopBLEScan();
			 } catch (err) {
				console.error("ble errCode:" + (err as BusinessError).code + ",errMessage:" + (err as BusinessError).message);
			 }
		  })

		  List({ space: "4vp", initialIndex: 0 }) {
			 ForEach(this.availableDevices, (item: ble.ScanResult, index: number) => {
				ListItemGroup() {
				ListItem() {
				   Text('['+index.toString(10) +"]" + item.deviceId)
					  .textAlign(TextAlign.Center)
					  .fontSize(30)
					  .backgroundColor(Color.Yellow)
					  .width('100%')
				}
				ListItem() {
				   Text('    name:' + item.deviceName)
					  .textAlign(TextAlign.Start)
					  .fontSize(30)
					  .backgroundColor(Color.Orange)
					  .width('100%')
				}

				ListItem() {
				   Text('    rssi:' + item.rssi.toString(10))
					  .textAlign(TextAlign.Start)
					  .fontSize(30)
					  .backgroundColor(Color.Orange)
					  .width('100%')
				}

				ListItem() {
				   Text('    connectable:' + item.connectable)
					  .textAlign(TextAlign.Start)
					  .fontSize(30)
					  .backgroundColor(Color.Orange)
					  .width('100%')
				}

				ListItem() {
				   Text('    data:' + this.dataToString(item.data))
					  .textAlign(TextAlign.Start)
					  .fontSize(30)
					  .backgroundColor(Color.Orange)
					  .width('100%')
				}


				}


			 })
		  }
		  .layoutWeight(10)
		  .backgroundColor(0xDCDCDC)
		  .height('50%')
		  .width('60%')
		  .margin({
			 top: 20
		  })
		  }
		  .width('100%')
	   }
	   .height('100%')
	   }
	}
4.3 Code Compilation
Tips
The detailed process of code compilation can be seen in:Hello World application and deployment in the second part (building part of the first page)
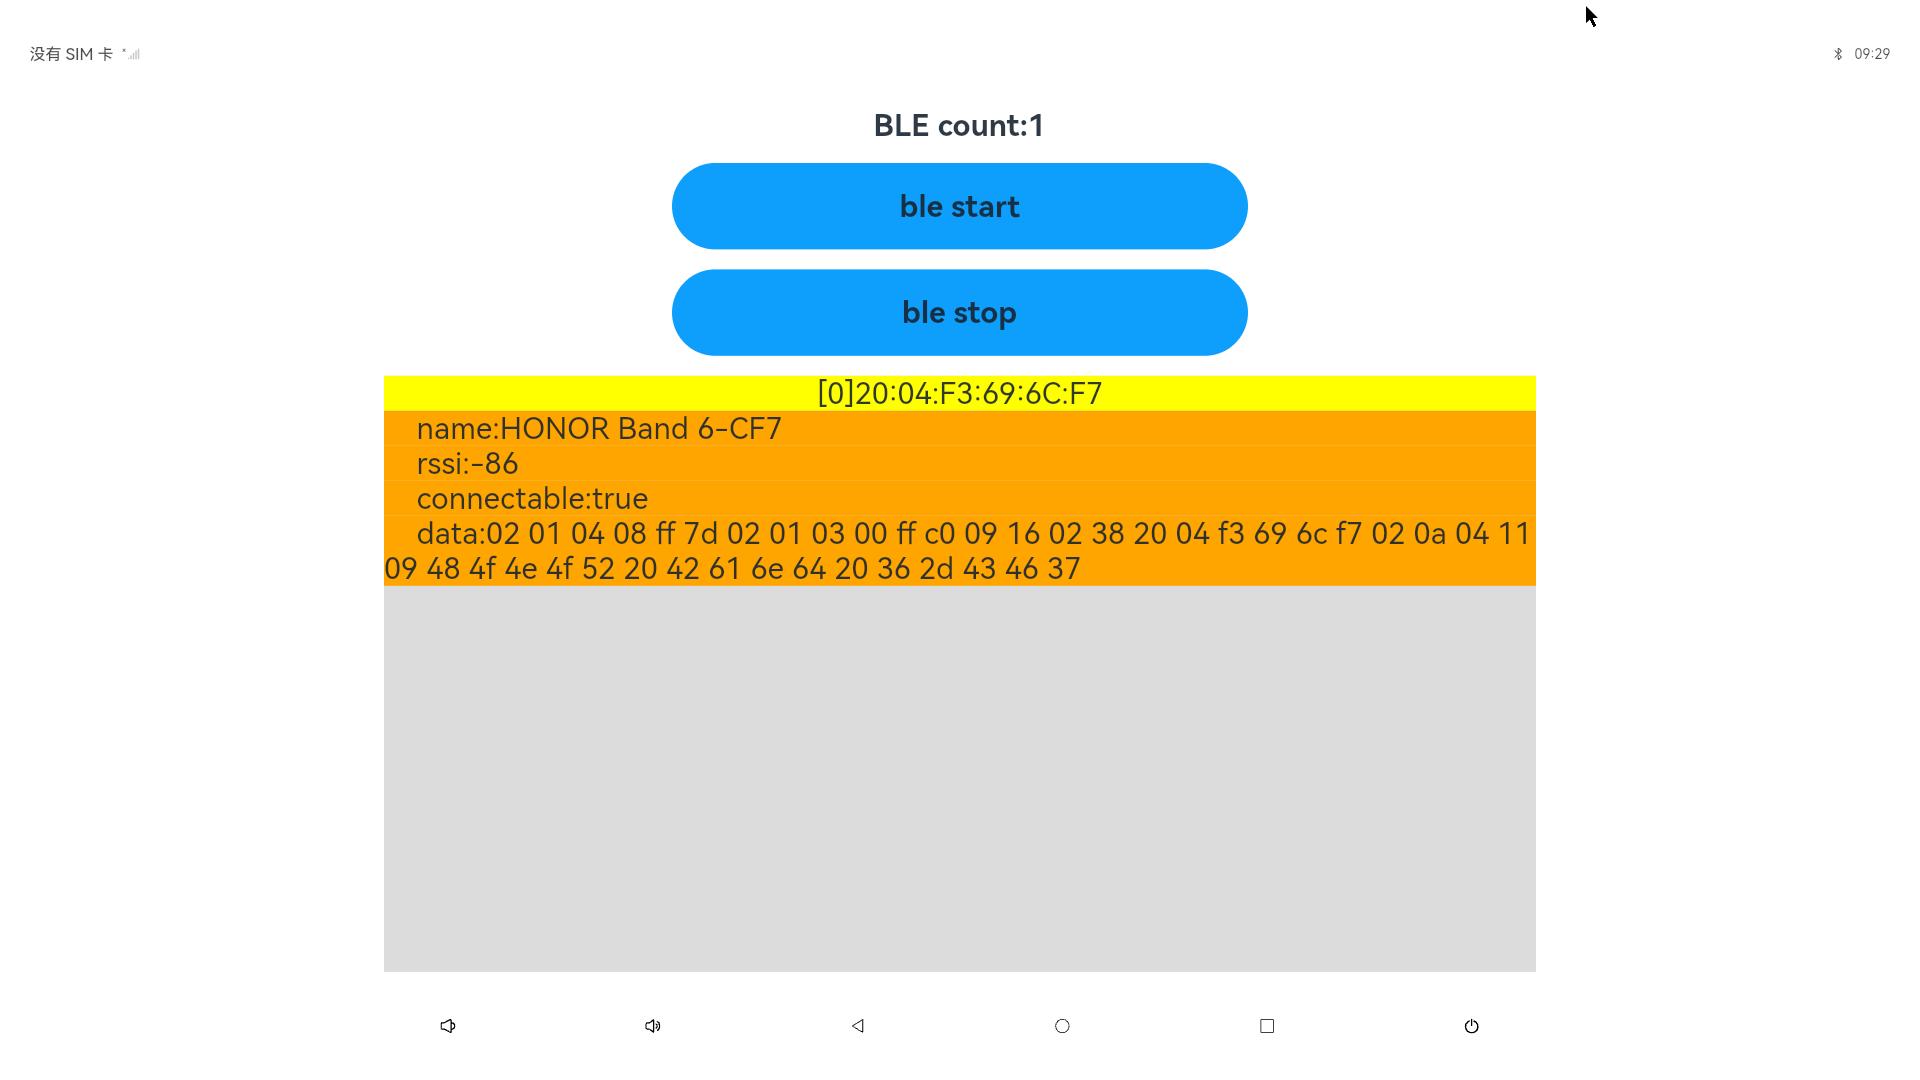
4.4 Code Running Effect
Use the above standard API interface to implement Bluetooth Demo, as shown below:
5. WIFI API usage and practice
5.1 HDC related instructions
The hdc command can be used to query WiFi information and connection status
hdc shell ifconfig5.2 How to use standard API
Warning
This module provides the capability for managing enterprise device WiFi, including querying the WiFi on/off status, etc. The first batch of interfaces is supported starting from API version 10, and these interfaces can only be used in the Stage model
- WLAN standard interface
@ohos.wifiManager (WLAN)
- API Usage Instructions
When developing with WIFI API, you need to first understand how to create your first open Harmony project. Related documents: Hello World application and deployment
When using an API, you need to pay attention to the following points:
- API permission description
- Parameters and return values of the API
- When an error occurs during API calls, refer to the API error codes and general error codes
- Correct use of API examples
As shown in the figure below, this is the standard API document
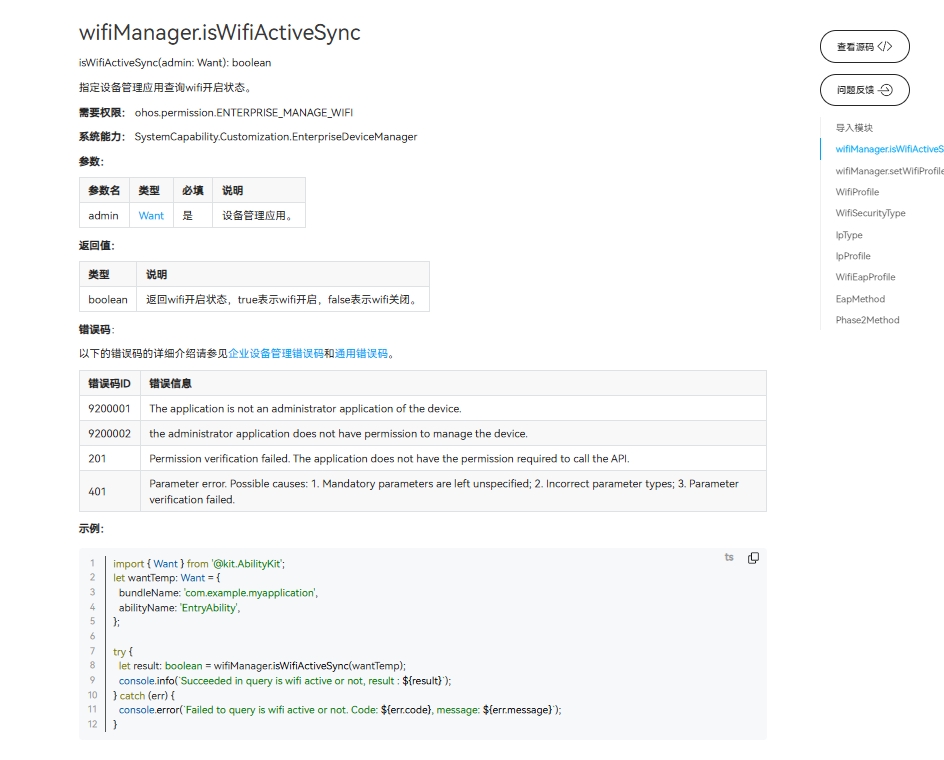
- Official standard development documents
WIFI official standard API development document
5.3 Community Demo
- Introduction
In order to help developers develop and learn more quickly using the board, we have provided a WiFi-related usage example on gitee. Each project is an independent DevEco Studio project. Developers can import the project into DevEco Studio and learn how to use the API involved in the application example by browsing the code, compiling the project, installing and running the application example
Gitee WiFi Example
Warning
When importing the community Demo project, developers need to pay attention to whether the local development environment is consistent with that of the project, that is, whether the local SDK is the same as the project SDK.
- Importing modules
When using the WIFI standard API, the most important step is to import the WIFI module to use the corresponding WIFI API interface. Usually the module is imported in the file header, and the import module is as follows:
import wifiManager from '@ohos.wifiManager'
- API Introduction
The implementation of the community demo references the following API to implement the basic implementation of how to turn on WIFI, WIFI scanning, and WIFI connection.
Tips
The following introductions are all brief introductions to the system capabilities of the APIs and the corresponding functions. Please refer to the Gitee WiFi Example and the Official WiFi Standard API Development Documentation to get familiar with the development.
- wifiManager.enableWifi (Enable WLAN)
    isWifiActive(): boolean
Permission required: ohos.permission.SET_WIFI_INFO and ohos.permission.MANAGE_WIFI_CONNECTION are only available for system applications.- wifiManager.disableWifi (disable WLAN)
    isWifiActive(): boolean
Permission required: ohos.permission.SET_WIFI_INFO and ohos.permission.MANAGE_WIFI_CONNECTION are only available for system applications.- wifiManager.startScan (Start WLAN scan)
startScan(): void- wifiManager.getScanInfoList (get scan results)
    getScanInfoList(): Array<WifiScanInfo>
Permission required: ohos.permission.GET_WIFI_INFO- wifiManager.isWifiActive (query whether WLAN is enabled)
    isWifiActive(): boolean
Permission required: ohos.permission.GET_WIFI_INFO- wifiManager.connectToDevice (connect to the specified network)
    connectToDevice(config: WifiDeviceConfig): void
	Permission required:  ohos.permission.SET_WIFI_INFO and ohos.permission.SET_WIFI_CONFIG and ohos.permission.MANAGE_WIFI_CONNECTION are only available for system applications.
Demo mainly implements source code
wifi.ets
import wifiManager from '@ohos.wifiManager';
import { MyDivider } from './MyDivider';
@Entry
@Component
struct Index {
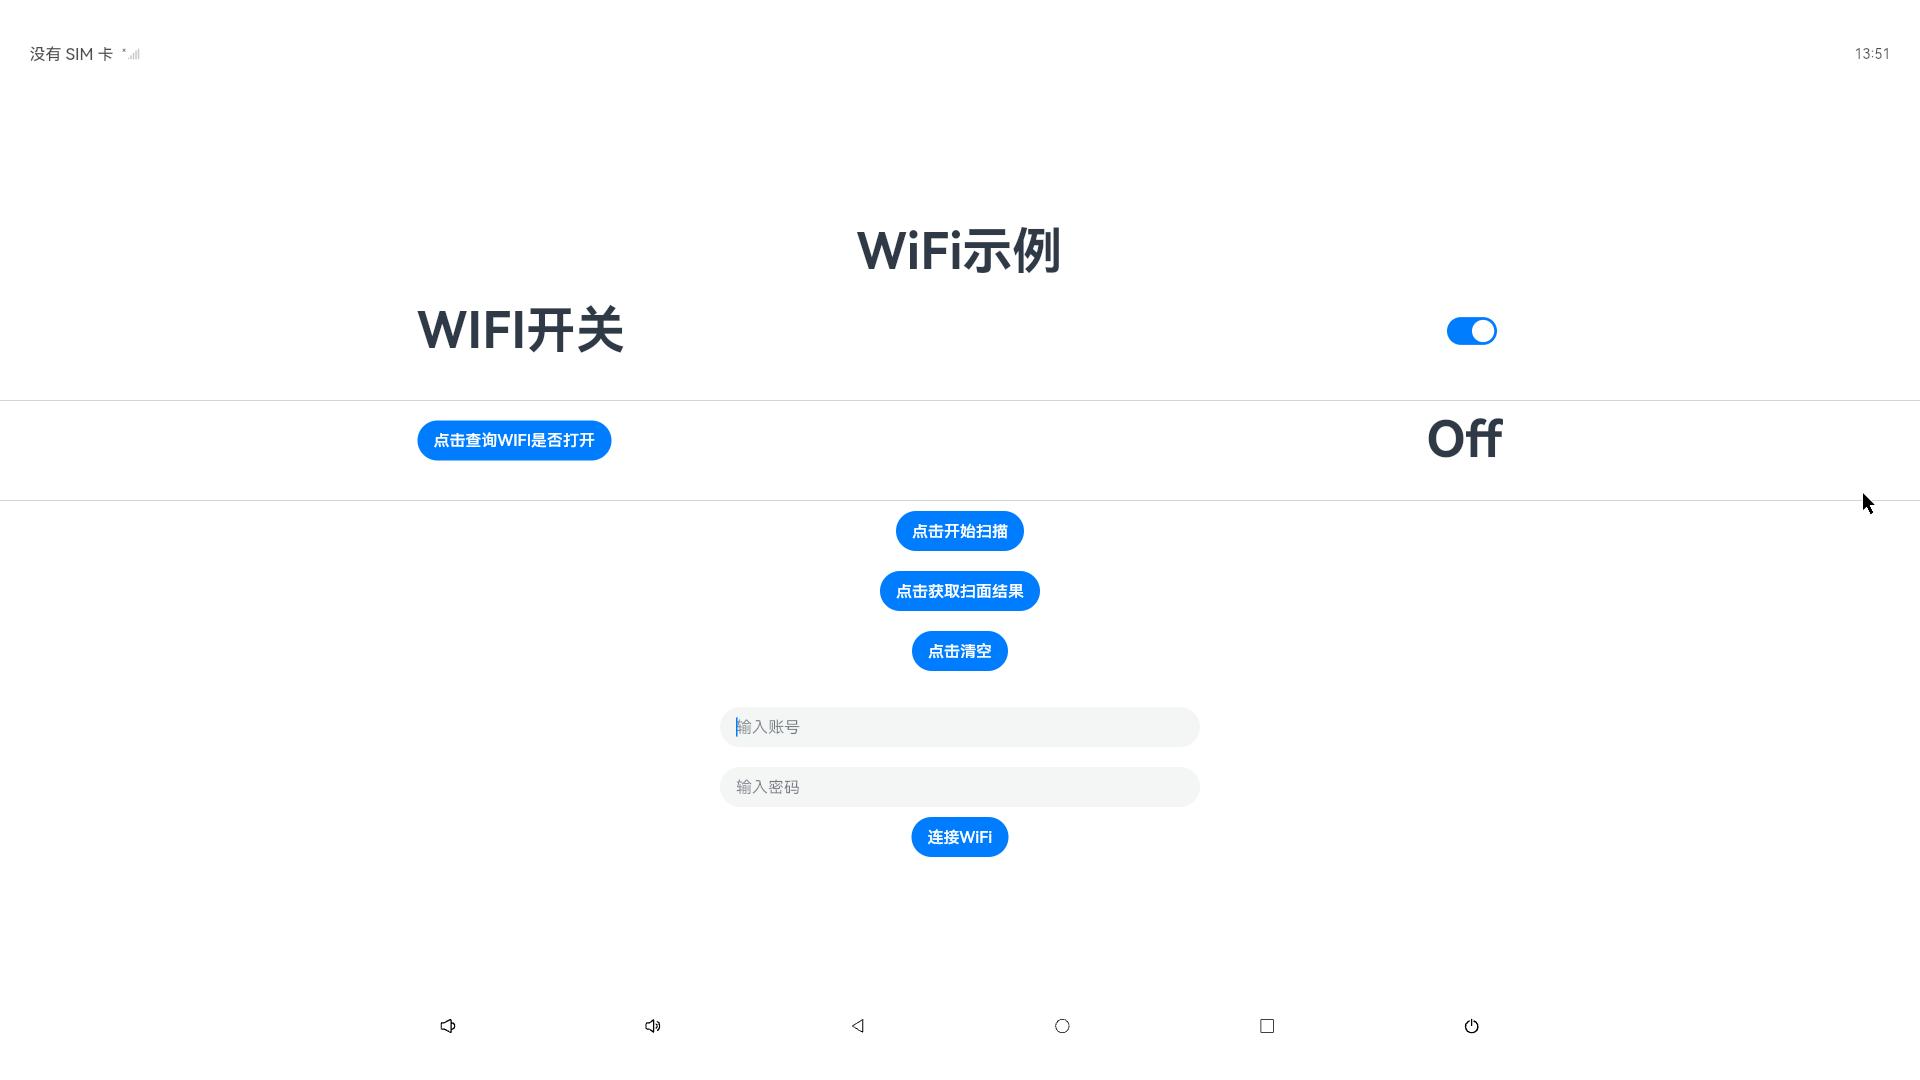
@State message: string = 'WiFi示例'
private TAG: string = 'ShiMetaWifi'
@State wifiStatus: string = 'null'
@State wifiInfoList: string = ''
@State passWord: string = ''
@State account: string = ''
build() {
Row() {
Column() {
Text(this.message)
.fontSize(50)
.fontWeight(FontWeight.Bold)
Row() {
Text('WIFI开关')
.fontSize(50)
.fontWeight(FontWeight.Bold)
Toggle({ type: ToggleType.Switch, isOn: false })
.width(50)
.height(50)
.selectedColor('#007DFF')
.switchPointColor('#FFFFFF')
.onChange((isOn: boolean) => {
if (isOn) {
try {
wifiManager.enableWifi();
} catch (error) {
console.error("failed:" + JSON.stringify(error));
}
} else {
try {
wifiManager.disableWifi();
} catch (error) {
console.error("failed:" + JSON.stringify(error));
}
}
})
}
.width('100%')
.justifyContent(FlexAlign.SpaceAround)
.padding(10)
MyDivider();
Row() {
Button('点击查询WIFI是否打开')
.onClick(() => {
let isWifiActive = wifiManager.isWifiActive();
if (isWifiActive) {
this.wifiStatus = 'On'
} else {
this.wifiStatus = 'Off'
}
console.log(this.TAG, 'isWifiActive' + isWifiActive);
})
Text(this.wifiStatus)
.fontSize(50)
.fontWeight(FontWeight.Bold)
}
.width('100%')
.justifyContent(FlexAlign.SpaceAround)
.padding(10)
MyDivider();
Row() {
Button('点击开始扫描')
.onClick(() => {
wifiManager.startScan()
})
}.padding(10)
Row() {
Button('点击获取扫面结果')
.onClick(() => {
let scanInfoList = wifiManager.getScanInfoList();
this.wifiInfoList = JSON.stringify(scanInfoList)
console.info("scanInfoList:" + JSON.stringify(scanInfoList));
})
}.padding(10)
Row() {
Button('点击清空')
.onClick(() => {
this.wifiInfoList = ''
})
}.padding(10)
Text(this.wifiInfoList)
Column() {
Row() {
TextInput({ placeholder: '输入账号' })
.onChange((value: string) => {
this.account = value;
console.log(this.TAG, 'account :' + this.account)
})
}.padding(10)
Row() {
TextInput({ placeholder: '输入密码' })
.onChange((value: string) => {
this.passWord = value;
console.log(this.TAG, 'passWord :' + this.passWord)
})
}.padding(10)
Button('连接WiFi')
.onClick(() => {
try {
let config: wifiManager.WifiDeviceConfig = {
ssid: this.account,
preSharedKey: this.passWord,
securityType: 3
}
wifiManager.connectToDevice(config);
} catch (error) {
console.error("failed:" + JSON.stringify(error));
}
})
}.width(500)
}
.width('100%')
}
.height('100%')
}
}5.4 Code Compilation
Tips
The detailed process of code compilation can be seen in: Hello World application and deployment in the second part (building part of the first page)
5.5 Code running effect
Use the above standard API interface to implement WIFI Demo, as shown below: