Ethernet
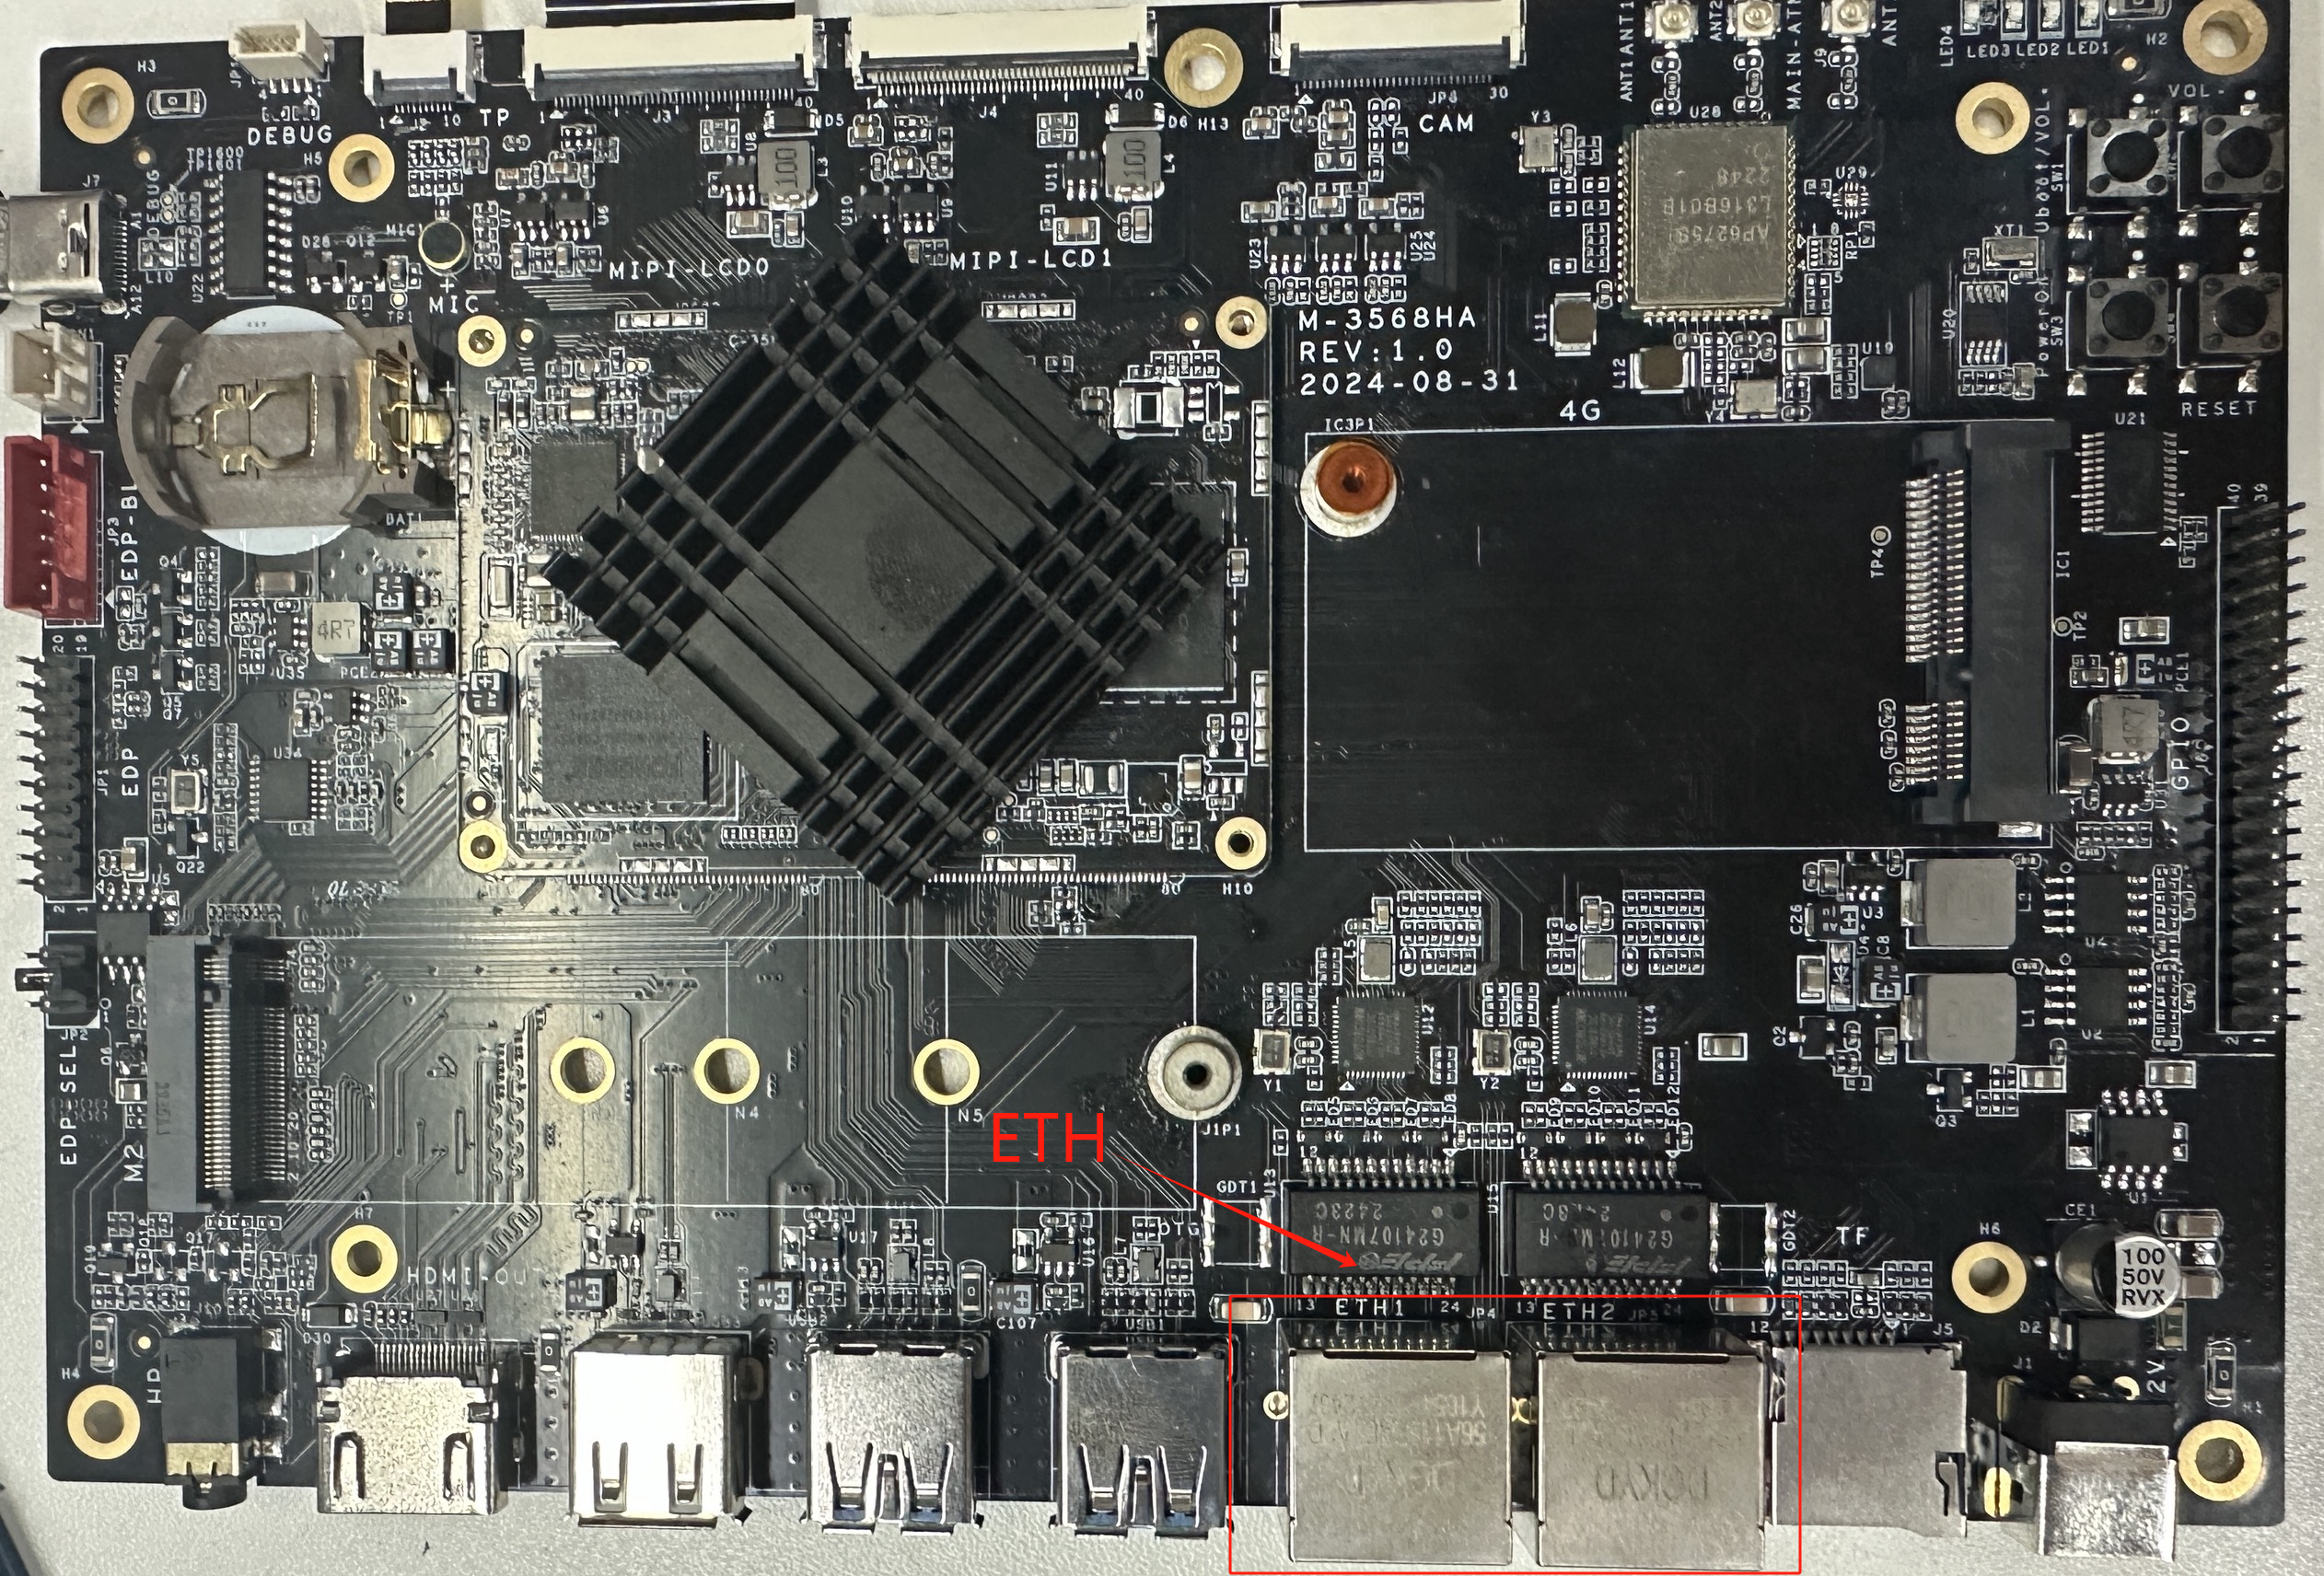
Taking SC-3568HA as an example, there are dual Ethernet ports on the board.
1. dts configuration
- arch/arm64/boot/dts/rockchip/rk3568-toybrick-x0.dtsi
&gmac0 {
phy-mode = "rgmii";
clock_in_out = "output";
snps,reset-gpio = <&gpio2 RK_PD3 GPIO_ACTIVE_LOW>;
snps,reset-active-low;
/* Reset time is 20ms, 100ms for rtl8211f */
snps,reset-delays-us = <0 20000 100000>;
assigned-clocks = <&cru SCLK_GMAC0_RX_TX>, <&cru SCLK_GMAC0>;
assigned-clock-parents = <&cru SCLK_GMAC0_RGMII_SPEED>, <&cru CLK_MAC0_2TOP>;
assigned-clock-rates = <0>, <125000000>;
pinctrl-names = "default";
pinctrl-0 = <&gmac0_miim
&gmac0_tx_bus2
&gmac0_rx_bus2
&gmac0_rgmii_clk
&gmac0_rgmii_bus>;
tx_delay = <0x2d>;
rx_delay = <0x13>;
phy-handle = <&rgmii_phy0>;
status = "okay";
};
&gmac1 {
phy-mode = "rgmii";
clock_in_out = "output";
snps,reset-gpio = <&gpio2 RK_PD1 GPIO_ACTIVE_LOW>;
snps,reset-active-low;
/* Reset time is 20ms, 100ms for rtl8211f */
snps,reset-delays-us = <0 20000 100000>;
assigned-clocks = <&cru SCLK_GMAC1_RX_TX>, <&cru SCLK_GMAC1>;
assigned-clock-parents = <&cru SCLK_GMAC1_RGMII_SPEED>, <&cru CLK_MAC1_2TOP>;
assigned-clock-rates = <0>, <125000000>;
pinctrl-names = "default";
pinctrl-0 = <&gmac1m1_miim
&gmac1m1_tx_bus2
&gmac1m1_rx_bus2
&gmac1m1_rgmii_clk
&gmac1m1_rgmii_bus>;
tx_delay = <0x37>;
rx_delay = <0x0f>;
phy-handle = <&rgmii_phy1>;
status = "okay";
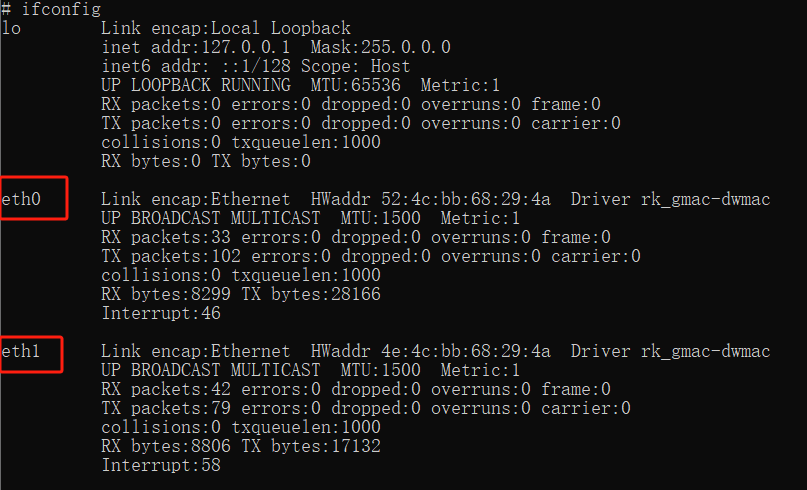
};2. Check the eth interface
Use the ifconfig command to check whether the ethX node is generated:
3. Connectivity test
Use the following command to test the network port
- eth0:
    ~# ping -I eth0 -c 10 www.baidu.com
    Ping www.baidu.com (183.2.172.42) from eth0 (192.168.49.35): 56(84) bytes.
    64 bytes from 183.2.172.42: icmp_seq=1 ttl=50 time=12 ms
    64 bytes from 183.2.172.42: icmp_seq=2 ttl=50 time=10 ms
    64 bytes from 183.2.172.42: icmp_seq=3 ttl=50 time=10 ms
    64 bytes from 183.2.172.42: icmp_seq=4 ttl=50 time=10 ms
    64 bytes from 183.2.172.42: icmp_seq=5 ttl=50 time=17 ms
    64 bytes from 183.2.172.42: icmp_seq=6 ttl=50 time=8 ms
    64 bytes from 183.2.172.42: icmp_seq=7 ttl=50 time=9 ms
    64 bytes from 183.2.172.42: icmp_seq=8 ttl=50 time=8 ms
    64 bytes from 183.2.172.42: icmp_seq=9 ttl=50 time=10 ms
    64 bytes from 183.2.172.42: icmp_seq=10 ttl=50 time=9 ms

    --- 183.2.172.42 ping statistics ---
    10 packets transmitted, 10 received, 0% packet loss
round-trip min/avg/max = 8/10/17 ms- eth1:
    ~# ping -I eth1 -c 10 www.baidu.com
    Ping www.baidu.com (183.2.172.185) from eth1 (192.168.49.241): 56(84) bytes.
    64 bytes from 183.2.172.185: icmp_seq=1 ttl=50 time=9 ms
    64 bytes from 183.2.172.185: icmp_seq=2 ttl=50 time=9 ms
    64 bytes from 183.2.172.185: icmp_seq=3 ttl=50 time=9 ms
    64 bytes from 183.2.172.185: icmp_seq=4 ttl=50 time=9 ms
    64 bytes from 183.2.172.185: icmp_seq=5 ttl=50 time=8 ms
    64 bytes from 183.2.172.185: icmp_seq=6 ttl=50 time=8 ms
    64 bytes from 183.2.172.185: icmp_seq=7 ttl=50 time=9 ms
    64 bytes from 183.2.172.185: icmp_seq=8 ttl=50 time=8 ms
    64 bytes from 183.2.172.185: icmp_seq=9 ttl=50 time=8 ms
    64 bytes from 183.2.172.185: icmp_seq=10 ttl=50 time=9 ms

    --- 183.2.172.185 ping statistics ---
    10 packets transmitted, 10 received, 0% packet loss
    round-trip min/avg/max = 8/8/9 ms
4. Ethernet API usage and practice
4.1 HDC related instructions
The hdc command can be used to query Ethernet information and connection status
hdc shell ifconfigTurn off/on Ethernet hdc command:
    ifconfig eth0 X.X.X.X up
    ifconfig eth0 X.X.X.X down
    注:x.x.x.x 为网卡地址。
4.2 How to use standard API
Tips
Ethernet connection management mainly provides the capability of a wired network. It allows users to set information such as the IP address, subnet mask, gateway, DNS, and proxy for the wired network.
The first batch of interfaces of this module is supported starting from API version 9. For newly added interfaces in subsequent versions, the starting version of each interface is separately marked with a superscript.
This module consists of system interfaces.
Ethernet standard interface
@ohos.net.ethernet (Ethernet connection management) (system interface)
API Usage Instructions
When developing with Ethernet APIs, you need to first understand how to create your first open Harmony project. Related documents: Hello World application and deployment
When using an API, you need to pay attention to the following points:
- API Permissions Description
- API parameters and return values
- When an API call fails, refer to the API error code and general error code.
- Correct use of API examples
As shown in the figure below, this is the standard API document
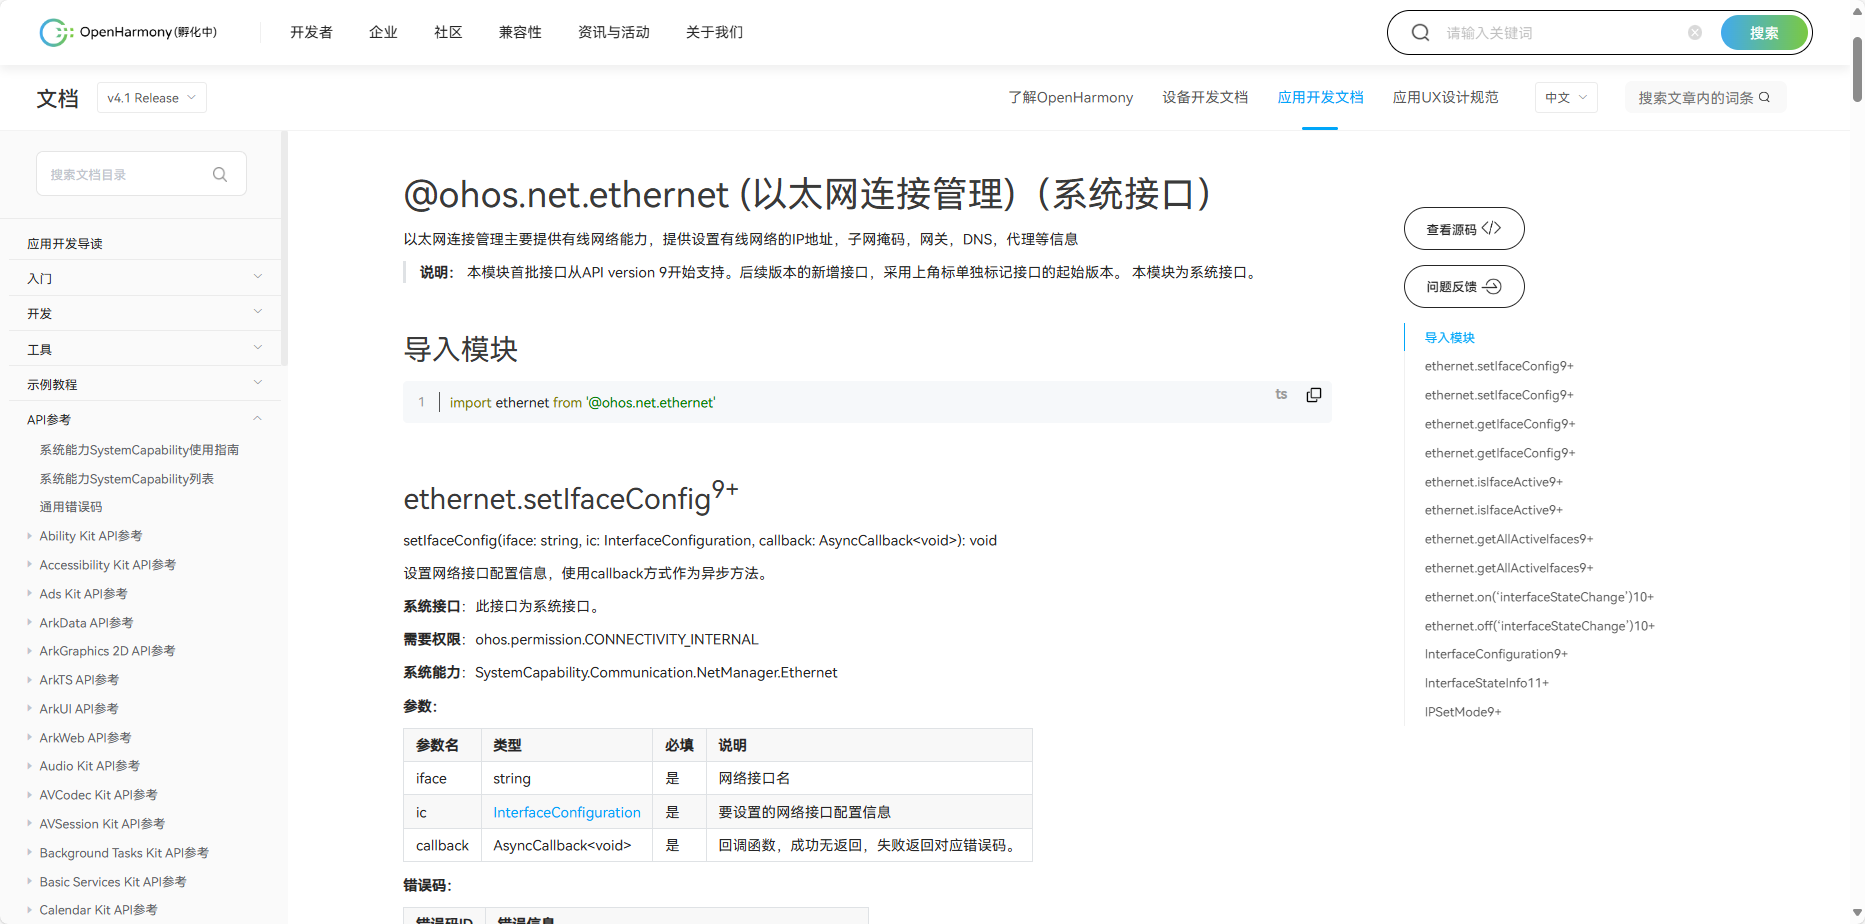
Official standard development documents
Ethereum official standard API development document
4.3 Community Demo
- Introduction
In order to help developers develop and learn more quickly using the board, we have provided an Ethernet-related usage example on gitee. Each project is an independent DevEco Studio project. Developers can import the project into DevEco Studio and understand the usage of the API involved in the application example by browsing the code, compiling the project, installing and running the application example.
Tips
When importing a community Demo project, developers need to pay attention to whether the local development environment is consistent with the project, that is, whether the local SDK is consistent with the project SDK.
- Importing modules
When using the Ethernet standard API, the most important step is to import the Ethernet module so that you can use the corresponding Ethernet API interface. Usually the module is imported in the file header.
Import the module as follows:
import ethernet from '@ohos.net.ethernet'
- API Introduction
The implementation of the community demo references the following API to implement how to open and obtain Ethernet information, set static and dynamic, and the basic implementation of Ethernet connection.
Note
The following introductions briefly describe the system capabilities of the APIs and the corresponding functions.Please refer to the Gitee Ethereum examples and Ethereum official standard API development documentsto get familiar with the development.
- ethernet.setIfaceConfig (set network interface configuration information)
	setIfaceConfig(iface: string, ic: InterfaceConfiguration): Promise<void>
需要权限: ohos.permission.CONNECTIVITY_INTERNAL 。- ethernet.getIfaceConfig (get the specified network interface information)
	getIfaceConfig(iface: string): Promise<InterfaceConfiguration>
需要权限: ohos.permission.GET_NETWORK_INFO 。- ethernet.isIfaceActive (determine whether the interface is activated)
	isIfaceActive(iface: string): Promise<number>
需要权限: ohos.permission.GET_NETWORK_INFO 。- ethernet.getAllActiveIfaces (get active network interfaces)
	getAllActiveIfaces(): Promise<Array<string>>
需要权限: ohos.permission.GET_NETWORK_INFO 。- ethernet.on('interfaceStateChange') (register network card hot plug event)
	getAllActiveIfaces(): Promise<Array<string>>
	需要权限: ohos.permission.GET_NETWORK_INFO 。
Demo mainly implements source code
ent.ets
  import ethernet from '@ohos.net.ethernet'
  import { BusinessError } from '@ohos.base';

  @Entry
  @Component
  struct Index {
  @State message: string = '以太网Demo';
  private  TAG : string = 'ent_Demo'
  @State entModeTest : string = '当前动态Ip'
  @State entName : string = "eth0"
  @State entModeStatus : boolean = true;//动/静态Ip的判断
  @State entMsg : string = ''
  @State entIp : string = ''
  @State entRoute : string = ''
  @State entGateway : string = ''
  @State entMask : string = ''
  @State entDNS : string = ''
  @State entMode : number = 1;


  aboutToAppear(): void {
	 this.getAllActiveIfaces();
	 this.getIfaceConfig();
  }


  setIfaceConfig(){
	 let config: ethernet.InterfaceConfiguration = {
		mode: this.entMode,
		ipAddr: this.entIp,
		route: this.entRoute,
		gateway: this.entGateway,
		netMask: this.entMask,
		dnsServers: this.entDNS
	 };

	 const setConfigPromise = ethernet.setIfaceConfig("eth0", config);

	 setConfigPromise.then(() => {
		console.log(this.TAG,"setIfaceConfig promise ok");
	 }).catch((error: BusinessError)  => {
		console.error(this.TAG,"setIfaceConfig promise error = " + JSON.stringify(error));
	 });
  }

  getIfaceConfig(){
	 ethernet.getIfaceConfig(this.entName).then((data: ethernet.InterfaceConfiguration) => {
		console.log(this.TAG,"getIfaceConfig promise mode = " + data.mode);
		console.log(this.TAG,"getIfaceConfig promise ipAddr = " + JSON.stringify(data.ipAddr));
		console.log(this.TAG,"getIfaceConfig promise route = " + JSON.stringify(data.route));
		console.log(this.TAG,"getIfaceConfig promise gateway = " + JSON.stringify(data.gateway));
		console.log(this.TAG,"getIfaceConfig promise netMask = " + JSON.stringify(data.netMask));
		console.log(this.TAG,"getIfaceConfig promise dnsServers = " + JSON.stringify(data.dnsServers));
		if (data.mode == 0) {
		this.entModeStatus = false;
		}else {
		this.entModeStatus = true
		}
		this.entMode = data.mode
		this.entMsg = JSON.stringify(data).toString();
		this.entRoute = data.route.toString();
		this.entGateway = data.gateway.toString();
		this.entMask = data.netMask.toString();
		this.entDNS = data.dnsServers.toString();
	 }).catch((error: BusinessError) => {
		console.error(this.TAG,"getIfaceConfig promise error = " + JSON.stringify(error));
	 });
  }

  isIfaceActive(){
	 ethernet.isIfaceActive("eth0").then((data: number) => {
		console.log(this.TAG,"isIfaceActive promise = " + JSON.stringify(data));
	 }).catch((error: BusinessError) => {
		console.log(this.TAG,"isIfaceActive promise error = " + JSON.stringify(error));
	 });
  }

  getAllActiveIfaces(){
	 ethernet.getAllActiveIfaces().then((data: string[]) => {
		console.log(this.TAG,"getAllActiveIfaces promise data.length = " + JSON.stringify(data.length));
		if (JSON.stringify(data.length) == '1' ) {
		console.log(this.TAG,'data.length')
		}
		for (let i = 0; i < data.length; i++) {
		console.log(this.TAG,"getAllActiveIfaces promise  = " + JSON.stringify(data[i]));
		}
	 }).catch((error:BusinessError) => {
		console.error(this.TAG,"getAllActiveIfaces promise error = " + JSON.stringify(error));
	 });
  }

  build() {
		Column() {
		Text(this.message)
		   .fontSize(50)
		   .fontWeight(FontWeight.Bold)
		   .padding(20)
		Button('点击切换动/静态IP')
		   .onClick(()=>{
			  if (this.entMode == 0) {
			  this.entMode = 1;
			  this.entModeTest = '当前动态Ip'
			  this.entModeStatus = true;
			  }else{
			  this.entMode = 0;
			  this.entModeTest = '当前静态Ip'
			  this.entModeStatus = false;
			  }
			  this.setIfaceConfig();
			  this.getIfaceConfig();
		   })
		if (this.entModeStatus){
		   Column(){
			  TextInput({placeholder : '静态Ip'})
			  .onChange((value : string)=>{
				 this.entIp = value
			  })
		   }
		   .height(80)
		   .width(300)
		   .padding(10)
		   .margin(10)
		}
		Text(this.entModeTest)
		   .fontSize(50)
		   .fontWeight(FontWeight.Bold)
		   .padding(30)
		Column(){
		   Text('网口信息')
		   Blank()
		   Text(this.entMsg)
		}
		.height(80)
		.padding(10)
		}
		.width('100%')
  }

  }
4.4 Code Compilation
Tips
The detailed process of code compilation can be seen in:Hello World application and deployment in the second part (building part of the first page)
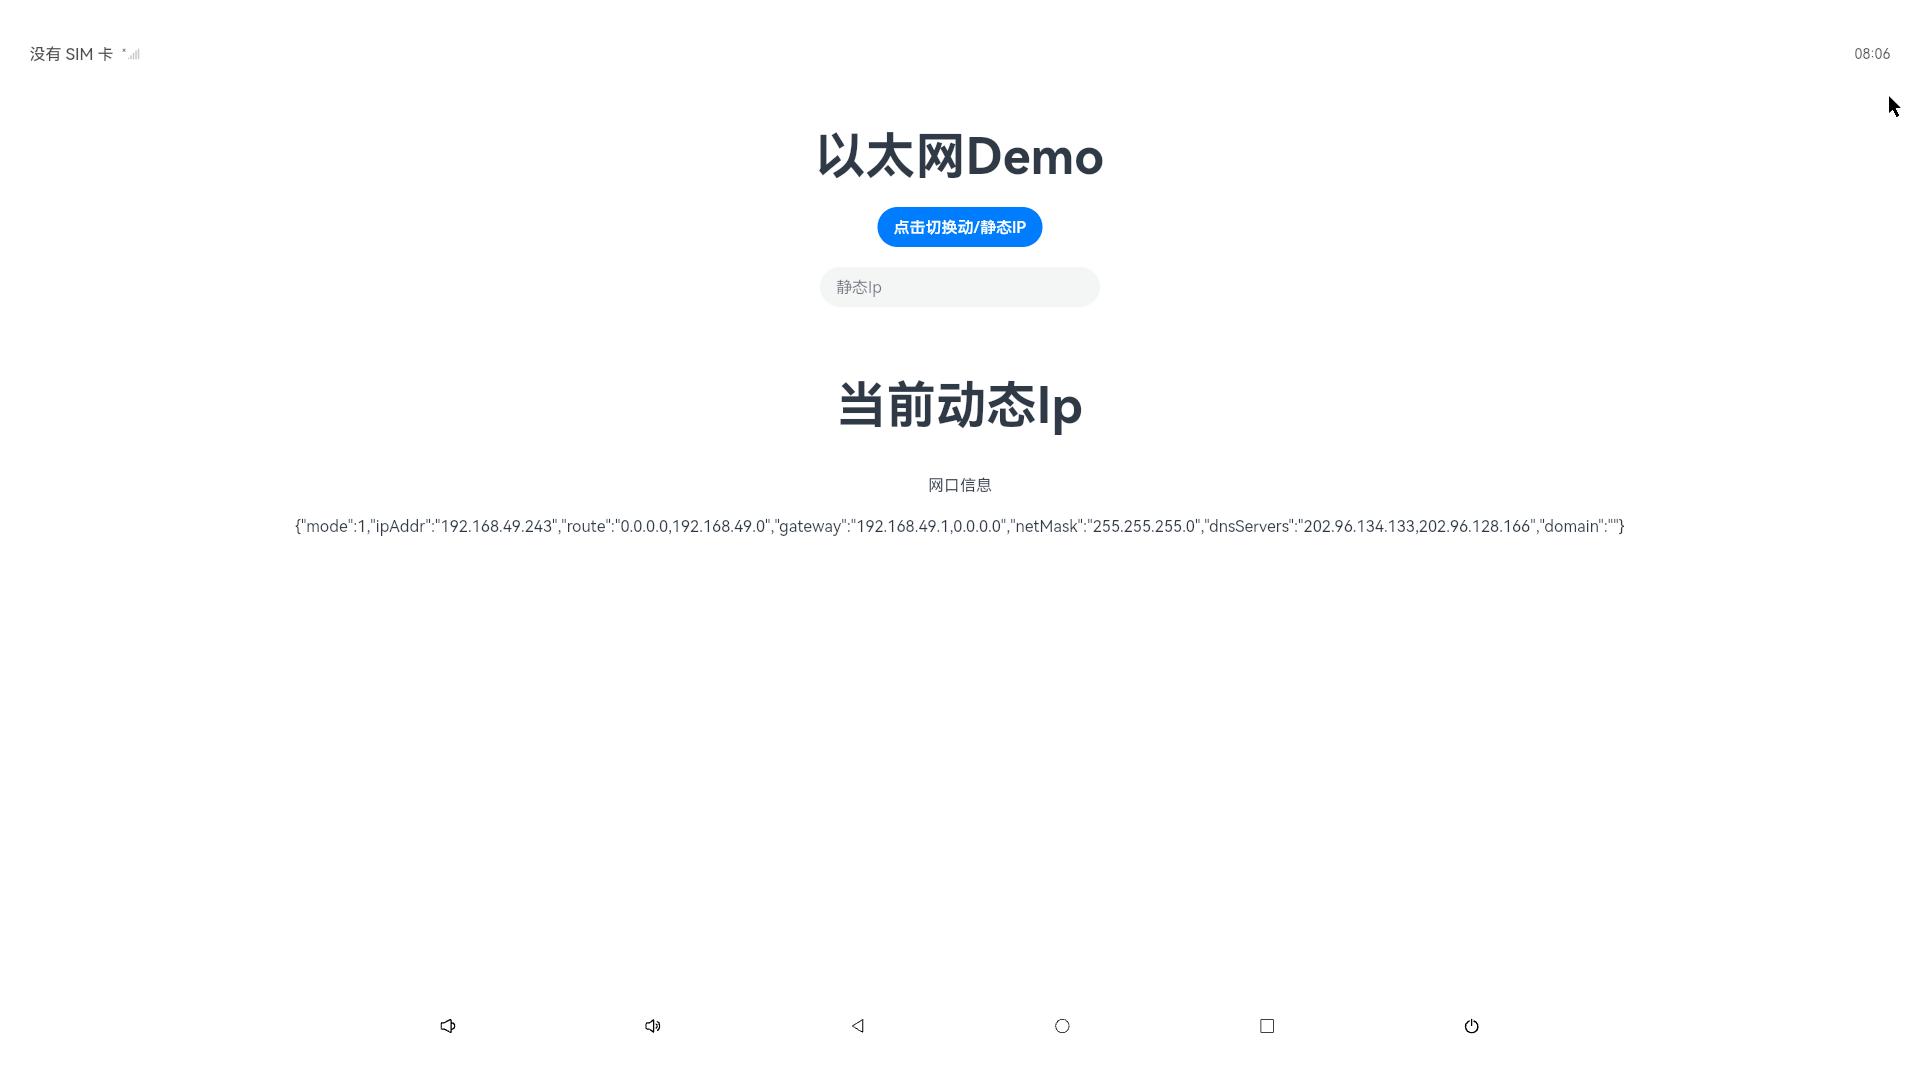
4.5 Code Running Effect
Use the above standard API interface to implement Ethernet Demo, as shown in the following figure: