实验2-颜色识别检测
pip install opencv-python #下载open-cv数据库(另外需自行安装python3,如已下载可忽略)cd OPENCV#打开OPENCV功能包sudo python3 ./color_detection.py#运行py文件
终端显示:

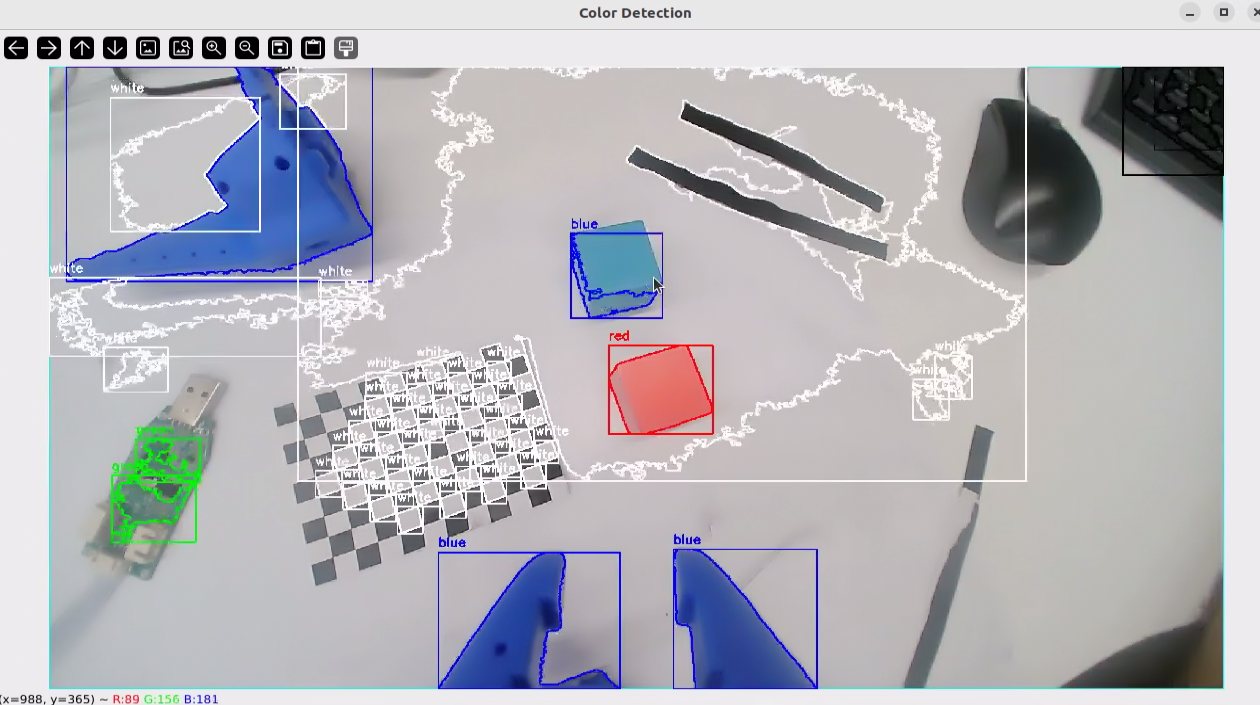
此时Linux系统上会显示摄像头实时画面,我们需要在窗口焦点下测试按键,效果如下:
#!/usr/bin/env python
# -*- coding: utf-8 -*-

"""
多颜色同时识别程序
功能:实时识别摄像头中的多种颜色物体
"""

import cv2
import numpy as np
import sys
import os
import argparse

def main():
    """
    主函数:打开摄像头并进行多颜色同时识别
    """
    # 解析命令行参数
    parser = argparse.ArgumentParser(description='多颜色同时识别程序')
    parser.add_argument('--width', type=int, default=2560, help='显示窗口宽度')
    parser.add_argument('--height', type=int, default=1440, help='显示窗口高度')
    args = parser.parse_args()

    # 打开默认摄像头
    cap = cv2.VideoCapture(0)

    # 检查摄像头是否成功打开
    if not cap.isOpened():
        print("错误:无法打开摄像头")
        sys.exit(1)

    # 设置摄像头分辨率
    cap.set(cv2.CAP_PROP_FRAME_WIDTH, args.width)
    cap.set(cv2.CAP_PROP_FRAME_HEIGHT, args.height)

    # 创建窗口并设置大小
    cv2.namedWindow('Original', cv2.WINDOW_NORMAL)
    cv2.namedWindow('Color Detection', cv2.WINDOW_NORMAL)
    cv2.namedWindow('Controls', cv2.WINDOW_NORMAL)

    # 设置窗口大小
    cv2.resizeWindow('Original', args.width // 2, args.height // 2)
    cv2.resizeWindow('Color Detection', args.width // 2, args.height // 2)
    cv2.resizeWindow('Controls', 600, 300)

    # 创建HSV颜色范围的滑动条
    cv2.createTrackbar('H_min', 'Controls', 0, 179, lambda x: None)
    cv2.createTrackbar('H_max', 'Controls', 179, 179, lambda x: None)
    cv2.createTrackbar('S_min', 'Controls', 0, 255, lambda x: None)
    cv2.createTrackbar('S_max', 'Controls', 255, 255, lambda x: None)
    cv2.createTrackbar('V_min', 'Controls', 0, 255, lambda x: None)
    cv2.createTrackbar('V_max', 'Controls', 255, 255, lambda x: None)

    # 定义颜色范围和对应的颜色名称及显示颜色
    color_ranges = {
        'red': {
            'ranges': [(0, 50, 50), (10, 255, 255), (160, 50, 50), (179, 255, 255)],  # 红色有两个范围
            'color': (0, 0, 255)  # BGR格式:蓝=0, 绿=0, 红=255
        },
        'green': {
            'ranges': [(35, 50, 50), (85, 255, 255)],
            'color': (0, 255, 0)  # BGR格式:蓝=0, 绿=255, 红=0
        },
        'blue': {
            'ranges': [(100, 50, 50), (130, 255, 255)],
            'color': (255, 0, 0)  # BGR格式:蓝=255, 绿=0, 红=0
        },
        'yellow': {
            'ranges': [(20, 100, 100), (30, 255, 255)],
            'color': (0, 255, 255)  # BGR格式:蓝=0, 绿=255, 红=255
        },
        'white': {
            'ranges': [(0, 0, 200), (180, 30, 255)],
            'color': (255, 255, 255)  # BGR格式:蓝=255, 绿=255, 红=255
        },
        'black': {
            'ranges': [(0, 0, 0), (180, 255, 30)],
            'color': (0, 0, 0)  # BGR格式:蓝=0, 绿=0, 红=0
        }
    }

    # 设置初始滑动条位置为自定义颜色
    cv2.setTrackbarPos('H_min', 'Controls', 0)
    cv2.setTrackbarPos('S_min', 'Controls', 0)
    cv2.setTrackbarPos('V_min', 'Controls', 0)
    cv2.setTrackbarPos('H_max', 'Controls', 179)
    cv2.setTrackbarPos('S_max', 'Controls', 255)
    cv2.setTrackbarPos('V_max', 'Controls', 255)

    print("多颜色同时识别程序已启动")
    print("按键说明:")
    print("- 'q':退出程序")
    print("- 's':保存当前帧和检测结果")
    print("- '+'/'-':调整窗口大小")

    # 循环读取摄像头画面
    while True:
        # 读取一帧图像
        ret, frame = cap.read()

        # 如果读取失败,退出循环
        if not ret:
            print("错误:无法读取摄像头画面")
            break

        # 转换到HSV颜色空间
        hsv = cv2.cvtColor(frame, cv2.COLOR_BGR2HSV)

        # 获取当前滑动条的值(用于自定义颜色检测)
        h_min = cv2.getTrackbarPos('H_min', 'Controls')
        h_max = cv2.getTrackbarPos('H_max', 'Controls')
        s_min = cv2.getTrackbarPos('S_min', 'Controls')
        s_max = cv2.getTrackbarPos('S_max', 'Controls')
        v_min = cv2.getTrackbarPos('V_min', 'Controls')
        v_max = cv2.getTrackbarPos('V_max', 'Controls')

        # 创建自定义颜色掩码
        custom_lower = np.array([h_min, s_min, v_min])
        custom_upper = np.array([h_max, s_max, v_max])
        custom_mask = cv2.inRange(hsv, custom_lower, custom_upper)

        # 创建检测结果图像
        detection_frame = frame.copy()

        # 处理自定义颜色
        contours, _ = cv2.findContours(custom_mask, cv2.RETR_EXTERNAL, cv2.CHAIN_APPROX_SIMPLE)
        for contour in contours:
            area = cv2.contourArea(contour)
            if area < 500:  # 忽略太小的轮廓
                continue

            # 绘制轮廓
            cv2.drawContours(detection_frame, [contour], -1, (255, 255, 0), 2)  # 青色

            # 计算轮廓的外接矩形
            x, y, w, h = cv2.boundingRect(contour)

            # 在矩形上方显示"自定义"
            cv2.putText(detection_frame, "Custom", (x, y - 10),
                        cv2.FONT_HERSHEY_SIMPLEX, 0.7, (255, 255, 0), 2)

            # 绘制矩形框
            cv2.rectangle(detection_frame, (x, y), (x + w, y + h), (255, 255, 0), 2)

        # 对每种预定义颜色进行检测
        for color_name, color_info in color_ranges.items():
            # 创建掩码
            if color_name == 'red':  # 红色需要特殊处理(两个范围)
                lower1 = np.array(color_info['ranges'][0])
                upper1 = np.array(color_info['ranges'][1])
                lower2 = np.array(color_info['ranges'][2])
                upper2 = np.array(color_info['ranges'][3])

                mask1 = cv2.inRange(hsv, lower1, upper1)
                mask2 = cv2.inRange(hsv, lower2, upper2)
                color_mask = cv2.bitwise_or(mask1, mask2)
            else:
                lower = np.array(color_info['ranges'][0])
                upper = np.array(color_info['ranges'][1])
                color_mask = cv2.inRange(hsv, lower, upper)

            # 查找轮廓
            contours, _ = cv2.findContours(color_mask, cv2.RETR_EXTERNAL, cv2.CHAIN_APPROX_SIMPLE)

            # 处理轮廓
            for contour in contours:
                area = cv2.contourArea(contour)
                if area < 500:  # 忽略太小的轮廓
                    continue

                # 绘制轮廓
                cv2.drawContours(detection_frame, [contour], -1, color_info['color'], 2)

                # 计算轮廓的外接矩形
                x, y, w, h = cv2.boundingRect(contour)

                # 在矩形上方显示颜色名称
                cv2.putText(detection_frame, color_name, (x, y - 10),
                            cv2.FONT_HERSHEY_SIMPLEX, 0.7, color_info['color'], 2)

                # 绘制矩形框
                cv2.rectangle(detection_frame, (x, y), (x + w, y + h), color_info['color'], 2)

        # 显示图像
        cv2.imshow('Original', frame)
        cv2.imshow('Color Detection', detection_frame)

        # 等待按键
        key = cv2.waitKey(30) & 0xFF

        # 处理按键
        if key == ord('q'):
            print("用户退出程序")
            break
        elif key == ord('s'):
            # 创建保存目录
            save_dir = "color_detection_images"
            if not os.path.exists(save_dir):
                os.makedirs(save_dir)

            # 生成文件名
            import time
            timestamp = time.strftime("%Y%m%d_%H%M%S")
            original_filename = os.path.join(save_dir, f"original_{timestamp}.jpg")
            detection_filename = os.path.join(save_dir, f"detection_{timestamp}.jpg")

            # 保存图像
            cv2.imwrite(original_filename, frame)
            cv2.imwrite(detection_filename, detection_frame)
            print(f"已保存图像: {original_filename}, {detection_filename}")
        elif key == ord('+') or key == ord('='):  # '='键和'+'键通常在同一个键位
            # 增大窗口
            current_width = cv2.getWindowImageRect('Color Detection')[2]
            current_height = cv2.getWindowImageRect('Color Detection')[3]
            new_width = int(current_width * 1.1)
            new_height = int(current_height * 1.1)
            cv2.resizeWindow('Original', new_width, new_height)
            cv2.resizeWindow('Color Detection', new_width, new_height)
            print(f"窗口大小增加到: {new_width}x{new_height}")
        elif key == ord('-'):
            # 减小窗口
            current_width = cv2.getWindowImageRect('Color Detection')[2]
            current_height = cv2.getWindowImageRect('Color Detection')[3]
            new_width = int(current_width * 0.9)
            new_height = int(current_height * 0.9)
            cv2.resizeWindow('Original', new_width, new_height)
            cv2.resizeWindow('Color Detection', new_width, new_height)
            print(f"窗口大小减小到: {new_width}x{new_height}")

    # 释放资源
    cap.release()
    cv2.destroyAllWindows()
    print("程序已退出")

if __name__ == "__main__":
    try:
        main()
    except Exception as e:
        print(f"程序发生错误: {e}")
        sys.exit(1)