HOME
Shop
  • English
  • 简体中文
HOME
Shop
  • English
  • 简体中文
  • Product Series

    • FPGA+ARM

      • GM-3568JHF

        • 1. Introduction

          • GM-3568JHF Introduction
        • 2. Quick Start

          • 01 Environment Construction
          • 02 Compilation Instructions
          • 03 Burning Guide
          • 04 Debugging Tools
          • 05 Software Update
          • 06 View information
          • 07 Test Command
          • 08 Application Compilation
          • 09 Source code acquisition
        • 3. Peripherals and Interfaces

          • USB
          • Display and touch
          • Ethernet
          • WIFI
          • Bluetooth
          • TF-Card
          • Audio
          • Serial Port
          • CAN
          • RTC
        • 4. Application Development

          • 01 UART read and write case
          • 02 Key detection case
          • 03 LED light flashing case
          • 04 MIPI screen detection case
          • 05 Read USB device information example
          • 06 FAN Detection Case
          • 07 FPGA FSPI Communication Case
          • 08 FPGA DMA read and write case
          • 09 GPS debugging case
          • 10 Ethernet Test Cases
          • 11 RS485 reading and writing examples
          • 12 FPGA IIC read and write examples
          • 13 PN532 NFC card reader case
          • 14 TF card reading and writing case
        • 5. QT Development

          • 01 ARM64 cross compiler environment construction
          • 02 QT program added automatic startup service
        • 6. Others

          • 01 Modification of the root directory file system
          • 02 System auto-start service
    • ShimetaPi

      • M4-R1

        • Introduction

          • M4-R1 Introduction
        • Get started quickly

          • OpenHarmony概述
          • 镜像烧录
          • 开发环境准备
          • Hello World应用以及部署
        • Application Development

          • getting Started

            • 第一章 ArkTS语言简介
            • 第二章 UI组件介绍和实际应用(上)
            • 第三章 UI组件介绍和实际应用(中)
            • 第四章 UI组件介绍和实际应用(下)
          • Advanced

            • 第一章 入门指引
            • 第二章 三方库的引用和使用
            • 第三章 应用编译以及部署
            • 第四章 命令行恢复出厂设置
            • 第五章 系统调试--HDC调试
            • 第六章 APP 稳定性测试
            • 第七章 应用测试
        • Equipment Development

          • 第一章 环境搭建
          • 第二章 下载源码
          • 第三章 编译源码
        • Peripherals and interfaces

          • 树莓派接口
          • GPIO 接口
          • I2C 接口
          • SPI通信
          • PWM控制
          • 串口通讯
          • TF Card
          • 屏幕
          • 触摸
          • 音频
          • RTC
          • Ethernet
          • M.2
          • MINI-PCIE
          • Camera
          • WIFI&BT
          • 树莓派拓展板
        • Frequently asked questions

          • 资源下载
      • M5-R1

        • Introduction

          • Introduction to ShimetaPi M5-R1
    • OpenHarmony

      • SC-3568HA

        • Introduction

          • SC-3568HA Overview
        • Quick Start Guide

          • OpenHarmony Overview
          • Image Flashing
          • Setting Up the Development Environment
          • Hello World Application and Deployment
        • Application Development

          • ArkUI

            • Chapter 1 Introduction to ArkTS Language
            • Chapter 2 Introduction to UI Components and Practical Applications (Part 1)
            • Chapter 3 Introduction to UI Components and Practical Applications (Part 2)
            • Chapter 4 Introduction to UI Components and Practical Applications (Part 3)
          • Expand

            • Chapter 1 Getting Started Guide
            • Chapter 2 Referencing and Using Third-Party Libraries
            • Chapter 3: Application Compilation and Deployment
            • Chapter 4: Command-Line Factory Reset
            • Chapter 5: System Debugging -- HDC (Huawei Device Connector) Debugging
            • Chapter 6 APP Stability Testing
            • Chapter 7 Application Testing
        • Device Development

          • Chapter 1 Environment Setup
          • Chapter 2 Download Source Code
          • Chapter 3 Compiling Source Code
        • Peripheral And Iinterface

          • Raspberry Pi interface
          • GPIO Interface
          • I2C Interface
          • SPI communication
          • PWM (Pulse Width Modulation) control
          • Serial port communication
          • TF Card
          • Display Screen
          • Touch
          • Audio
          • RTC
          • Ethernet
          • M.2
          • MINI-PCIE
          • Camera
          • WIFI&BT
          • Raspberry Pi expansion board
        • Frequently Asked Questions

          • Resource Downloads
      • M-K1HSE

        • Introduction

          • M-K1HSE Introduction
        • Quick Start

          • Development environment construction
          • Source code acquisition
          • Compilation Notes
          • Burning Guide
        • Peripherals and interfaces

          • 01 Audio
          • 02 RS485
          • 03 Display
        • System customization development

          • System transplant
          • System customization
          • Driver Development
          • System Debugging
          • OTA Update
    • EVS-Camera

      • CF-NRS1

        • 1. Introduction

          • Event Camera Technical Documentation
        • 2. Quick Start

          • Host driver and software installation
        • 3. SDK application development

          • API Usage Instructions
      • CF-CRA2

        • Introduction

          • About CF-NRS1
    • AI-model

      • 1684XB-32T

        • Introduction

          • AIBOX-1684XB-32 Introduction
        • Get started quickly

          • First time use
          • Network Configuration
          • Disk usage
          • Memory allocation
          • Fan Strategy
          • Firmware Upgrade
        • Deployment Tutorial

          • Algorithm deployment
          • Deploy Llama3 Example
        • Application Development

          • Sophgo SDK Development
          • Sophon LLM_api_server development
          • Deploy MiniCPM-V-2_6
          • Qwen-2-5-VL Image and Video Recognition DEMO
          • Qwen3-chat-DEMO
          • Qwen3-Qwen Agent-MCP-Demo
          • Qwen3-langchain-AI Agent
      • 1684X-416T

        • Introduction

          • AIBOX-1684X-416 Introduction
        • Demo simple operation guide

          • Simple instructions for using shimeta smart monitoring demo
    • Core-Board

      • C-3568BQ

        • Introduction

          • C-3568BQ Overview
      • C-3588LQ

        • Introduction

          • C-3588LQ Introduction
      • GC-3568JBAF

        • Introduction

          • GC-3568JBAF Introduction
      • C-K1BA

        • Introduction

          • C-K1BA Introduction

01 Modification of the root directory file system

The method provided in this document is to modify the root directory file system by mounting img. The detailed operation tutorial is as follows

Take modifying linaro-rootfs.img as an example

1 Mount the root directory file system image

# 创建挂载文件夹
mkdir /mnt/GM_3568JHF_root

# 挂载
sudo mount -o loop /home/ubuntu/SDK/debain/linaro-rootfs.img /mnt/GM_3568JHF_root
# /home/ubuntu/SDK/debain/linaro-rootfs.img:是 linaro-rootfs.img 所在路径

# 进入挂载目录
sudo chroot /mnt/GM_3568JHF_root /bin/bash

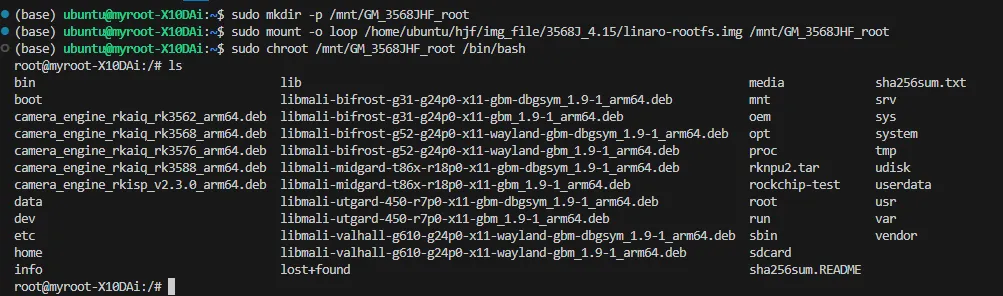
After executing the above command, you will enter the mounted root directory interface, as shown in the figure

rootfile1

You can then download the required installation package

2 Add files

2.1 Add files to the root directory

To add files to the root directory, you first need to mount the root directory file system image, and then copy the files to the mounted directory. Then enter the mounted directory to see the added files. Users can modify files in the mounted directory, such as modifying file permissions.

# 在根目录下添加文件
sudo mv /home/ubuntu/test.txt /mnt/GM_3568JHF_root

# 进入挂载目录
sudo chroot /mnt/GM_3568JHF_root /bin/bash

# 在挂载目录下对文件进行修改
chmod 777 ./test.txt

2.2 Add files in non-root directories

To add files to a non-root directory (such as the desktop directory), follow these steps:

# 创建需要添加文件的目录
sudo mkdir -p /mnt/GM_3568JHF_root/home
sudo mkdir -p /mnt/GM_3568JHF_root/home/linaro
sudo mkdir -p /mnt/GM_3568JHF_root/home/linaro/Desktop

# 移动文件到挂载的指定目录
sudo mv /home/ubuntu/test.txt /mnt/GM_3568JHF_root/home/linaro/Desktop

# 进入挂载目录
sudo chroot /mnt/GM_3568JHF_root /bin/bash

# 在挂载目录下对文件进行修改
cd /home/linaro/Desktop
chmod 777 ./test.txt

3. Cancel the mount after modification is completed

After the modification is completed, execute the following command to cancel the mount operation

# 取消挂载
sudo umount -l /mnt/GM_3568JHF_root
Edit this page on GitHub
Last Updated:
Contributors: zwhuang
Next
02 System auto-start service