05 Read USB device information example
1 Case Introduction
This case aims to test the reading function of the USB interface by reading the device information connected to the external USB interface
2. Preparation before the test
Before starting the test, please complete the following steps to prepare:
2.1 Install dependent libraries
Update the package index on the development board and install the libusb-1.0 library. This operation needs to be performed when the development board is connected to the network.
# 更新软件包索引
sudo apt update

# 安装libusb-1.0 库
sudo apt install libusb-1.0-0 libusb-1.0-0-dev
3 Operation process
Open the terminal and copy the executable program smdt_usb_r_demo in the bin directory of this case (05-Development Materials\Software Development Materials\linux_demo\smdt_usb_r_demo\bin) to the development board file system (the source code can be viewed in the src path).
Optional operation : Because the development board is equipped with a wireless network card, if the terminal keeps displaying the log information generated by the wireless network card driver, you can modify the display level of the Linux kernel log by using the following code.
#修改 Linux 内核日志的显示级别,内核的日志级别被设置为只显示紧急或更高级别的消息
echo 1 4 1 7 > /proc/sys/kernel/printk
Execute the following command in the terminal and switch to the directory where the smdt_usb_r_demo executable program is located.
#切换到 smdt_usb_r_demo 可执行程序所在目录
cd ‘the file's directory’

#查看 smdt_usb_r_demo 是否在该目录下
ls
If the executable file smdt_usb_r_demo is in the current directory, modify the permissions of the executable file.
#修改文件权限
chmod 777 smdt_usb_r_demo

#查询是否修改成功
ls -ld smdt_usb_r_demo
After confirming that the file modification permission is successful, execute ./smdt_usb_r_demo -h to view the help information of the program.
#查看帮助信息
./smdt_usb_r_demo -h
The execution result is as follows:

Execute ./smdt_usb_r_demo -l to read the USB external device information and continuously detect the device connection and disconnection status. Press "Ctrl+C" to exit the test.
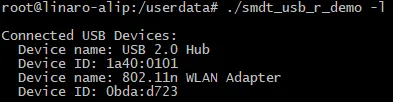
#检查外部 USB 连接设备信息
./smdt_usb_r_demo -l
4 Test results
Execute ./smdt_usb_r_demo -l to list the device information of the current external USB connection of the development board (does not display the virtual USB device of the Linux kernel). The execution result is as follows:
Continuously detect whether a USB device is connected or disconnected, with a detection interval of 5s
When a device is connected, the terminal prints the following information:

When a device is disconnected, the terminal responds with the following message:

Press "Ctrl+C" to exit the test:
