HOME
Shop
  • English
  • 简体中文
HOME
Shop
  • English
  • 简体中文
  • Product Series

    • FPGA+ARM

      • GM-3568JHF

        • 1. Introduction

          • GM-3568JHF Introduction
        • 2. Quick Start

          • 01 Environment Construction
          • 02 Compilation Instructions
          • 03 Burning Guide
          • 04 Debugging Tools
          • 05 Software Update
          • 06 View information
          • 07 Test Command
          • 08 Application Compilation
          • 09 Source code acquisition
        • 3. Peripherals and Interfaces

          • USB
          • Display and touch
          • Ethernet
          • WIFI
          • Bluetooth
          • TF-Card
          • Audio
          • Serial Port
          • CAN
          • RTC
        • 4. Application Development

          • 01 UART read and write case
          • 02 Key detection case
          • 03 LED light flashing case
          • 04 MIPI screen detection case
          • 05 Read USB device information example
          • 06 FAN Detection Case
          • 07 FPGA FSPI Communication Case
          • 08 FPGA DMA read and write case
          • 09 GPS debugging case
          • 10 Ethernet Test Cases
          • 11 RS485 reading and writing examples
          • 12 FPGA IIC read and write examples
          • 13 PN532 NFC card reader case
          • 14 TF card reading and writing case
        • 5. QT Development

          • 01 ARM64 cross compiler environment construction
          • 02 QT program added automatic startup service
        • 6. Others

          • 01 Modification of the root directory file system
          • 02 System auto-start service
    • ShimetaPi

      • M4-R1

        • Introduction

          • M4-R1 Introduction
        • Get started quickly

          • OpenHarmony概述
          • 镜像烧录
          • 开发环境准备
          • Hello World应用以及部署
        • Application Development

          • getting Started

            • 第一章 ArkTS语言简介
            • 第二章 UI组件介绍和实际应用(上)
            • 第三章 UI组件介绍和实际应用(中)
            • 第四章 UI组件介绍和实际应用(下)
          • Advanced

            • 第一章 入门指引
            • 第二章 三方库的引用和使用
            • 第三章 应用编译以及部署
            • 第四章 命令行恢复出厂设置
            • 第五章 系统调试--HDC调试
            • 第六章 APP 稳定性测试
            • 第七章 应用测试
        • Equipment Development

          • 第一章 环境搭建
          • 第二章 下载源码
          • 第三章 编译源码
        • Peripherals and interfaces

          • 树莓派接口
          • GPIO 接口
          • I2C 接口
          • SPI通信
          • PWM控制
          • 串口通讯
          • TF Card
          • 屏幕
          • 触摸
          • 音频
          • RTC
          • Ethernet
          • M.2
          • MINI-PCIE
          • Camera
          • WIFI&BT
          • 树莓派拓展板
        • Frequently asked questions

          • 资源下载
      • M5-R1

        • Introduction

          • Introduction to ShimetaPi M5-R1
    • OpenHarmony

      • SC-3568HA

        • Introduction

          • SC-3568HA Overview
        • Quick Start Guide

          • OpenHarmony Overview
          • Image Flashing
          • Setting Up the Development Environment
          • Hello World Application and Deployment
        • Application Development

          • ArkUI

            • Chapter 1 Introduction to ArkTS Language
            • Chapter 2 Introduction to UI Components and Practical Applications (Part 1)
            • Chapter 3 Introduction to UI Components and Practical Applications (Part 2)
            • Chapter 4 Introduction to UI Components and Practical Applications (Part 3)
          • Expand

            • Chapter 1 Getting Started Guide
            • Chapter 2 Referencing and Using Third-Party Libraries
            • Chapter 3: Application Compilation and Deployment
            • Chapter 4: Command-Line Factory Reset
            • Chapter 5: System Debugging -- HDC (Huawei Device Connector) Debugging
            • Chapter 6 APP Stability Testing
            • Chapter 7 Application Testing
        • Device Development

          • Chapter 1 Environment Setup
          • Chapter 2 Download Source Code
          • Chapter 3 Compiling Source Code
        • Peripheral And Iinterface

          • Raspberry Pi interface
          • GPIO Interface
          • I2C Interface
          • SPI communication
          • PWM (Pulse Width Modulation) control
          • Serial port communication
          • TF Card
          • Display Screen
          • Touch
          • Audio
          • RTC
          • Ethernet
          • M.2
          • MINI-PCIE
          • Camera
          • WIFI&BT
          • Raspberry Pi expansion board
        • Frequently Asked Questions

          • Resource Downloads
      • M-K1HSE

        • Introduction

          • M-K1HSE Introduction
        • Quick Start

          • Development environment construction
          • Source code acquisition
          • Compilation Notes
          • Burning Guide
        • Peripherals and interfaces

          • 01 Audio
          • 02 RS485
          • 03 Display
        • System customization development

          • System transplant
          • System customization
          • Driver Development
          • System Debugging
          • OTA Update
    • EVS-Camera

      • CF-NRS1

        • 1. Introduction

          • Event Camera Technical Documentation
        • 2. Quick Start

          • Host driver and software installation
        • 3. SDK application development

          • API Usage Instructions
      • CF-CRA2

        • Introduction

          • About CF-NRS1
    • AI-model

      • 1684XB-32T

        • Introduction

          • AIBOX-1684XB-32 Introduction
        • Get started quickly

          • First time use
          • Network Configuration
          • Disk usage
          • Memory allocation
          • Fan Strategy
          • Firmware Upgrade
        • Deployment Tutorial

          • Algorithm deployment
          • Deploy Llama3 Example
        • Application Development

          • Sophgo SDK Development
          • Sophon LLM_api_server development
          • Deploy MiniCPM-V-2_6
          • Qwen-2-5-VL Image and Video Recognition DEMO
          • Qwen3-chat-DEMO
          • Qwen3-Qwen Agent-MCP-Demo
          • Qwen3-langchain-AI Agent
      • 1684X-416T

        • Introduction

          • AIBOX-1684X-416 Introduction
        • Demo simple operation guide

          • Simple instructions for using shimeta smart monitoring demo
    • Core-Board

      • C-3568BQ

        • Introduction

          • C-3568BQ Overview
      • C-3588LQ

        • Introduction

          • C-3588LQ Introduction
      • GC-3568JBAF

        • Introduction

          • GC-3568JBAF Introduction
      • C-K1BA

        • Introduction

          • C-K1BA Introduction

Ethernet

The development board is equipped with 2 Gigabit network ports

  • ETH0 RGMII: end0, default network card.
  • ETH1 RGMII: end1.
  • Please use an Ethernet cable to connect the corresponding network port of the development board and the PC to the same router.

Network connectivity test

Enter the file system and execute the following command to obtain the IP and view the network port configuration information.

root@linaro-alip:/# ifconfig
end0: flags=4163<UP,BROADCAST,RUNNING,MULTICAST>  mtu 1500
        inet 192.168.49.176  netmask 255.255.255.0  broadcast 192.168.49.255
        inet6 fe80::561a:9e84:b5bd:20d7  prefixlen 64  scopeid 0x20<link>
        ether 32:b0:e6:11:eb:7e  txqueuelen 1000  (Ethernet)
        RX packets 3236  bytes 236287 (230.7 KiB)
        RX errors 0  dropped 569  overruns 0  frame 0
        TX packets 745  bytes 63449 (61.9 KiB)
        TX errors 0  dropped 0 overruns 0  carrier 0  collisions 0
        device interrupt 69

end1: flags=4099<UP,BROADCAST,MULTICAST>  mtu 1500
        ether 36:b0:e6:11:eb:7e  txqueuelen 1000  (Ethernet)
        RX packets 0  bytes 0 (0.0 B)
        RX errors 0  dropped 0  overruns 0  frame 0
        TX packets 0  bytes 0 (0.0 B)
        TX errors 0  dropped 0 overruns 0  carrier 0  collisions 0
        device interrupt 67

Execute the following command to test whether the network port is connected to the external network normally, taking "www.baidu.com" as an example. "-I" represents the specified network port, and without "-I", the default network card is used. You can press "Ctrl + C" to terminate the ping command.

root@linaro-alip:/# ping www.baidu.com -I end0
PING www.a.shifen.com (183.2.172.42) 56(84) bytes of data.
64 bytes from 183.2.172.42 (183.2.172.42): icmp_seq=1 ttl=50 time=9.28 ms
64 bytes from 183.2.172.42 (183.2.172.42): icmp_seq=2 ttl=50 time=8.77 ms
64 bytes from 183.2.172.42 (183.2.172.42): icmp_seq=3 ttl=50 time=8.65 ms
64 bytes from 183.2.172.42 (183.2.172.42): icmp_seq=4 ttl=50 time=8.83 ms
64 bytes from 183.2.172.42 (183.2.172.42): icmp_seq=5 ttl=50 time=8.63 ms
64 bytes from 183.2.172.42 (183.2.172.42): icmp_seq=6 ttl=50 time=8.73 ms

--- www.a.shifen.com ping statistics ---
6 packets transmitted, 6 received, 0% packet loss, time 5007ms
rtt min/avg/max/mdev = 8.630/8.813/9.275/0.216 ms

root@linaro-alip:/# ping www.baidu.com -I end1
PING www.a.shifen.com (183.2.172.42) 56(84) bytes of data.
64 bytes from 183.2.172.42 (183.2.172.42): icmp_seq=1 ttl=50 time=8.35 ms
64 bytes from 183.2.172.42 (183.2.172.42): icmp_seq=2 ttl=50 time=8.88 ms
64 bytes from 183.2.172.42 (183.2.172.42): icmp_seq=3 ttl=50 time=9.07 ms
64 bytes from 183.2.172.42 (183.2.172.42): icmp_seq=4 ttl=50 time=8.91 ms
64 bytes from 183.2.172.42 (183.2.172.42): icmp_seq=5 ttl=50 time=8.67 ms
64 bytes from 183.2.172.42 (183.2.172.42): icmp_seq=6 ttl=50 time=8.66 ms
64 bytes from 183.2.172.42 (183.2.172.42): icmp_seq=7 ttl=50 time=8.78 ms
64 bytes from 183.2.172.42 (183.2.172.42): icmp_seq=8 ttl=50 time=8.41 ms

--- www.a.shifen.com ping statistics ---
8 packets transmitted, 8 received, 0% packet loss, time 7011ms
rtt min/avg/max/mdev = 8.352/8.716/9.068/0.230 ms

TCP Bandwidth Test

Server

Install the iperf3 tool on the development board and run the following command:

root@linaro-alip:/# sudo apt update
root@linaro-alip:/# sudo apt install iperf3

The development board acts as the server and executes the following commands:

root@linaro-alip:/# iperf3 -s
-----------------------------------------------------------
Server listening on 5201 (test #1)
-----------------------------------------------------------

Client

The iperf3 tool for Windows can be obtained in the test tool kit.

Open PowerShell in the Windows system, enter the path where the iperf3 tool is located, and use Windows as the client to send data. Execute the following command:

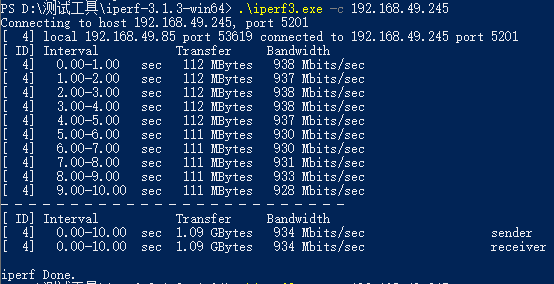
.\iperf3.exe -c 192.168.137.149 // 192.168.137.149为服务端IP地址

Test Results

  • Server
root@linaro-alip:/# iperf3 -s
-----------------------------------------------------------
Server listening on 5201 (test #1)
-----------------------------------------------------------
Accepted connection from 192.168.49.85, port 53618
[  5] local 192.168.49.245 port 5201 connected to 192.168.49.85 port 53619
[ ID] Interval           Transfer     Bitrate
[  5]   0.00-1.00   sec   112 MBytes   936 Mbits/sec
[  5]   1.00-2.00   sec   112 MBytes   937 Mbits/sec
[  5]   2.00-3.00   sec   112 MBytes   939 Mbits/sec
[  5]   3.00-4.00   sec   112 MBytes   938 Mbits/sec
[  5]   4.00-5.00   sec   112 MBytes   937 Mbits/sec
[  5]   5.00-6.00   sec   111 MBytes   931 Mbits/sec
[  5]   6.00-7.00   sec   111 MBytes   929 Mbits/sec
[  5]   7.00-8.00   sec   111 MBytes   930 Mbits/sec
[  5]   8.00-9.00   sec   111 MBytes   933 Mbits/sec
[  5]   9.00-10.00  sec   111 MBytes   929 Mbits/sec
[  5]  10.00-10.00  sec   265 KBytes   885 Mbits/sec
- - - - - - - - - - - - - - - - - - - - - - - - -
[ ID] Interval           Transfer     Bitrate
[  5]   0.00-10.00  sec  1.09 GBytes   934 Mbits/sec                  receiver
-----------------------------------------------------------
  • Client

ETH

Edit this page on GitHub
Last Updated:
Contributors: zsl, zwhuang
Prev
Display and touch
Next
WIFI