首页
商城
  • English
  • 简体中文
首页
商城
  • English
  • 简体中文
  • 产品系列

    • FPGA+ARM

      • GM-3568JHF

        • 一、简介

          • GM-3568JHF 简介
        • 二、快速开始

          • 00 前言
          • 01 环境搭建
          • 02 编译说明
          • 03 烧录指南
          • 04 调试工具
          • 05 软件更新
          • 06 查看信息
          • 07 测试命令
          • 08 应用编译
          • 09 源码获取
        • 三、外设与接口

          • 01 USB
          • 02 显示与触摸
          • 03 以太网
          • 04 WIFI
          • 05 蓝牙
          • 06 TF-Card
          • 07 音频
          • 08 串口
          • 09 CAN
          • 10 RTC
        • 四、应用开发

          • 01 UART读写案例
          • 02 按键检测案例
          • 03 LED灯闪烁案例
          • 04 MIPI屏幕检测案例
          • 05 读取 USB 设备信息案例
          • 06 FAN 检测案例
          • 07 FPGA FSPI 通信案例
          • 08 FPGA DMA 读写案例
          • 09 GPS调试案例
          • 10 以太网测试案例
          • 11 RS485读写案例
          • 12 FPGA IIC 读写案例
          • 13 PN532 NFC读卡案例
          • 14 TF卡读写案例
        • 五、QT开发

          • 01 ARM64交叉编译器环境搭建
          • 02 QT 程序加入开机自启服务
        • 六、RKNN_NPU开发

          • 01 RK3568 NPU 概述
          • 02 开发环境搭建
          • 运行官方 YOLOv5 示例
        • 七、FPGA开发

          • ARM与FPGA通讯
          • FPGA开发手册
        • 八、其他

          • 01 根目录文件系统的修改
          • 02 系统自启服务
        • 九、资料下载

          • 资料下载
    • ShimetaPi

      • M4-R1

        • 一、简介

          • M4-R1简介
        • 二、快速上手

          • 01 OpenHarmony概述
          • 02 镜像烧录
          • 03 应用开发快速上手
          • 04 设备开发快速上手
        • 三、应用开发

          • 01 ArkUI

            • 1 ArkTS语言简介
            • 2 UI 组件-Row 容器介绍
            • 3 UI 组件-Column 容器介绍
            • 4 UI 组件-Text 组件
            • 5 UI 组件-Toggle 组件
            • 6 UI 组件-Slider 组件
            • 7 UI 组件-Animation 组件&Transition 组件
          • 02 资料获取

            • 1 OpenHarmony 官方资料
          • 03 开发须知

            • 1 Full-SDK替换教程
            • 2 引入和使用三方库
            • 3 HDC调试
            • 4 命令行恢复出厂模式
            • 5 升级App为system权限
          • 04 构建第一个应用

            • 1 构建第一个ArkTs应用-HelloWorld
          • 05 案例

            • 01 串口调试助手应用案例
            • 02 手写板应用案例
            • 03 数字时钟应用案例
            • 04 WIFI 信息获取应用案例
        • 四、设备开发

          • 1 Ubuntu环境开发

            • 01 环境搭建
            • 02 下载源码
            • 03 编译源码
          • 2 使用DevEco Device Tool 工具

            • 01 工具简介
            • 02 开发环境的搭建
            • 03 导入SDK
            • 04 HUAWEI DevEco Tool 功能介绍
        • 五、内核外设与接口

          • 01 指南
          • 02 设备树介绍
          • 03 NAPI 入门
          • 04 ArkTS入门
          • 05 NAPI开发实战演示
          • 06 GPIO介绍
          • 07 I2C通讯
          • 08 SPI通信
          • 09 PWM 控制
          • 10 串口通讯
          • 11 TF卡
          • 12 屏幕
          • 13 触摸
          • 14 Ethernet(以太网)
          • 15 M.2 硬盘
          • 16 音频
          • 17 WIFI & BT
          • 18 摄像头
        • 六、资料下载

          • 资料下载
      • M5-R1

        • 一、简介

          • M5-R1 开发文档
        • 二、快速上手

          • 镜像烧录
          • 环境搭建
          • 下载源码
        • 三、外设与接口

          • 树莓派接口
          • GPIO 接口
          • I2C 接口
          • SPI通信
          • PWM控制
          • 串口通讯
          • TF Card
          • 屏幕
          • 触摸
          • 音频
          • RTC
          • Ethernet
          • M.2
          • MINI-PCIE
          • Camera
          • WIFI&BT
        • 四、资料下载

          • 资料下载
      • Pico-G1

        • 一、产品概述

          • 01 芯片与硬件平台介绍
          • 02 SDK版本说明
        • 二、快速入门

          • 01 开发环境搭建
          • 02 镜像编译
          • 03 镜像烧录
          • 04 系统登录
          • 05 网络配置
          • 06 文件传输
          • 07 SDK目录结构
          • 08 部署第一个应用程序
          • 09 部署第一个驱动程序
          • 10 SD卡挂载
        • 三、外设与接口

          • 01 GPIO控制
          • 02 UART串口通信
          • 03 I2C 通信
          • 04 SPI 通信
        • 四、MPP媒体开发

          • 01 MPP媒体处理软件
          • 02 图像处理链路
          • 03 视频输入
          • 04 图像编码
        • 五、NPU与AI

          • 01 NPU驱动与运行库架构
          • 02 .xmm 模型加载
          • 03 SVP视频处理
          • 04 AI降噪 (AI_NR)
        • 六、应用程序示例

          • 01 区域运动检测应用
          • 02 MTCNN 人脸检测应用
    • 开源鸿蒙

      • SC-3568HA

        • 一、简介

          • SC-3568HA简介
        • 二、快速上手

          • OpenHarmony概述
          • 镜像烧录
          • 开发环境准备
          • Hello World应用以及部署
        • 三、应用开发

          • ArkUI

            • 第一章 ArkTS语言简介
            • 第二章 UI组件介绍和实际应用(上)
            • 第三章 UI组件介绍和实际应用(中)
            • 第四章 UI组件介绍和实际应用(下)
          • 拓展

            • 第一章 入门指引
            • 第二章 三方库的引用和使用
            • 第三章 应用编译以及部署
            • 第四章 命令行恢复出厂设置
            • 第五章 系统调试--HDC调试
            • 第六章 APP 稳定性测试
            • 第七章 应用测试
        • 四、设备开发

          • 第一章 环境搭建
          • 第二章 下载源码
          • 第三章 编译源码
        • 五、内核的外设与接口

          • 树莓派接口
          • GPIO 接口
          • I2C 接口
          • SPI通信
          • PWM控制
          • 串口通讯
          • TF Card
          • 屏幕
          • 触摸
          • 音频
          • RTC
          • Ethernet
          • M.2
          • MINI-PCIE
          • Camera
          • WIFI&BT
          • 树莓派拓展板
        • 六、资料下载

          • 资料下载
      • M-K1HSE

        • 一、简介

          • M-K1HSE 简介
        • 二、快速开始

          • 开发环境搭建
          • 源码获取
          • 编译说明
          • 烧录指南
        • 三、应用开发

          • 00 应用开发环境搭建
          • 01 第一个应用-Hello World
        • 四、外设与接口

          • 01 Audio
          • 02 RS485
          • 03 Display
        • 五、系统定制开发

          • 系统移植
          • 系统定制
          • 驱动开发
          • 系统调试
          • OTA升级
        • 六、资料下载

          • 资料下载
    • EVS相机

      • CF-NRS1

        • 一、简介

          • 01-产品介绍
          • 02-相关概念
          • 03-MultiVision Studio 介绍
        • 二、开发

          • 01-ShiMetaPi Hybrid vision SDK 介绍
          • 02-Hybrid_vision_toolkit
          • 03-Hybrid_vision_toolkit API (C++)
          • 04 Hybrid Vision algo
          • 05 Hybrid vision algo API
          • 06 EVS Network Server
          • 07 EVS Time Sync
          • 08 Web Window
        • 三、资料下载

          • 资料下载
        • 四、常见问题

          • 常见问题解决指南
      • CF-CRA2

        • 一、简介

          • CF-NRS2 简介
        • 二、资料下载

          • 资料下载
      • EVS模块

        • 一、相关概念
        • 二、硬件准备与环境配置
        • 三、示例程序使用指南
        • 资料下载
    • AI硬件

      • 1684XB-32T

        • 一、简介

          • AIBOX-1684XB-32简介
        • 二、快速上手

          • 初次使用
          • 网络配置
          • 磁盘使用
          • 内存分配
          • 风扇策略
          • 固件升级
          • 交叉编译
          • 模型量化
        • 三、应用开发

          • 开发简介

            • Sophgo SDK开发
            • SOPHON-DEMO简介
          • 大语言模型

            • 部署Llama3示例
            • Sophon LLM_api_server开发
            • 部署MiniCPM-V-2_6
            • Qwen-2-5-VL图片视频识别DEMO
            • Qwen3-chat-DEMO
            • Qwen3-Qwen Agent-MCP开发
            • Qwen3-langchain-AI Agent
          • 深度学习

            • ResNet(图像分类)
            • LPRNet(车牌识别)
            • SAM(通用图像分割基础模型)
            • YOLOv5(目标检测)
            • OpenPose(人体关键点检测)
            • PP-OCR(光学字符识别)
        • 四、资料下载

          • 资料下载
      • 1684X-416T

        • 简介

          • AIBOX-1684X-416简介
        • Demo简单操作指引

          • shimeta智慧监控demo的简单使用说明
      • RDK-X5

        • 简介

          • RDK-X5 硬件简介
        • 快速开始

          • RDK-X5 快速开始
        • 应用开发

          • AI在线模型开发

            • 实验01-接入火山引擎豆包 AI
            • 实验02-图片分析
            • 实验03-多模态视觉分析定位
            • 实验04-多模态图文比较分析
            • 实验05-多模态文档表格分析
            • 实验06-摄像头运用-AI视觉分析
          • 大语言模型

            • 实验01-语音识别
            • 实验02-语音对话
            • 实验03-多模态图片分析-语音对话
            • 实验04-多模态图片比较-语音对话
            • 实验05-多模态文档分析-语音对话
            • 实验06-多模态视觉运用-语音对话
          • ROS2基础开发

            • 实验01-搭建环境
            • 实验02-工作包的创建及编译
            • 实验03-运行 ROS2 话题通信节点
            • 实验04-ROS2 相机应用
          • 40pin-IO开发

            • 实验01-GPIO 输出(LED闪烁)
            • 实验02-GPIO 输入
            • 实验03-按键控制 LED
            • 实验04-PWM 输出
            • 实验05-串口输出
            • 实验06-IIC 实验
            • 实验07-SPI 实验
          • USB模块开发使用

            • 实验01-USB 语音模块使用
            • 实验02-声源定位模块使用
          • 机器视觉技术实战

            • 实验01-打开 USB 摄像头
            • 实验02-颜色识别检测
            • 实验03-手势识别体验
            • 实验04-YOLOv5物体检测
      • RDK-S100

        • 简介

          • RDK-S100 硬件简介
        • 快速开始

          • RDK-S100 硬件简介
        • 应用开发

          • AI在线模型开发

            • 实验01-接入火山引擎豆包 AI
            • 实验02-图片分析
            • 实验03-多模态视觉分析定位
            • 实验04-多模态图文比较分析
            • 实验05-多模态文档表格分析
            • 实验06-摄像头运用-AI视觉分析
          • 大语言模型

            • 实验01-语音识别
            • 实验02-语音对话
            • 实验03-多模态图片分析-语音对话
            • 实验04-多模态图片比较-语音对话
            • 实验05-多模态文档分析-语音对话
            • 实验06-多模态视觉运用-语音对话
          • ROS2基础开发

            • 实验01-搭建环境
            • 实验02-工作包的创建及编译
            • 实验03-运行 ROS2 话题通信节点
            • 实验04-ROS2 相机应用
          • 40pin-IO开发

            • 实验01-GPIO 输出(LED闪烁)
            • 实验02-GPIO 输入
            • 实验03-按键控制 LED
            • 实验04-PWM 输出
            • 实验05-串口输出
            • 实验06-IIC 实验
            • 实验07-SPI 实验
          • USB模块开发使用

            • 实验01-USB 语音模块使用
            • 实验02-声源定位模块使用
          • 机器视觉技术实战

            • 实验01-打开 USB 摄像头
            • 实验02-图像处理基础
            • 实验03-目标检测
            • 实验04-图像分割
    • 核心板

      • C-3568BQ

        • 简介

          • C-3568BQ 简介
      • C-3588LQ

        • 简介

          • C-3588LQ 简介
      • GC-3568JBAF

        • 简介

          • GC-3568JBAF 简介
      • C-K1BA

        • 简介

          • C-K1BA 简介

第四章 UI组件介绍和实际应用(下)

通过前几章的学习,我们已经对 OpenHarmony 的一些基础组件和布局方式有了初步的了解。在本章中,我们将结合多个组件的使用,通过一个数字时钟的完整示例,进一步巩固学习的内容。本示例会展示如何使用 OpenHarmony 的动画功能、状态管理,以及滑动条和切换开关等组件,帮助您更好地理解和应用 ArkUI 框架。
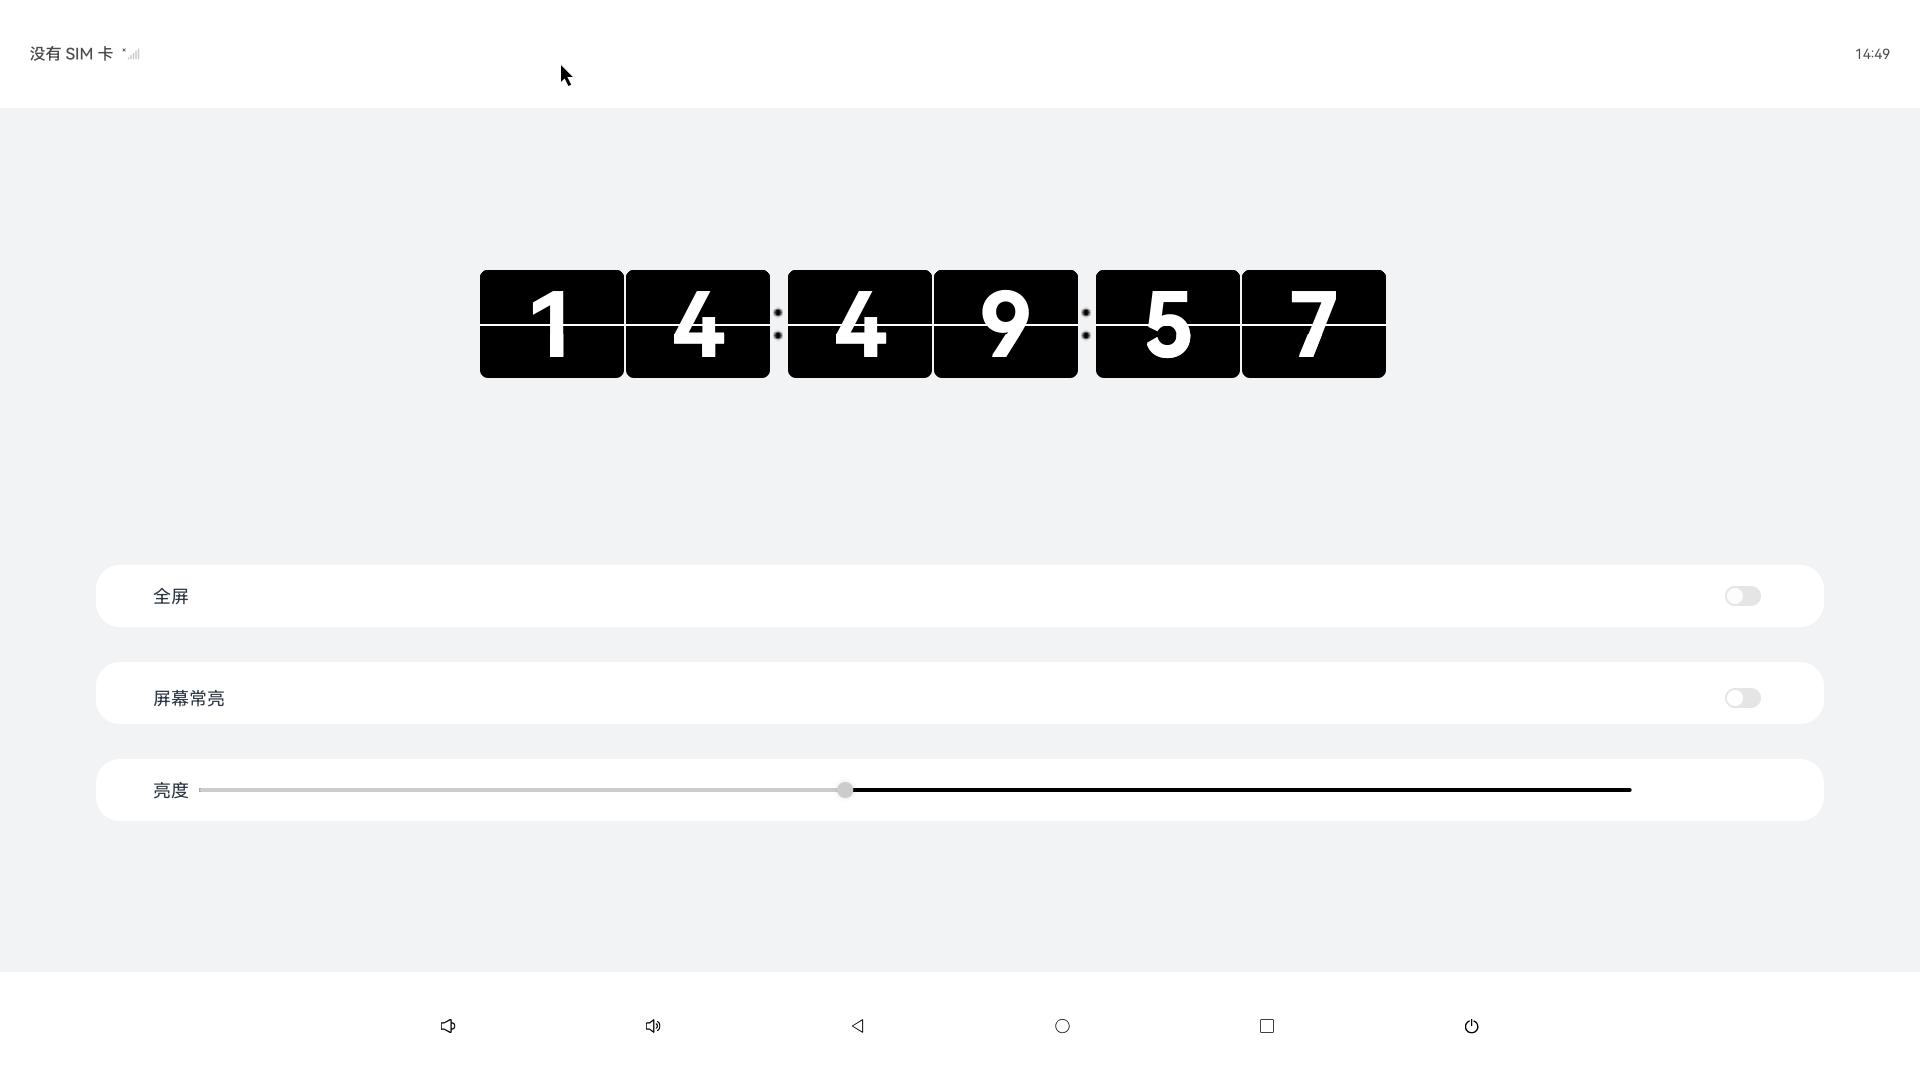
1. 示例演示

经过前几章的学习,我们对一些基本的组件也有大概的一些了解,若想了解更多可以到鸿蒙官网了解更多

提示

鸿蒙官网

我们将实现一个动态数字时钟,时钟能够显示实时更新的时间,并包含以下:

核心功能:时间动态更新:通过动画实现数字的翻页效果。亮度调节:使用滑动条组件动态设置屏幕亮度。全屏模式切换:使用开关组件实现全屏模式和常规模式的切换。关键组件:

Text:用于显示时钟数字。Slider:滑动条,用于调整屏幕亮度。Toggle:开关,用于全屏切换功能。动画功能:实现数字翻页效果。

TOOL

1.1 数字闹钟主要部分代码:

    //修改时间
	changeTime(): Array<number> {
		const time = new Date()
		const hour = time.getHours()
		const hourOne = Math.floor(hour / 10)
		const hourTwo = hour % 10
		const minutesOne = Math.floor(time.getMinutes() / 10)
		const minutesTwo = time.getMinutes() % 10
		const secondsOne = Math.floor(time.getSeconds() / 10)
		const secondsTwo = time.getSeconds() % 10
		return [hourOne, hourTwo, minutesOne, minutesTwo, secondsOne, secondsTwo]
	}

	@Builder box(num : number) {
		Column() {
		Divider()
			.zIndex(5)
			.strokeWidth(2)
			.color(Color.White)
			.position({ x: 0, y: '50%' })

		Text(`${this.timeOne[num]}`)
			.zIndex(1)
			.height(108)
			.width('100%')
			.borderRadius(8)
			.fontWeight(700)
			.padding({ top: 0 })
			.fontSize(90)
			.position({ x: 0, y: 0 })
			.fontColor(Color.White)
			.fontFamily('Monospace')
			.backgroundColor($r('app.color.text_bg'))
			.textAlign(TextAlign.Center)

		Text(`${this.timeTwo[num]}`)
			.zIndex(2)
			.height(64)
			.width('100%')
			.fontWeight(700)
			.borderRadius(8)
			.padding({ top: 3 })
			.fontSize(90)
			.position({ x: 0, y: 0 })
			.fontColor(Color.White)
			.fontFamily('Monospace')
			.backgroundColor($r('app.color.text_bg'))
			.textAlign(TextAlign.Center)

		Text(`${this.timeThree[num]}`)
			.zIndex(4)
			.height(64)
			.width('100%')
			.fontWeight(700)
			.borderRadius(8)
			.padding({ top: 3 })
			.fontSize(90)
			.position({ x: 0, y: 0 })
			.fontColor(Color.White)
			.fontFamily('Monospace')
			.textAlign(TextAlign.Center)
			.backgroundColor($r('app.color.text_bg'))
			.rotate({
			x: 1,
			y: 0,
			z: 0,
			centerX: '50%',
			centerY: '100%',
			angle: this.angleOne[num]
			})

		Text(`${this.timeFour[num]}`)
			.zIndex(3)
			.height(108)
			.width('100%')
			.fontWeight(700)
			.borderRadius(8)
			.padding({ top: 0 })
			.fontSize(90)
			.position({ x: 0, y: 0 })
			.fontColor(Color.White)
			.fontFamily('Monospace')
			.backgroundColor($r('app.color.text_bg'))
			.textAlign(TextAlign.Center)
			.rotate({
			x: 1,
			y: 0,
			z: 0,
			centerX: '50%',
			centerY: '50%',
			angle: this.angleTwo[num]
			})
		}
		.height(108)
		.width('50%')
	}

1.2 动画旋转部分代码:

		animationOne(i : number): void {
		animateTo({
		duration: 250,
		delay: 0,
		iterations: 1,
		onFinish: () => {
			this.animationTwo(i)
			this.angleOne[i] = 0
		}
		}, () => this.angleOne[i] = 90)
	}

	animationTwo(i : number): void {
		animateTo({
		duration: 250,
		delay: 0,
		iterations: 1,
		onFinish: () => {
			this.angleTwo[i] = -90
		}
		}, () => this.angleTwo[i] = 0)
	}

1.3 全屏部分代码:

	this.isFullScreen = !this.isFullScreen
		try {
			let win = await window.getLastWindow(getContext(this))
			let names = this.isFullScreen ? [] : ['status', 'navigation']
			await win.setWindowSystemBarEnable(names as Array<'status' | 'navigation'>)
			}

完整代码展示 :

	import { brightness } from '@kit.BasicServicesKit';
	import { LockSwitch } from './LockSwitch';
	import { window } from '@kit.ArkUI';

	@Entry
	@Component
	struct Index {
	@State message: string = 'Hello World';
	@State timeOne: Array<number> = []
	@State timeTwo: Array<number> = []
	@State timeThree: Array<number> = []
	@State timeFour: Array<number> = []
	@State angleOne: Array<number> = [0, 0, 0, 0, 0, 0]
	@State angleTwo: Array<number> = [-90, -90, -90, -90, -90, -90]

	@State isFullScreen: boolean = false
	@State inSetValue: number = 40


	aboutToAppear() {
		const arr = this.changeTime()
		this.timeOne = [...arr]
		this.timeTwo = [...arr]
		this.timeThree = [...arr]
		this.timeFour = [...arr]
		setInterval(() => {
		const time = new Date()
		if (this.timeOne[5] != time.getSeconds() % 10) {
			const arr = this.changeTime()
			for (let i = 0;i < 6; i++) {
			if (arr[i] != this.timeFour[i]) {
				this.timeFour[i] = arr[i]
				this.animationOne(i)
				setTimeout(() => {
				this.timeTwo[i] = arr[i]
				}, 100)
				setTimeout(() => {
				this.timeThree[i] = arr[i]
				}, 150)
				setTimeout(() => {
				this.timeOne[i] = arr[i]
				}, 240)
			}
			}
		}
		}, 1000)
	}

	animationOne(i : number): void {
		animateTo({
		duration: 250,
		delay: 0,
		iterations: 1,
		onFinish: () => {
			this.animationTwo(i)
			this.angleOne[i] = 0
		}
		}, () => this.angleOne[i] = 90)
	}

	animationTwo(i : number): void {
		animateTo({
		duration: 250,
		delay: 0,
		iterations: 1,
		onFinish: () => {
			this.angleTwo[i] = -90
		}
		}, () => this.angleTwo[i] = 0)
	}

	setBrightness(): void {
		brightness.setValue(this.inSetValue)
	}

	//修改时间
	changeTime(): Array<number> {
		const time = new Date()
		const hour = time.getHours()
		const hourOne = Math.floor(hour / 10)
		const hourTwo = hour % 10
		const minutesOne = Math.floor(time.getMinutes() / 10)
		const minutesTwo = time.getMinutes() % 10
		const secondsOne = Math.floor(time.getSeconds() / 10)
		const secondsTwo = time.getSeconds() % 10
		return [hourOne, hourTwo, minutesOne, minutesTwo, secondsOne, secondsTwo]
	}

	@Builder box(num : number) {
		Column() {
		Divider()
			.zIndex(5)
			.strokeWidth(2)
			.color(Color.White)
			.position({ x: 0, y: '50%' })

		Text(`${this.timeOne[num]}`)
			.zIndex(1)
			.height(108)
			.width('100%')
			.borderRadius(8)
			.fontWeight(700)
			.padding({ top: 0 })
			.fontSize(90)
			.position({ x: 0, y: 0 })
			.fontColor(Color.White)
			.fontFamily('Monospace')
			.backgroundColor($r('app.color.text_bg'))
			.textAlign(TextAlign.Center)

		Text(`${this.timeTwo[num]}`)
			.zIndex(2)
			.height(64)
			.width('100%')
			.fontWeight(700)
			.borderRadius(8)
			.padding({ top: 3 })
			.fontSize(90)
			.position({ x: 0, y: 0 })
			.fontColor(Color.White)
			.fontFamily('Monospace')
			.backgroundColor($r('app.color.text_bg'))
			.textAlign(TextAlign.Center)

		Text(`${this.timeThree[num]}`)
			.zIndex(4)
			.height(64)
			.width('100%')
			.fontWeight(700)
			.borderRadius(8)
			.padding({ top: 3 })
			.fontSize(90)
			.position({ x: 0, y: 0 })
			.fontColor(Color.White)
			.fontFamily('Monospace')
			.textAlign(TextAlign.Center)
			.backgroundColor($r('app.color.text_bg'))
			.rotate({
			x: 1,
			y: 0,
			z: 0,
			centerX: '50%',
			centerY: '100%',
			angle: this.angleOne[num]
			})

		Text(`${this.timeFour[num]}`)
			.zIndex(3)
			.height(108)
			.width('100%')
			.fontWeight(700)
			.borderRadius(8)
			.padding({ top: 0 })
			.fontSize(90)
			.position({ x: 0, y: 0 })
			.fontColor(Color.White)
			.fontFamily('Monospace')
			.backgroundColor($r('app.color.text_bg'))
			.textAlign(TextAlign.Center)
			.rotate({
			x: 1,
			y: 0,
			z: 0,
			centerX: '50%',
			centerY: '50%',
			angle: this.angleTwo[num]
			})
		}
		.height(108)
		.width('50%')
	}

	build() {
		Column() {
		Row() {
			Row({ space: 2 }) {
			this.box(0)
			this.box(1)
			}
			.width('30%')
			.height('30%')

			Image($r('app.media.dot'))
			.width(20)
			.height(50)

			Row({ space: 2 }) {
			this.box(2)
			this.box(3)
			}
			.width('30%')
			.height('30%')

			Image($r('app.media.dot'))
			.width(20)
			.height(50)

			Row({ space: 2 }) {
			this.box(4)
			this.box(5)
			}
			.width('30%')
			.height('30%')
		}
		.id('currentTimeBox')
		.width('50%')
		.height('50%')


		Column({ space: 10 }) {
			Divider()
			.strokeWidth(5)
			.color($r('app.color.divider_bg'))

			Row() {
			Text($r("app.string.fullScreen")).fontSize(18)

			Blank()

			Toggle({ type: ToggleType.Switch, isOn: this.isFullScreen })
				.switchPointColor(0xe5ffffff)
				.onChange(async () => {
				this.isFullScreen = !this.isFullScreen
				try {
					let win = await window.getLastWindow(getContext(this))
					let names = this.isFullScreen ? [] : ['status', 'navigation']
					await win.setWindowSystemBarEnable(names as Array<'status' | 'navigation'>)
				} catch (err) {
					console.info(`setFullScreen fail, code = ${err.code}`)
				}
				})
			}
			.width('90%')
			.height(62)
			.borderRadius(24)
			.margin({ top: 10 })
			.backgroundColor(Color.White)
			.padding({ left: '3%', right: '3%' })

			Divider()
			.strokeWidth(5)
			.color($r('app.color.divider_bg'))

			Row() {
			Lock()
			}
			.width('90%')
			.height(62)
			.borderRadius(24)
			.margin({ top: 10 })
			.backgroundColor(Color.White)
			.padding({ left: '3%', right: '3%' })

			Divider()
			.strokeWidth(5)
			.color($r('app.color.divider_bg'))

			Row() {
			Text($r("app.string.brightness"))
				.fontSize(18)

			Slider({
				value: this.inSetValue,
				min: 0,
				max: 255,
				step: 5,
				style: SliderStyle.OutSet
			})
				.id('brightness')
				.width('90%')
				.showTips(false)
				.showSteps(false)
				.blockColor(0xCCCCCC)
				.trackColor(Color.Black)
				.selectedColor(0xCCCCCC)
				.onChange((value: number, mode: SliderChangeMode) => {
				this.inSetValue = value
				this.setBrightness()
				})
			}
			.width('90%')
			.height(62)
			.borderRadius(24)
			.margin({ top: 10 })
			.backgroundColor(Color.White)
			.padding({ left: '3%', right: '3%' })

			Divider()
			.strokeWidth(5)
			.color($r('app.color.divider_bg'))
		}
		.height('100%')

		}
		.width('100%')
		.height('100%')
		.backgroundColor('#F1F3F5')
		.justifyContent(FlexAlign.Center)
	}
	}

	@Component
	struct Lock {
	@State isComTime: boolean = true

	build() {
		Flex({ direction: FlexDirection.Column, alignItems: ItemAlign.Center, justifyContent: FlexAlign.Center }) {
		Column() {
			LockSwitch({ isComTime: $isComTime })
		}
		.width('100%')
		}
	}
	}

源码地址 : 示例源码


在 GitHub 上编辑此页
上次更新:
贡献者: hychen