HOME
Shop
  • English
  • 简体中文
HOME
Shop
  • English
  • 简体中文
  • Product Series

    • FPGA+ARM

      • GM-3568JHF

        • 1. Introduction

          • About GM-3568JHF
        • 2. Quick Start

          • 00 Introduction
          • 01 Environment Setup
          • 02 Compilation Instructions
          • 03 Flashing Guide
          • 04 Debug Tools
          • 05 Software Update
          • 06 View Information
          • 07 Test Commands
          • 08 App Compilation
          • 09 Source Code Acquisition
        • 3. Peripherals and Interfaces

          • 01 USB
          • 02 Display and Touch
          • 03 Ethernet
          • 04 WIFI
          • 05 Bluetooth
          • 06 TF-Card
          • 07 Audio
          • 08 Serial Port
          • 09 CAN
          • 10 RTC
        • 4. Application Development

          • 01 UART read and write case
          • 02 Key detection case
          • 03 LED light flashing case
          • 04 MIPI screen detection case
          • 05 Read USB device information example
          • 06 FAN Detection Case
          • 07 FPGA FSPI Communication Case
          • 08 FPGA DMA read and write case
          • 09 GPS debugging case
          • 10 Ethernet Test Cases
          • 11 RS485 reading and writing examples
          • 12 FPGA IIC read and write examples
          • 13 PN532 NFC card reader case
          • 14 TF card reading and writing case
        • 5. QT Development

          • 01 ARM64 cross compiler environment construction
          • 02 QT program added automatic startup service
        • 6. RKNN_NPU Development

          • 01 RK3568 NPU Overview
          • 02 Development Environment Setup
          • Run Official YOLOv5 Example
          • Model Conversion Detailed Explanation
          • Run Custom Model on Board
        • 7. FPGA Development

          • ARM and FPGA Communication
          • /fpga-arm/GM-3568JHF/FPGA/ch02-FPGA-Development-Manual.html
        • 8. Others

          • 01 Modification of the root directory file system
          • 02 System auto-start service
        • 9. Download

          • Download Resources
    • ShimetaPi

      • M4-R1

        • 1. Introduction

          • 1.1 About M4-R1
        • 2. Quick Start

          • 2.1 OpenHarmony Overview
          • 2.2 Image Burning
          • 2.3 Development Environment Preparation
          • 2.4 Hello World Application
        • 3. Application Development

          • 3.1 Getting Started

            • 3.1.1 ArkTS Language Overview
            • 3.1.2 UI Components (Part 1)
            • 3.1.3 UI Components (Part 2)
            • 3.1.4 UI Components (Part 3)
          • 3.2 Advanced

            • 3.2.1 Getting Started Guide
            • 3.2.2 Usage of Third Party Libraries
            • 3.2.3 Deployment of the Application
            • 3.2.4 Factory Reset
            • 3.2.5 System Debug
            • 3.2.6 APP Stability Testing
            • 3.2.7 Application Testing
          • 3.3 Getting Docs

            • 3.3.1 Official Website Information
          • 3.4 Development Instructions

            • 3.4.1 Full SDK
            • 3.4.2 Introduction of Third Party Libraries
            • 3.4.3 Introduction of HDC Tool
            • 3.4.4 Restore Factory Mode
            • 3.4.5 Update System API
          • 3.5 First Application

            • 3.5.1 First ArkTS App
          • 3.6 Application Demo

            • 3.6.1 UART Tool
            • 3.6.2 Graphics Tablet
            • 3.6.3 Digital Clock
            • 3.6.4 WIFI Tool
        • 4. Device Development

          • 4.1 Ubuntu Environment Development

            • 4.1.1 Environment Setup
            • 4.1.2 Download Source Code
            • 4.1.3 Compile Source Code
          • 4.2 Using DevEco Device Tool

            • 4.2.1 Tool Introduction
            • 4.2.2 Environment Construction
            • 4.2.3 Import SDK
            • 4.2.4 Function Introduction
        • 5. Peripherals and Interfaces

          • 5.1 Raspberry Pi Interfaces
          • 5.2 GPIO Interface
          • 5.3 I2C Interface
          • 5.4 SPI Communication
          • 5.5 PWM Control
          • 5.6 Serial Port Communication
          • 5.7 TF Card Slot
          • 5.8 Display Screen
          • 5.9 Touch Screen
          • 5.10 Audio
          • 5.11 RTC
          • 5.12 Ethernet
          • 5.13 M.2
          • 5.14 MINI PCIE
          • 5.15 Camera
          • 5.16 WIFI BT
          • 5.17 HAT
        • 6. FAQ

          • 6.1 Download Link
      • M5-R1

        • 1. Introduction

          • M5-R1 Development Documentation
        • 2. Quick Start

          • OpenHarmony Overview
          • Image Burning
          • Development Environment Preparation
          • Hello World Application and Deployment
        • 3. Peripherals and Interfaces

          • 3.1 Raspberry Pi Interfaces
          • 3.2 GPIO Interface
          • 3.3 I2C Interface
          • 3.4 SPI Communication
          • 3.5 PWM Control
          • 3.6 Serial Port Communication
          • 3.7 TF Card Slot
          • 3.8 Display Screen
          • 3.9 Touch Screen
          • 3.10 Audio
          • 3.11 RTC
          • 3.12 Ethernet
          • 3.13 M.2
          • 3.14 MINI PCIE
          • 3.15 Camera
          • 3.16 WIFI BT
          • 3.17 HAT
        • 4. Application Development

          • 4.1 Getting Started

            • 4.1.1 ArkTS Language Overview
            • 4.1.2 UI Components (Part 1)
            • 4.1.3 UI Components (Part 2)
            • 4.1.4 UI Components (Part 3)
          • 4.2 Advanced

            • 4.2.1 Getting Started Guide
            • 4.2.2 Usage of Third Party Libraries
            • 4.2.3 Deployment of the Application
            • 4.2.4 Factory Reset
            • 4.2.5 System Debug
            • 4.2.6 APP Stability Testing
            • 4.2.7 Application Testing
        • 5. Device Development

          • 5.1 Environment Setup
          • 5.2 Download Source Code
          • 5.3 Compile Source Code
        • 6. Download

          • Data Download
    • OpenHarmony

      • SC-3568HA

        • 1. Introduction

          • 1.1 About SC-3568HA
        • 2. Quick Start

          • 2.1 OpenHarmony Overview
          • 2.2 Image Burning
          • 2.3 Development Environment Preparation
          • 2.4 Hello World Application
        • 3. Application Development

          • 3.1 ArkUI

            • 3.1.1 ArkTS Language Overview
            • 3.1.2 UI Components (Part 1)
            • 3.1.3 UI Components (Part 2)
            • 3.1.4 UI Components (Part 3)
          • 3.2 Advanced

            • 3.2.1 Getting Started Guide
            • 3.2.2 Usage of Third Party Libraries
            • 3.2.3 Deployment of the Application
            • 3.2.4 Factory Reset
            • 3.2.5 System Debug
            • 3.2.6 APP Stability Testing
            • 3.2.7 Application Testing
        • 4. Device Development

          • 4.1 Environment Setup
          • 4.2 Download Source Code
          • 4.3 Compile Source Code
        • 5. Peripherals and Interfaces

          • 5.1 Raspberry Pi Interfaces
          • 5.2 GPIO Interface
          • 5.3 I2C Interface
          • 5.4 SPI Communication
          • 5.5 PWM Control
          • 5.6 Serial Port Communication
          • 5.7 TF Card Slot
          • 5.8 Display Screen
          • 5.9 Touch Screen
          • 5.10 Audio
          • 5.11 RTC
          • 5.12 Ethernet
          • 5.13 M.2
          • 5.14 MINI PCIE
          • 5.15 Camera
          • 5.16 WIFI BT
          • 5.17 HAT
        • 6. FAQ

          • 6.1 Download Link
      • M-K1HSE

        • 1. Introduction

          • 1.1 Product Introduction
        • 2. Quick Start

          • 2.1 Debug Tool Installation
          • 2.2 Development Environment Setup
          • 2.3 Source Code Download
          • 2.4 Build Instructions
          • 2.5 Flashing Guide
          • 2.6 APT Update Sources
          • 2.7 View Board Info
          • 2.8 CLI LED and Key Test
          • 2.9 GCC Build Programs
        • 3. Application Development

          • 3.1 Basic Application Development

            • 3.1.1 Development Environment Preparation
            • 3.1.2 First Application HelloWorld
            • 3.1.3 Develop HAR Package
          • 3.2 Peripheral Application Cases

            • 3.2.1 UART Read/Write
            • 3.2.2 Key Demo
            • 3.2.3 LED Flash
        • 4. Peripherals and Interfaces

          • 4.1 Standard Peripherals

            • 4.1.1 USB
            • 4.1.2 Display and Touch
            • 4.1.3 Ethernet
            • 4.1.4 WIFI
            • 4.1.5 Bluetooth
            • 4.1.6 TF Card
            • 4.1.7 Audio
            • 4.1.8 Serial Port
            • 4.1.9 CAN
            • 4.1.10 RTC
          • 4.2 Interfaces

            • 4.2.1 Audio
            • 4.2.2 RS485
            • 4.2.3 Display
            • 4.2.4 Touch
        • 5. System Customization Development

          • 5.1 System Porting
          • 5.2 System Customization
          • 5.3 Driver Development
          • 5.4 System Debugging
          • 5.5 OTA Upgrade
        • 6. Download

          • 6.1 Download
    • EVS-Camera

      • CF-NRS1

        • 1. Introduction

          • 1.1 About CF-NRS1
          • 1.2 Event-Based Concepts
          • 1.3 Quick Start
          • 1.4 Resources
        • 2. Development

          • 2.1 Development Overview

            • 2.1.1 Shimetapi Hybrid Camera SDK Introduction
          • 2.2 Environment & API

            • 2.2.1 Environment Overview
            • 2.2.2 Development API Overview
          • 2.3 Linux Development

            • 2.3.1 Linux SDK Introduction
            • 2.3.2 Linux SDK API
            • 2.3.3 Linux Algorithm
            • 2.3.4 Linux Algorithm API
          • 2.4 Service & Web

            • 2.4.1 EVS Server
            • 2.4.2 Time Server
            • 2.4.3 EVS Web
        • 3. Download

          • 3.1 Download
        • 4. Common Problems

          • 4.1 Common Problems
      • CF-CRA2

        • 1. Introduction

          • 1.1 About CF-CRA2
        • 2. Download

          • 2.1 Download
      • EVS Module

        • 1. Related Concepts
        • 2. Hardware Preparation and Environment Configuration
        • 3. Example Program User Guide
        • Resources Download
    • AI-model

      • 1684XB-32T

        • 1. Introduction

          • AIBOX-1684XB-32 Introduction
        • 2. Quick Start

          • First time use
          • Network Configuration
          • Disk usage
          • Memory allocation
          • Fan Strategy
          • Firmware Upgrade
          • Cross-Compilation
          • Model Quantization
        • 3. Application Development

          • 3.1 Development Introduction

            • Sophgo SDK Development
            • SOPHON-DEMO Introduction
          • 3.2 Large Language Models

            • Deploying Llama3 Example
            • /ai-model/AIBOX-1684XB-32/application-development/LLM/Sophon_LLM_api_server-Development-AIBOX-1684XB-32.html
            • /ai-model/AIBOX-1684XB-32/application-development/LLM/MiniCPM-V-2_6-AIBOX-1684XB-32.html
            • /ai-model/AIBOX-1684XB-32/application-development/LLM/Qwen-2-5-VL-demo-Development-AIBOX-1684XB-32.html
            • /ai-model/AIBOX-1684XB-32/application-development/LLM/Qwen-3-chat-demo-Development-AIBOX-1684XB-32.html
            • /ai-model/AIBOX-1684XB-32/application-development/LLM/Qwen3-Qwen Agent-MCP.html
            • /ai-model/AIBOX-1684XB-32/application-development/LLM/Qwen3-langchain-AI Agent.html
          • 3.3 Deep Learning

            • ResNet (Image Classification)
            • LPRNet (License Plate Recognition)
            • SAM (Universal Image Segmentation Foundation Model)
            • YOLOv5 (Object Detection)
            • OpenPose (Human Keypoint Detection)
            • PP-OCR (Optical Character Recognition)
        • 4. Download

          • Resource Download
      • 1684X-416T

        • 1. Introduction

          • AIBOX-1684X-416 Introduction
        • 2. Demo Simple Operation Guide

          • Simple instructions for using shimeta smart monitoring demo
      • RDK-X5

        • 1. Introduction

          • RDK-X5 Hardware Introduction
        • 2. Quick Start

          • RDK-X5 Quick Start
        • 3. Application Development

          • 3.1 AI Online Model Development

            • AI Online Development - Experiment01
            • AI Online Development - Experiment02
            • AI Online Development - Experiment03
            • AI Online Development - Experiment04
            • AI Online Development - Experiment05
            • AI Online Development - Experiment06
          • 3.2 Large Language Models (Voice)

            • Voice LLM Application - Experiment01
            • Voice LLM Application - Experiment02
            • Voice LLM Application - Experiment03
            • Voice LLM Application - Experiment04
            • Voice LLM Application - Experiment05
            • Voice LLM Application - Experiment06
          • 3.3 40pin-IO Development

            • 40pin IO Development - Experiment01
            • 40pin IO Development - Experiment02
            • 40pin IO Development - Experiment03
            • 40pin IO Development - Experiment04
            • 40pin IO Development - Experiment05
            • 40pin IO Development - Experiment06
            • 40pin IO Development - Experiment07
          • 3.4 USB Module Development

            • USB Module Usage - Experiment01
            • USB Module Usage - Experiment02
          • 3.5 Machine Vision

            • Machine Vision Technology Development - Experiment01
            • Machine Vision Technology Development - Experiment02
            • Machine Vision Technology Development - Experiment03
            • Machine Vision Technology Development - Experiment04
          • 3.6 ROS2 Base Development

            • ROS2 Basic Development - Experiment01
            • ROS2 Basic Development - Experiment02
            • ROS2 Basic Development - Experiment03
            • ROS2 Basic Development - Experiment04
      • RDK-S100

        • 1. Introduction

          • 1.1 About RDK-S100
        • 2. Quick Start

          • 2.1 First Use
        • 3. Application Development

          • 3.1 AI Online Model Development

            • 3.1.1 Volcano Engine Doubao AI
            • 3.1.2 Image Analysis
            • 3.1.3 Multimodal Visual Analysis
            • 3.1.4 Multimodal Image Comparison
            • 3.1.5 Multimodal Document Analysis
            • 3.1.6 Camera AI Vision Analysis
          • 3.2 Large Language Models

            • 3.2.1 Speech Recognition
            • 3.2.2 Voice Conversation
            • 3.2.3 Multimodal Image Analysis
            • 3.2.4 Multimodal Image Comparison
            • 3.2.5 Multimodal Document Analysis
            • 3.2.6 Multimodal Vision Application
          • 3.3 40pin-IO Development

            • 3.3.1 GPIO Output LED Blink
            • 3.3.2 GPIO Input
            • 3.3.3 Key Control LED
            • 3.3.4 PWM Output
            • 3.3.5 Serial Output
            • 3.3.6 I2C Experiment
          • 3.4 USB Module Development

            • 3.4.1 USB Voice Module
            • 3.4.2 Sound Source Localization
          • 3.5 Machine Vision

            • 3.5.1 USB Camera
            • 3.5.2 Image Processing Basics
            • 3.5.3 Object Detection
            • 3.5.4 Image Segmentation
          • 3.6 ROS2 Base Development

            • 3.6.1 Environment Setup
            • 3.6.2 Create and Build Workspace
            • 3.6.3 ROS2 Topic Communication
            • 3.6.4 ROS2 Camera Application
    • Core-Board

      • C-3568BQ

        • 1. Introduction

          • C-3568BQ Introduction
      • C-3588LQ

        • 1. Introduction

          • C-3588LQ Introduction
      • GC-3568JBAF

        • 1. Introduction

          • GC-3568JBAF Introduction
      • C-K1BA

        • 1. Introduction

          • C-K1BA Introduction

Machine Vision Technology Development

Experiment 2 - Color Recognition Detection

  1. pip install opencv-python # Download open-cv database (Also need to install python3 yourself, can skip if already downloaded)
  2. cd OPENCV # Open OPENCV package
  3. sudo python3 ./color_detection.py # Run py file

Terminal displays:

TOOL

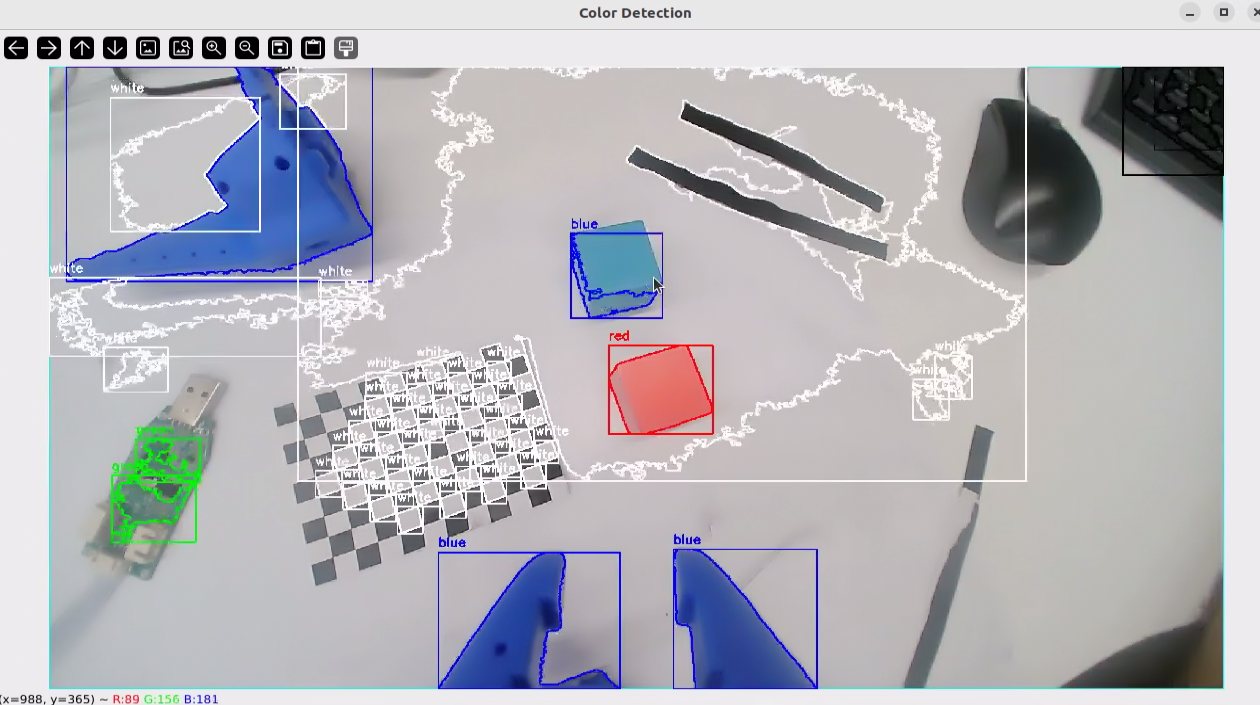
At this time, the Linux system will display the camera's real-time video. We need to test the keys under the window focus, the effect is as follows:

TOOL
#!/usr/bin/env python
# -*- coding: utf-8 -*-

"""
Multi-color simultaneous recognition program
Function: Real-time recognition of multiple color objects in camera
"""

import cv2
import numpy as np
import sys
import os
import argparse

def main():
    """
    Main function: Open camera and perform multi-color simultaneous recognition
    """
    # Parse command line arguments
    parser = argparse.ArgumentParser(description='Multi-color simultaneous recognition program')
    parser.add_argument('--width', type=int, default=2560, help='Display window width')
    parser.add_argument('--height', type=int, default=1440, help='Display window height')
    args = parser.parse_args()

    # Open default camera
    cap = cv2.VideoCapture(0)

    # Check if camera opened successfully
    if not cap.isOpened():
        print("Error: Unable to open camera")
        sys.exit(1)

    # Set camera resolution
    cap.set(cv2.CAP_PROP_FRAME_WIDTH, args.width)
    cap.set(cv2.CAP_PROP_FRAME_HEIGHT, args.height)

    # Create windows and set sizes
    cv2.namedWindow('Original', cv2.WINDOW_NORMAL)
    cv2.namedWindow('Color Detection', cv2.WINDOW_NORMAL)
    cv2.namedWindow('Controls', cv2.WINDOW_NORMAL)

    # Set window sizes
    cv2.resizeWindow('Original', args.width // 2, args.height // 2)
    cv2.resizeWindow('Color Detection', args.width // 2, args.height // 2)
    cv2.resizeWindow('Controls', 600, 300)

    # Create HSV color range sliders
    cv2.createTrackbar('H_min', 'Controls', 0, 179, lambda x: None)
    cv2.createTrackbar('H_max', 'Controls', 179, 179, lambda x: None)
    cv2.createTrackbar('S_min', 'Controls', 0, 255, lambda x: None)
    cv2.createTrackbar('S_max', 'Controls', 255, 255, lambda x: None)
    cv2.createTrackbar('V_min', 'Controls', 0, 255, lambda x: None)
    cv2.createTrackbar('V_max', 'Controls', 255, 255, lambda x: None)

    # Define color ranges and corresponding color names and display colors
    color_ranges = {
        'red': {
            'ranges': [(0, 50, 50), (10, 255, 255), (160, 50, 50), (179, 255, 255)],  # Red has two ranges
            'color': (0, 0, 255)  # BGR format: Blue=0, Green=0, Red=255
        },
        'green': {
            'ranges': [(35, 50, 50), (85, 255, 255)],
            'color': (0, 255, 0)  # BGR format: Blue=0, Green=255, Red=0
        },
        'blue': {
            'ranges': [(100, 50, 50), (130, 255, 255)],
            'color': (255, 0, 0)  # BGR format: Blue=255, Green=0, Red=0
        },
        'yellow': {
            'ranges': [(20, 100, 100), (30, 255, 255)],
            'color': (0, 255, 255)  # BGR format: Blue=0, Green=255, Red=255
        },
        'white': {
            'ranges': [(0, 0, 200), (180, 30, 255)],
            'color': (255, 255, 255)  # BGR format: Blue=255, Green=255, Red=255
        },
        'black': {
            'ranges': [(0, 0, 0), (180, 255, 30)],
            'color': (0, 0, 0)  # BGR format: Blue=0, Green=0, Red=0
        }
    }

    # Set initial slider positions for custom color
    cv2.setTrackbarPos('H_min', 'Controls', 0)
    cv2.setTrackbarPos('S_min', 'Controls', 0)
    cv2.setTrackbarPos('V_min', 'Controls', 0)
    cv2.setTrackbarPos('H_max', 'Controls', 179)
    cv2.setTrackbarPos('S_max', 'Controls', 255)
    cv2.setTrackbarPos('V_max', 'Controls', 255)

    print("Multi-color simultaneous recognition program started")
    print("Key instructions:")
    print("- 'q': Exit program")
    print("- 's': Save current frame and detection results")
    print("- '+'/'-': Adjust window size")

    # Loop to read camera frames
    while True:
        # Read a frame
        ret, frame = cap.read()

        # If failed to read, exit loop
        if not ret:
            print("Error: Unable to read camera frame")
            break

        # Convert to HSV color space
        hsv = cv2.cvtColor(frame, cv2.COLOR_BGR2HSV)

        # Get current slider values (for custom color detection)
        h_min = cv2.getTrackbarPos('H_min', 'Controls')
        h_max = cv2.getTrackbarPos('H_max', 'Controls')
        s_min = cv2.getTrackbarPos('S_min', 'Controls')
        s_max = cv2.getTrackbarPos('S_max', 'Controls')
        v_min = cv2.getTrackbarPos('V_min', 'Controls')
        v_max = cv2.getTrackbarPos('V_max', 'Controls')

        # Create custom color mask
        custom_lower = np.array([h_min, s_min, v_min])
        custom_upper = np.array([h_max, s_max, v_max])
        custom_mask = cv2.inRange(hsv, custom_lower, custom_upper)

        # Create detection result image
        detection_frame = frame.copy()

        # Process custom color
        contours, _ = cv2.findContours(custom_mask, cv2.RETR_EXTERNAL, cv2.CHAIN_APPROX_SIMPLE)
        for contour in contours:
            area = cv2.contourArea(contour)
            if area < 500:  # Ignore too small contours
                continue

            # Draw contour
            cv2.drawContours(detection_frame, [contour], -1, (255, 255, 0), 2)  # Cyan

            # Calculate bounding rectangle
            x, y, w, h = cv2.boundingRect(contour)

            # Display "Custom" above rectangle
            cv2.putText(detection_frame, "Custom", (x, y - 10),
                        cv2.FONT_HERSHEY_SIMPLEX, 0.7, (255, 255, 0), 2)

            # Draw rectangle
            cv2.rectangle(detection_frame, (x, y), (x + w, y + h), (255, 255, 0), 2)

        # Detect each predefined color
        for color_name, color_info in color_ranges.items():
            # Create mask
            if color_name == 'red':  # Red needs special treatment (two ranges)
                lower1 = np.array(color_info['ranges'][0])
                upper1 = np.array(color_info['ranges'][1])
                lower2 = np.array(color_info['ranges'][2])
                upper2 = np.array(color_info['ranges'][3])

                mask1 = cv2.inRange(hsv, lower1, upper1)
                mask2 = cv2.inRange(hsv, lower2, upper2)
                color_mask = cv2.bitwise_or(mask1, mask2)
            else:
                lower = np.array(color_info['ranges'][0])
                upper = np.array(color_info['ranges'][1])
                color_mask = cv2.inRange(hsv, lower, upper)

            # Find contours
            contours, _ = cv2.findContours(color_mask, cv2.RETR_EXTERNAL, cv2.CHAIN_APPROX_SIMPLE)

            # Process contours
            for contour in contours:
                area = cv2.contourArea(contour)
                if area < 500:  # Ignore too small contours
                    continue

                # Draw contour
                cv2.drawContours(detection_frame, [contour], -1, color_info['color'], 2)

                # Calculate bounding rectangle
                x, y, w, h = cv2.boundingRect(contour)

                # Display color name above rectangle
                cv2.putText(detection_frame, color_name, (x, y - 10),
                            cv2.FONT_HERSHEY_SIMPLEX, 0.7, color_info['color'], 2)

                # Draw rectangle
                cv2.rectangle(detection_frame, (x, y), (x + w, y + h), color_info['color'], 2)

        # Display images
        cv2.imshow('Original', frame)
        cv2.imshow('Color Detection', detection_frame)

        # Wait for key press
        key = cv2.waitKey(30) & 0xFF

        # Handle key press
        if key == ord('q'):
            print("User exited program")
            break
        elif key == ord('s'):
            # Create save directory
            save_dir = "color_detection_images"
            if not os.path.exists(save_dir):
                os.makedirs(save_dir)

            # Generate file names
            import time
            timestamp = time.strftime("%Y%m%d_%H%M%S")
            original_filename = os.path.join(save_dir, f"original_{timestamp}.jpg")
            detection_filename = os.path.join(save_dir, f"detection_{timestamp}.jpg")

            # Save images
            cv2.imwrite(original_filename, frame)
            cv2.imwrite(detection_filename, detection_frame)
            print(f"Saved images: {original_filename}, {detection_filename}")
        elif key == ord('+') or key == ord('='):  # '=' and '+' are usually on the same key
            # Increase window size
            current_width = cv2.getWindowImageRect('Color Detection')[2]
            current_height = cv2.getWindowImageRect('Color Detection')[3]
            new_width = int(current_width * 1.1)
            new_height = int(current_height * 1.1)
            cv2.resizeWindow('Original', new_width, new_height)
            cv2.resizeWindow('Color Detection', new_width, new_height)
            print(f"Window size increased to: {new_width}x{new_height}")
        elif key == ord('-'):
            # Decrease window size
            current_width = cv2.getWindowImageRect('Color Detection')[2]
            current_height = cv2.getWindowImageRect('Color Detection')[3]
            new_width = int(current_width * 0.9)
            new_height = int(current_height * 0.9)
            cv2.resizeWindow('Original', new_width, new_height)
            cv2.resizeWindow('Color Detection', new_width, new_height)
            print(f"Window size decreased to: {new_width}x{new_height}")

    # Release resources
    cap.release()
    cv2.destroyAllWindows()
    print("Program exited")

if __name__ == "__main__":
    try:
        main()
    except Exception as e:
        print(f"Program error: {e}")
        sys.exit(1)
Edit this page on GitHub
Prev
Machine Vision Technology Development - Experiment01
Next
Machine Vision Technology Development - Experiment03