RDK-X5 Quick Start
System Basics
Connect to Wi-Fi
Use the Wi-Fi manager in the top-right system tray to connect to your network. Select the SSID and enter the password.
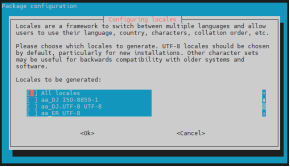
Enable SSH
SSH is enabled by default. You can toggle it from the system menu:
- Open RDK Configuration from the menu bar.
- Navigate to Interface Options → SSH.
- Enable or disable SSH as needed.
Login Mode
RDK-X5 supports four login modes:
- Desktop with auto login
- Desktop with manual login
- Console with auto login
- Console with manual login
To change the mode:
- Open RDK Configuration.
- Go to System Options → Boot / Auto Login.
- Select the desired mode and reboot.
System Flashing
Preparation
- RDK-X5 main board
- SD card reader
- Micro SD card (32GB or larger recommended)
Flashing Steps
- Download the RDK-X5 Ubuntu image and extract the
.imgfile. - Use a flashing tool like Rufus to write the image to the Micro SD card.
- Insert the SD card, connect HDMI, and power on the board.
The first boot completes initial setup in about 45 seconds and then shows the Ubuntu desktop.
Remote Login
SSH (Recommended)
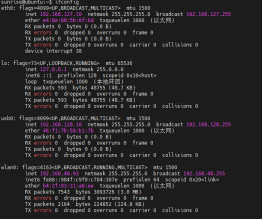
- Run
ifconfigon the RDK-X5 to get the IP address. - On your PC, connect using:
ssh sunrise@<ip-address>Default username/password: sunrise / sunrise.
NoMachine (Optional)
After SSH is working, you can use NoMachine for a remote desktop session if required.