HOME
Shop
  • English
  • 简体中文
HOME
Shop
  • English
  • 简体中文
  • Product Series

    • FPGA+ARM

      • GM-3568JHF

        • 1. Introduction

          • About GM-3568JHF
        • 2. Quick Start

          • 00 Introduction
          • 01 Environment Setup
          • 02 Compilation Instructions
          • 03 Flashing Guide
          • 04 Debug Tools
          • 05 Software Update
          • 06 View Information
          • 07 Test Commands
          • 08 App Compilation
          • 09 Source Code Acquisition
        • 3. Peripherals and Interfaces

          • 01 USB
          • 02 Display and Touch
          • 03 Ethernet
          • 04 WIFI
          • 05 Bluetooth
          • 06 TF-Card
          • 07 Audio
          • 08 Serial Port
          • 09 CAN
          • 10 RTC
        • 4. Application Development

          • 01 UART read and write case
          • 02 Key detection case
          • 03 LED light flashing case
          • 04 MIPI screen detection case
          • 05 Read USB device information example
          • 06 FAN Detection Case
          • 07 FPGA FSPI Communication Case
          • 08 FPGA DMA read and write case
          • 09 GPS debugging case
          • 10 Ethernet Test Cases
          • 11 RS485 reading and writing examples
          • 12 FPGA IIC read and write examples
          • 13 PN532 NFC card reader case
          • 14 TF card reading and writing case
        • 5. QT Development

          • 01 ARM64 cross compiler environment construction
          • 02 QT program added automatic startup service
        • 6. RKNN_NPU Development

          • 01 RK3568 NPU Overview
          • 02 Development Environment Setup
          • Run Official YOLOv5 Example
          • Model Conversion Detailed Explanation
          • Run Custom Model on Board
        • 7. FPGA Development

          • ARM and FPGA Communication
          • /fpga-arm/GM-3568JHF/FPGA/ch02-FPGA-Development-Manual.html
        • 8. Others

          • 01 Modification of the root directory file system
          • 02 System auto-start service
        • 9. Download

          • Download Resources
    • ShimetaPi

      • M4-R1

        • 1. Introduction

          • 1.1 About M4-R1
        • 2. Quick Start

          • 2.1 OpenHarmony Overview
          • 2.2 Image Burning
          • 2.3 Development Environment Preparation
          • 2.4 Hello World Application
        • 3. Application Development

          • 3.1 Getting Started

            • 3.1.1 ArkTS Language Overview
            • 3.1.2 UI Components (Part 1)
            • 3.1.3 UI Components (Part 2)
            • 3.1.4 UI Components (Part 3)
          • 3.2 Advanced

            • 3.2.1 Getting Started Guide
            • 3.2.2 Usage of Third Party Libraries
            • 3.2.3 Deployment of the Application
            • 3.2.4 Factory Reset
            • 3.2.5 System Debug
            • 3.2.6 APP Stability Testing
            • 3.2.7 Application Testing
          • 3.3 Getting Docs

            • 3.3.1 Official Website Information
          • 3.4 Development Instructions

            • 3.4.1 Full SDK
            • 3.4.2 Introduction of Third Party Libraries
            • 3.4.3 Introduction of HDC Tool
            • 3.4.4 Restore Factory Mode
            • 3.4.5 Update System API
          • 3.5 First Application

            • 3.5.1 First ArkTS App
          • 3.6 Application Demo

            • 3.6.1 UART Tool
            • 3.6.2 Graphics Tablet
            • 3.6.3 Digital Clock
            • 3.6.4 WIFI Tool
        • 4. Device Development

          • 4.1 Ubuntu Environment Development

            • 4.1.1 Environment Setup
            • 4.1.2 Download Source Code
            • 4.1.3 Compile Source Code
          • 4.2 Using DevEco Device Tool

            • 4.2.1 Tool Introduction
            • 4.2.2 Environment Construction
            • 4.2.3 Import SDK
            • 4.2.4 Function Introduction
        • 5. Peripherals and Interfaces

          • 5.1 Raspberry Pi Interfaces
          • 5.2 GPIO Interface
          • 5.3 I2C Interface
          • 5.4 SPI Communication
          • 5.5 PWM Control
          • 5.6 Serial Port Communication
          • 5.7 TF Card Slot
          • 5.8 Display Screen
          • 5.9 Touch Screen
          • 5.10 Audio
          • 5.11 RTC
          • 5.12 Ethernet
          • 5.13 M.2
          • 5.14 MINI PCIE
          • 5.15 Camera
          • 5.16 WIFI BT
          • 5.17 HAT
        • 6. FAQ

          • 6.1 Download Link
      • M5-R1

        • 1. Introduction

          • M5-R1 Development Documentation
        • 2. Quick Start

          • OpenHarmony Overview
          • Image Burning
          • Development Environment Preparation
          • Hello World Application and Deployment
        • 3. Peripherals and Interfaces

          • 3.1 Raspberry Pi Interfaces
          • 3.2 GPIO Interface
          • 3.3 I2C Interface
          • 3.4 SPI Communication
          • 3.5 PWM Control
          • 3.6 Serial Port Communication
          • 3.7 TF Card Slot
          • 3.8 Display Screen
          • 3.9 Touch Screen
          • 3.10 Audio
          • 3.11 RTC
          • 3.12 Ethernet
          • 3.13 M.2
          • 3.14 MINI PCIE
          • 3.15 Camera
          • 3.16 WIFI BT
          • 3.17 HAT
        • 4. Application Development

          • 4.1 Getting Started

            • 4.1.1 ArkTS Language Overview
            • 4.1.2 UI Components (Part 1)
            • 4.1.3 UI Components (Part 2)
            • 4.1.4 UI Components (Part 3)
          • 4.2 Advanced

            • 4.2.1 Getting Started Guide
            • 4.2.2 Usage of Third Party Libraries
            • 4.2.3 Deployment of the Application
            • 4.2.4 Factory Reset
            • 4.2.5 System Debug
            • 4.2.6 APP Stability Testing
            • 4.2.7 Application Testing
        • 5. Device Development

          • 5.1 Environment Setup
          • 5.2 Download Source Code
          • 5.3 Compile Source Code
        • 6. Download

          • Data Download
    • OpenHarmony

      • SC-3568HA

        • 1. Introduction

          • 1.1 About SC-3568HA
        • 2. Quick Start

          • 2.1 OpenHarmony Overview
          • 2.2 Image Burning
          • 2.3 Development Environment Preparation
          • 2.4 Hello World Application
        • 3. Application Development

          • 3.1 ArkUI

            • 3.1.1 ArkTS Language Overview
            • 3.1.2 UI Components (Part 1)
            • 3.1.3 UI Components (Part 2)
            • 3.1.4 UI Components (Part 3)
          • 3.2 Advanced

            • 3.2.1 Getting Started Guide
            • 3.2.2 Usage of Third Party Libraries
            • 3.2.3 Deployment of the Application
            • 3.2.4 Factory Reset
            • 3.2.5 System Debug
            • 3.2.6 APP Stability Testing
            • 3.2.7 Application Testing
        • 4. Device Development

          • 4.1 Environment Setup
          • 4.2 Download Source Code
          • 4.3 Compile Source Code
        • 5. Peripherals and Interfaces

          • 5.1 Raspberry Pi Interfaces
          • 5.2 GPIO Interface
          • 5.3 I2C Interface
          • 5.4 SPI Communication
          • 5.5 PWM Control
          • 5.6 Serial Port Communication
          • 5.7 TF Card Slot
          • 5.8 Display Screen
          • 5.9 Touch Screen
          • 5.10 Audio
          • 5.11 RTC
          • 5.12 Ethernet
          • 5.13 M.2
          • 5.14 MINI PCIE
          • 5.15 Camera
          • 5.16 WIFI BT
          • 5.17 HAT
        • 6. FAQ

          • 6.1 Download Link
      • M-K1HSE

        • 1. Introduction

          • 1.1 Product Introduction
        • 2. Quick Start

          • 2.1 Debug Tool Installation
          • 2.2 Development Environment Setup
          • 2.3 Source Code Download
          • 2.4 Build Instructions
          • 2.5 Flashing Guide
          • 2.6 APT Update Sources
          • 2.7 View Board Info
          • 2.8 CLI LED and Key Test
          • 2.9 GCC Build Programs
        • 3. Application Development

          • 3.1 Basic Application Development

            • 3.1.1 Development Environment Preparation
            • 3.1.2 First Application HelloWorld
            • 3.1.3 Develop HAR Package
          • 3.2 Peripheral Application Cases

            • 3.2.1 UART Read/Write
            • 3.2.2 Key Demo
            • 3.2.3 LED Flash
        • 4. Peripherals and Interfaces

          • 4.1 Standard Peripherals

            • 4.1.1 USB
            • 4.1.2 Display and Touch
            • 4.1.3 Ethernet
            • 4.1.4 WIFI
            • 4.1.5 Bluetooth
            • 4.1.6 TF Card
            • 4.1.7 Audio
            • 4.1.8 Serial Port
            • 4.1.9 CAN
            • 4.1.10 RTC
          • 4.2 Interfaces

            • 4.2.1 Audio
            • 4.2.2 RS485
            • 4.2.3 Display
            • 4.2.4 Touch
        • 5. System Customization Development

          • 5.1 System Porting
          • 5.2 System Customization
          • 5.3 Driver Development
          • 5.4 System Debugging
          • 5.5 OTA Upgrade
        • 6. Download

          • 6.1 Download
    • EVS-Camera

      • CF-NRS1

        • 1. Introduction

          • 1.1 About CF-NRS1
          • 1.2 Event-Based Concepts
          • 1.3 Quick Start
          • 1.4 Resources
        • 2. Development

          • 2.1 Development Overview

            • 2.1.1 Shimetapi Hybrid Camera SDK Introduction
          • 2.2 Environment & API

            • 2.2.1 Environment Overview
            • 2.2.2 Development API Overview
          • 2.3 Linux Development

            • 2.3.1 Linux SDK Introduction
            • 2.3.2 Linux SDK API
            • 2.3.3 Linux Algorithm
            • 2.3.4 Linux Algorithm API
          • 2.4 Service & Web

            • 2.4.1 EVS Server
            • 2.4.2 Time Server
            • 2.4.3 EVS Web
        • 3. Download

          • 3.1 Download
        • 4. Common Problems

          • 4.1 Common Problems
      • CF-CRA2

        • 1. Introduction

          • 1.1 About CF-CRA2
        • 2. Download

          • 2.1 Download
      • EVS Module

        • 1. Related Concepts
        • 2. Hardware Preparation and Environment Configuration
        • 3. Example Program User Guide
        • Resources Download
    • AI-model

      • 1684XB-32T

        • 1. Introduction

          • AIBOX-1684XB-32 Introduction
        • 2. Quick Start

          • First time use
          • Network Configuration
          • Disk usage
          • Memory allocation
          • Fan Strategy
          • Firmware Upgrade
          • Cross-Compilation
          • Model Quantization
        • 3. Application Development

          • 3.1 Development Introduction

            • Sophgo SDK Development
            • SOPHON-DEMO Introduction
          • 3.2 Large Language Models

            • Deploying Llama3 Example
            • /ai-model/AIBOX-1684XB-32/application-development/LLM/Sophon_LLM_api_server-Development-AIBOX-1684XB-32.html
            • /ai-model/AIBOX-1684XB-32/application-development/LLM/MiniCPM-V-2_6-AIBOX-1684XB-32.html
            • /ai-model/AIBOX-1684XB-32/application-development/LLM/Qwen-2-5-VL-demo-Development-AIBOX-1684XB-32.html
            • /ai-model/AIBOX-1684XB-32/application-development/LLM/Qwen-3-chat-demo-Development-AIBOX-1684XB-32.html
            • /ai-model/AIBOX-1684XB-32/application-development/LLM/Qwen3-Qwen Agent-MCP.html
            • /ai-model/AIBOX-1684XB-32/application-development/LLM/Qwen3-langchain-AI Agent.html
          • 3.3 Deep Learning

            • ResNet (Image Classification)
            • LPRNet (License Plate Recognition)
            • SAM (Universal Image Segmentation Foundation Model)
            • YOLOv5 (Object Detection)
            • OpenPose (Human Keypoint Detection)
            • PP-OCR (Optical Character Recognition)
        • 4. Download

          • Resource Download
      • 1684X-416T

        • 1. Introduction

          • AIBOX-1684X-416 Introduction
        • 2. Demo Simple Operation Guide

          • Simple instructions for using shimeta smart monitoring demo
      • RDK-X5

        • 1. Introduction

          • RDK-X5 Hardware Introduction
        • 2. Quick Start

          • RDK-X5 Quick Start
        • 3. Application Development

          • 3.1 AI Online Model Development

            • AI Online Development - Experiment01
            • AI Online Development - Experiment02
            • AI Online Development - Experiment03
            • AI Online Development - Experiment04
            • AI Online Development - Experiment05
            • AI Online Development - Experiment06
          • 3.2 Large Language Models (Voice)

            • Voice LLM Application - Experiment01
            • Voice LLM Application - Experiment02
            • Voice LLM Application - Experiment03
            • Voice LLM Application - Experiment04
            • Voice LLM Application - Experiment05
            • Voice LLM Application - Experiment06
          • 3.3 40pin-IO Development

            • 40pin IO Development - Experiment01
            • 40pin IO Development - Experiment02
            • 40pin IO Development - Experiment03
            • 40pin IO Development - Experiment04
            • 40pin IO Development - Experiment05
            • 40pin IO Development - Experiment06
            • 40pin IO Development - Experiment07
          • 3.4 USB Module Development

            • USB Module Usage - Experiment01
            • USB Module Usage - Experiment02
          • 3.5 Machine Vision

            • Machine Vision Technology Development - Experiment01
            • Machine Vision Technology Development - Experiment02
            • Machine Vision Technology Development - Experiment03
            • Machine Vision Technology Development - Experiment04
          • 3.6 ROS2 Base Development

            • ROS2 Basic Development - Experiment01
            • ROS2 Basic Development - Experiment02
            • ROS2 Basic Development - Experiment03
            • ROS2 Basic Development - Experiment04
      • RDK-S100

        • 1. Introduction

          • 1.1 About RDK-S100
        • 2. Quick Start

          • 2.1 First Use
        • 3. Application Development

          • 3.1 AI Online Model Development

            • 3.1.1 Volcano Engine Doubao AI
            • 3.1.2 Image Analysis
            • 3.1.3 Multimodal Visual Analysis
            • 3.1.4 Multimodal Image Comparison
            • 3.1.5 Multimodal Document Analysis
            • 3.1.6 Camera AI Vision Analysis
          • 3.2 Large Language Models

            • 3.2.1 Speech Recognition
            • 3.2.2 Voice Conversation
            • 3.2.3 Multimodal Image Analysis
            • 3.2.4 Multimodal Image Comparison
            • 3.2.5 Multimodal Document Analysis
            • 3.2.6 Multimodal Vision Application
          • 3.3 40pin-IO Development

            • 3.3.1 GPIO Output LED Blink
            • 3.3.2 GPIO Input
            • 3.3.3 Key Control LED
            • 3.3.4 PWM Output
            • 3.3.5 Serial Output
            • 3.3.6 I2C Experiment
          • 3.4 USB Module Development

            • 3.4.1 USB Voice Module
            • 3.4.2 Sound Source Localization
          • 3.5 Machine Vision

            • 3.5.1 USB Camera
            • 3.5.2 Image Processing Basics
            • 3.5.3 Object Detection
            • 3.5.4 Image Segmentation
          • 3.6 ROS2 Base Development

            • 3.6.1 Environment Setup
            • 3.6.2 Create and Build Workspace
            • 3.6.3 ROS2 Topic Communication
            • 3.6.4 ROS2 Camera Application
    • Core-Board

      • C-3568BQ

        • 1. Introduction

          • C-3568BQ Introduction
      • C-3588LQ

        • 1. Introduction

          • C-3588LQ Introduction
      • GC-3568JBAF

        • 1. Introduction

          • GC-3568JBAF Introduction
      • C-K1BA

        • 1. Introduction

          • C-K1BA Introduction

02 Development Environment Setup

1 Environment Setup Overview

Before starting, let's understand the architecture of the entire development environment:

┌─────────────────┐    Network Conn    ┌─────────────────┐
│   Host Dev PC   │ ←----------→  │  GM-3568JHF     │
│                 │               │   Dev Board     │
│ • RKNN-Toolkit2 │               │ • RKNN Runtime  │
│ • Python        │               │ • NPU Driver    │
│ • Dev Tools     │               │ • Linux System  │
└─────────────────┘               └─────────────────┘

Development Process:

  1. Convert the model using RKNN-Toolkit2 on the PC side.
  2. Transfer the converted model to the development board.
  3. Run the model using RKNN Runtime on the development board.

2 Development Board Environment Preparation

2.1 Install Python and Conda

# Download and install Anaconda or Miniconda
# Create a Python 3.9 environment named 'rknn' (RKNN-Toolkit2 is usually compatible with Python 3.6-3.9)
conda create -n rknn python=3.9 -y
conda activate rknn

conda environmentconda environment

When (rknn) appears before the command line, it means the rknn environment is successfully activated.

2.2 Install Pytorch and YOLOv5 Dependencies

Install the CPU version of Pytorch (GPU is not needed for model conversion):

pip install torch torchvision torchaudio --index-url https://download.pytorch.org/whl/cpu

Install Pytorch

Clone the YOLOv5 repository and install its dependencies:

git clone https://github.com/ultralytics/yolov5.git
cd yolov5
pip install -r requirements.txt

Install YOLOv5

Install other necessary libraries:

pip install opencv-python numpy onnx onnxsim onnxruntime

Install other libraries

2.3 Install RKNN-Toolkit2

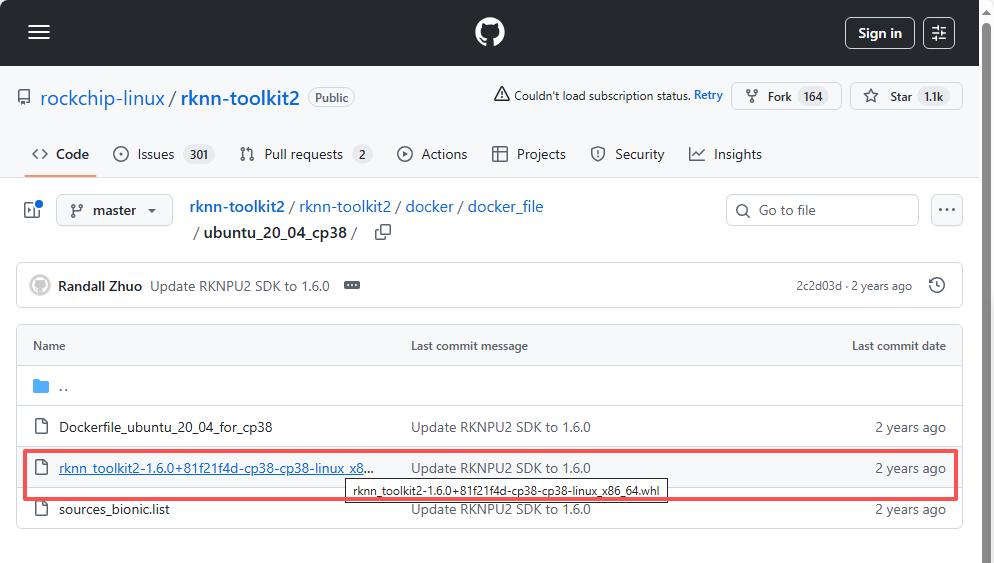
Step ①: Get the installation package

Visit https://github.com/rockchip-linux/rknn-toolkit2. Download the wheel file for Linux x86_64 in the rknn-toolkit2 / docker / docker_file /ubuntu_20_04_cp38 directory (rknn_toolkit2-1.6.0+81f21f4d-cp38-cp38-linux_x86_64.whl).

wheel

pip install rknn-toolkit2

Install RKNN-Toolkit2

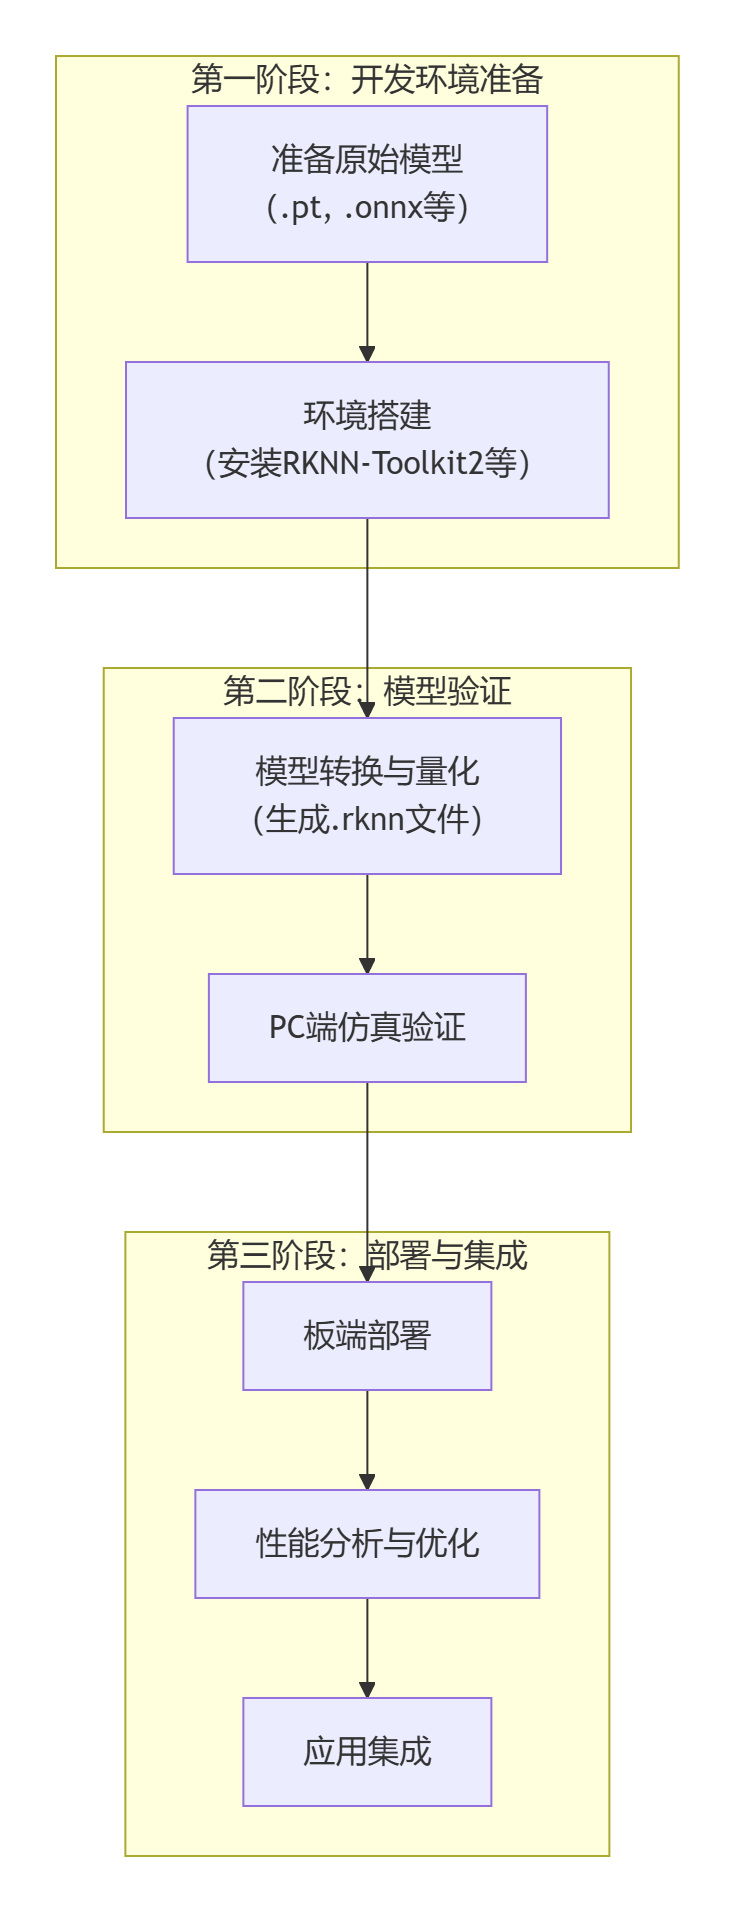
2.4 System Optimization Configuration

Why is system optimization needed?

Optimizing system configuration can improve NPU performance, reduce inference latency, and ensure stable model operation.

Memory Optimization

Step 1: Check current memory usage

# View memory usage
free -h

# View detailed memory information
cat /proc/meminfo | head -10

Step 2: Create Swap space (if memory is insufficient)

# Check if swap exists
swapon --show

# If memory is less than 4GB, it is recommended to create 2GB swap
sudo fallocate -l 2G /swapfile

# Set correct permissions
sudo chmod 600 /swapfile

# Create swap file system
sudo mkswap /swapfile

# Enable swap
sudo swapon /swapfile

# Verify swap is enabled
free -h

Step 3: Permanently enable Swap

# Add to fstab for automatic mounting on boot
echo '/swapfile none swap sw 0 0' | sudo tee -a /etc/fstab

# Verify fstab configuration
cat /etc/fstab | grep swap

Step 4: Adjust memory parameters

# Adjust swap usage tendency (reduce swap usage frequency)
echo 'vm.swappiness=10' | sudo tee -a /etc/sysctl.conf

# Adjust cache pressure
echo 'vm.vfs_cache_pressure=50' | sudo tee -a /etc/sysctl.conf

# Apply configuration (takes effect automatically after restart)
sudo sysctl -p

NPU Performance Optimization

Step 1: View NPU current status

# View NPU current frequency
cat /sys/class/devfreq/fdab0000.npu/cur_freq

# View NPU frequency scaling policy
cat /sys/class/devfreq/fdab0000.npu/governor

# View available frequency list
cat /sys/class/devfreq/fdab0000.npu/available_frequencies

Step 2: Set NPU performance mode

# Set to performance mode (highest performance)
echo performance | sudo tee /sys/class/devfreq/fdab0000.npu/governor

# Verify settings
cat /sys/class/devfreq/fdab0000.npu/governor

Step 3: Create performance optimization script

# Create optimization script
sudo nano /usr/local/bin/npu_performance.sh

Enter the following content:

#!/bin/bash
# NPU Performance Optimization Script

echo "Optimizing NPU performance..."

# Set NPU to performance mode
echo performance > /sys/class/devfreq/fdab0000.npu/governor

# Set CPU to performance mode (optional)
echo performance > /sys/devices/system/cpu/cpufreq/policy0/scaling_governor

# Disable CPU idle state (optional, will increase power consumption)
# echo 1 > /sys/devices/system/cpu/cpu0/cpuidle/state1/disable

echo "NPU performance optimization completed"
echo "Current NPU frequency: $(cat /sys/class/devfreq/fdab0000.npu/cur_freq)"
# Set execution permission
sudo chmod +x /usr/local/bin/npu_performance.sh

# Test script
sudo /usr/local/bin/npu_performance.sh

3 PC Side Environment Setup

3.1 Confirm PC System Requirements

System Compatibility Check

Supported Operating Systems (Sorted by recommendation):

  1. Ubuntu 20.04/22.04 LTS

    • Best compatibility
    • Main official test platform
    • Simple package management
  2. Windows 10/11 (x64)

    • Most users
    • Rich development tools
    • Requires extra configuration
  3. macOS 10.15+

    • Good development experience
    • Some functions may be limited

Hardware Requirements Check

Minimum Configuration:

  • CPU: Intel i5 or AMD Ryzen 5
  • Memory: 8GB RAM
  • Storage: 20GB available space
  • Network: Stable internet connection

Recommended Configuration:

  • CPU: Intel i7 or AMD Ryzen 7
  • Memory: 16GB+ RAM
  • Storage: 50GB+ SSD
  • Graphics Card: Independent graphics card (for large model training)

3.2 Install Python Environment

Why Choose Python?

Python is the main language for RKNN development, with a rich machine learning library ecosystem, low learning cost, and suitable for rapid prototyping.

Windows Environment Installation

Step 1: Download Python

  1. Visit Python Official Website
  2. Download Python 3.9.x (Recommended version, best compatibility)
  3. Important: Check "Add Python to PATH" during installation

Step 2: Verify Installation

# Open Command Prompt (Win+R, type cmd)
python --version
pip --version

# If the version number is displayed, the installation is successful

Step 3: Upgrade pip

# Upgrade pip to the latest version
python -m pip install --upgrade pip

Step 4: Create Virtual Environment

# Create project directory
mkdir C:\rknn_project
cd C:\rknn_project

# Create virtual environment
python -m venv rknn_env

# Activate virtual environment
rknn_env\Scripts\activate

# After activation, (rknn_env) will be displayed before the command prompt

Linux (Ubuntu) Environment Installation

Step 1: Update System

# Update package list
sudo apt update
sudo apt upgrade -y

Step 2: Install Python

# Install Python 3.9 and related tools
sudo apt install -y python3.9 python3.9-venv python3.9-dev python3-pip

# Set Python 3.9 as default python3
sudo update-alternatives --install /usr/bin/python3 python3 /usr/bin/python3.9 1

Step 3: Create Virtual Environment

# Create project directory
mkdir ~/rknn_project
cd ~/rknn_project

# Create virtual environment
python3 -m venv rknn_env

# Activate virtual environment
source rknn_env/bin/activate

# Upgrade pip
pip install --upgrade pip

3.3 Install RKNN-Toolkit2

What is RKNN-Toolkit2?

RKNN-Toolkit2 is a model conversion tool provided by Rockchip, which can convert models in formats such as TensorFlow, PyTorch, ONNX, etc. into RKNN format for running on the NPU of RK chips.

Install RKNN-Toolkit2

Step 1: Ensure virtual environment is activated

# Linux/macOS
source rknn_env/bin/activate

# Windows
rknn_env\Scripts\activate

# Confirm virtual environment is activated ((rknn_env) should be displayed before the command prompt)

Step 2: Install RKNN-Toolkit2

# Install RKNN-Toolkit2
pip install rknn-toolkit2

# If the network is slow, use a domestic mirror
pip install -i https://pypi.tuna.tsinghua.edu.cn/simple rknn-toolkit2

Step 3: Install Dependency Packages

# Install necessary dependency packages
pip install numpy>=1.19.0
pip install opencv-python>=4.5.0
pip install pillow>=8.0.0
pip install matplotlib>=3.3.0

# Install deep learning frameworks (optional)
pip install torch>=1.8.0 torchvision>=0.9.0
pip install onnx>=1.8.0

# Install other useful tools
pip install tqdm  # Progress bar
pip install paramiko  # SSH connection

Step 4: Verify Installation

# Create test script
cat > test_rknn_toolkit.py << 'EOF'
#!/usr/bin/env python3
"""
RKNN-Toolkit2 Installation Verification Script
"""

print("RKNN-Toolkit2 Environment Check")
print("=" * 40)

# Test RKNN-Toolkit2 import
try:
    from rknn.api import RKNN
    print("RKNN-Toolkit2: Import Successful")
    
    # Create RKNN object
    rknn = RKNN(verbose=False)
    print("RKNN Object: Creation Successful")
    
    # Display supported target platforms
    print("Supported Target Platforms:")
    platforms = ['rk3566', 'rk3568', 'rk3588']
    for platform in platforms:
        print(f" - {platform}")
    
except ImportError as e:
    print(f"RKNN-Toolkit2: Import Failed - {e}")
except Exception as e:
    print(f"RKNN Object: Creation Failed - {e}")

# Test other dependency packages
print("\nDependency Package Check:")
packages = {
    'numpy': 'NumPy',
    'cv2': 'OpenCV',
    'PIL': 'Pillow',
    'matplotlib': 'Matplotlib'
}

for module, name in packages.items():
    try:
        if module == 'cv2':
            import cv2
            print(f"{name}: {cv2.__version__}")
        elif module == 'PIL':
            import PIL
            print(f"{name}: {PIL.__version__}")
        else:
            imported = __import__(module)
            version = getattr(imported, '__version__', 'Installed')
            print(f"{name}: {version}")
    except ImportError:
        print(f"{name}: Not Installed")

print("\nEnvironment Check Completed!")
EOF

# Run test
python test_rknn_toolkit.py

3.4 Configure Development Board Connection

Why Configure Connection?

After configuring the connection from PC to the development board, you can:

  • Transfer files remotely
  • Execute commands remotely
  • Debug programs remotely
  • View running results in real-time

Test Connection

# Install paramiko (if not installed yet)
pip install paramiko pyyaml

# Run connection test
python src/utils/board_connection.py

Common Problem Solutions

Python Environment Problems

Problem 1: Slow pip installation

# Solution: Use domestic mirror source
pip install -i https://pypi.tuna.tsinghua.edu.cn/simple rknn-toolkit2

# Permanently configure mirror source
pip config set global.index-url https://pypi.tuna.tsinghua.edu.cn/simple

Problem 2: Permission issues (Linux/macOS)

# Solution: Use user installation mode
pip install --user rknn-toolkit2

# Or fix pip permissions
sudo chown -R $(whoami) ~/.local

Problem 3: Virtual environment issues

# Delete old virtual environment
rm -rf rknn_env

# Recreate
python3 -m venv rknn_env
source rknn_env/bin/activate
pip install --upgrade pip

RKNN Tool Problems

Problem 1: Failed to import RKNN

# Check Python version compatibility
python --version

# Ensure correct Python version (3.8-3.10)
# Reinstall RKNN-Toolkit2
pip uninstall rknn-toolkit2
pip install rknn-toolkit2

Problem 2: Model conversion failed

# Check model format and version
# Ensure model file is complete and correct format
# Update to latest version of RKNN-Toolkit2
pip install --upgrade rknn-toolkit2

Problem 3: Insufficient memory

# Increase virtual memory
sudo fallocate -l 4G /swapfile
sudo chmod 600 /swapfile
sudo mkswap /swapfile
sudo swapon /swapfile

# Or use smaller batch size for conversion

NPU Driver Problems

Problem 1: NPU device does not exist

# Check kernel module
lsmod | grep rknpu

# Manually load driver
sudo modprobe rknpu

# Check device tree configuration
cat /proc/device-tree/npu*/status

Problem 2: Insufficient permissions

# Check device permissions
ls -la /dev/rknpu*

# Fix permissions
sudo chmod 666 /dev/rknpu*

# Or add user to video group
sudo usermod -a -G video $USER

Newcomer Reminder: If you encounter problems during environment setup, don't worry. Read the error messages carefully, check the troubleshooting section, or seek help in the community. RKNN development requires a certain learning curve, but once mastered, you will be able to fully unleash the powerful performance of NPU!

In the next chapter, we will verify the correctness of the environment configuration by running the official YOLOv5 example and start your first RKNN project.

Edit this page on GitHub
Last Updated:
Contributors: ZSL
Prev
01 RK3568 NPU Overview
Next
Run Official YOLOv5 Example