HOME
Shop
  • English
  • 简体中文
HOME
Shop
  • English
  • 简体中文
  • Product Series

    • FPGA+ARM

      • GM-3568JHF

        • Introduction

          • GM-3568JHF Introduction
        • Quick Start

          • Preface
          • Environment Setup
          • Compilation Notes
          • Flashing Guide
          • Debugging Tools
          • Software Update
          • Viewing System Information
          • Test Commands
          • Application Compilation
          • Source Code Access
        • Peripherals & Interfaces

          • USB
          • Display and Touch
          • Ethernet
          • WIFI
          • Bluetooth
          • TF-Card
          • Audio
          • Serial Port
          • CAN
          • RTC
        • Application Development

          • UART Read/Write Demo
          • Key Detection Demo
          • LED Blink Demo
          • MIPI Screen Detection Demo
          • Read USB Device Information Demo
          • FAN Detection Demo
          • FPGA FSPI Communication Demo
          • FPGA DMA Read/Write Demo
          • GPS Debugging Demo
          • Ethernet Test Demo
          • RS485 Read/Write Demo
          • FPGA I2C Read/Write Demo
          • PN532 NFC Card-Reading Demo
          • TF Card Read/Write Demo
        • QT Development

          • ARM64 Cross-Compiler Environment Setup
          • Adding a QT Program to Boot Auto-Start
        • RKNN_NPU Development

          • RK3568 NPU Overview
          • Development Environment Setup
          • Run the Official YOLOv5 Example
        • FPGA Development

          • ARM and FPGA Communication
          • FPGA Development Manual
        • Others

          • Modifying the Root Filesystem
          • System Auto-Start Services
        • Downloads

          • Downloads
      • MB-E30P

        • Introduction

          • MB-E30P Introduction
        • Quick Start

          • Preface
          • Environment Setup
          • Compilation Instructions
          • Flashing Guide
          • Debugging Tools
          • Software Update
          • Viewing Information
          • Test Commands
          • Application Compilation
          • Source Code Acquisition
        • Peripherals & Interfaces

          • USB
          • Display and Touch
          • Ethernet
          • WIFI
          • Bluetooth
          • TF-Card
          • Audio
          • RTC
        • Application Development

          • Key Detection Demo
          • LED Blink Demo
          • MIPI Screen Detection Demo
          • Read USB Device Information Demo
          • FAN Detection Demo
          • FPGA FSPI Communication Demo
          • FPGA DMA Read/Write Demo
          • Ethernet Test Demo
          • FPGA IIC Read/Write Demo
          • PN532 NFC Card Reading Demo
          • TF Card Read/Write Demo
        • QT Development

          • ARM64 Cross-Compiler Environment Setup
          • Adding a QT Program to the Boot Auto-Start Service
        • RKNN_NPU Development

          • RK3568 NPU Overview
          • Development Environment Setup
          • Run the Official YOLOv5 Example
          • Model Conversion In Detail
          • Run Custom Models on the Board
        • FPGA Development

          • ARM and FPGA Communication
          • FPGA Development Manual
        • Others

          • Modifying the Root Filesystem
          • System Auto-Start Service
        • Downloads

          • Downloads
    • ShimetaPi

      • M4-R1

        • Introduction

          • M4-R1 Introduction
        • Quick Start

          • OpenHarmony Overview
          • Image Burning
          • Application Development Quick Start
          • Device Development Quick Start
        • Application Development

          • ArkUI

            • ArkTS Language Overview
            • UI Components - Row Container Introduction
            • UI Components - Column Container Introduction
            • UI Components - Text Component
            • UI Components - Toggle Component
            • UI Components - Slider Component
            • UI Components - Animation Component & Transition Component
          • Documentation

            • OpenHarmony Official Materials
          • Development Notes

            • Full-SDK Replacement Tutorial
            • Introducing and Using Third-Party Libraries
            • HDC Debugging
            • Restore Factory Mode via Command Line
            • Upgrade App to System Permission
          • First App

            • Build Your First ArkTS Application - HelloWorld
          • Demos

            • Serial-Debug-Assistant Application Demo
            • Writing-Board Application Demo
            • Digital Clock Application Demo
            • Wi-Fi Information Acquisition Application Demo
        • Device Development

          • Ubuntu Development

            • Environment Setup
            • Download Source Code
            • Compile Source Code
          • DevEco Device Tool

            • Tool Introduction
            • Development Environment Construction
            • Import the SDK
            • HUAWEI DevEco Tool Function Introduction
        • Kernel Peripherals & Interfaces

          • Guide
          • Device Tree Introduction
          • NAPI Introduction
          • ArkTS Introduction
          • NAPI Development Hands-on Demo
          • GPIO Introduction
          • I2C Communication
          • SPI Communication
          • PWM Control
          • UART Communication
          • TF Card (MicroSD)
          • Screen (Display)
          • Touch
          • Ethernet
          • M.2 SSD
          • Audio
          • WIFI & BT
          • Camera
        • Downloads

          • Downloads
      • M5-R1

        • Introduction

          • M5-R1 Development Docs
        • Quick Start

          • Image Burning
          • Environment Setup
          • Download Source Code
        • Peripherals & Interfaces

          • Raspberry Pi Interfaces
          • GPIO Interface
          • I2C Interface
          • SPI Communication
          • PWM Control
          • Serial Port Communication
          • TF Card
          • Display
          • Touch
          • Audio
          • RTC
          • Ethernet
          • M.2
          • MINI-PCIE
          • Camera
          • WIFI & BT
        • Downloads

          • Downloads
      • Pico-G1

        • Product Overview

          • Product Introduction
          • SDK Version Information
        • Quick Start

          • Development Environment Setup
          • Image Build
          • Image Flashing
          • System Login
          • Network Configuration
          • File Transfer
          • SDK Directory Structure
          • Deploying Your First Application
          • Deploying Your First Driver
          • Mounting an SD Card
        • Peripherals & Interfaces

          • GPIO Control
          • UART Serial Communication
          • I2C Communication
          • SPI Communication
        • MPP Media Development

          • MPP Media Processing Software
          • Image Processing Chain
          • Video Input
          • Image Encoding
        • NPU & AI

          • NPU Driver and Runtime Library Architecture
          • .xmm Model Loading
          • SVP Video Processing
          • AI Noise Reduction (AI_NR)
        • Application Samples

          • Encryption/Decryption Application
          • ADC Acquisition Application
          • Low-Power Application
          • Audio Processing Application
          • Video Encoding Application
          • Video Input Application
          • Video Graphics Subsystem (VGS) Application
          • 08 Region Overlay Application
          • 09 Intelligent Video Engine Application
          • 10 UVC Webcam Application
          • 11 All-in-One Quickstart Application
          • 12 FPN Correction Application
          • 13 Regional Motion Detection Application
          • 14 MTCNN Face Detection Application
        • Expansion Board Peripheral Examples

          • 00 - Pico Expansion Board Peripheral Examples Overview
          • 01 - OLED Display Application
          • 02 - TFT Display Application
          • 03 - MPU6050 Gyroscope Application
          • 04 - ADC Acquisition Application
          • 05 - Passive Buzzer Application
          • 06 - MQ Gas Sensor Application
          • 07 - GPS Positioning Application
          • 08 - SHT20 Temperature & Humidity Application
          • 09 - Ultrasonic Ranging Application
          • 10 - SpO2 Sensor Application
          • 11 - DC Motor Control Application
          • 12 - Servo Control Application
    • OpenHarmony

      • SC-3568HA

        • Introduction

          • SC-3568HA Overview
        • Quick Start Guide

          • OpenHarmony Overview
          • Image Flashing
          • Setting Up the Development Environment
          • Hello World Application and Deployment
        • Application Development

          • ArkUI

            • Introduction to ArkTS Language
            • Introduction to UI Components and Practical Applications (Part 1)
            • Introduction to UI Components and Practical Applications (Part 2)
            • Introduction to UI Components and Practical Applications (Part 3)
          • Expand

            • Getting Started Guide
            • Referencing and Using Third-Party Libraries
            • Application Compilation and Deployment
            • Command-Line Factory Reset
            • System Debugging -- HDC Debugging
            • APP Stability Testing
            • Chapter 7 Application Testing
        • Device Development

          • Environment Setup
          • Download Source Code
          • Compiling Source Code
        • Peripheral And Interface

          • Raspberry Pi interface
          • GPIO Interface
          • I2C Interface
          • SPI communication
          • PWM (Pulse Width Modulation) control
          • Serial port communication
          • TF Card
          • Display Screen
          • Touch
          • Audio
          • RTC
          • Ethernet
          • M.2
          • MINI-PCIE
          • Camera
          • WIFI&BT
          • Raspberry Pi expansion board
        • Downloads

          • Downloads
      • M-K1HSE

        • Introduction

          • M-K1HSE Introduction
        • Quick Start

          • Development environment construction
          • Source code acquisition
          • Compilation Notes
          • Burning Guide
        • Application Development

          • Application Development Environment Setup
          • First Application - Hello World
        • Peripherals and interfaces

          • 01 Audio
          • 02 RS485
          • 03 Display
        • System customization development

          • System transplant
          • System customization
          • Driver Development
          • System Debugging
          • OTA Update
        • Downloads

          • Downloads
    • HVS Camera

      • Quick Start

        • SDK Overview
        • Downloads
        • Your First C++ Program
        • Python Data Analysis
        • MultiVision Studio
      • Development

        • Programming Guides

          • Open Camera
          • Read Events
          • Recording & Replay
          • Event Processing (Denoising)
          • Display & Visualization
          • Tuning
          • Capture APS Image
        • Toolkit SDK

          • Hybrid Vision Toolkit
          • Quick Start
          • C++ API
          • Python API
        • Algorithm

          • Hybrid Vision Algo
          • Hybrid Vision Algo API
          • Windows Algo SDK
        • Samples Overview
        • Applications
      • Fundamentals

        • Event Camera Fundamentals
        • HVS Hybrid Vision
        • Event Visualization
        • Data Formats Reference
        • Glossary
        • Bias & Tuning
        • Video Tutorials
      • USB Cameras

        • HVS Camera Quick Start
        • Networking Capabilities

          • HVS Camera System Architecture
          • EVS Network Server
          • EVS Time Sync
          • Web Window
        • HVS Camera Compatibility Matrix
        • FAQ & Troubleshooting Guide
        • Products

          • CF-NRS1 (Lingguang No.1 Hybrid Vision Camera)
      • MIPI Modules

        • MIPI Module Quick Start
        • Carrier Boards

          • RDK X5 Carrier Board Adaptation
          • Raspberry Pi Carrier Board Adaptation
          • Digua Pi Carrier Board Adaptation
          • ShimeTai Board Carrier Board Adaptation
        • MIPI Module Compatibility Matrix
        • Products

          • EVS_003 Sensor Module
    • AI-model

      • 1684XB-32T

        • Introduction

          • AIBOX-1684XB-32 Introduction
        • Quick Start

          • First Use
          • Network Configuration
          • Disk Usage
          • Memory Allocation
          • Fan Control Strategy
          • Firmware Upgrade
          • Cross Compilation
          • Model Quantization
        • Application Development

          • Development Overview

            • Sophgo SDK Development
            • Sophgo Demo Introduction
          • Large Language Models

            • Deploying Llama3 Example
            • Sophon LLM_api_server Development
            • Deploying MiniCPM-V-2_6
            • Qwen-2-5-VL Image and Video Recognition Demo
            • Qwen3-chat Demo
            • Qwen3-Qwen Agent-MCP Development
            • Qwen3-langchain-AI Agent
          • Deep Learning

            • ResNet (Image Classification)
            • LPRNet (License Plate Recognition)
            • SAM (General Image Segmentation Foundation Model)
            • YOLOv5 (Object Detection)
            • OpenPose (Human Keypoint Detection)
            • PP-OCR (Optical Character Recognition)
        • Downloads

          • Downloads
      • 1684X-416T

        • Introduction

          • AIBOX-1684X-416 Introduction
        • Demo Quick Guide

          • ShimeTai Intelligent Monitoring Demo Quick Usage Guide
      • RDK-X5

        • Introduction

          • RDK-X5 Hardware Introduction
        • Quick Start

          • RDK-X5 Quick Start
        • Application Development

          • AI Online Model Development

            • Experiment 01 - Access Volcengine Doubao AI
            • Experiment 02 - Image Analysis
            • Experiment 03 - Multimodal Visual Analysis & Localization
            • Experiment 04 - Multimodal Image-Text Comparison
            • Experiment 05 - Multimodal Document/Table Analysis
            • Experiment 06 - Camera-based AI Visual Analysis
          • Large Language Models

            • Experiment 01 - Speech Recognition
            • Experiment 02 - Voice Conversation
            • Experiment 03 - Multimodal Image Analysis - Voice
            • Experiment 04 - Multimodal Image Comparison - Voice
            • Experiment 05 - Multimodal Document Analysis - Voice
            • Experiment 06 - Multimodal Vision Application - Voice
          • ROS2 Basics

            • Experiment 01 - Environment Setup
            • Experiment 02 - Create & Build a Workspace Package
            • Experiment 03 - Run ROS2 Topic Communication Node
            • Experiment 04 - ROS2 Camera Application
          • 40-pin IO Development

            • Experiment 01 - GPIO Output (LED Blink)
            • Experiment 02 - GPIO Input
            • Experiment 03 - Button-controlled LED
            • Experiment 04 - PWM Output
            • Experiment 05 - Serial Output
            • Experiment 06 - I2C Experiment
            • Experiment 07 - SPI Experiment
          • USB Module Usage

            • Experiment 01 - USB Voice Module Usage
            • Experiment 02 - Sound Source Localization Module
          • Machine Vision Practice

            • Experiment 01 - Open USB Camera
            • Experiment 02 - Color Recognition
            • Experiment 03 - Gesture Recognition
            • Experiment 04 - YOLOv5 Object Detection
      • RDK-S100

        • Introduction

          • RDK-S100 Hardware Introduction
        • Quick Start

          • RDK-S100 Quick Start
        • Application Development

          • AI Online Model Development

            • Experiment 01 - Access Volcengine Doubao AI
            • Experiment 02 - Image Analysis
            • Experiment 03 - Multimodal Visual Analysis & Localization
            • Experiment 04 - Multimodal Image-Text Comparison
            • Experiment 05 - Multimodal Document/Table Analysis
            • Experiment 06 - Camera-based AI Visual Analysis
          • Large Language Models

            • Experiment 01 - Speech Recognition
            • Experiment 02 - Voice Conversation
            • Experiment 03 - Multimodal Image Analysis - Voice
            • Experiment 04 - Multimodal Image Comparison - Voice
            • Experiment 05 - Multimodal Document Analysis - Voice
            • Experiment 06 - Multimodal Vision Application - Voice
          • ROS2 Basics

            • Experiment 01 - Environment Setup
            • Experiment 02 - Create & Build a Workspace Package
            • Experiment 03 - Run ROS2 Topic Communication Node
            • Experiment 04 - ROS2 Camera Application
          • 40-pin IO Development

            • Experiment 01 - GPIO Output (LED Blink)
            • Experiment 02 - GPIO Input
            • Experiment 03 - Button-controlled LED
            • Experiment 04 - PWM Output
            • Experiment 05 - Serial Output
            • Experiment 06 - I2C Experiment
            • Experiment 07 - SPI Experiment
          • USB Module Usage

            • Experiment 01 - USB Voice Module Usage
            • Experiment 02 - Sound Source Localization Module
          • Machine Vision Practice

            • Experiment 01 - Open USB Camera
            • Experiment 02 - Image Processing Basics
            • Experiment 03 - Object Detection
            • Experiment 04 - Image Segmentation
      • RK1828

        • Introduction

          • M5-182X-A1 AI Edge Box - Product Introduction
          • M5-182X-A1 Hardware Specifications
          • M5-182X-A1 Usage & Safety
        • Quick Start

          • M5-182X-A1 Image Flashing
          • RK182X Hardware Installation & Verification
          • RK182X Development Environment Quick Setup
          • RK182X SDK Overview
          • RK182X Environment Setup in Detail
          • RK182X Quick Start
          • Vendor SDK Data Extraction Record
        • Development Guide

          • ClawChips Architecture and Principles
          • SKILL User Manual
          • RK182X Series LLM Inference (RK1828 Model)
          • RK182X Series CNN Inference (RK1828 Model)
          • Model Conversion
          • RK182X AI Agent Application Development Guide
          • RK182X Industrial Anomaly Detection Application
        • SDK Reference

          • RKNN3-SDK Overview

            • RKNN3 SDK Overview
          • RKNN3-Toolkit

            • RKNN3 Toolkit Installation and Usage
          • RKLLM

            • RKLLM On-Device LLM Inference
          • RK182X Series NPU Overview and Architecture (RK1828 Model)
          • RK182X INT8 Quantized Inference Deployment
          • RK182X MPP Multimedia Framework
          • MPP Details

            • RK182X Video Decoding
            • RK182X Video Encoding
          • NPU Details

            • RKNN Model Conversion
            • RK182X NPU INT8 Quantized Inference
            • RK182X Multi-Model Parallel Inference
          • RGA Details

            • RK182X RGA 2D Graphics Acceleration
          • VPU Details

            • RK182X VPU Codec
        • Hardware Reference

          • RK182X Series Hardware Architecture Overview (RK1828 Model)
          • RK182X Pin Definitions and Multiplexing Configuration
          • RK182X Pin Definitions
          • RK182X Power Management
          • RK182X Clock and PLL Configuration
          • RK182X Clock and Frequency Configuration
        • Tutorials

          • Hello World
          • Hello RK1828 - The First Program
          • RTSP Streaming
          • RTSP Streaming + AI Analysis
          • ShiMetaPi AI Lobster One-Click Deployment
          • PaddleOCR-VL Text Recognition
          • Qwen3-1.7B LLM Text Chat
          • AI Multi-View Inspection (Qwen3-VL Wrapper)
          • YOLOv5 Object Detection
        • Downloads

          • Downloads
        • FAQ

          • FAQ
    • Core-Board

      • C-3568BQ

        • Introduction

          • C-3568BQ Overview
      • C-3588LQ

        • Introduction

          • C-3588LQ Overview
      • GC-3568JBAF

        • Introduction

          • GC-3568JBAF Overview
      • C-K1BA

        • Introduction

          • C-K1BA Overview
    • Software Platform

      • ShiMetaPi Workbench

        • Introduction

          • Product Overview
          • Core Architecture
          • Feature Entries
          • Supported Hardware
          • Release Notes
        • Quick Start

          • Install & Login
          • Connect the Device
          • Set Up the Environment
          • Connect to AIHub
          • First Inference
        • User Guide

          • Workspace Overview
          • Device Manager
          • Model Market
          • One-Click Deploy
          • Vision — SVP
          • Vision - Custom Models
          • shimeta-py IDE
          • Terminal
          • Agent Debug Assistant
          • Settings and Resources
        • FAQ

          • Installation & Login
          • Device Connection
          • Models & Deployment
          • Vision & Runtime
          • Settings & Other
      • ShimetaPi Repository

        • Introduction

          • ShimetaPi Software Repository
        • Pico G1 (GK7206)

          • Quick Start

            • Installation & First Inference
            • shimeta_infer — Image Inference
            • shimeta_camera — Real-time Camera Inference
            • SVP Scene Detection
            • File Transfer & Built-in Model Reference
            • FAQ
          • HTTP API & Python SDK

            • HTTP API Reference
      • Model Fine-tuning Platform

        • Introduction

          • Model Training Platform
        • Quick Start

          • Register & Login
          • Create Your First Model (30-Minute Quick Experience)
        • Training Guide

          • Data Preparation & Annotation
          • Training Parameter Configuration
          • Start & Monitor Training
          • Model Evaluation & Testing
        • Model Deployment

          • Export Model
          • Deploy to Edge Device

AI Online Development

Experiment 04 - Multimodal Image-Text Comparison

Experiment preparation:

  1. Ensure you have connected to Volcengine Doubao AI.
  2. Find a JPG image to use as the experiment material.

Experiment steps:

  1. cd AI_online # Enter the main directory
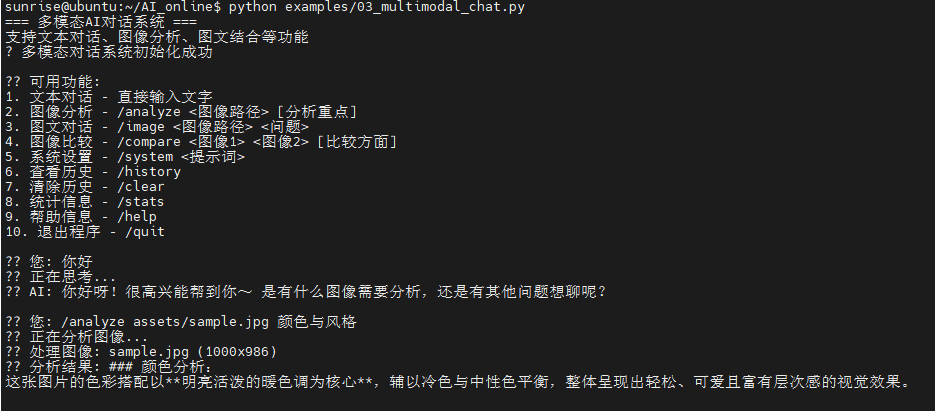
  2. python examples/03_multimodal_chat.py # Run the example program

Sample commands:

  1. Hello (just type text to chat)
  2. /analyze assets/sample.jpg color and style (analyze the image)
  3. /image assets/sample.jpg What scene does this image describe? (image-text conversation)
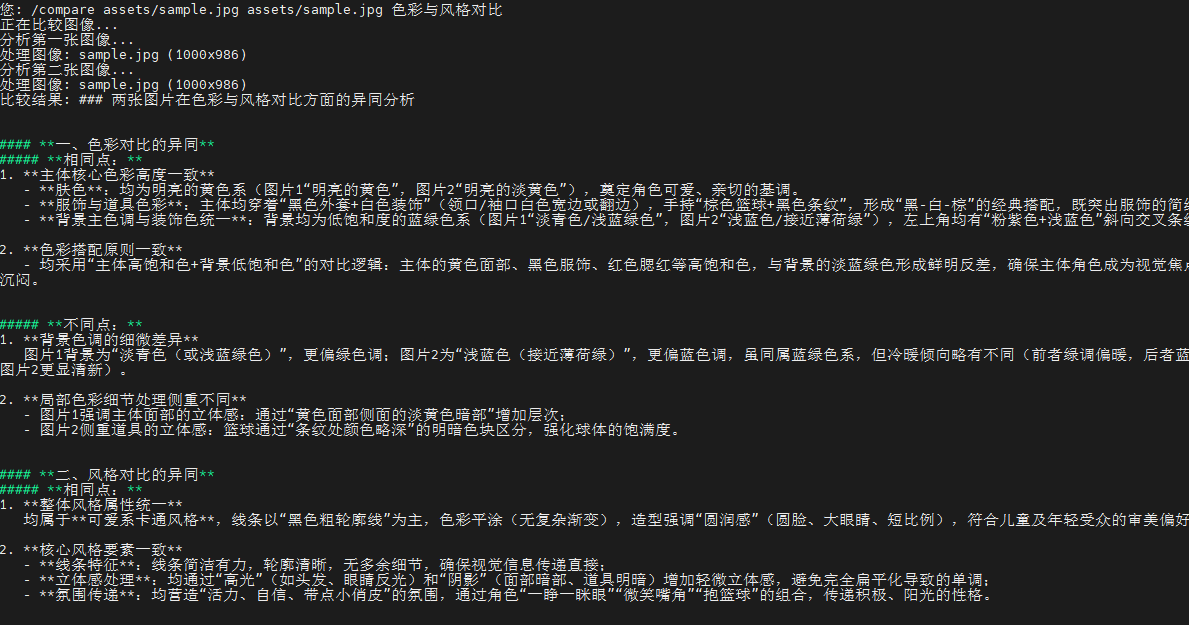
  4. /compare assets/sample.jpg assets/sample.jpg compare color and style (two-image comparison; you may add more images as needed)

Terminal output:
TOOLTOOL
# -*- coding: utf-8 -*-
"""
图像对话功能示例
支持上传图像并进行多轮对话
"""

import os
import sys
import requests
import base64
from typing import List, Dict, Optional

# 添加父目录到路径
sys.path.append(os.path.dirname(os.path.dirname(os.path.abspath(__file__))))

from config import API_KEY, MODEL_ENDPOINT, API_BASE_URL, REQUEST_TIMEOUT
from utils.image_processor import ImageProcessor

class ImageChatBot:
    """图像对话机器人"""

    def __init__(self):
        self.api_key = API_KEY
        self.model_endpoint = MODEL_ENDPOINT
        self.base_url = API_BASE_URL
        self.timeout = REQUEST_TIMEOUT
        self.processor = ImageProcessor()

        # 对话历史
        self.chat_history: List[Dict] = []
        self.current_image_base64: Optional[str] = None
        self.current_image_path: Optional[str] = None

        # 检查配置
        self._check_config()

    def _check_config(self):
        """检查API配置"""
        if not self.api_key or self.api_key == "你的API_KEY":
            raise ValueError("请在config.py中配置正确的API_KEY")

        if not self.model_endpoint or self.model_endpoint == "你的接入点ID":
            raise ValueError("请在config.py中配置正确的MODEL_ENDPOINT")

    def load_image(self, image_path: str) -> bool:
        """
        加载图像

        Args:
            image_path: 图像文件路径

        Returns:
            bool: 是否成功加载
        """
        try:
            # 对齐 01 的行为:仅按扩展名检查 JPG/JPEG
            ext = os.path.splitext(image_path)[1].lower()
            if ext not in [".jpg", ".jpeg"]:
                print("仅支持JPG/JPEG格式,请选择 .jpg 或 .jpeg 文件")
                return False

            if not os.path.exists(image_path):
                print(f"图像文件不存在: {image_path}")
                return False

            # 转换为base64(与 01 一致,直接读取文件字节)
            base64_data = self.processor.image_to_base64(image_path)
            if not base64_data:
                print("图像编码失败")
                return False

            self.current_image_base64 = base64_data
            self.current_image_path = image_path

            # 获取图像信息(用于提示显示,不作为严格格式校验)
            image_info = self.processor.get_image_info(image_path)
            width = image_info.get('width', 0)
            height = image_info.get('height', 0)
            file_size = image_info.get('file_size', 0)
            print(f"? 图像加载成功: {os.path.basename(image_path)}")
            print(f"  尺寸: {width}x{height}")
            print(f"  大小: {file_size / 1024:.1f}KB")

            return True

        except Exception as e:
            print(f"图像加载失败: {e}")
            return False

    def send_message(self, message: str, include_image: bool = True) -> Optional[str]:
        """
        发送消息并获取回复

        Args:
            message: 用户消息
            include_image: 是否包含当前图像

        Returns:
            str: AI回复,失败返回None
        """
        try:
            # 构建消息内容
            content = [{"type": "text", "text": message}]

            # 如果需要包含图像且有当前图像
            if include_image and self.current_image_base64:
                content.append({
                    "type": "image_url",
                    "image_url": {
                        "url": f"data:image/jpeg;base64,{self.current_image_base64}"
                    }
                })

            # 添加到对话历史
            user_message = {"role": "user", "content": content}

            # 构建完整的消息列表(包含历史)
            messages = self.chat_history + [user_message]

            # 构建API请求
            # 1) API_BASE_URL 已配置为完整端点(.../chat/completions),直接使用
            # 2) API_BASE_URL 为基础路径(.../api/v3),则补齐 /chat/completions
            base = self.base_url.rstrip('/')
            url = base if base.endswith('chat/completions') else f"{base}/chat/completions"
            headers = {
                "Authorization": f"Bearer {self.api_key}",
                "Content-Type": "application/json"
            }
            data = {
                "model": self.model_endpoint,
                "messages": messages,
                "temperature": 0.7,
                "max_tokens": 1000
            }

            print("?? AI正在思考...")
            response = requests.post(url, json=data, headers=headers, timeout=self.timeout)

            if response.status_code == 200:
                result = response.json()
                if 'choices' in result and len(result['choices']) > 0:
                    ai_reply = result['choices'][0]['message']['content']

                    # 更新对话历史
                    self.chat_history.append(user_message)
                    self.chat_history.append({
                        "role": "assistant",
                        "content": ai_reply
                    })

                    return ai_reply
                else:
                    print("API响应格式异常")
                    return None
            else:
                print(f"API请求失败: {response.status_code}")
                if response.status_code == 401:
                    print("认证失败,请检查API_KEY")
                elif response.status_code == 404:
                    print("模型端点不存在,请检查MODEL_ENDPOINT")
                else:
                    print(f"错误详情: {response.text}")
                return None

        except requests.exceptions.Timeout:
            print("请求超时,请检查网络连接")
            return None
        except requests.exceptions.RequestException as e:
            print(f"网络请求错误: {e}")
            return None
        except Exception as e:
            print(f"发送消息失败: {e}")
            return None

    def clear_history(self):
        """清除对话历史"""
        self.chat_history = []
        print("? 对话历史已清除")

    def show_history(self):
        """显示对话历史"""
        if not self.chat_history:
            print("暂无对话历史")
            return

        print("\n=== 对话历史 ===")
        for i, msg in enumerate(self.chat_history, 1):
            role = "用户" if msg["role"] == "user" else "AI"
            content = msg["content"]

            if isinstance(content, list):
                # 提取文本内容
                text_content = ""
                has_image = False
                for item in content:
                    if item["type"] == "text":
                        text_content = item["text"]
                    elif item["type"] == "image_url":
                        has_image = True

                print(f"{i}. {role}: {text_content}")
                if has_image:
                    print("   [包含图像]")
            else:
                print(f"{i}. {role}: {content}")
        print("=" * 30)

def main():
    """主函数"""
    print("=== 火山引擎图像对话系统 ===")
    print("支持上传图像并进行多轮对话")

    # 创建对话机器人
    try:
        chatbot = ImageChatBot()
    except ValueError as e:
        print(f"配置错误: {e}")
        return

    print("\n可用命令:")
    print("- /load <图像路径>  : 加载图像")
    print("- /clear           : 清除对话历史")
    print("- /history         : 显示对话历史")
    print("- /help            : 显示帮助")
    print("- /quit            : 退出程序")
    print("- 直接输入文字进行对话")
    print("\n[路径提示] 可使用以下示例路径:")
    if os.name == 'nt':
        print("1. 绝对路径: C:\\Users\\Administrator\\Pictures\\image.jpg")
        print("2. 相对路径: assets\\sample.jpg")
        print("3. 当前目录: .\\assets\\sample.jpg")
    else:
        print("1. 绝对路径: /home/sunrise/Pictures/image.jpg")
        print("2. 相对路径: assets/sample.jpg")
        print("3. 当前目录: ./assets/sample.jpg")
    print("注意: 仅支持JPG/JPEG格式")

    while True:
        try:
            user_input = input("\n?? 您: ").strip()

            if not user_input:
                continue

            # 处理命令(仅识别已知命令,避免把 Linux 绝对路径当作命令)
            recognized_commands = {"/load", "/clear", "/history", "/help", "/quit"}
            if user_input.startswith("/") and user_input.split(" ", 1)[0].lower() in recognized_commands:
                command_parts = user_input.split(" ", 1)
                command = command_parts[0].lower()

                if command == "/quit":
                    print("感谢使用图像对话系统!")
                    break

                elif command == "/load":
                    if len(command_parts) < 2:
                        print("请提供图像路径: /load <图像路径>")
                        continue

                    image_path = command_parts[1].strip().strip('\"').strip("'")
                    # 非 Windows 平台将反斜杠转换为正斜杠,并展开 ~
                    if os.name != 'nt':
                        image_path = image_path.replace('\\', '/')
                    image_path = os.path.expanduser(image_path)
                    # 与 01 保持一致:支持项目根相对路径与当前工作目录相对路径
                    project_root = os.path.dirname(os.path.dirname(os.path.abspath(__file__)))
                    full_path = os.path.join(project_root, image_path)
                    if os.path.exists(full_path):
                        image_path = full_path
                    elif os.path.exists(image_path):
                        pass
                    else:
                        print(f"图像文件不存在: {image_path}")
                        print("路径示例:")
                        if os.name == 'nt':
                            print("  - 绝对路径: C:\\Users\\Administrator\\Pictures\\image.jpg")
                            print("  - 相对路径: assets\\sample.jpg")
                            print("  - 当前目录: .\\assets\\sample.jpg")
                        else:
                            print("  - 绝对路径: /home/sunrise/Pictures/image.jpg")
                            print("  - 相对路径: assets/sample.jpg")
                            print("  - 当前目录: ./assets/sample.jpg")
                        print("  - 仅支持JPG/JPEG格式 (.jpg/.jpeg)")
                        continue

                    ext = os.path.splitext(image_path)[1].lower()
                    if ext not in [".jpg", ".jpeg"]:
                        print("仅支持JPG/JPEG格式,请选择 .jpg 或 .jpeg 文件")
                        continue
                    if chatbot.load_image(image_path):
                        print("现在可以开始关于这张图片的对话了!")
                    else:
                        print("图像加载失败")

                elif command == "/clear":
                    chatbot.clear_history()

                elif command == "/history":
                    chatbot.show_history()

                elif command == "/help":
                    print("\n可用命令:")
                    print("- /load <图像路径>  : 加载图像")
                    print("- /clear           : 清除对话历史")
                    print("- /history         : 显示对话历史")
                    print("- /help            : 显示帮助")
                    print("- /quit            : 退出程序")
                    print("- 直接输入文字进行对话")
                    print("\n[路径提示] 可使用以下示例路径:")
                    if os.name == 'nt':
                        print("1. 绝对路径: C:\\Users\\Administrator\\Pictures\\image.jpg")
                        print("2. 相对路径: assets\\sample.jpg")
                        print("3. 当前目录: .\\assets\\sample.jpg")
                    else:
                        print("1. 绝对路径: /home/sunrise/Pictures/image.jpg")
                        print("2. 相对路径: assets/sample.jpg")
                        print("3. 当前目录: ./assets/sample.jpg")
                    print("注意: 仅支持JPG/JPEG格式")

                else:
                    print("未知命令,输入 /help 查看帮助")

            else:
                # 支持直接输入路径进行加载(参考 01 的交互方式)
                possible_path = user_input.strip().strip('\"').strip("'")
                looks_like_path = any(sep in possible_path for sep in ['\\', '/']) or possible_path.lower().endswith(('.jpg', '.jpeg'))
                # 非 Windows 平台将反斜杠转换为正斜杠,并展开 ~
                if os.name != 'nt':
                    possible_path = possible_path.replace('\\', '/')
                possible_path = os.path.expanduser(possible_path)
                if looks_like_path:
                    project_root = os.path.dirname(os.path.dirname(os.path.abspath(__file__)))
                    full_path = os.path.join(project_root, possible_path)
                    target_path = full_path if os.path.exists(full_path) else possible_path
                    if not os.path.exists(target_path):
                        print(f"图像文件不存在: {possible_path}")
                        print("路径示例:")
                        if os.name == 'nt':
                            print("  - 绝对路径: C:\\Users\\Administrator\\Pictures\\image.jpg")
                            print("  - 相对路径: assets\\sample.jpg")
                            print("  - 当前目录: .\\assets\\sample.jpg")
                        else:
                            print("  - 绝对路径: /home/sunrise/Pictures/image.jpg")
                            print("  - 相对路径: assets/sample.jpg")
                            print("  - 当前目录: ./assets/sample.jpg")
                        print("  - 仅支持JPG/JPEG格式 (.jpg/.jpeg)")
                    else:
                        ext = os.path.splitext(target_path)[1].lower()
                        if ext not in [".jpg", ".jpeg"]:
                            print("仅支持JPG/JPEG格式,请选择 .jpg 或 .jpeg 文件")
                        elif chatbot.load_image(target_path):
                            print("现在可以开始关于这张图片的对话了!")
                        else:
                            print("图像加载失败")
                    continue

                # 普通对话
                if not chatbot.current_image_base64:
                    print("提示: 还未加载图像,使用 /load <图像路径> 加载图像后可进行图像相关对话")

                reply = chatbot.send_message(user_input)
                if reply:
                    print(f"?? AI: {reply}")
                else:
                    print("? 获取回复失败,请重试")

        except KeyboardInterrupt:
            print("\n\n程序被用户中断")
            break
        except Exception as e:
            print(f"发生错误: {e}")

if __name__ == "__main__":
    main()
Edit this page on GitHub
Prev
Experiment 03 - Multimodal Visual Analysis & Localization
Next
Experiment 05 - Multimodal Document/Table Analysis