HOME
Shop
  • English
  • 简体中文
HOME
Shop
  • English
  • 简体中文
  • Product Series

    • FPGA+ARM

      • GM-3568JHF

        • 1. Introduction

          • About GM-3568JHF
        • 2. Quick Start

          • 00 Introduction
          • 01 Environment Setup
          • 02 Compilation Instructions
          • 03 Flashing Guide
          • 04 Debug Tools
          • 05 Software Update
          • 06 View Information
          • 07 Test Commands
          • 08 App Compilation
          • 09 Source Code Acquisition
        • 3. Peripherals and Interfaces

          • 01 USB
          • 02 Display and Touch
          • 03 Ethernet
          • 04 WIFI
          • 05 Bluetooth
          • 06 TF-Card
          • 07 Audio
          • 08 Serial Port
          • 09 CAN
          • 10 RTC
        • 4. Application Development

          • 01 UART read and write case
          • 02 Key detection case
          • 03 LED light flashing case
          • 04 MIPI screen detection case
          • 05 Read USB device information example
          • 06 FAN Detection Case
          • 07 FPGA FSPI Communication Case
          • 08 FPGA DMA read and write case
          • 09 GPS debugging case
          • 10 Ethernet Test Cases
          • 11 RS485 reading and writing examples
          • 12 FPGA IIC read and write examples
          • 13 PN532 NFC card reader case
          • 14 TF card reading and writing case
        • 5. QT Development

          • 01 ARM64 cross compiler environment construction
          • 02 QT program added automatic startup service
        • 6. RKNN_NPU Development

          • 01 RK3568 NPU Overview
          • 02 Development Environment Setup
          • Run Official YOLOv5 Example
          • Model Conversion Detailed Explanation
          • Run Custom Model on Board
        • 7. FPGA Development

          • ARM and FPGA Communication
          • /fpga-arm/GM-3568JHF/FPGA/ch02-FPGA-Development-Manual.html
        • 8. Others

          • 01 Modification of the root directory file system
          • 02 System auto-start service
        • 9. Download

          • Download Resources
    • ShimetaPi

      • M4-R1

        • 1. Introduction

          • 1.1 About M4-R1
        • 2. Quick Start

          • 2.1 OpenHarmony Overview
          • 2.2 Image Burning
          • 2.3 Development Environment Preparation
          • 2.4 Hello World Application
        • 3. Application Development

          • 3.1 Getting Started

            • 3.1.1 ArkTS Language Overview
            • 3.1.2 UI Components (Part 1)
            • 3.1.3 UI Components (Part 2)
            • 3.1.4 UI Components (Part 3)
          • 3.2 Advanced

            • 3.2.1 Getting Started Guide
            • 3.2.2 Usage of Third Party Libraries
            • 3.2.3 Deployment of the Application
            • 3.2.4 Factory Reset
            • 3.2.5 System Debug
            • 3.2.6 APP Stability Testing
            • 3.2.7 Application Testing
          • 3.3 Getting Docs

            • 3.3.1 Official Website Information
          • 3.4 Development Instructions

            • 3.4.1 Full SDK
            • 3.4.2 Introduction of Third Party Libraries
            • 3.4.3 Introduction of HDC Tool
            • 3.4.4 Restore Factory Mode
            • 3.4.5 Update System API
          • 3.5 First Application

            • 3.5.1 First ArkTS App
          • 3.6 Application Demo

            • 3.6.1 UART Tool
            • 3.6.2 Graphics Tablet
            • 3.6.3 Digital Clock
            • 3.6.4 WIFI Tool
        • 4. Device Development

          • 4.1 Ubuntu Environment Development

            • 4.1.1 Environment Setup
            • 4.1.2 Download Source Code
            • 4.1.3 Compile Source Code
          • 4.2 Using DevEco Device Tool

            • 4.2.1 Tool Introduction
            • 4.2.2 Environment Construction
            • 4.2.3 Import SDK
            • 4.2.4 Function Introduction
        • 5. Peripherals and Interfaces

          • 5.1 Raspberry Pi Interfaces
          • 5.2 GPIO Interface
          • 5.3 I2C Interface
          • 5.4 SPI Communication
          • 5.5 PWM Control
          • 5.6 Serial Port Communication
          • 5.7 TF Card Slot
          • 5.8 Display Screen
          • 5.9 Touch Screen
          • 5.10 Audio
          • 5.11 RTC
          • 5.12 Ethernet
          • 5.13 M.2
          • 5.14 MINI PCIE
          • 5.15 Camera
          • 5.16 WIFI BT
          • 5.17 HAT
        • 6. FAQ

          • 6.1 Download Link
      • M5-R1

        • 1. Introduction

          • M5-R1 Development Documentation
        • 2. Quick Start

          • OpenHarmony Overview
          • Image Burning
          • Development Environment Preparation
          • Hello World Application and Deployment
        • 3. Peripherals and Interfaces

          • 3.1 Raspberry Pi Interfaces
          • 3.2 GPIO Interface
          • 3.3 I2C Interface
          • 3.4 SPI Communication
          • 3.5 PWM Control
          • 3.6 Serial Port Communication
          • 3.7 TF Card Slot
          • 3.8 Display Screen
          • 3.9 Touch Screen
          • 3.10 Audio
          • 3.11 RTC
          • 3.12 Ethernet
          • 3.13 M.2
          • 3.14 MINI PCIE
          • 3.15 Camera
          • 3.16 WIFI BT
          • 3.17 HAT
        • 4. Application Development

          • 4.1 Getting Started

            • 4.1.1 ArkTS Language Overview
            • 4.1.2 UI Components (Part 1)
            • 4.1.3 UI Components (Part 2)
            • 4.1.4 UI Components (Part 3)
          • 4.2 Advanced

            • 4.2.1 Getting Started Guide
            • 4.2.2 Usage of Third Party Libraries
            • 4.2.3 Deployment of the Application
            • 4.2.4 Factory Reset
            • 4.2.5 System Debug
            • 4.2.6 APP Stability Testing
            • 4.2.7 Application Testing
        • 5. Device Development

          • 5.1 Environment Setup
          • 5.2 Download Source Code
          • 5.3 Compile Source Code
        • 6. Download

          • Data Download
    • OpenHarmony

      • SC-3568HA

        • 1. Introduction

          • 1.1 About SC-3568HA
        • 2. Quick Start

          • 2.1 OpenHarmony Overview
          • 2.2 Image Burning
          • 2.3 Development Environment Preparation
          • 2.4 Hello World Application
        • 3. Application Development

          • 3.1 ArkUI

            • 3.1.1 ArkTS Language Overview
            • 3.1.2 UI Components (Part 1)
            • 3.1.3 UI Components (Part 2)
            • 3.1.4 UI Components (Part 3)
          • 3.2 Advanced

            • 3.2.1 Getting Started Guide
            • 3.2.2 Usage of Third Party Libraries
            • 3.2.3 Deployment of the Application
            • 3.2.4 Factory Reset
            • 3.2.5 System Debug
            • 3.2.6 APP Stability Testing
            • 3.2.7 Application Testing
        • 4. Device Development

          • 4.1 Environment Setup
          • 4.2 Download Source Code
          • 4.3 Compile Source Code
        • 5. Peripherals and Interfaces

          • 5.1 Raspberry Pi Interfaces
          • 5.2 GPIO Interface
          • 5.3 I2C Interface
          • 5.4 SPI Communication
          • 5.5 PWM Control
          • 5.6 Serial Port Communication
          • 5.7 TF Card Slot
          • 5.8 Display Screen
          • 5.9 Touch Screen
          • 5.10 Audio
          • 5.11 RTC
          • 5.12 Ethernet
          • 5.13 M.2
          • 5.14 MINI PCIE
          • 5.15 Camera
          • 5.16 WIFI BT
          • 5.17 HAT
        • 6. FAQ

          • 6.1 Download Link
      • M-K1HSE

        • 1. Introduction

          • 1.1 Product Introduction
        • 2. Quick Start

          • 2.1 Debug Tool Installation
          • 2.2 Development Environment Setup
          • 2.3 Source Code Download
          • 2.4 Build Instructions
          • 2.5 Flashing Guide
          • 2.6 APT Update Sources
          • 2.7 View Board Info
          • 2.8 CLI LED and Key Test
          • 2.9 GCC Build Programs
        • 3. Application Development

          • 3.1 Basic Application Development

            • 3.1.1 Development Environment Preparation
            • 3.1.2 First Application HelloWorld
            • 3.1.3 Develop HAR Package
          • 3.2 Peripheral Application Cases

            • 3.2.1 UART Read/Write
            • 3.2.2 Key Demo
            • 3.2.3 LED Flash
        • 4. Peripherals and Interfaces

          • 4.1 Standard Peripherals

            • 4.1.1 USB
            • 4.1.2 Display and Touch
            • 4.1.3 Ethernet
            • 4.1.4 WIFI
            • 4.1.5 Bluetooth
            • 4.1.6 TF Card
            • 4.1.7 Audio
            • 4.1.8 Serial Port
            • 4.1.9 CAN
            • 4.1.10 RTC
          • 4.2 Interfaces

            • 4.2.1 Audio
            • 4.2.2 RS485
            • 4.2.3 Display
            • 4.2.4 Touch
        • 5. System Customization Development

          • 5.1 System Porting
          • 5.2 System Customization
          • 5.3 Driver Development
          • 5.4 System Debugging
          • 5.5 OTA Upgrade
        • 6. Download

          • 6.1 Download
    • EVS-Camera

      • CF-NRS1

        • 1. Introduction

          • 1.1 About CF-NRS1
          • 1.2 Event-Based Concepts
          • 1.3 Quick Start
          • 1.4 Resources
        • 2. Development

          • 2.1 Development Overview

            • 2.1.1 Shimetapi Hybrid Camera SDK Introduction
          • 2.2 Environment & API

            • 2.2.1 Environment Overview
            • 2.2.2 Development API Overview
          • 2.3 Linux Development

            • 2.3.1 Linux SDK Introduction
            • 2.3.2 Linux SDK API
            • 2.3.3 Linux Algorithm
            • 2.3.4 Linux Algorithm API
          • 2.4 Service & Web

            • 2.4.1 EVS Server
            • 2.4.2 Time Server
            • 2.4.3 EVS Web
        • 3. Download

          • 3.1 Download
        • 4. Common Problems

          • 4.1 Common Problems
      • CF-CRA2

        • 1. Introduction

          • 1.1 About CF-CRA2
        • 2. Download

          • 2.1 Download
      • EVS Module

        • 1. Related Concepts
        • 2. Hardware Preparation and Environment Configuration
        • 3. Example Program User Guide
        • Resources Download
    • AI-model

      • 1684XB-32T

        • 1. Introduction

          • AIBOX-1684XB-32 Introduction
        • 2. Quick Start

          • First time use
          • Network Configuration
          • Disk usage
          • Memory allocation
          • Fan Strategy
          • Firmware Upgrade
          • Cross-Compilation
          • Model Quantization
        • 3. Application Development

          • 3.1 Development Introduction

            • Sophgo SDK Development
            • SOPHON-DEMO Introduction
          • 3.2 Large Language Models

            • Deploying Llama3 Example
            • /ai-model/AIBOX-1684XB-32/application-development/LLM/Sophon_LLM_api_server-Development-AIBOX-1684XB-32.html
            • /ai-model/AIBOX-1684XB-32/application-development/LLM/MiniCPM-V-2_6-AIBOX-1684XB-32.html
            • /ai-model/AIBOX-1684XB-32/application-development/LLM/Qwen-2-5-VL-demo-Development-AIBOX-1684XB-32.html
            • /ai-model/AIBOX-1684XB-32/application-development/LLM/Qwen-3-chat-demo-Development-AIBOX-1684XB-32.html
            • /ai-model/AIBOX-1684XB-32/application-development/LLM/Qwen3-Qwen Agent-MCP.html
            • /ai-model/AIBOX-1684XB-32/application-development/LLM/Qwen3-langchain-AI Agent.html
          • 3.3 Deep Learning

            • ResNet (Image Classification)
            • LPRNet (License Plate Recognition)
            • SAM (Universal Image Segmentation Foundation Model)
            • YOLOv5 (Object Detection)
            • OpenPose (Human Keypoint Detection)
            • PP-OCR (Optical Character Recognition)
        • 4. Download

          • Resource Download
      • 1684X-416T

        • 1. Introduction

          • AIBOX-1684X-416 Introduction
        • 2. Demo Simple Operation Guide

          • Simple instructions for using shimeta smart monitoring demo
      • RDK-X5

        • 1. Introduction

          • RDK-X5 Hardware Introduction
        • 2. Quick Start

          • RDK-X5 Quick Start
        • 3. Application Development

          • 3.1 AI Online Model Development

            • AI Online Development - Experiment01
            • AI Online Development - Experiment02
            • AI Online Development - Experiment03
            • AI Online Development - Experiment04
            • AI Online Development - Experiment05
            • AI Online Development - Experiment06
          • 3.2 Large Language Models (Voice)

            • Voice LLM Application - Experiment01
            • Voice LLM Application - Experiment02
            • Voice LLM Application - Experiment03
            • Voice LLM Application - Experiment04
            • Voice LLM Application - Experiment05
            • Voice LLM Application - Experiment06
          • 3.3 40pin-IO Development

            • 40pin IO Development - Experiment01
            • 40pin IO Development - Experiment02
            • 40pin IO Development - Experiment03
            • 40pin IO Development - Experiment04
            • 40pin IO Development - Experiment05
            • 40pin IO Development - Experiment06
            • 40pin IO Development - Experiment07
          • 3.4 USB Module Development

            • USB Module Usage - Experiment01
            • USB Module Usage - Experiment02
          • 3.5 Machine Vision

            • Machine Vision Technology Development - Experiment01
            • Machine Vision Technology Development - Experiment02
            • Machine Vision Technology Development - Experiment03
            • Machine Vision Technology Development - Experiment04
          • 3.6 ROS2 Base Development

            • ROS2 Basic Development - Experiment01
            • ROS2 Basic Development - Experiment02
            • ROS2 Basic Development - Experiment03
            • ROS2 Basic Development - Experiment04
      • RDK-S100

        • 1. Introduction

          • 1.1 About RDK-S100
        • 2. Quick Start

          • 2.1 First Use
        • 3. Application Development

          • 3.1 AI Online Model Development

            • 3.1.1 Volcano Engine Doubao AI
            • 3.1.2 Image Analysis
            • 3.1.3 Multimodal Visual Analysis
            • 3.1.4 Multimodal Image Comparison
            • 3.1.5 Multimodal Document Analysis
            • 3.1.6 Camera AI Vision Analysis
          • 3.2 Large Language Models

            • 3.2.1 Speech Recognition
            • 3.2.2 Voice Conversation
            • 3.2.3 Multimodal Image Analysis
            • 3.2.4 Multimodal Image Comparison
            • 3.2.5 Multimodal Document Analysis
            • 3.2.6 Multimodal Vision Application
          • 3.3 40pin-IO Development

            • 3.3.1 GPIO Output LED Blink
            • 3.3.2 GPIO Input
            • 3.3.3 Key Control LED
            • 3.3.4 PWM Output
            • 3.3.5 Serial Output
            • 3.3.6 I2C Experiment
          • 3.4 USB Module Development

            • 3.4.1 USB Voice Module
            • 3.4.2 Sound Source Localization
          • 3.5 Machine Vision

            • 3.5.1 USB Camera
            • 3.5.2 Image Processing Basics
            • 3.5.3 Object Detection
            • 3.5.4 Image Segmentation
          • 3.6 ROS2 Base Development

            • 3.6.1 Environment Setup
            • 3.6.2 Create and Build Workspace
            • 3.6.3 ROS2 Topic Communication
            • 3.6.4 ROS2 Camera Application
    • Core-Board

      • C-3568BQ

        • 1. Introduction

          • C-3568BQ Introduction
      • C-3588LQ

        • 1. Introduction

          • C-3588LQ Introduction
      • GC-3568JBAF

        • 1. Introduction

          • GC-3568JBAF Introduction
      • C-K1BA

        • 1. Introduction

          • C-K1BA Introduction

Machine Vision Technology Development

Experiment 3 - Gesture Recognition Experience

Step 1: System Preparation

sudo apt update && sudo apt upgrade -y
sudo apt install -y build-essential cmake pkg-config python3-dev python3-pip (can skip if python3 is already installed)

Step 2: Create Virtual Environment

cd OPENCV
python3 -m venv rdkx5_vision_env
source rdkx5_vision_env/bin/activate

Step 3: Install Dependencies

pip install --upgrade pip
pip install -r requirements.txt

Step 4: Test Environment

python3 mediapipe_gesture_demo.py
TOOLTOOL

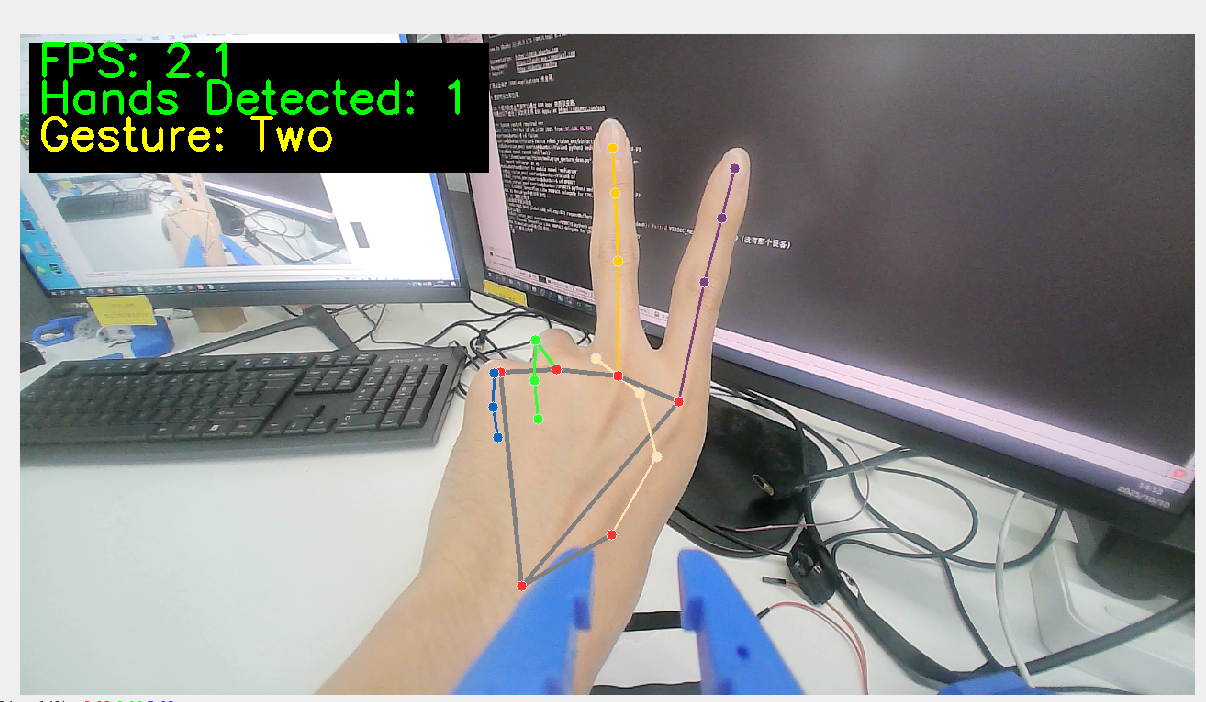
Sample program includes the following features:

  • ✅ Real-time gesture detection - supports simultaneous detection of both hands
  • ✅ Number gesture recognition - recognizes finger counts 1-5
  • ✅ Special gesture recognition - OK gesture, thumbs up gesture
  • ✅ Performance monitoring - real-time FPS display
  • ✅ Visual feedback - hand keypoint drawing
import cv2
import numpy as np
import math
import time

# Initialize camera
cap = cv2.VideoCapture(0)

# Set window size
window_width = 1280
window_height = 720

# Adjust camera resolution
cap.set(cv2.CAP_PROP_FRAME_WIDTH, window_width)
cap.set(cv2.CAP_PROP_FRAME_HEIGHT, window_height)

# Create window
cv2.namedWindow('Hand Gesture Recognition', cv2.WINDOW_NORMAL)
cv2.resizeWindow('Hand Gesture Recognition', window_width, window_height)

# Create slider window for adjusting skin color threshold
cv2.namedWindow('Skin Detection Controls')
cv2.resizeWindow('Skin Detection Controls', 400, 250)

# Create HSV threshold sliders for skin detection
cv2.createTrackbar('H_min', 'Skin Detection Controls', 0, 179, lambda x: None)
cv2.createTrackbar('H_max', 'Skin Detection Controls', 20, 179, lambda x: None)
cv2.createTrackbar('S_min', 'Skin Detection Controls', 30, 255, lambda x: None)
cv2.createTrackbar('S_max', 'Skin Detection Controls', 150, 255, lambda x: None)
cv2.createTrackbar('V_min', 'Skin Detection Controls', 60, 255, lambda x: None)
cv2.createTrackbar('V_max', 'Skin Detection Controls', 255, 255, lambda x: None)

# Set default values
cv2.setTrackbarPos('H_min', 'Skin Detection Controls', 0)
cv2.setTrackbarPos('H_max', 'Skin Detection Controls', 20)
cv2.setTrackbarPos('S_min', 'Skin Detection Controls', 30)
cv2.setTrackbarPos('S_max', 'Skin Detection Controls', 150)
cv2.setTrackbarPos('V_min', 'Skin Detection Controls', 60)
cv2.setTrackbarPos('V_max', 'Skin Detection Controls', 255)

# Function to count fingers
def count_fingers(contour, drawing):
    # Calculate convex hull
    hull = cv2.convexHull(contour, returnPoints=False)

    # If too few hull points, cannot calculate defects
    if len(hull) < 3:
        return 0

    # Calculate convexity defects
    defects = cv2.convexityDefects(contour, hull)
    if defects is None:
        return 0

    # Count valid convexity defects (gaps between fingers)
    finger_count = 0

    for i in range(defects.shape[0]):
        s, e, f, d = defects[i, 0]
        start = tuple(contour[s][0])
        end = tuple(contour[e][0])
        far = tuple(contour[f][0])

        # Calculate three sides of triangle
        a = math.sqrt((end[0] - start[0]) ** 2 + (end[1] - start[1]) ** 2)
        b = math.sqrt((far[0] - start[0]) ** 2 + (far[1] - start[1]) ** 2)
        c = math.sqrt((end[0] - far[0]) ** 2 + (end[1] - far[1]) ** 2)

        # Use cosine theorem to calculate angle
        angle = math.degrees(math.acos((b ** 2 + c ** 2 - a ** 2) / (2 * b * c)))

        # If angle is less than 90 degrees, consider it as gap between fingers
        if angle <= 90:
            # Mark defect point on image
            cv2.circle(drawing, far, 5, [0, 0, 255], -1)
            finger_count += 1

    # Defect count plus 1 equals finger count (because defects are gaps between fingers)
    return finger_count + 1

# Main loop
while cap.isOpened():
    success, image = cap.read()
    if not success:
        print("Unable to get camera frame")
        break

    # Flip image horizontally to look more like a mirror
    image = cv2.flip(image, 1)

    # Create a copy for drawing
    drawing = image.copy()

    # Convert to HSV color space
    hsv = cv2.cvtColor(image, cv2.COLOR_BGR2HSV)

    # Get current skin color threshold
    h_min = cv2.getTrackbarPos('H_min', 'Skin Detection Controls')
    h_max = cv2.getTrackbarPos('H_max', 'Skin Detection Controls')
    s_min = cv2.getTrackbarPos('S_min', 'Skin Detection Controls')
    s_max = cv2.getTrackbarPos('S_max', 'Skin Detection Controls')
    v_min = cv2.getTrackbarPos('V_min', 'Skin Detection Controls')
    v_max = cv2.getTrackbarPos('V_max', 'Skin Detection Controls')

    # Create skin color mask
    lower_skin = np.array([h_min, s_min, v_min])
    upper_skin = np.array([h_max, s_max, v_max])
    mask = cv2.inRange(hsv, lower_skin, upper_skin)

    # Perform morphological operations to remove noise
    kernel = np.ones((5, 5), np.uint8)
    mask = cv2.erode(mask, kernel, iterations=1)
    mask = cv2.dilate(mask, kernel, iterations=2)
    mask = cv2.GaussianBlur(mask, (5, 5), 0)

    # Find contours
    contours, _ = cv2.findContours(mask, cv2.RETR_EXTERNAL, cv2.CHAIN_APPROX_SIMPLE)

    # Find the largest contour (assumed to be hand)
    if contours:
        max_contour = max(contours, key=cv2.contourArea)

        # Only process contours large enough
        if cv2.contourArea(max_contour) > 5000:
            # Draw contour
            cv2.drawContours(drawing, [max_contour], 0, (0, 255, 0), 2)

            # Calculate and display finger count
            finger_count = count_fingers(max_contour, drawing)

            # Limit finger count between 1-5
            finger_count = max(1, min(5, finger_count))

            # Display number on image
            cv2.putText(
                drawing,
                f"Fingers: {finger_count}",
                (50, 50),
                cv2.FONT_HERSHEY_SIMPLEX,
                1,
                (0, 255, 0),
                2,
                cv2.LINE_AA
            )

    # Display skin detection result
    cv2.imshow('Skin Detection', mask)

    # Display final result
    cv2.imshow('Hand Gesture Recognition', drawing)

    # Display usage instructions
    cv2.putText(
        drawing,
        "Adjust sliders to detect skin color properly",
        (10, drawing.shape[0] - 40),
        cv2.FONT_HERSHEY_SIMPLEX,
        0.5,
        (0, 0, 255),
        1,
        cv2.LINE_AA
    )

    cv2.putText(
        drawing,
        "Press 'q' to quit",
        (10, drawing.shape[0] - 10),
        cv2.FONT_HERSHEY_SIMPLEX,
        0.5,
        (0, 0, 255),
        1,
        cv2.LINE_AA
    )

    # Press 'q' to quit
    if cv2.waitKey(5) & 0xFF == ord('q'):
        break

# Release resources
cap.release()
cv2.destroyAllWindows()
Edit this page on GitHub
Prev
Machine Vision Technology Development - Experiment02
Next
Machine Vision Technology Development - Experiment04