Ethernet
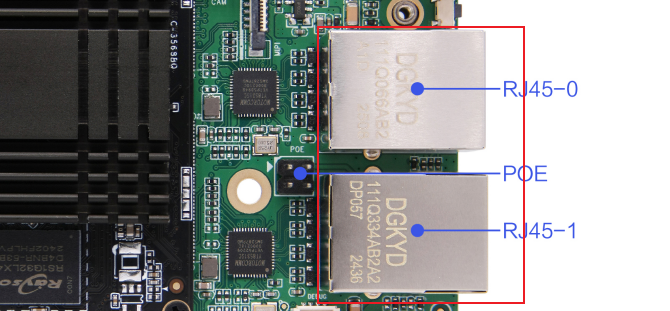
以M4-R1为例,板卡上有双以太网网口
1. dts配置
- arch/arm64/boot/dts/rockchip/rk3568-toybrick-x0.dtsi
&gmac0 {
phy-mode = "rgmii";
clock_in_out = "output";
snps,reset-gpio = <&gpio2 RK_PD3 GPIO_ACTIVE_LOW>;
snps,reset-active-low;
/* Reset time is 20ms, 100ms for rtl8211f */
snps,reset-delays-us = <0 20000 100000>;
assigned-clocks = <&cru SCLK_GMAC0_RX_TX>, <&cru SCLK_GMAC0>;
assigned-clock-parents = <&cru SCLK_GMAC0_RGMII_SPEED>, <&cru CLK_MAC0_2TOP>;
assigned-clock-rates = <0>, <125000000>;
pinctrl-names = "default";
pinctrl-0 = <&gmac0_miim
&gmac0_tx_bus2
&gmac0_rx_bus2
&gmac0_rgmii_clk
&gmac0_rgmii_bus>;
tx_delay = <0x2d>;
rx_delay = <0x13>;
phy-handle = <&rgmii_phy0>;
status = "okay";
};
&gmac1 {
phy-mode = "rgmii";
clock_in_out = "output";
snps,reset-gpio = <&gpio2 RK_PD1 GPIO_ACTIVE_LOW>;
snps,reset-active-low;
/* Reset time is 20ms, 100ms for rtl8211f */
snps,reset-delays-us = <0 20000 100000>;
assigned-clocks = <&cru SCLK_GMAC1_RX_TX>, <&cru SCLK_GMAC1>;
assigned-clock-parents = <&cru SCLK_GMAC1_RGMII_SPEED>, <&cru CLK_MAC1_2TOP>;
assigned-clock-rates = <0>, <125000000>;
pinctrl-names = "default";
pinctrl-0 = <&gmac1m1_miim
&gmac1m1_tx_bus2
&gmac1m1_rx_bus2
&gmac1m1_rgmii_clk
&gmac1m1_rgmii_bus>;
tx_delay = <0x37>;
rx_delay = <0x0f>;
phy-handle = <&rgmii_phy1>;
status = "okay";
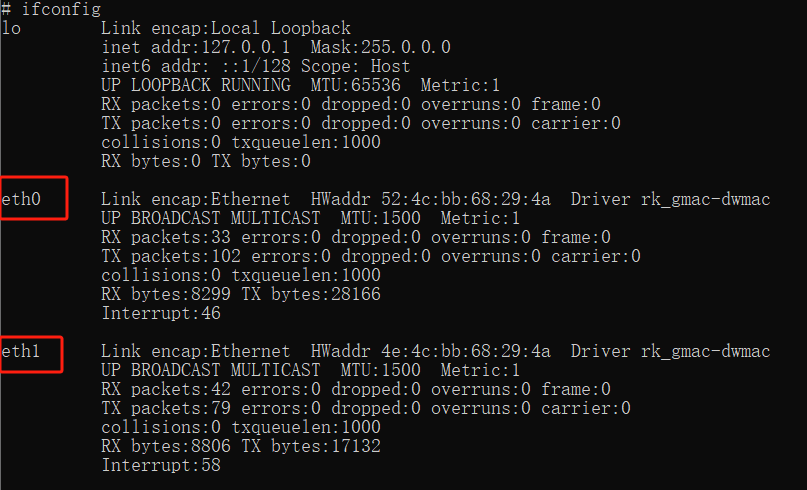
};2. 检查eth接口
使用ifconfig命令检查是否生成ethX节点:
3. 连通性测试
使用以下命令测试网口
- eth0:
    ~# ping -I eth0 -c 10 www.baidu.com
    Ping www.baidu.com (183.2.172.42) from eth0 (192.168.49.35): 56(84) bytes.
    64 bytes from 183.2.172.42: icmp_seq=1 ttl=50 time=12 ms
    64 bytes from 183.2.172.42: icmp_seq=2 ttl=50 time=10 ms
    64 bytes from 183.2.172.42: icmp_seq=3 ttl=50 time=10 ms
    64 bytes from 183.2.172.42: icmp_seq=4 ttl=50 time=10 ms
    64 bytes from 183.2.172.42: icmp_seq=5 ttl=50 time=17 ms
    64 bytes from 183.2.172.42: icmp_seq=6 ttl=50 time=8 ms
    64 bytes from 183.2.172.42: icmp_seq=7 ttl=50 time=9 ms
    64 bytes from 183.2.172.42: icmp_seq=8 ttl=50 time=8 ms
    64 bytes from 183.2.172.42: icmp_seq=9 ttl=50 time=10 ms
    64 bytes from 183.2.172.42: icmp_seq=10 ttl=50 time=9 ms

    --- 183.2.172.42 ping statistics ---
    10 packets transmitted, 10 received, 0% packet loss
round-trip min/avg/max = 8/10/17 ms- eth1:
    ~# ping -I eth1 -c 10 www.baidu.com
    Ping www.baidu.com (183.2.172.185) from eth1 (192.168.49.241): 56(84) bytes.
    64 bytes from 183.2.172.185: icmp_seq=1 ttl=50 time=9 ms
    64 bytes from 183.2.172.185: icmp_seq=2 ttl=50 time=9 ms
    64 bytes from 183.2.172.185: icmp_seq=3 ttl=50 time=9 ms
    64 bytes from 183.2.172.185: icmp_seq=4 ttl=50 time=9 ms
    64 bytes from 183.2.172.185: icmp_seq=5 ttl=50 time=8 ms
    64 bytes from 183.2.172.185: icmp_seq=6 ttl=50 time=8 ms
    64 bytes from 183.2.172.185: icmp_seq=7 ttl=50 time=9 ms
    64 bytes from 183.2.172.185: icmp_seq=8 ttl=50 time=8 ms
    64 bytes from 183.2.172.185: icmp_seq=9 ttl=50 time=8 ms
    64 bytes from 183.2.172.185: icmp_seq=10 ttl=50 time=9 ms

    --- 183.2.172.185 ping statistics ---
    10 packets transmitted, 10 received, 0% packet loss
    round-trip min/avg/max = 8/8/9 ms
4. 以太网API使用与实践
4.1 HDC相关指令
hdc指令可以用于查询以太网的信息以及连接状态
hdc shell ifconfig关闭/打开以太网 hdc命令:
    ifconfig eth0 X.X.X.X up
    ifconfig eth0 X.X.X.X down
    注:x.x.x.x 为网卡地址。
4.2 标准API使用方法
备注
以太网连接管理主要提供有线网络能力,提供设置有线网络的IP地址,子网掩码,网关,DNS,代理等信息 本模块首批接口从API version 9开始支持。后续版本的新增接口,采用上角标单独标记接口的起始版本。 本模块为系统接口。
以太网标准接口
@ohos.net.ethernet (以太网连接管理)(系统接口)
API使用说明
使用以太网相关API开发时候,需要先了解熟悉第一个open Harmony工程的创建,相关文档:
在使用一个API时,需要注意以下几点:
- API权限说明
- API的参数与返回值
- API调用错误的时候,参考API错误码和通用错误码
- API示例的正确使用
如下图所示,即为标准API文档
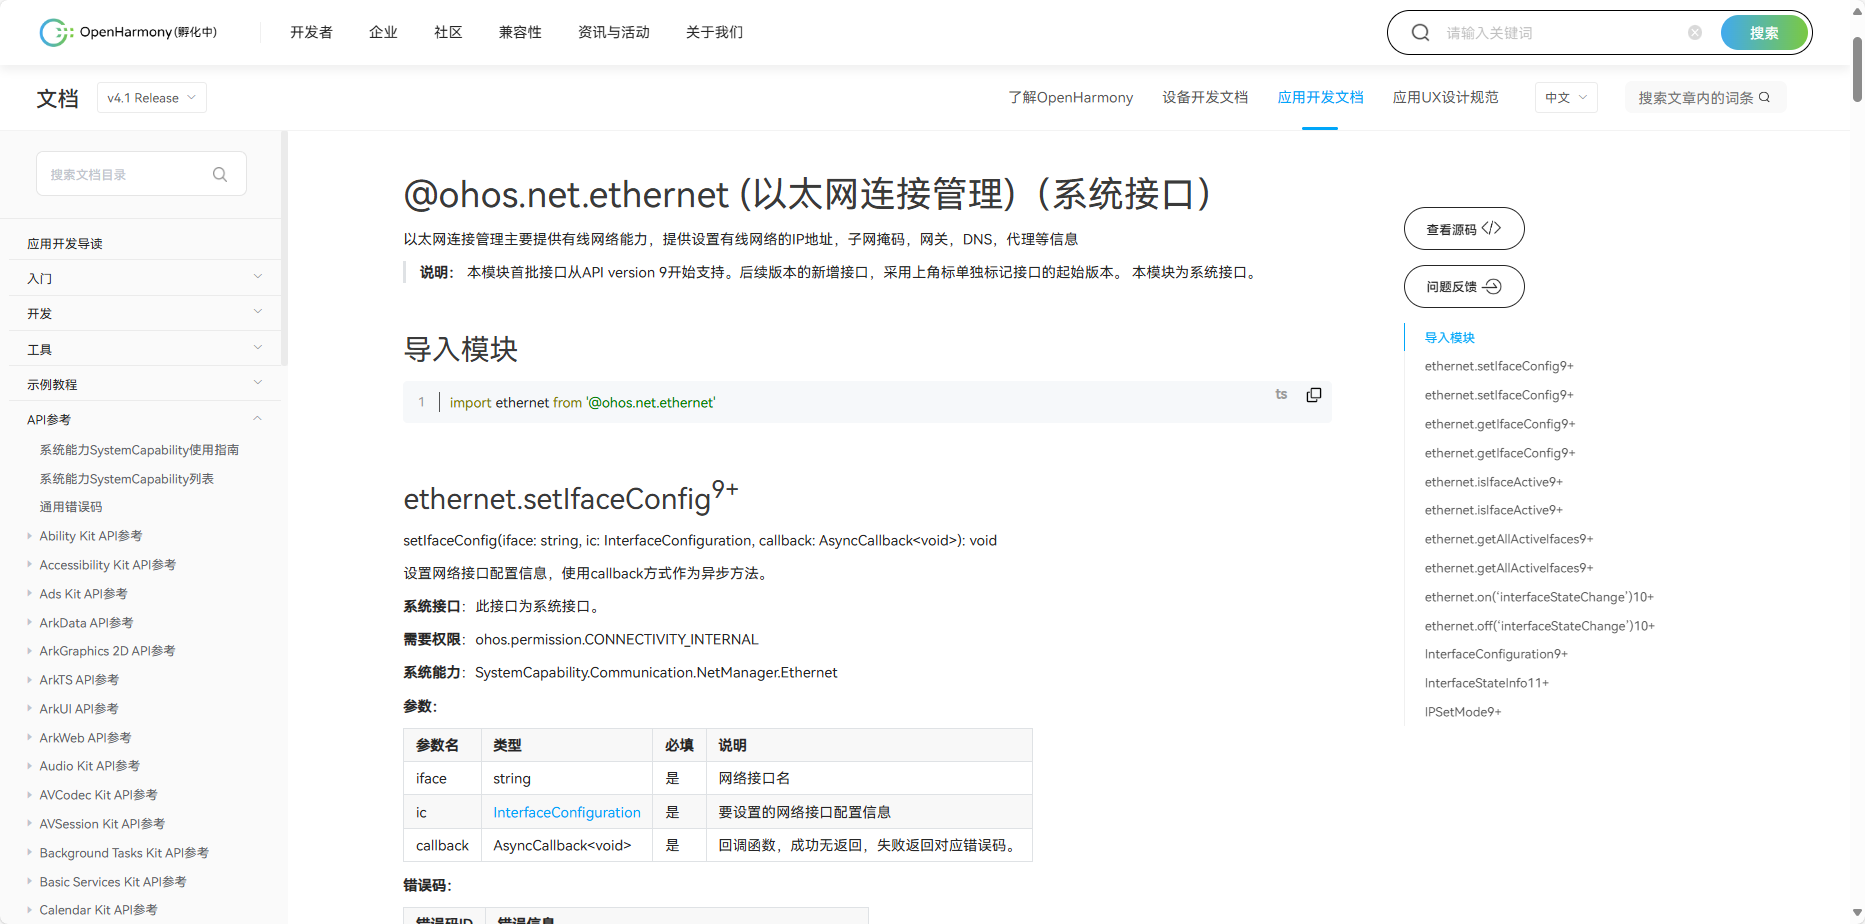
官方标准开发文档
4.3 社区Demo
- 简介
为了帮助开发者更快速的使用板子开发和学习,我们在gitee上提供了一个以太网相关的使用示例,每一个项目都是独立的DevEco Studio工程,开发者可以将工程导入到DevEco Studio中即可,通过浏览代码、编译工程、安装和运行应用示例来了解应用示例中涉及API的使用方法。
Tips
在导入社区Demo工程的时候,需要开发者需要注意本地的开发环境是否与项目的一致,即本地SDK是否与项目SDK一致。
- 导入模块
在使用以太网标准API的时候,最重要的一步是导入以太网的模块,才能使用以太网相应的API接口。通常模块导入是在文件头导入
导入模块如下:
import ethernet from '@ohos.net.ethernet'
- API 介绍
社区Demo的实现引用以下API,实现如何打开获取以太网信息,设置静动态,以及以太网的连接的基本实现。
注意
以下介绍均以为简单介绍API的系统能力以及对应函数,请结合 gitee以太网示例 和 以太网官方标准API开发文档去熟悉开发
- ethernet.setIfaceConfig(设置网络接口配置信息)
	setIfaceConfig(iface: string, ic: InterfaceConfiguration): Promise<void>
需要权限: ohos.permission.CONNECTIVITY_INTERNAL 。- ethernet.getIfaceConfig(获取指定网络接口信息,)
	getIfaceConfig(iface: string): Promise<InterfaceConfiguration>
需要权限: ohos.permission.GET_NETWORK_INFO 。- ethernet.isIfaceActive(判断接口是否已激活)
	isIfaceActive(iface: string): Promise<number>
需要权限: ohos.permission.GET_NETWORK_INFO 。- ethernet.getAllActiveIfaces(获取活动的网络接口)
	getAllActiveIfaces(): Promise<Array<string>>
需要权限: ohos.permission.GET_NETWORK_INFO 。- ethernet.on(‘interfaceStateChange’)(注册网卡热插拔事件)
	getAllActiveIfaces(): Promise<Array<string>>
	需要权限: ohos.permission.GET_NETWORK_INFO 。
Demo主要实现源码
ent.ets
  import ethernet from '@ohos.net.ethernet'
  import { BusinessError } from '@ohos.base';

  @Entry
  @Component
  struct Index {
  @State message: string = '以太网Demo';
  private  TAG : string = 'ent_Demo'
  @State entModeTest : string = '当前动态Ip'
  @State entName : string = "eth0"
  @State entModeStatus : boolean = true;//动/静态Ip的判断
  @State entMsg : string = ''
  @State entIp : string = ''
  @State entRoute : string = ''
  @State entGateway : string = ''
  @State entMask : string = ''
  @State entDNS : string = ''
  @State entMode : number = 1;


  aboutToAppear(): void {
	 this.getAllActiveIfaces();
	 this.getIfaceConfig();
  }


  setIfaceConfig(){
	 let config: ethernet.InterfaceConfiguration = {
		mode: this.entMode,
		ipAddr: this.entIp,
		route: this.entRoute,
		gateway: this.entGateway,
		netMask: this.entMask,
		dnsServers: this.entDNS
	 };

	 const setConfigPromise = ethernet.setIfaceConfig("eth0", config);

	 setConfigPromise.then(() => {
		console.log(this.TAG,"setIfaceConfig promise ok");
	 }).catch((error: BusinessError)  => {
		console.error(this.TAG,"setIfaceConfig promise error = " + JSON.stringify(error));
	 });
  }

  getIfaceConfig(){
	 ethernet.getIfaceConfig(this.entName).then((data: ethernet.InterfaceConfiguration) => {
		console.log(this.TAG,"getIfaceConfig promise mode = " + data.mode);
		console.log(this.TAG,"getIfaceConfig promise ipAddr = " + JSON.stringify(data.ipAddr));
		console.log(this.TAG,"getIfaceConfig promise route = " + JSON.stringify(data.route));
		console.log(this.TAG,"getIfaceConfig promise gateway = " + JSON.stringify(data.gateway));
		console.log(this.TAG,"getIfaceConfig promise netMask = " + JSON.stringify(data.netMask));
		console.log(this.TAG,"getIfaceConfig promise dnsServers = " + JSON.stringify(data.dnsServers));
		if (data.mode == 0) {
		this.entModeStatus = false;
		}else {
		this.entModeStatus = true
		}
		this.entMode = data.mode
		this.entMsg = JSON.stringify(data).toString();
		this.entRoute = data.route.toString();
		this.entGateway = data.gateway.toString();
		this.entMask = data.netMask.toString();
		this.entDNS = data.dnsServers.toString();
	 }).catch((error: BusinessError) => {
		console.error(this.TAG,"getIfaceConfig promise error = " + JSON.stringify(error));
	 });
  }

  isIfaceActive(){
	 ethernet.isIfaceActive("eth0").then((data: number) => {
		console.log(this.TAG,"isIfaceActive promise = " + JSON.stringify(data));
	 }).catch((error: BusinessError) => {
		console.log(this.TAG,"isIfaceActive promise error = " + JSON.stringify(error));
	 });
  }

  getAllActiveIfaces(){
	 ethernet.getAllActiveIfaces().then((data: string[]) => {
		console.log(this.TAG,"getAllActiveIfaces promise data.length = " + JSON.stringify(data.length));
		if (JSON.stringify(data.length) == '1' ) {
		console.log(this.TAG,'data.length')
		}
		for (let i = 0; i < data.length; i++) {
		console.log(this.TAG,"getAllActiveIfaces promise  = " + JSON.stringify(data[i]));
		}
	 }).catch((error:BusinessError) => {
		console.error(this.TAG,"getAllActiveIfaces promise error = " + JSON.stringify(error));
	 });
  }

  build() {
		Column() {
		Text(this.message)
		   .fontSize(50)
		   .fontWeight(FontWeight.Bold)
		   .padding(20)
		Button('点击切换动/静态IP')
		   .onClick(()=>{
			  if (this.entMode == 0) {
			  this.entMode = 1;
			  this.entModeTest = '当前动态Ip'
			  this.entModeStatus = true;
			  }else{
			  this.entMode = 0;
			  this.entModeTest = '当前静态Ip'
			  this.entModeStatus = false;
			  }
			  this.setIfaceConfig();
			  this.getIfaceConfig();
		   })
		if (this.entModeStatus){
		   Column(){
			  TextInput({placeholder : '静态Ip'})
			  .onChange((value : string)=>{
				 this.entIp = value
			  })
		   }
		   .height(80)
		   .width(300)
		   .padding(10)
		   .margin(10)
		}
		Text(this.entModeTest)
		   .fontSize(50)
		   .fontWeight(FontWeight.Bold)
		   .padding(30)
		Column(){
		   Text('网口信息')
		   Blank()
		   Text(this.entMsg)
		}
		.height(80)
		.padding(10)
		}
		.width('100%')
  }

  }
4.4 代码编译
Tips
代码编译详细流程可见:Hello World应用以及部署 中的第二部分(构建第一个页面部分内容)
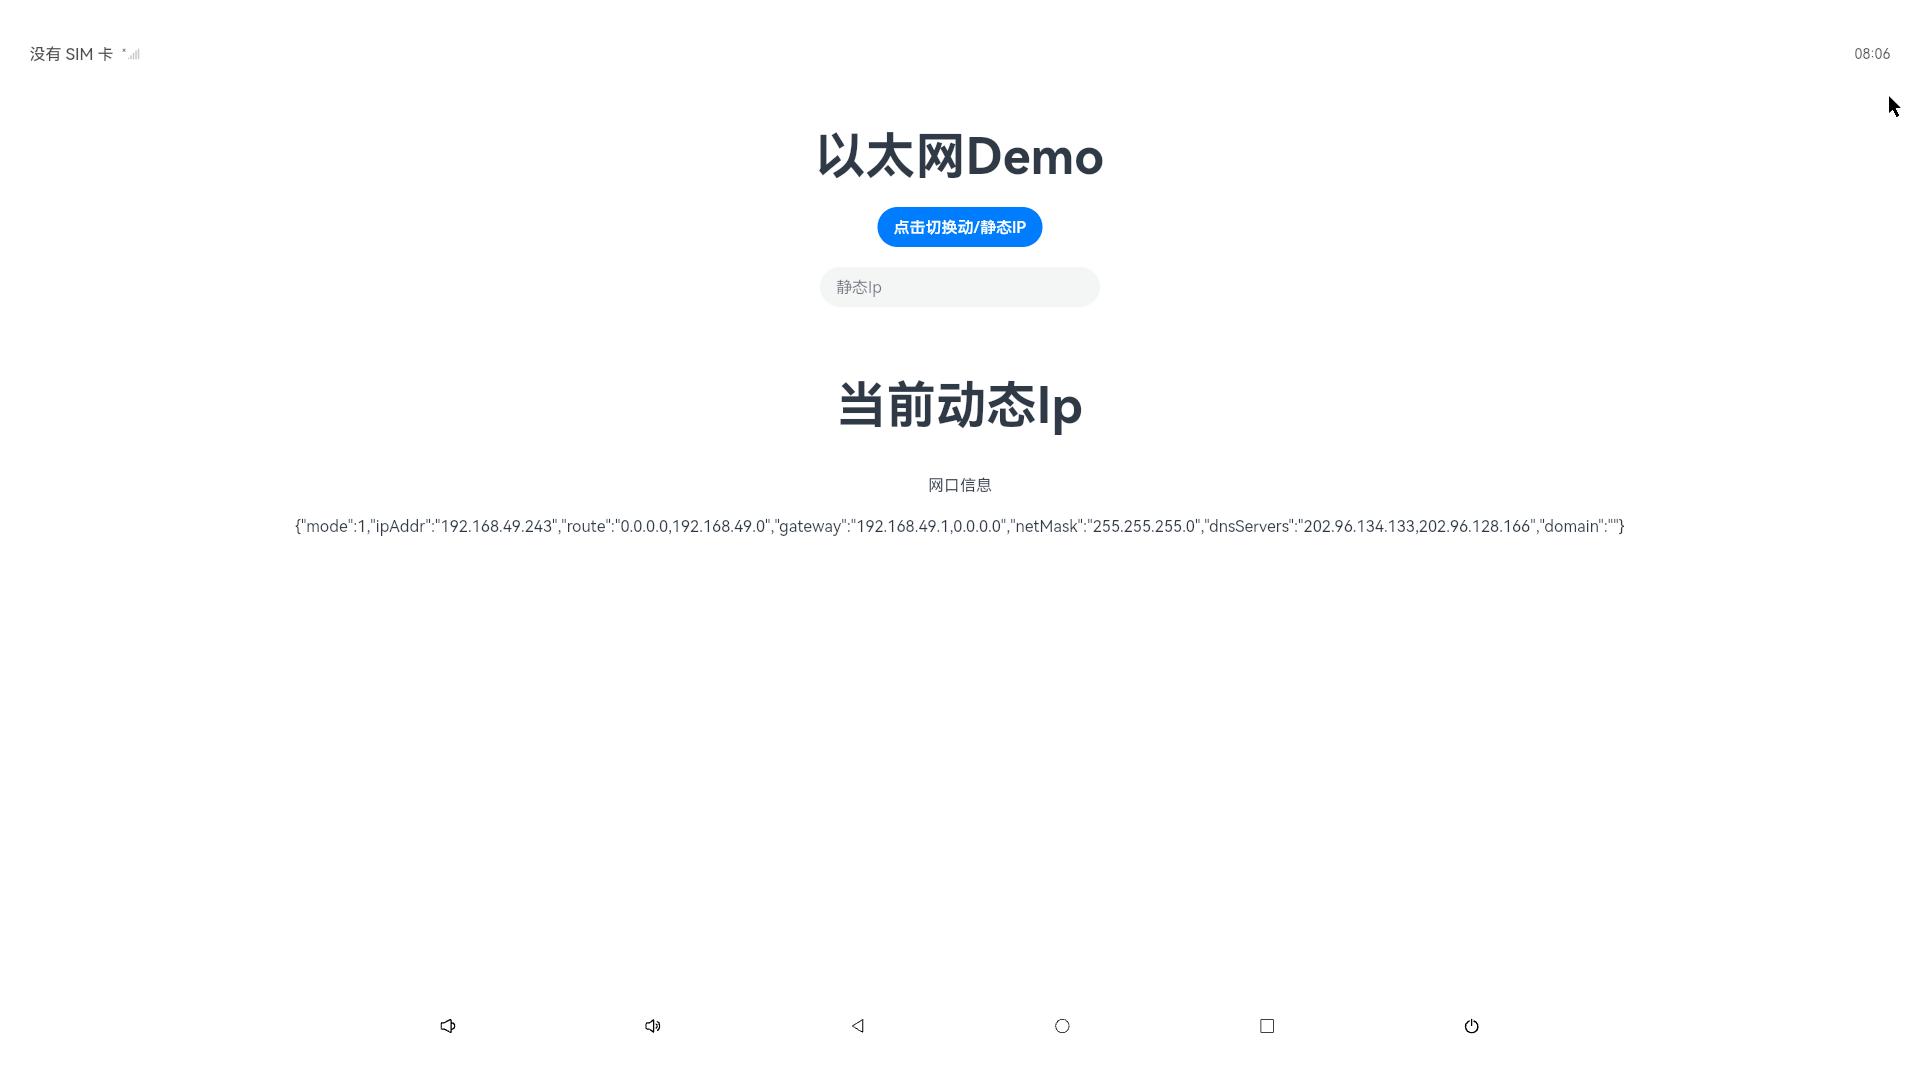
4.5 代码运行效果
用以上标准API接口实现以太网Demo,如下图所示: