02 Developing HAR Package
1 Developing for ArkUI Components
1.1 Creating a New Static Library
Open DevEco Studio. If there is an existing project, open it. If not, create a new one, then proceed with HAR package development.
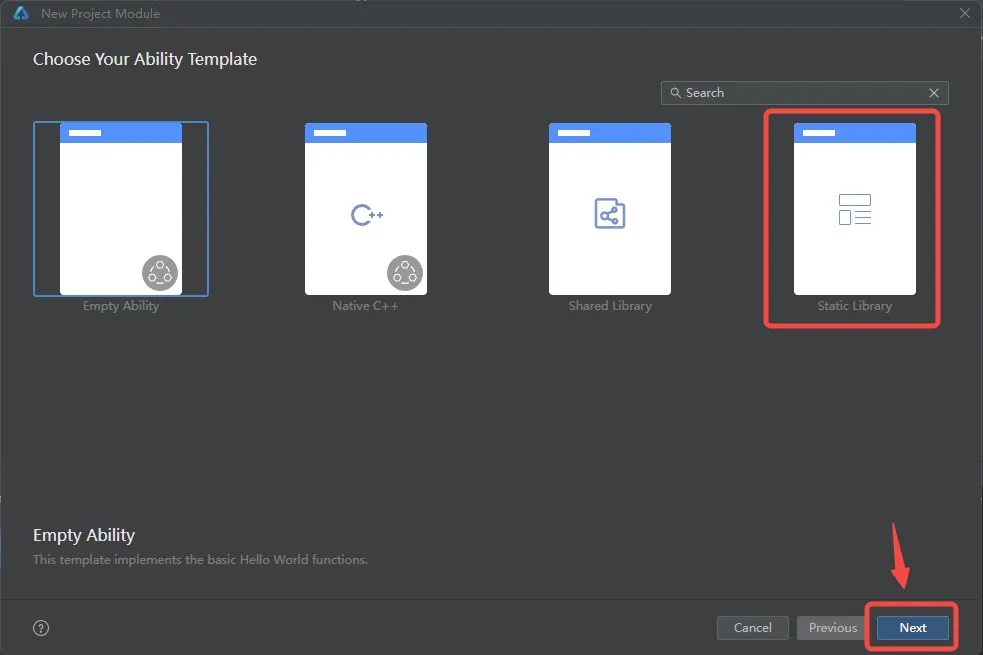
- In the menu bar, select File > New > Module. Select Static Library and click [Next]
- In the new module configuration interface, configure the Module name and Device type. Click [Finish] to create the module. Note: If you need to create a shared module for calling C/C++ code, simply check [Enable native] to create it.
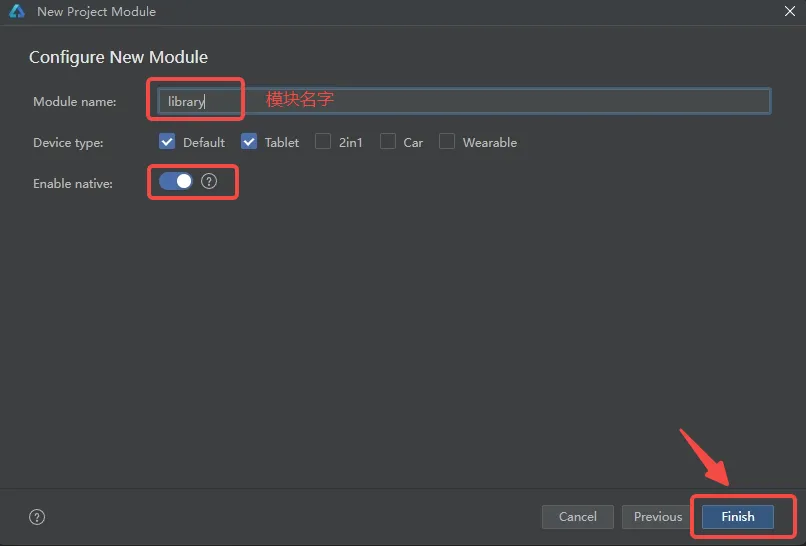
The module content is as shown (with Enable native checked)

1.2 Exporting ArkUI Components
Export ArkUI components through export. The example is as follows:
// File path: library/src/main/ets/components/mainpage/MainPage.ets
import { hilog } from '@kit.PerformanceAnalysisKit';
import testNapi from 'liblibrary.so';

const DOMAIN = 0x0000;

@Component
  export struct MainPage {
    @State message: string = 'Hello World';

    build() {
      Row() {
        Column() {
          Text(this.message)
            .fontSize($r('app.float.page_text_font_size'))
            .fontWeight(FontWeight.Bold)
            .onClick(() => {
              const result = testNapi.add(2, 3);
              this.message = `Welcome! Test NAPI 2 + 3 = ${result}`;
              hilog.info(DOMAIN, 'testTag', 'Test NAPI 2 + 3 = %{public}d', result);
            })
        }
        .width('100%')
      }
      .height('100%')
    }
  }
The interface exposed by HAR to the outside is declared in the Index.ets export file as follows:
// File path: library/Index.ets
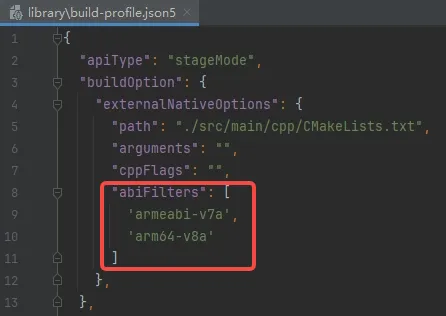
export { MainPage } from './src/main/ets/components/MainPage';Since M-K1HSE firmware is a 32-bit system, it is necessary to add the following code in the buildOption -> externalNativeOption of the module-level build-profile.json5 in the library module:
// File path: library/build-profile.json5
"abiFilters": [
  'armeabi-v7a',
  'arm64-v8a'
]
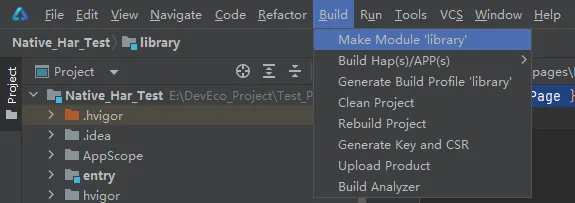
In the menu bar, select Build -> Make Module ${libraryName} to compile and build. The HAR package will be generated.
After waiting for compilation to complete, in the library/build/default/outputs/default directory, you can find library.har, indicating the HAR package was successfully generated.

1.3 Referencing ArkUI Components
In a new project, to reference the ArkUI components of the HAR package, you first need to configure HAR package dependencies. Referencing third-party HAR packages includes two methods: installing from the ohpm repository and referencing local HAR packages. This document uses local HAR package referencing as a case. Later updates will cover installing HAR packages from the ohpm repository.
- First create a new Empty Ability project, then copy the generated HAR package to the entry module directory

- In the oh-package.json5 of the module that needs to import third-party packages, configure the local HAR package as follows:
"dependencies": {
  "library": "file:./library.har" // Relative path starting from the directory where oh-package.json5 is located.
}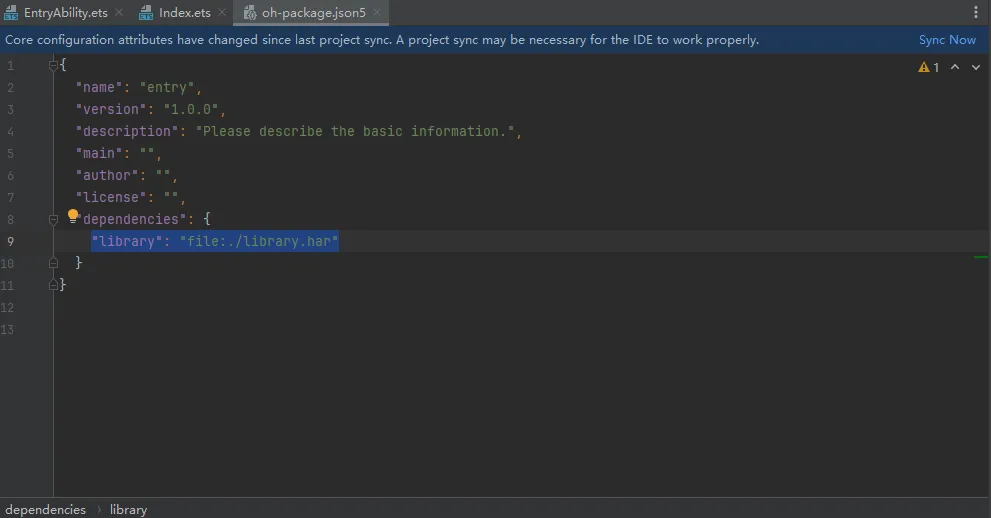
- Click [Sync Now] for synchronization and wait for synchronization to complete.
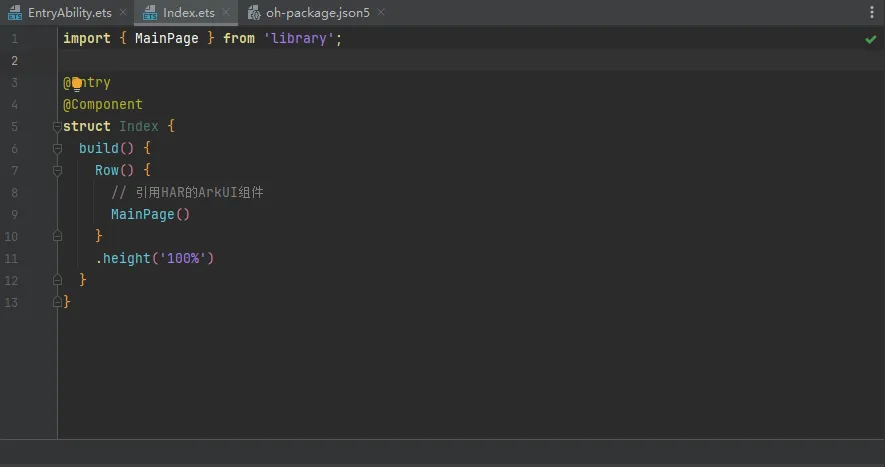
- Import the HAR exported ArkUI components through import. The example is as follows:
//File path: entry/src/main/ets/pages/Index.ets
import { MainPage } from 'library';

@Entry
@Component
struct Index {
  build() {
    Row() {
      // Reference HAR's ArkUI component
      MainPage()
    }
    .height('100%')
  }
}
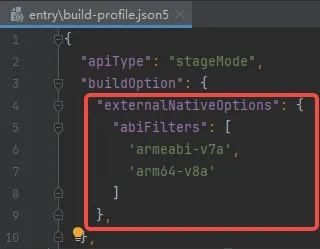
- Since M-K1HSE firmware is a 32-bit system, it is necessary to add the following code in the buildOption of the module-level build-profile.json5 in the entry module:
// File path: entry/build-profile.json5
"externalNativeOptions": {
  "abiFilters": [
    'armeabi-v7a',
    'arm64-v8a'
  ]
},
- For signing configuration, refer to 01 Hello World -> 2 Launch the First Application -> 2.2 Signing File
- If SysCap property adjustment has not been done before, refer to 01 Hello World -> 2 Launch the First Application -> 2.3 SysCap Property Adjustment
- After completing the above operations and synchronizing, run the application to the board
Sample Application Effect
Application starts and displays Hello World textWhen clicking Hello World text, it switches to Welcome! Test NAPI 2 + 3 =5