HOME
Shop
  • English
  • 简体中文
HOME
Shop
  • English
  • 简体中文
  • Product Series

    • FPGA+ARM

      • GM-3568JHF

        • 1. Introduction

          • About GM-3568JHF
        • 2. Quick Start

          • 00 Introduction
          • 01 Environment Setup
          • 02 Compilation Instructions
          • 03 Flashing Guide
          • 04 Debug Tools
          • 05 Software Update
          • 06 View Information
          • 07 Test Commands
          • 08 App Compilation
          • 09 Source Code Acquisition
        • 3. Peripherals and Interfaces

          • 01 USB
          • 02 Display and Touch
          • 03 Ethernet
          • 04 WIFI
          • 05 Bluetooth
          • 06 TF-Card
          • 07 Audio
          • 08 Serial Port
          • 09 CAN
          • 10 RTC
        • 4. Application Development

          • 01 UART read and write case
          • 02 Key detection case
          • 03 LED light flashing case
          • 04 MIPI screen detection case
          • 05 Read USB device information example
          • 06 FAN Detection Case
          • 07 FPGA FSPI Communication Case
          • 08 FPGA DMA read and write case
          • 09 GPS debugging case
          • 10 Ethernet Test Cases
          • 11 RS485 reading and writing examples
          • 12 FPGA IIC read and write examples
          • 13 PN532 NFC card reader case
          • 14 TF card reading and writing case
        • 5. QT Development

          • 01 ARM64 cross compiler environment construction
          • 02 QT program added automatic startup service
        • 6. RKNN_NPU Development

          • 01 RK3568 NPU Overview
          • 02 Development Environment Setup
          • Run Official YOLOv5 Example
          • Model Conversion Detailed Explanation
          • Run Custom Model on Board
        • 7. FPGA Development

          • ARM and FPGA Communication
          • /fpga-arm/GM-3568JHF/FPGA/ch02-FPGA-Development-Manual.html
        • 8. Others

          • 01 Modification of the root directory file system
          • 02 System auto-start service
        • 9. Download

          • Download Resources
    • ShimetaPi

      • M4-R1

        • 1. Introduction

          • 1.1 About M4-R1
        • 2. Quick Start

          • 2.1 OpenHarmony Overview
          • 2.2 Image Burning
          • 2.3 Development Environment Preparation
          • 2.4 Hello World Application
        • 3. Application Development

          • 3.1 Getting Started

            • 3.1.1 ArkTS Language Overview
            • 3.1.2 UI Components (Part 1)
            • 3.1.3 UI Components (Part 2)
            • 3.1.4 UI Components (Part 3)
          • 3.2 Advanced

            • 3.2.1 Getting Started Guide
            • 3.2.2 Usage of Third Party Libraries
            • 3.2.3 Deployment of the Application
            • 3.2.4 Factory Reset
            • 3.2.5 System Debug
            • 3.2.6 APP Stability Testing
            • 3.2.7 Application Testing
          • 3.3 Getting Docs

            • 3.3.1 Official Website Information
          • 3.4 Development Instructions

            • 3.4.1 Full SDK
            • 3.4.2 Introduction of Third Party Libraries
            • 3.4.3 Introduction of HDC Tool
            • 3.4.4 Restore Factory Mode
            • 3.4.5 Update System API
          • 3.5 First Application

            • 3.5.1 First ArkTS App
          • 3.6 Application Demo

            • 3.6.1 UART Tool
            • 3.6.2 Graphics Tablet
            • 3.6.3 Digital Clock
            • 3.6.4 WIFI Tool
        • 4. Device Development

          • 4.1 Ubuntu Environment Development

            • 4.1.1 Environment Setup
            • 4.1.2 Download Source Code
            • 4.1.3 Compile Source Code
          • 4.2 Using DevEco Device Tool

            • 4.2.1 Tool Introduction
            • 4.2.2 Environment Construction
            • 4.2.3 Import SDK
            • 4.2.4 Function Introduction
        • 5. Peripherals and Interfaces

          • 5.1 Raspberry Pi Interfaces
          • 5.2 GPIO Interface
          • 5.3 I2C Interface
          • 5.4 SPI Communication
          • 5.5 PWM Control
          • 5.6 Serial Port Communication
          • 5.7 TF Card Slot
          • 5.8 Display Screen
          • 5.9 Touch Screen
          • 5.10 Audio
          • 5.11 RTC
          • 5.12 Ethernet
          • 5.13 M.2
          • 5.14 MINI PCIE
          • 5.15 Camera
          • 5.16 WIFI BT
          • 5.17 HAT
        • 6. FAQ

          • 6.1 Download Link
      • M5-R1

        • 1. Introduction

          • M5-R1 Development Documentation
        • 2. Quick Start

          • OpenHarmony Overview
          • Image Burning
          • Development Environment Preparation
          • Hello World Application and Deployment
        • 3. Peripherals and Interfaces

          • 3.1 Raspberry Pi Interfaces
          • 3.2 GPIO Interface
          • 3.3 I2C Interface
          • 3.4 SPI Communication
          • 3.5 PWM Control
          • 3.6 Serial Port Communication
          • 3.7 TF Card Slot
          • 3.8 Display Screen
          • 3.9 Touch Screen
          • 3.10 Audio
          • 3.11 RTC
          • 3.12 Ethernet
          • 3.13 M.2
          • 3.14 MINI PCIE
          • 3.15 Camera
          • 3.16 WIFI BT
          • 3.17 HAT
        • 4. Application Development

          • 4.1 Getting Started

            • 4.1.1 ArkTS Language Overview
            • 4.1.2 UI Components (Part 1)
            • 4.1.3 UI Components (Part 2)
            • 4.1.4 UI Components (Part 3)
          • 4.2 Advanced

            • 4.2.1 Getting Started Guide
            • 4.2.2 Usage of Third Party Libraries
            • 4.2.3 Deployment of the Application
            • 4.2.4 Factory Reset
            • 4.2.5 System Debug
            • 4.2.6 APP Stability Testing
            • 4.2.7 Application Testing
        • 5. Device Development

          • 5.1 Environment Setup
          • 5.2 Download Source Code
          • 5.3 Compile Source Code
        • 6. Download

          • Data Download
    • OpenHarmony

      • SC-3568HA

        • 1. Introduction

          • 1.1 About SC-3568HA
        • 2. Quick Start

          • 2.1 OpenHarmony Overview
          • 2.2 Image Burning
          • 2.3 Development Environment Preparation
          • 2.4 Hello World Application
        • 3. Application Development

          • 3.1 ArkUI

            • 3.1.1 ArkTS Language Overview
            • 3.1.2 UI Components (Part 1)
            • 3.1.3 UI Components (Part 2)
            • 3.1.4 UI Components (Part 3)
          • 3.2 Advanced

            • 3.2.1 Getting Started Guide
            • 3.2.2 Usage of Third Party Libraries
            • 3.2.3 Deployment of the Application
            • 3.2.4 Factory Reset
            • 3.2.5 System Debug
            • 3.2.6 APP Stability Testing
            • 3.2.7 Application Testing
        • 4. Device Development

          • 4.1 Environment Setup
          • 4.2 Download Source Code
          • 4.3 Compile Source Code
        • 5. Peripherals and Interfaces

          • 5.1 Raspberry Pi Interfaces
          • 5.2 GPIO Interface
          • 5.3 I2C Interface
          • 5.4 SPI Communication
          • 5.5 PWM Control
          • 5.6 Serial Port Communication
          • 5.7 TF Card Slot
          • 5.8 Display Screen
          • 5.9 Touch Screen
          • 5.10 Audio
          • 5.11 RTC
          • 5.12 Ethernet
          • 5.13 M.2
          • 5.14 MINI PCIE
          • 5.15 Camera
          • 5.16 WIFI BT
          • 5.17 HAT
        • 6. FAQ

          • 6.1 Download Link
      • M-K1HSE

        • 1. Introduction

          • 1.1 Product Introduction
        • 2. Quick Start

          • 2.1 Debug Tool Installation
          • 2.2 Development Environment Setup
          • 2.3 Source Code Download
          • 2.4 Build Instructions
          • 2.5 Flashing Guide
          • 2.6 APT Update Sources
          • 2.7 View Board Info
          • 2.8 CLI LED and Key Test
          • 2.9 GCC Build Programs
        • 3. Application Development

          • 3.1 Basic Application Development

            • 3.1.1 Development Environment Preparation
            • 3.1.2 First Application HelloWorld
            • 3.1.3 Develop HAR Package
          • 3.2 Peripheral Application Cases

            • 3.2.1 UART Read/Write
            • 3.2.2 Key Demo
            • 3.2.3 LED Flash
        • 4. Peripherals and Interfaces

          • 4.1 Standard Peripherals

            • 4.1.1 USB
            • 4.1.2 Display and Touch
            • 4.1.3 Ethernet
            • 4.1.4 WIFI
            • 4.1.5 Bluetooth
            • 4.1.6 TF Card
            • 4.1.7 Audio
            • 4.1.8 Serial Port
            • 4.1.9 CAN
            • 4.1.10 RTC
          • 4.2 Interfaces

            • 4.2.1 Audio
            • 4.2.2 RS485
            • 4.2.3 Display
            • 4.2.4 Touch
        • 5. System Customization Development

          • 5.1 System Porting
          • 5.2 System Customization
          • 5.3 Driver Development
          • 5.4 System Debugging
          • 5.5 OTA Upgrade
        • 6. Download

          • 6.1 Download
    • EVS-Camera

      • CF-NRS1

        • 1. Introduction

          • 1.1 About CF-NRS1
          • 1.2 Event-Based Concepts
          • 1.3 Quick Start
          • 1.4 Resources
        • 2. Development

          • 2.1 Development Overview

            • 2.1.1 Shimetapi Hybrid Camera SDK Introduction
          • 2.2 Environment & API

            • 2.2.1 Environment Overview
            • 2.2.2 Development API Overview
          • 2.3 Linux Development

            • 2.3.1 Linux SDK Introduction
            • 2.3.2 Linux SDK API
            • 2.3.3 Linux Algorithm
            • 2.3.4 Linux Algorithm API
          • 2.4 Service & Web

            • 2.4.1 EVS Server
            • 2.4.2 Time Server
            • 2.4.3 EVS Web
        • 3. Download

          • 3.1 Download
        • 4. Common Problems

          • 4.1 Common Problems
      • CF-CRA2

        • 1. Introduction

          • 1.1 About CF-CRA2
        • 2. Download

          • 2.1 Download
      • EVS Module

        • 1. Related Concepts
        • 2. Hardware Preparation and Environment Configuration
        • 3. Example Program User Guide
        • Resources Download
    • AI-model

      • 1684XB-32T

        • 1. Introduction

          • AIBOX-1684XB-32 Introduction
        • 2. Quick Start

          • First time use
          • Network Configuration
          • Disk usage
          • Memory allocation
          • Fan Strategy
          • Firmware Upgrade
          • Cross-Compilation
          • Model Quantization
        • 3. Application Development

          • 3.1 Development Introduction

            • Sophgo SDK Development
            • SOPHON-DEMO Introduction
          • 3.2 Large Language Models

            • Deploying Llama3 Example
            • /ai-model/AIBOX-1684XB-32/application-development/LLM/Sophon_LLM_api_server-Development-AIBOX-1684XB-32.html
            • /ai-model/AIBOX-1684XB-32/application-development/LLM/MiniCPM-V-2_6-AIBOX-1684XB-32.html
            • /ai-model/AIBOX-1684XB-32/application-development/LLM/Qwen-2-5-VL-demo-Development-AIBOX-1684XB-32.html
            • /ai-model/AIBOX-1684XB-32/application-development/LLM/Qwen-3-chat-demo-Development-AIBOX-1684XB-32.html
            • /ai-model/AIBOX-1684XB-32/application-development/LLM/Qwen3-Qwen Agent-MCP.html
            • /ai-model/AIBOX-1684XB-32/application-development/LLM/Qwen3-langchain-AI Agent.html
          • 3.3 Deep Learning

            • ResNet (Image Classification)
            • LPRNet (License Plate Recognition)
            • SAM (Universal Image Segmentation Foundation Model)
            • YOLOv5 (Object Detection)
            • OpenPose (Human Keypoint Detection)
            • PP-OCR (Optical Character Recognition)
        • 4. Download

          • Resource Download
      • 1684X-416T

        • 1. Introduction

          • AIBOX-1684X-416 Introduction
        • 2. Demo Simple Operation Guide

          • Simple instructions for using shimeta smart monitoring demo
      • RDK-X5

        • 1. Introduction

          • RDK-X5 Hardware Introduction
        • 2. Quick Start

          • RDK-X5 Quick Start
        • 3. Application Development

          • 3.1 AI Online Model Development

            • AI Online Development - Experiment01
            • AI Online Development - Experiment02
            • AI Online Development - Experiment03
            • AI Online Development - Experiment04
            • AI Online Development - Experiment05
            • AI Online Development - Experiment06
          • 3.2 Large Language Models (Voice)

            • Voice LLM Application - Experiment01
            • Voice LLM Application - Experiment02
            • Voice LLM Application - Experiment03
            • Voice LLM Application - Experiment04
            • Voice LLM Application - Experiment05
            • Voice LLM Application - Experiment06
          • 3.3 40pin-IO Development

            • 40pin IO Development - Experiment01
            • 40pin IO Development - Experiment02
            • 40pin IO Development - Experiment03
            • 40pin IO Development - Experiment04
            • 40pin IO Development - Experiment05
            • 40pin IO Development - Experiment06
            • 40pin IO Development - Experiment07
          • 3.4 USB Module Development

            • USB Module Usage - Experiment01
            • USB Module Usage - Experiment02
          • 3.5 Machine Vision

            • Machine Vision Technology Development - Experiment01
            • Machine Vision Technology Development - Experiment02
            • Machine Vision Technology Development - Experiment03
            • Machine Vision Technology Development - Experiment04
          • 3.6 ROS2 Base Development

            • ROS2 Basic Development - Experiment01
            • ROS2 Basic Development - Experiment02
            • ROS2 Basic Development - Experiment03
            • ROS2 Basic Development - Experiment04
      • RDK-S100

        • 1. Introduction

          • 1.1 About RDK-S100
        • 2. Quick Start

          • 2.1 First Use
        • 3. Application Development

          • 3.1 AI Online Model Development

            • 3.1.1 Volcano Engine Doubao AI
            • 3.1.2 Image Analysis
            • 3.1.3 Multimodal Visual Analysis
            • 3.1.4 Multimodal Image Comparison
            • 3.1.5 Multimodal Document Analysis
            • 3.1.6 Camera AI Vision Analysis
          • 3.2 Large Language Models

            • 3.2.1 Speech Recognition
            • 3.2.2 Voice Conversation
            • 3.2.3 Multimodal Image Analysis
            • 3.2.4 Multimodal Image Comparison
            • 3.2.5 Multimodal Document Analysis
            • 3.2.6 Multimodal Vision Application
          • 3.3 40pin-IO Development

            • 3.3.1 GPIO Output LED Blink
            • 3.3.2 GPIO Input
            • 3.3.3 Key Control LED
            • 3.3.4 PWM Output
            • 3.3.5 Serial Output
            • 3.3.6 I2C Experiment
          • 3.4 USB Module Development

            • 3.4.1 USB Voice Module
            • 3.4.2 Sound Source Localization
          • 3.5 Machine Vision

            • 3.5.1 USB Camera
            • 3.5.2 Image Processing Basics
            • 3.5.3 Object Detection
            • 3.5.4 Image Segmentation
          • 3.6 ROS2 Base Development

            • 3.6.1 Environment Setup
            • 3.6.2 Create and Build Workspace
            • 3.6.3 ROS2 Topic Communication
            • 3.6.4 ROS2 Camera Application
    • Core-Board

      • C-3568BQ

        • 1. Introduction

          • C-3568BQ Introduction
      • C-3588LQ

        • 1. Introduction

          • C-3588LQ Introduction
      • GC-3568JBAF

        • 1. Introduction

          • GC-3568JBAF Introduction
      • C-K1BA

        • 1. Introduction

          • C-K1BA Introduction

01 RK3568 NPU Overview

1 What is NPU

1.1 Basic Concept of NPU

NPU (Neural Processing Unit) is a dedicated processor designed for artificial intelligence and machine learning tasks. Compared with traditional CPUs and GPUs, NPU has higher energy efficiency and lower power consumption when executing neural network inference tasks.

1.2 Technical Features of NPU

Dedicated Architecture Design

  • Parallel Computing Capability: Optimized for neural network matrix operations
  • Low Power Design: Lower power consumption in inference tasks compared to GPU
  • Efficient Memory Access: Optimized memory hierarchy reduces data movement
  • Fixed-Point Operation Support: Supports low-precision operations such as INT8/INT16, improving inference speed

Application Scenarios

  • Computer Vision: Image classification, object detection, face recognition
  • Natural Language Processing: Speech recognition, text analysis
  • Intelligent Control: Industrial automation, robot control
  • Edge Computing: IoT devices, intelligent monitoring

1.3 NPU vs CPU/GPU Comparison

FeatureCPUGPUNPU
ArchitectureGeneral ComputingParallel ComputingAI Dedicated Computing
Inference PerformanceLowMediumHigh
Power EfficiencyLowMediumHigh
Programming ComplexitySimpleMediumSimple (Framework Support)
Applicable ScenariosGeneral TasksGraphics/Parallel ComputingAI Inference

2 RK3568 NPU Performance Indicators

2.1 Hardware Specifications

Basic Parameters

  • NPU Model: Rockchip Self-developed NPU
  • Computing Performance: 0.8 TOPS (INT8)
  • Supported Precision: INT8, INT16, FP16, BFP16
  • Memory Bandwidth: Shared System Memory
  • Operating Frequency: Up to 600MHz

Architecture Features

RK3568 NPU Architecture
├── Computing Unit
│   ├── Matrix Multiplication Unit (MAC Array)
│   ├── Activation Function Unit (Activation)
│   └── Pooling Unit (Pooling)
├── Memory Subsystem
│   ├── On-chip Cache (On-chip Cache)
│   ├── DMA Controller
│   └── Memory Management Unit (MMU)
└── Control Unit
    ├── Instruction Decoder
    ├── Scheduler
    └── Interrupt Controller

2.2 Performance Benchmark

Typical Model Performance (INT8)

ModelInput SizeInference TimeFPSAccuracy Loss
MobileNetV2224x224x3~15ms~66< 1%
YOLOv5s640x640x3~180ms~5.5< 2%
ResNet50224x224x3~45ms~22< 1%
EfficientNet-B0224x224x3~25ms~40< 1%

Power Consumption Characteristics

  • Peak Power Consumption: About 1.2W
  • Average Power Consumption: About 0.8W (Typical inference task)
  • Standby Power Consumption: < 10mW
  • Power Efficiency: About 667 GOPS/W

2.3 Supported Operators

① Convolution Operators

These operators are the core of deep learning, especially computer vision tasks, used to extract features from input data (such as images).

- Conv2D             (Standard Convolution)
- DepthwiseConv2D    (Depthwise Separable Convolution)
- TransposeConv2D    (Transposed Convolution)
- DilatedConv2D      (Dilated Convolution)
  • Conv2D: Standard convolution operation, uses a learnable convolution kernel (filter) to perform sliding window calculations on the input feature map, thereby extracting local features such as edges and textures.
  • DepthwiseConv2D: Decomposes standard convolution into two steps: Depthwise Convolution (independent convolution for each input channel) and Pointwise Convolution (1x1 convolution, used to combine channel information). This structure can significantly reduce the amount of calculation and the number of parameters.
  • TransposeConv2D: Can be seen as the "inverse process" of standard convolution. It can upsample (enlarge) a small-sized feature map to a larger-sized feature map.
  • DilatedConv2D: Inserts "holes" (zero values) between the elements of the standard convolution kernel, thereby expanding the receptive field of the convolution kernel and capturing broader context information without increasing the number of parameters and calculations.

② Pooling and Normalization

These operators are mainly used for dimensionality reduction, maintaining translation invariance (such as image classification tasks), and stabilizing the training process.

- MaxPool2D / AvgPool2D          (Max Pooling / Average Pooling)
- GlobalMaxPool / GlobalAvgPool  (Global Max Pooling / Global Average Pooling)
- BatchNormalization             (Batch Normalization)
- LayerNormalization             (Layer Normalization)
  • MaxPool2D / AvgPool2D: Take the maximum value (MaxPool) or average value (AvgPool) within a local area (such as a 2x2 window). Mainly used to reduce the spatial size (width and height) of the feature map, reduce the amount of calculation, and enhance the position invariance of features.
  • GlobalMaxPool / GlobalAvgPool: Take the maximum or average value for each channel of the entire feature map, and finally convert an HxWxC feature map directly into a 1x1xC vector for extracting global features.
  • BatchNormalization: Normalize the data within a batch (subtract mean, divide by standard deviation) so that its mean is 0 and variance is 1. Then scale and offset through learnable parameters. This can accelerate model training convergence, alleviate gradient disappearance/explosion problems, and has a certain regularization effect. Used to stabilize the training process and accelerate convergence.
  • LayerNormalization: Similar to batch normalization, but its normalization dimension is different. It normalizes all channels and spatial positions within a single sample. Performs better in sequence models (such as Transformer) and small batch training, used to normalize the features of each sample.

③ Activation Functions

Activation functions introduce non-linearity to neural networks, helping models learn complex feature representations.

- ReLU / ReLU6 / LeakyReLU    (Rectified Linear Unit)
- Sigmoid / Tanh              (S-shaped Function / Hyperbolic Tangent Function)
- Swish / Mish                (Smooth ReLU / Mish Activation Function)
- Softmax                     (Softmax Function)
  • ReLU: Rectified Linear Unit, sets all negative values to 0 and keeps positive values unchanged. Commonly used in hidden layers, solving the gradient disappearance problem.
  • ReLU6: Similar to ReLU, but limits the output to the range [0, 6], used for mobile deployment.
  • LeakyReLU: An improvement on ReLU, solving the "Dead ReLU" problem. When the input is negative, it outputs a small non-zero value to avoid neuron "death".
  • Sigmoid: Maps input to the range (0, 1), commonly used in the output layer of binary classification problems.
  • Tanh: Maps input to the range (-1, 1), similar to Sigmoid, but with a wider output range.
  • Swish: A smooth activation function, formula f(x) = x * sigmoid(x), performs well in some models.
  • Mish: A new activation function, formula f(x) = x * tanh(softplus(x)), also performs well in some models.
  • Softmax: Maps the input vector to a probability distribution, commonly used in the output layer of multi-classification problems. Converts each element to a probability value between 0 and 1, and the sum of all elements is 1.

④ Other Operators

The following are the basic operations and link operators necessary for building complex network structures.

- Add / Sub / Mul / Div    (Basic Arithmetic Operations)
- Concat / Split           (Concatenation and Splitting)
- Reshape / Transpose      (Shape Transformation)
- MatMul / FullyConnected  (Matrix Multiplication / Fully Connected Layer)
  • Add / Sub / Mul / Div: Correspond to addition, subtraction, multiplication, and division respectively.
  • Concat: Used to merge multiple tensors, concatenating on the specified dimension.
  • Split: Used to split a tensor into multiple sub-tensors, splitting on the specified dimension.
  • Reshape: Used to change the shape of the tensor without changing the number of elements.
  • Transpose: Used to swap the dimension order of the tensor.
  • MatMul: Used for matrix multiplication, mainly used to build linear transformation layers in neural networks.
  • FullyConnected: Used for fully connected layers, multiplying the input tensor with the weight matrix, then adding the bias term.

3 RKNN Software Stack Ecosystem Introduction

3.1 RKNN Software Stack Architecture

Application Layer
├── Python Application   (rknn-toolkit2)
├── C/C++ Application    (rknnrt)
└── Android Application  (RKNN API)
    │
Framework Layer
├── RKNN-Toolkit2 (Model Conversion)
├── RKNN Runtime  (Inference Engine)
└── RKNN API      (Programming Interface)
    │
Driver Layer
├── NPU Driver   (Kernel Driver)
├── Memory Management   (Memory Manager)
└── Power Management   (Power Manager)
    │
Hardware Layer
└── RK3568 NPU Hardware

3.2 Core Component Introduction

1) RKNN-Toolkit2

The core function of RKNN-Toolkit2 is to serve as a bridge for model conversion and deployment. It supports converting models trained by various mainstream frameworks (such as TensorFlow, PyTorch, ONNX, etc.) into dedicated RKNN format. During the conversion process, the tool automatically performs quantization and graph optimization, significantly improving model inference efficiency on NPU. At the same time, it provides model simulation and performance analysis functions, facilitating developers to verify model effects and running speed before deployment. The tool supports running on Windows, Linux, and macOS systems, with good cross-platform compatibility.

Supported Frameworks:

# Supported input formats
- TensorFlow / TensorFlow Lite
- PyTorch / ONNX
- Caffe / Caffe2
- MXNet
- Darknet

2) RKNN Runtime

Core Functions:

  • Efficient model inference engine
  • Memory management and optimization
  • Multi-threading support
  • Hardware resource scheduling

To meet the needs of different development scenarios, RKNN Runtime provides multi-level API language support. For embedded deployment scenarios pursuing extreme performance and low latency, C/C++ API is the best choice, providing the most direct and efficient low-level control. In the stage of rapid algorithm prototype verification, scientific research, and script development, Python API is favored for its concise syntax and fast iteration capability, greatly improving development convenience. In addition, for application development on the Android platform, it also provides Java API, allowing developers to easily integrate AI functions into existing Android applications.

3.3 Development Toolchain

PC Side Tools

# RKNN-Toolkit2 Installation
pip install rknn-toolkit2

# Model Conversion Tool
rknn-toolkit2-convert

# Performance Analysis Tool
rknn-toolkit2-profiler

Board Side Runtime

# RKNN Runtime Library
librknnrt.so

# Python Bindings
rknnlite

# Example Program
rknn_demo

3.4 Ecosystem Support

  • GitHub Repository: https://github.com/rockchip-linux/rknn-toolkit2
  • Development Documentation: Complete API documentation and user guide
  • Sample Code: Demos covering various application scenarios
  • Model Zoo: Pre-trained models and conversion scripts

RK3568 NPU has a mature development ecosystem led by officials and active in the community. Its core resources are concentrated on the official GitHub repository (rockchip-linux/rknn-toolkit2), which provides a complete software development kit, including detailed API documentation, user guides, sample codes covering image classification, object detection, semantic segmentation, and other applications, as well as a constantly updated model library containing a large number of pre-trained RKNN models and conversion scripts to help developers get started quickly.

4 Development Process Overview

WholeStep

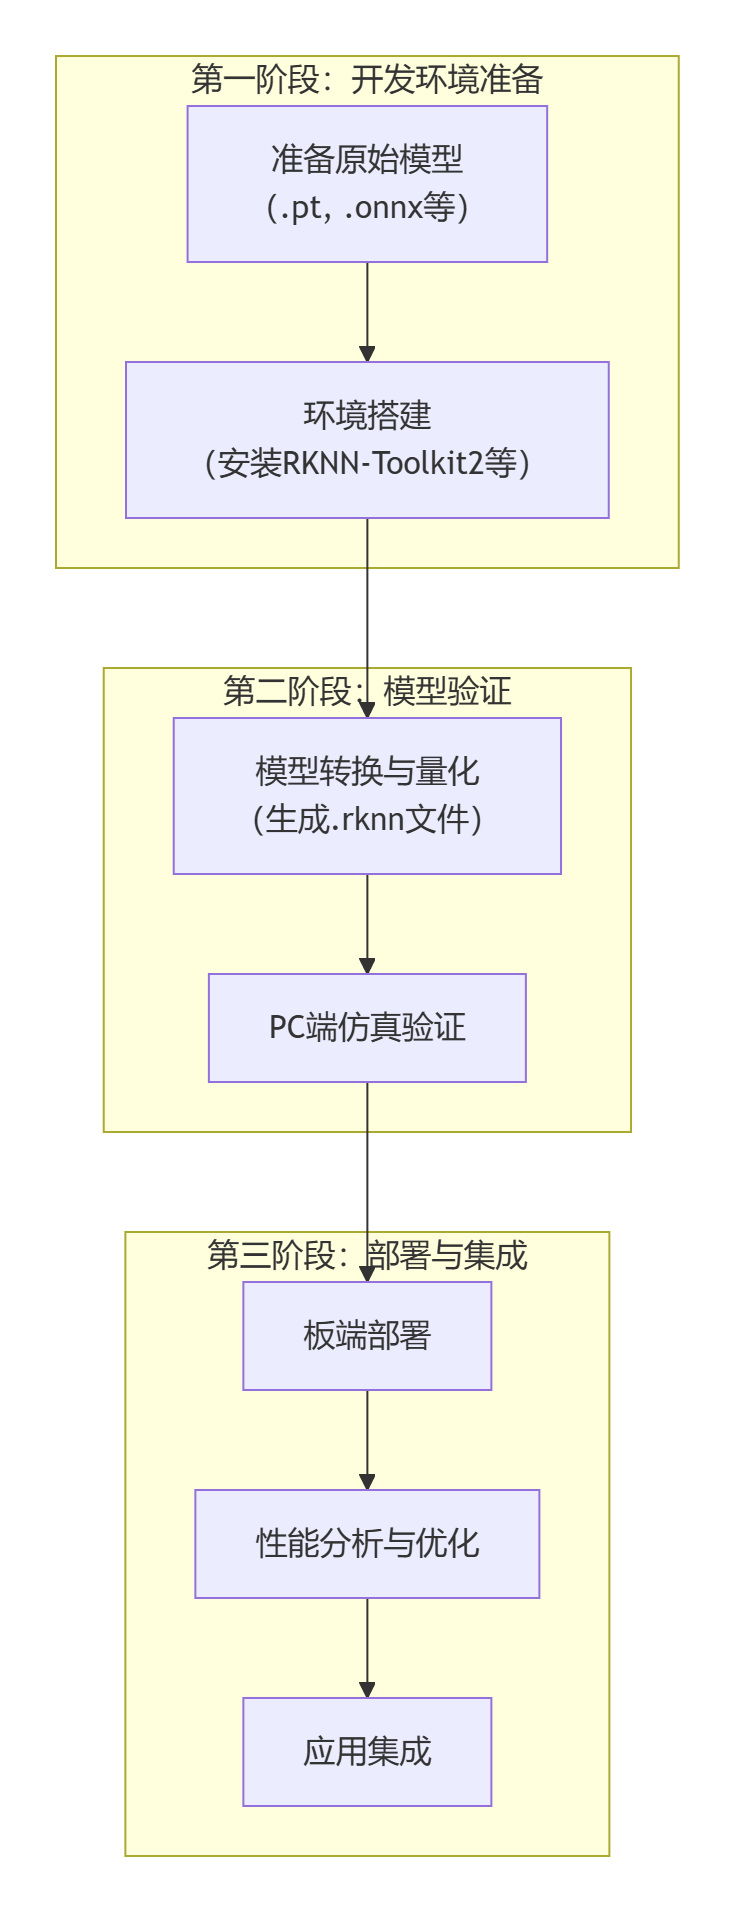
First is the first stage "Development Environment Preparation". Here, two basic tasks need to be completed: one is to prepare the original model files (such as .pt or .onnx format) trained and exported by mainstream frameworks such as PyTorch or TensorFlow, and the other is to configure the core model conversion toolchain, i.e., install the RKNN-Toolkit2 software development kit and its related dependency environment.

Next, enter the second stage "Model Verification". This is a key link to ensure that the model can run correctly and efficiently. First, use RKNN-Toolkit2 to convert the original model into the NPU-specific RKNN format. This process usually includes key quantization steps aimed at optimizing model size and inference speed. Subsequently, perform simulation verification on the PC side to quickly verify the functional correctness and basic performance of the converted model without connecting to actual hardware, greatly improving development and debugging efficiency.

Finally is the third stage "Deployment and Integration". Deploy the verified RKNN model to the target hardware. This stage first performs board-side deployment to ensure that the model is correctly loaded in the real environment; then, through performance analysis and optimization, finely adjust parameters to fully release the computing power of the NPU; finally, integrate the optimized model into the final application to complete the implementation of the entire AI solution.

5 Summary

The NPU of RK3568 provides powerful computing capabilities and complete software ecosystem support for edge AI applications. Through the RKNN software stack, developers can easily deploy various deep learning models to the GM-3568JHF development board to achieve efficient AI inference applications.

The following chapters will detail specific operation steps such as development environment setup, official example running, model conversion, and custom model deployment, helping you quickly get started with RK3568 NPU development.

Edit this page on GitHub
Last Updated:
Contributors: ZSL
Next
02 Development Environment Setup