Qwen3-chat Demo
1. Introduction
Qwen3 (Tongyi Qianwen 3) is Alibaba's new generation of large language model (LLM) series, the latest iteration of the Qwen family. It has been significantly upgraded in performance, multimodal capability, long-text handling, and other aspects, and is suitable for natural language understanding, code generation, mathematical reasoning, multi-turn dialogue, and other tasks.
1. Features
- 1. Stronger performance Parameter scale: covers 1.8B, 7B, 14B, 72B and other sizes to meet different scenario needs. Benchmark performance: leads comparable models on Chinese and English evaluations such as MMLU, C-Eval, GSM8K, and HumanEval. Long-text support: the context window is extended to 128K tokens, suitable for long-document analysis and code comprehension.
- 2. Open source and ecosystem Open-source license: some models use the Apache 2.0 license, allowing commercial and research use. Toolchain support: provides quantization, fine-tuning, API, and other supporting tools, adapted to GPU/TPU hardware (e.g. BM1684X).
- 3. Inference optimization Low-resource adaptation: supports 4-bit/8-bit quantization; can be deployed on consumer-grade GPUs (e.g. RTX 4090) or edge devices (e.g. BM1684X TPU). Dynamic compute: adaptively adjusts compute resources to balance speed and accuracy.
2. Project Directory
Personal demo project directory:
    Qwen3
    ├── cpp_demo
    ├── Models
    │   └── BM1684X
    │       └── qwen3-4b_w4bf16_seq512_bm1684x_1dev_20250429_120231.bmodel    # BM1684X qwen3-4b模型
    ├── python_demo
    │   ├── config                        # 配置文件
    │   ├── chat.cpp                      # 启动程序
    │   ├── CMakeLists.txt                # 创建python chat模块
    │   ├── pipeline.py                   # 运行文件
    │   └── README.md                     # 说明文档
    └── README.md                      # 说明文档
2. Running Steps
1. Prepare the Python Environment, Data, and Model
1.1 First upgrade Python to version 3.10
    sudo add-apt-repository ppa:deadsnakes/ppa
    sudo apt update
    sudo apt install python3.10 python3.10-dev

    # 创建虚拟环境(不含pip包)
    # !!!每次运行都要按照步骤切换虚拟环境!!!
    cd /data
    # 创建虚拟环境(不包含 pip)
    python3.10 -m venv --without-pip myenv

    # 进入虚拟环境
    source myenv/bin/activate

    # 手动安装 pip
    curl https://bootstrap.pypa.io/get-pip.py -o get-pip.py
    python get-pip.py
    rm get-pip.py

    # 安装依赖库
    pip3 install torchvision pillow qwen_vl_utils transformers --upgrade
1.2 Copy the Sophgo official Qwen3 project directory (or upload Qwen3 to /data on the box after copying)
    git clone https://github.com/sophgo/LLM-TPU.git
    cd sophgo/LLM-TPU/models/Qwen3
    cd /data/Qwen3  ##如果只上传了Qwen3,则只需进入此目录下操作
1.3 Prepare the Runtime Environment
Memory configuration (recommended) On PCIe, no memory change is needed; the following applies to SoC mode. For 1684X-series devices (e.g. SE7/SM7), the environment can be prepared this way to satisfy the Qwen2.5-VL runtime requirements. First, make sure you are using the V24.04.01 SDK; you can check the SDK version with bm_version. If an upgrade is needed, obtain the v24.04.01 SDK from sophgo.com — the flashing package is in sophon-img-xxx/sdcard.tgz; refer to the corresponding product manual to flash.
After confirming the SDK version, on the 1684x SoC environment, modify the device memory with the following commands:
    cd /data/
    mkdir memedit && cd memedit
    wget -nd https://sophon-file.sophon.cn/sophon-prod-s3/drive/23/09/11/13/DeviceMemoryModificationKit.tgz
    tar xvf DeviceMemoryModificationKit.tgz
    cd DeviceMemoryModificationKit
    tar xvf memory_edit_{vx.x}.tar.xz #vx.x是版本号
    cd memory_edit
    ./memory_edit.sh -p #这个命令会打印当前的内存布局信息
    ./memory_edit.sh -c -npu 7615 -vpu 2048 -vpp 2048 #如果是在1688平台上请修改为:./memory_edit.sh -c -npu 10240 -vpu 0 -vpp 3072
    sudo cp /data/memedit/DeviceMemoryModificationKit/memory_edit/emmcboot.itb /boot/emmcboot.itb && sync
    sudo reboot
1.4 Model Preparation
    cd /data/Qwen3
    # 建议/data/Qwen3/下新建Models/BM1684X目录,并将模型移动到此目录下(或者不新建目录,只需要记住模型的路径)
    mkdir Models && mkdir Models/BM1684X && cd /data/Qwen3/Models/BM1684X
    python3 -m dfss --url=open@sophgo.com:/ext_model_information/LLM/LLM-TPU/qwen3-4b_w4bf16_seq512_bm1684x_1dev_20250429_120231.bmodel  ##下载模型文件
2. Python Example
2.1 Environment Preparation
    cd /data/Qwen3/python_demo
    # 建议在/data/Qwen3/python_demo/下新建一个requirements.txt的文本文档,并添加如下内容
    transformers==4.49.0
    torch==2.4.1
    numpy==1.24.4
    requests==2.32.3
    torchvision==0.19.1
    packaging==24.2
    av==12.3.0
    psutil==5.9.1
    opencv-python-headless==4.11.0.86
    # 此外您可能还需要安装其他库
    pip3 install dfss -i https://pypi.tuna.tsinghua.edu.cn/simple --upgrade
    pip3 install -r requirements.txt -i https://pypi.tuna.tsinghua.edu.cn/simple

    # 您需要安装SILK2.Tools.logger
    python3 -m dfss --url=open@sophgo.com:tools/silk2/silk2.tools.logger-1.0.2-py3-none-any.whl
    pip3 install silk2.tools.logger-1.0.2-py3-none-any.whl --force-reinstall
    rm -f silk2.tools.logger-1.0.2-py3-none-any.whl

    # 本例程依赖sophon-sail,可直接安装sophon-sail,执行如下命令:
    pip3 install dfss --upgrade
    python3 -m dfss --install sail
2.2 Compile and Run
    # 安装 pybind11 开发包
    sudo apt-get update
    sudo apt-get install pybind11-dev
    mkdir build cd build && cmake .. && make && cp *cpython* .. && cd ..
2.3 Run the Test
    # chat测试
    python3 pipeline.py -m qwen3_xxx.bmodel -c config   # 请将模型路径和config路径换成自己的路径
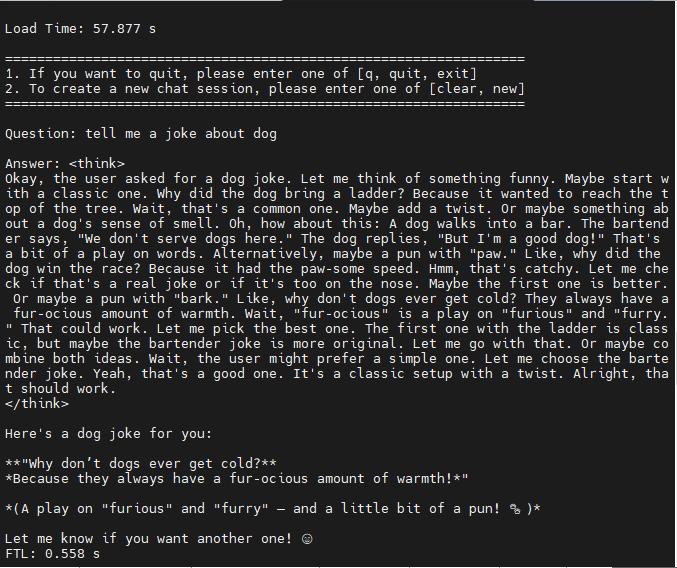
Usage Result