03 NAPI Getting Started
Part 1: NAPI Basic Concept Introduction
NAPI in OpenHarmony (extended from Node.js N-API framework) is part of the ArkUI subsystem under the UI framework. It is used for interaction between code written in JS/ETS language and native code (C/C++). NAPI is suitable for encapsulating IO, CPU-intensive, OS low-level capabilities and exposing JS interfaces. Through NAPI, JS (JavaScript) can access C/C++ code and vice versa.
1 JavaScript, TypeScript and ArkTS
TypeScript is a superset of JavaScript types, supporting ES6 syntax and object-oriented programming concepts such as classes, interfaces, inheritance, and generics. It is a statically typed language that provides type annotations, which can check data type errors at the code compilation stage, while extending JavaScript's syntax. Therefore, any existing JavaScript program can work under TypeScript without modification. To ensure compatibility, TypeScript needs to be compiled into pure JavaScript by a compiler at the compilation stage. TypeScript file extension is .ts (.ts, .tsx, .d.ts), JavaScript file is .js.
ArkTS extends some functionality on the basis of TypeScript, adding some syntax sugar and "annotation"-like features.
2 .ts and .d.ts Files
.ts files contain actual code logic, used to write implementation of TypeScript programs. The files contain definitions and implementations of variables, functions, classes, and other TypeScript code. At compile time, .ts files will be converted to JavaScript files, which can then be executed in browsers or other JavaScript runtime environments; .d.ts files are type declaration files that only contain type code, no specific code implementation. Its file name is generally in the form of [module name].d.ts, where d stands for declaration. It is used to describe type information of JavaScript code in TypeScript. Simply put, .ts files are where we write actual business logic, while .d.ts files are for providing type declarations.
3 Basic Data Types
In the NAPI framework, all parameters, whether the eight data types defined in ECMAScript standard (Boolean, Null, Undefined, Number, BigInt, String, Symbol, Object) or Function type, are uniformly encapsulated into napi_value type. Therefore, Function type parameters can be obtained like parameters of data types.
Basic data types:
- napi_env corresponds to NativeEngine. In oh, it refers to the relevant context environment of ArkComplier JSNAPI. Any napi data type and js data type conversion require it.
- napi_value corresponds to NativeValue. In oh, it refers to all js data types recognizable by ArkComplier. It has subclasses such as ArkNativeNumber, ArkNativeString, ArkNativeFunction, corresponding to number, string, function and other data types in js.
- napi_callback_info corresponds to NativeCallbackInfo. It is a data type used to store js passed parameter information when registering callback handles. It is a struct.
- napi_property_descriptor is a data type used to store a single property.
- napi_callback corresponds to NativeCallback, which is the callback handle mentioned earlier. Native code registers it as a callback function for corresponding js interface.
4 NAPI Object Lifecycle
The lifecycle of NAPI objects represents the entire process from object creation to release, as shown in the figure below:
When the ArkTS application starts, the NAPI module is loaded. During the NAPI module loading process, an object A is created for the application to use. Before the application exits or actively releases object A, object A must remain "active". The entire process from object A's creation to release also represents object A's lifecycle.
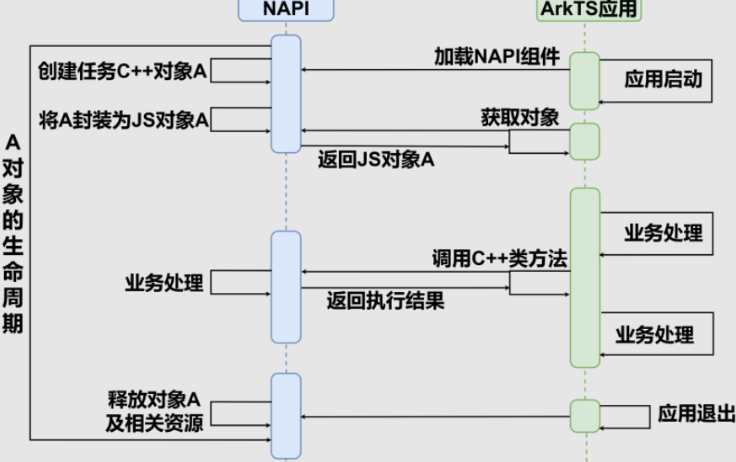
When calling Node-API, the underlying virtual machine may return handles to objects on the heap in the form of napi_values. These handles must keep the object "active" until the native code no longer needs them.
5 Synchronous and Asynchronous Interfaces
Synchronous interfaces execute on the main thread and may cause interface freezing; asynchronous interfaces execute on worker threads, avoiding main thread blocking.
| Concept | Synchronous Interface | Asynchronous Interface |
|---|---|---|
| Execution Thread | Main Thread | Worker Thread |
| Blocking | Will Block Main Thread | Won't Block Main Thread |
| Use Case | Simple Tasks | Complex Tasks, CPU-Intensive Tasks |
| Implementation Complexity | Simple | Complex |
Asynchronous interfaces use napi_create_async_work function to create asynchronous work items, and use napi_queue_async_work function to add them to the scheduling queue. Process asynchronous results in the Complete function, call callback function or update Promise state.
Part 2: Common NAPI Functions
After learning the basic theory of NAPI, this section will introduce several functions frequently used by developers.
1 napi_get_cb_info
Function Description:
napi_get_cb_info is a core function in Node.js N-API, mainly used in native plugins (usually written in C/C++) to obtain parameter information passed when calling JavaScript functions, this object, and other context data. Simply put, it is the core for native code to interact with JavaScript.
Function Prototype:
napi_status napi_get_cb_info(napi_env env,
                             napi_callback_info cbinfo,
                             size_t* argc,
                             napi_value* argv,
                             napi_value* this_arg,
                             void** data)
Parameter Description:
| Parameter | Type (C/C++) | Direction (for function) | Description |
|---|---|---|---|
| env | napi_env | Input | N-API environment handle, provides context for function execution. |
| cbinfo | napi_callback_info | Input | Callback info handle, usually passed by Node.js when calling native functions. |
| argc | size_t * | Input/Output | Input: number of parameters expected to obtain, Output: actual number of parameters received. |
| argv | napi_value * | Output | Array to store parameters. If nullptr is passed, parameters won't be copied, only count obtained. |
| this_arg | napi_value * | Output | Used to receive JavaScript this object. |
| data | void ** | Output | Used to receive additional data pointer possibly bound when creating function. |
Usage Example:
#include <node_api.h>

// Prepare variables to get parameters and info
size_t argc = 2; // We expect to get 2 parameters
napi_value argv[2]; // Prepare an array to store these two parameters
napi_value this_arg;
void* data;

// Call napi_get_cb_info to get info
status = napi_get_cb_info(env, info, &argc, argv, &this_arg, &data);
if (status != napi_ok) {
  // Handle error...
}
2 napi_get_value_string_utf8
Function Description: Extracts a UTF-8 encoded C string from a JavaScript string value. It converts JavaScript string to a character array in UTF-8 format for C/C++ code processing.
Function Prototype:
napi_status napi_get_value_string_utf8(napi_env env,
                                       napi_value value,
                                       char* buf,
                                       size_t bufsize,
                                       size_t* result);
Parameter Description:
| Parameter | Type | Direction | Description |
|---|---|---|---|
| env | napi_env | Input | N-API environment handle, provides function execution context |
| value | napi_value | Input | JavaScript string value to convert |
| buf | char* | Output | Pointer to buffer for storing result (can be NULL) |
| bufsize | size_t | Input | Buffer size (in bytes) |
| result | size_t* | Output | Optional parameter, receives actual string length (excluding null terminator) |
Usage Example:
napi_value js_string;
// ... Get JavaScript string to js_string ...

// First get required buffer size
size_t length;
napi_get_value_string_utf8(env, js_string, NULL, 0, &length);

// Allocate buffer (+1 for null terminator)
char* buffer = (char*)malloc(length + 1);

// Actually get string content
napi_get_value_string_utf8(env, js_string, buffer, length + 1, NULL);

// Use buffer...
free(buffer);
3 napi_create_function
Function Description: Creates a new JavaScript function object that, when called, executes the specified C/C++ callback function.
Function Prototype:
napi_status napi_create_function(napi_env env,
                                 const char* utf8name,
                                 size_t length,
                                 napi_callback cb,
                                 void* data,
                                 napi_value* result);
Parameter Description:
| Parameter | Type | Direction | Description |
|---|---|---|---|
| env | napi_env | Input | N-API environment handle |
| utf8name | const char* | Input | Function name (UTF-8 encoded) |
| length | size_t | Input | Function name length (use NAPI_AUTO_LENGTH for auto calculation) |
| cb | napi_callback | Input | Native callback function to execute when JavaScript function is called |
| data | void* | Input | User data to pass to callback function |
| result | napi_value* | Output | Newly created JavaScript function object |
Usage Example:
napi_value my_function;
napi_create_function(env, "myFunction", NAPI_AUTO_LENGTH, MyNativeFunction, NULL, &my_function);
4 napi_create_object
Function Description: Creates a new empty JavaScript object.
Function Prototype:
napi_status napi_create_object(napi_env env, napi_value* result);Parameter Description:
| Parameter | Type | Direction | Description |
|---|---|---|---|
| env | napi_env | Input | N-API environment handle |
| result | napi_value* | Output | Newly created JavaScript object |
Usage Example:
napi_value obj;
napi_create_object(env, &obj);
5 napi_create_string_utf8
Function Description: Creates a JavaScript string from a UTF-8 encoded C string.
Function Prototype:
napi_status napi_create_string_utf8(napi_env env,
                                    const char* str,
                                    size_t length,
                                    napi_value* result);
Parameter Description:
| Parameter | Type | Direction | Description |
|---|---|---|---|
| env | napi_env | Input | N-API environment handle |
| str | const char* | Input | UTF-8 encoded C string |
| length | size_t | Input | String length (use NAPI_AUTO_LENGTH for auto calculation) |
| result | napi_value* | Output | Newly created JavaScript string |
Usage Example:
napi_value js_string;
napi_create_string_utf8(env, "Hello World", NAPI_AUTO_LENGTH, &js_string);
6 napi_set_named_property
Function Description: Sets a named property on a JavaScript object.
Function Prototype:
napi_status napi_set_named_property(napi_env env,
                                    napi_value object,
                                    const char* utf8name,
                                    napi_value value);
Parameter Description:
| Parameter | Type | Direction | Description |
|---|---|---|---|
| env | napi_env | Input | N-API environment handle |
| object | napi_value | Input | JavaScript object to set property on |
| utf8name | const char* | Input | Property name (UTF-8 encoded) |
| value | napi_value | Input | Property value to set |
Usage Example:
napi_value obj, value;
napi_create_object(env, &obj);
napi_create_string_utf8(env, "test", NAPI_AUTO_LENGTH, &value);
napi_set_named_property(env, obj, "propertyName", value);
7 napi_get_value_double
Function Description: Extracts C double precision floating-point value from JavaScript number value.
Function Prototype:
napi_status napi_get_value_double(napi_env env, napi_value value, double* result);Parameter Description:
| Parameter | Type | Direction | Description |
|---|---|---|---|
| env | napi_env | Input | N-API environment handle |
| value | napi_value | Input | JavaScript number value |
| result | double* | Output | Extracted double precision floating point value |
Usage Example:
double number;
napi_get_value_double(env, js_number_value, &number);
8 napi_typeof
Function Description: Determines the type of JavaScript value.
Function Prototype:
napi_status napi_typeof(napi_env env, napi_value value, napi_valuetype* result);Parameter Description:
| Parameter | Type | Direction | Description |
|---|---|---|---|
| env | napi_env | Input | N-API environment handle |
| value | napi_value | Input | JavaScript value to check |
| result | napi_valuetype* | Output | Type of value (such as napi_number, napi_string, etc.) |
Usage Example:
napi_valuetype type;
napi_typeof(env, js_value, &type);
if (type == napi_number) {
    // Handle number type
}
9 napi_open_handle_scope / napi_close_handle_scope
Function Description: Manages napi_value handle lifecycle to prevent memory leaks.
Function Prototype:
napi_status napi_open_handle_scope(napi_env env, napi_handle_scope* result);
napi_status napi_close_handle_scope(napi_env env, napi_handle_scope scope);
Parameter Description:
| Parameter | Type | Direction | Description |
|---|---|---|---|
| env | napi_env | Input | N-API environment handle |
| result | napi_handle_scope* | Output | Newly created scope handle |
| scope | napi_handle_scope | Input | Scope handle to close |
Usage Example:
napi_handle_scope scope;
napi_open_handle_scope(env, &scope);
// Create napi_value within this scope
napi_close_handle_scope(env, scope);
10 napi_throw_error
Function Description: Throws a JavaScript error.
Function Prototype:
napi_status napi_throw_error(napi_env env, const char* code, const char* msg);Parameter Description:
| Parameter | Type | Direction | Description |
|---|---|---|---|
| env | napi_env | Input | N-API environment handle |
| code | const char* | Input | Error code (can be NULL) |
| msg | const char* | Input | Error message |
Usage Example:
napi_throw_error(env, NULL, "Something went wrong");11 napi_create_int32
Function Description: Creates JavaScript number from C int32_t value.
Function Prototype:
napi_status napi_create_int32(napi_env env, int32_t value, napi_value* result);Parameter Description:
| Parameter | Type | Direction | Description |
|---|---|---|---|
| env | napi_env | Input | N-API environment handle |
| value | int32_t | Input | C integer value |
| result | napi_value* | Output | Newly created JavaScript number |
Usage Example:
napi_value js_number;
napi_create_int32(env, 42, &js_number);
12 napi_call_function
Function Description: Calls JavaScript function.
Function Prototype:
napi_status napi_call_function(napi_env env,
                               napi_value recv,
                               napi_value func,
                               size_t argc,
                               const napi_value* argv,
                               napi_value* result);
Parameter Description:
| Parameter | Type | Direction | Description |
|---|---|---|---|
| env | napi_env | Input | N-API environment handle |
| recv | napi_value | Input | this object when function is called |
| func | napi_value | Input | JavaScript function to call |
| argc | size_t | Input | Number of parameters |
| argv | const napi_value* | Input | Parameter array |
| result | napi_value* | Output | Return value of function call (can be NULL) |
Usage Example:
napi_value global, func, args[1], result;
napi_get_global(env, &global);
// Assume func is a JavaScript function
napi_call_function(env, global, func, 1, args, &result);
Part 3: NAPI Development Steps
1. Include Header File and Implement C/C++ Function Body
First, include #include "napi/native_api.h" in the C/C++ file, then implement the C/C++ function body according to normal logic.
#include "napi/native_api.h"2. Define Mapping Between NAPI Interface Functions to Open and Native Functions
Open Native functions or attributes in C/C++ for JavaScript use. This mapping is usually completed in the framework's built-in function static napi_value Init(napi_env env, napi_value exports).
EXTERN_C_START
static napi_value Init(napi_env env, napi_value exports) {
    napi_property_descriptor desc[] = {
        {"Init", nullptr, ObjectDectionInit, nullptr, nullptr, nullptr, napi_default, nullptr},
        {"Process", nullptr, ObjectDectionProcess, nullptr, nullptr, nullptr, napi_default, nullptr},
        {"DeInit", nullptr, ObjectDectionDeInit, nullptr, nullptr, nullptr, napi_default, nullptr}};
    napi_define_properties(env, exports, sizeof(desc) / sizeof(desc[0]), desc);
    return exports;
}
EXTERN_C_END
Or use macro definitions:
EXTERN_C_START
static napi_value Init(napi_env env, napi_value exports) {
    napi_property_descriptor desc[] = {
        DECLARE_NAPI_FUNCTION("Init", ObjectDectionInit),
        DECLARE_NAPI_FUNCTION("Process", ObjectDectionProcess),
        DECLARE_NAPI_FUNCTION("DeInit", ObjectDectionDeInit)
         };
    napi_define_properties(env, exports, sizeof(desc) / sizeof(desc[0]), desc);
    return exports;
}
EXTERN_C_END
This completes the mapping relationship.
3. Establish Mapping Between Interface and Module
3.1 Define a napi_module Object
Define a napi_module object, bind the corresponding so to the nm_modname attribute, and bind the module registration entry function.
/*
 * Napi Module define
 */

static napi_module msLiteModule = {
    .nm_version = 1,
    .nm_flags = 0,
    .nm_filename = nullptr,
    .nm_register_func = Init,
    .nm_modname = "mslite_napi",
    .nm_priv = ((void *)0),
    .reserved = {0},
};
After binding, it can be used on ETS side via import mslite_napi from 'libmslite_napi.so'
import mslite_napi from 'libmslite_napi.so'

let resourceManager = context.resourceManager
mslite_napi.Init(resourceManager)
mslite_napi
  .Process(this.modelId, picDesc, buffer)
  .then((value: InferResult) => {
    callback(value.objects)
  })
  .catch((err: BusinessError) => {})
mslite_napi.DeInit()
3.2 Bind napi_module Object to System Function RegisterModule
Then pass the napi_module object to the system function RegisterModule:
/*
 * module register
 */
extern "C" __attribute__((constructor)) void RegisterModule(void) {
  MS_LOG(INFO) << "RegisterModule() is called";
  napi_module_register(&g_module);
}
3.3 Execute Entry Function nm_register_func of napi_module
Generally in OH system, the NAPI registration entry function is automatically executed by the Framework. Therefore, if we develop NAPI ourselves, we need to call and trigger it ourselves.
4. Define ETS Interface Description File .d.ts
export const Init: (path: Object) => number
export const Process: (
  modeid: number,
  picDesc: Object,
  buffer: ArrayBuffer,
) => number
export const DeInit: () => number
5. Implement Receiving and Processing ETS Parameters and Feedback Results on Native Side
Because on ETS side, you can consider data types as weakly typed. The specific type needs to be resolved by the Native side itself.
On Native side, the function parameter list passed from ETS side and return values are all fixed types.
5.1 Develop Synchronous Interface
C developers just need to do data conversion work.
The parameter objects and function objects passed by JavaScript call are provided to C as an abstract type napi_value. Developers need to convert them to C data types for calculation, then convert the calculation results back to napi_value type to return. The NAPI framework provides various API interfaces for users to complete these conversions. These conversions are implemented by relying on the JS engine behind the scenes.
static napi_value GetVisitCountSync(napi_env env, napi_callback_info info) {
  /* Get parameters according to environment variables */
  size_t argc = 2; //Number of parameters
  napi_value argv[2] = { 0 }; //Parameter definition

  /* Get input parameter variables */
  napi_get_cb_info(env, info, &argc, argv, nullptr, nullptr);
  // Get type of input parameter
  napi_valuetype valueType = napi_undefined;
  napi_typeof(env, argv[0], &valueType);

  // Convert input value to data type that C/C++ can operate
  char value[VALUE_BUFFER_SIZE] = { 0 };
  size_t valueLen = 0;
  napi_get_value_string_utf8(env, argv[0], value, VALUE_BUFFER_SIZE, &valueLen);

  // ...... Omit some business process calculation steps

  /* Convert C/C++ data type to JS data type and return */
  napi_value result = nullptr; // JS string object
  std::string resultStr = "Visit Count = 65535";
  napi_create_string_utf8(env, resultStr.c_str(), resultStr.length(), &result);

  return result; //Return JS object
}
5.1.1 Function Declaration
Every mapped function must have parameters napi_env env, napi_callback_info cbinfo, and return value napi_value. To achieve js or ets call, the NAPI framework needs to solve the following problems: data passing and conversion. The input parameters obtained from js/ets and the returned results need to be converted to data types that C/C++ code can operate on. Therefore, the NAPI framework introduces an intermediate data type to correspond to the types of upper-layer js/ets and C/C++, as well as methods for operating on data types.
5.1.2 Get Input Parameters
The function napi_get_cb_info obtains JavaScript input parameters from the cbinfo parameter.
5.1.3 Convert NAPI Type to C/C++ Recognizable Type
napi_value NapiDemo(napi_env env, napi_callback_info cbinfo)
{
        ...
    char* type = nullptr;
    size_t typeLen = 0;
    napi_get_value_string_utf8(env, argv[0], nullptr, 0, &typeLen);
    NAPI_ASSERT(env, typeLen > 0, "typeLen == 0");
    type = new char[typeLen + 1];
    napi_get_value_string_utf8(env, argv[0], type, typeLen + , &typeLen);
        ...
}
5.1.4 Return Value
When C++ has no return value, NapiDemo returns nullptr. NAPI framework doesn't have nullptr. It converts nullptr to napi_undefined via napi_get_undefined.
napi_value NapiDemo(napi_env env, napi_callback_info cbinfo)
{
...
    napi_value result = nullptr;
    napi_get_undefined(env, &result);
    return result;
}