
HOME
Shop
  • English
  • 简体中文
HOME
Shop
  • English
  • 简体中文
  • Product Series

    • FPGA+ARM

      • GM-3568JHF

        • Introduction

          • GM-3568JHF Introduction
        • Quick Start

          • Preface
          • Environment Setup
          • Compilation Notes
          • Flashing Guide
          • Debugging Tools
          • Software Update
          • Viewing System Information
          • Test Commands
          • Application Compilation
          • Source Code Access
        • Peripherals & Interfaces

          • USB
          • Display and Touch
          • Ethernet
          • WIFI
          • Bluetooth
          • TF-Card
          • Audio
          • Serial Port
          • CAN
          • RTC
        • Application Development

          • UART Read/Write Demo
          • Key Detection Demo
          • LED Blink Demo
          • MIPI Screen Detection Demo
          • Read USB Device Information Demo
          • FAN Detection Demo
          • FPGA FSPI Communication Demo
          • FPGA DMA Read/Write Demo
          • GPS Debugging Demo
          • Ethernet Test Demo
          • RS485 Read/Write Demo
          • FPGA I2C Read/Write Demo
          • PN532 NFC Card-Reading Demo
          • TF Card Read/Write Demo
        • QT Development

          • ARM64 Cross-Compiler Environment Setup
          • Adding a QT Program to Boot Auto-Start
        • RKNN_NPU Development

          • RK3568 NPU Overview
          • Development Environment Setup
          • Run the Official YOLOv5 Example
        • FPGA Development

          • ARM and FPGA Communication
          • FPGA Development Manual
        • Others

          • Modifying the Root Filesystem
          • System Auto-Start Services
        • Downloads

          • Downloads
      • MB-E30P

        • Introduction

          • MB-E30P Introduction
        • Quick Start

          • Preface
          • Environment Setup
          • Compilation Instructions
          • Flashing Guide
          • Debugging Tools
          • Software Update
          • Viewing Information
          • Test Commands
          • Application Compilation
          • Source Code Acquisition
        • Peripherals & Interfaces

          • USB
          • Display and Touch
          • Ethernet
          • WIFI
          • Bluetooth
          • TF-Card
          • Audio
          • RTC
        • Application Development

          • Key Detection Demo
          • LED Blink Demo
          • MIPI Screen Detection Demo
          • Read USB Device Information Demo
          • FAN Detection Demo
          • FPGA FSPI Communication Demo
          • FPGA DMA Read/Write Demo
          • Ethernet Test Demo
          • FPGA IIC Read/Write Demo
          • PN532 NFC Card Reading Demo
          • TF Card Read/Write Demo
        • QT Development

          • ARM64 Cross-Compiler Environment Setup
          • Adding a QT Program to the Boot Auto-Start Service
        • RKNN_NPU Development

          • RK3568 NPU Overview
          • Development Environment Setup
          • Run the Official YOLOv5 Example
          • Model Conversion In Detail
          • Run Custom Models on the Board
        • FPGA Development

          • ARM and FPGA Communication
          • FPGA Development Manual
        • Others

          • Modifying the Root Filesystem
          • System Auto-Start Service
        • Downloads

          • Downloads
    • ShimetaPi

      • M4-R1

        • Introduction

          • M4-R1 Introduction
        • Quick Start

          • OpenHarmony Overview
          • Image Burning
          • Application Development Quick Start
          • Device Development Quick Start
        • Application Development

          • ArkUI

            • ArkTS Language Overview
            • UI Components - Row Container Introduction
            • UI Components - Column Container Introduction
            • UI Components - Text Component
            • UI Components - Toggle Component
            • UI Components - Slider Component
            • UI Components - Animation Component & Transition Component
          • Documentation

            • OpenHarmony Official Materials
          • Development Notes

            • Full-SDK Replacement Tutorial
            • Introducing and Using Third-Party Libraries
            • HDC Debugging
            • Restore Factory Mode via Command Line
            • Upgrade App to System Permission
          • First App

            • Build Your First ArkTS Application - HelloWorld
          • Demos

            • Serial-Debug-Assistant Application Demo
            • Writing-Board Application Demo
            • Digital Clock Application Demo
            • Wi-Fi Information Acquisition Application Demo
        • Device Development

          • Ubuntu Development

            • Environment Setup
            • Download Source Code
            • Compile Source Code
          • DevEco Device Tool

            • Tool Introduction
            • Development Environment Construction
            • Import the SDK
            • HUAWEI DevEco Tool Function Introduction
        • Kernel Peripherals & Interfaces

          • Guide
          • Device Tree Introduction
          • NAPI Introduction
          • ArkTS Introduction
          • NAPI Development Hands-on Demo
          • GPIO Introduction
          • I2C Communication
          • SPI Communication
          • PWM Control
          • UART Communication
          • TF Card (MicroSD)
          • Screen (Display)
          • Touch
          • Ethernet
          • M.2 SSD
          • Audio
          • WIFI & BT
          • Camera
        • Downloads

          • Downloads
      • M5-R1

        • Introduction

          • M5-R1 Development Docs
        • Quick Start

          • Image Burning
          • Environment Setup
          • Download Source Code
        • Peripherals & Interfaces

          • Raspberry Pi Interfaces
          • GPIO Interface
          • I2C Interface
          • SPI Communication
          • PWM Control
          • Serial Port Communication
          • TF Card
          • Display
          • Touch
          • Audio
          • RTC
          • Ethernet
          • M.2
          • MINI-PCIE
          • Camera
          • WIFI & BT
        • Downloads

          • Downloads
      • Pico-G1

        • Product Overview

          • Product Introduction
          • SDK Version Information
        • Quick Start

          • Development Environment Setup
          • Image Build
          • Image Flashing
          • System Login
          • Network Configuration
          • File Transfer
          • SDK Directory Structure
          • Deploying Your First Application
          • Deploying Your First Driver
          • Mounting an SD Card
        • Peripherals & Interfaces

          • GPIO Control
          • UART Serial Communication
          • I2C Communication
          • SPI Communication
        • MPP Media Development

          • MPP Media Processing Software
          • Image Processing Chain
          • Video Input
          • Image Encoding
        • NPU & AI

          • NPU Driver and Runtime Library Architecture
          • .xmm Model Loading
          • SVP Video Processing
          • AI Noise Reduction (AI_NR)
        • Application Samples

          • Encryption/Decryption Application
          • ADC Acquisition Application
          • Low-Power Application
          • Audio Processing Application
          • Video Encoding Application
          • Video Input Application
          • Video Graphics Subsystem (VGS) Application
          • 08 Region Overlay Application
          • 09 Intelligent Video Engine Application
          • 10 UVC Webcam Application
          • 11 All-in-One Quickstart Application
          • 12 FPN Correction Application
          • 13 Regional Motion Detection Application
          • 14 MTCNN Face Detection Application
        • Expansion Board Peripheral Examples

          • 00 - Pico Expansion Board Peripheral Examples Overview
          • 01 - OLED Display Application
          • 02 - TFT Display Application
          • 03 - MPU6050 Gyroscope Application
          • 04 - ADC Acquisition Application
          • 05 - Passive Buzzer Application
          • 06 - MQ Gas Sensor Application
          • 07 - GPS Positioning Application
          • 08 - SHT20 Temperature & Humidity Application
          • 09 - Ultrasonic Ranging Application
          • 10 - SpO2 Sensor Application
          • 11 - DC Motor Control Application
          • 12 - Servo Control Application
    • OpenHarmony

      • SC-3568HA

        • Introduction

          • SC-3568HA Overview
        • Quick Start Guide

          • OpenHarmony Overview
          • Image Flashing
          • Setting Up the Development Environment
          • Hello World Application and Deployment
        • Application Development

          • ArkUI

            • Introduction to ArkTS Language
            • Introduction to UI Components and Practical Applications (Part 1)
            • Introduction to UI Components and Practical Applications (Part 2)
            • Introduction to UI Components and Practical Applications (Part 3)
          • Expand

            • Getting Started Guide
            • Referencing and Using Third-Party Libraries
            • Application Compilation and Deployment
            • Command-Line Factory Reset
            • System Debugging -- HDC Debugging
            • APP Stability Testing
            • Chapter 7 Application Testing
        • Device Development

          • Environment Setup
          • Download Source Code
          • Compiling Source Code
        • Peripheral And Interface

          • Raspberry Pi interface
          • GPIO Interface
          • I2C Interface
          • SPI communication
          • PWM (Pulse Width Modulation) control
          • Serial port communication
          • TF Card
          • Display Screen
          • Touch
          • Audio
          • RTC
          • Ethernet
          • M.2
          • MINI-PCIE
          • Camera
          • WIFI&BT
          • Raspberry Pi expansion board
        • Downloads

          • Downloads
      • M-K1HSE

        • Introduction

          • M-K1HSE Introduction
        • Quick Start

          • Development environment construction
          • Source code acquisition
          • Compilation Notes
          • Burning Guide
        • Application Development

          • Application Development Environment Setup
          • First Application - Hello World
        • Peripherals and interfaces

          • 01 Audio
          • 02 RS485
          • 03 Display
        • System customization development

          • System transplant
          • System customization
          • Driver Development
          • System Debugging
          • OTA Update
        • Downloads

          • Downloads
    • HVS Camera

      • Quick Start

        • SDK Overview
        • Downloads
        • Your First C++ Program
        • Python Data Analysis
        • MultiVision Studio
      • Development

        • Programming Guides

          • Open Camera
          • Read Events
          • Recording & Replay
          • Event Processing (Denoising)
          • Display & Visualization
          • Tuning
          • Capture APS Image
        • Toolkit SDK

          • Hybrid Vision Toolkit
          • Quick Start
          • C++ API
          • Python API
        • Algorithm

          • Hybrid Vision Algo
          • Hybrid Vision Algo API
          • Windows Algo SDK
        • Samples Overview
        • Applications
      • Fundamentals

        • Event Camera Fundamentals
        • HVS Hybrid Vision
        • Event Visualization
        • Data Formats Reference
        • Glossary
        • Bias & Tuning
        • Video Tutorials
      • USB Cameras

        • HVS Camera Quick Start
        • Networking Capabilities

          • HVS Camera System Architecture
          • EVS Network Server
          • EVS Time Sync
          • Web Window
        • HVS Camera Compatibility Matrix
        • FAQ & Troubleshooting Guide
        • Products

          • CF-NRS1 (Lingguang No.1 Hybrid Vision Camera)
      • MIPI Modules

        • MIPI Module Quick Start
        • Carrier Boards

          • RDK X5 Carrier Board Adaptation
          • Raspberry Pi Carrier Board Adaptation
          • Digua Pi Carrier Board Adaptation
          • ShimeTai Board Carrier Board Adaptation
        • MIPI Module Compatibility Matrix
        • Products

          • EVS_003 Sensor Module
    • AI-model

      • 1684XB-32T

        • Introduction

          • AIBOX-1684XB-32 Introduction
        • Quick Start

          • First Use
          • Network Configuration
          • Disk Usage
          • Memory Allocation
          • Fan Control Strategy
          • Firmware Upgrade
          • Cross Compilation
          • Model Quantization
        • Application Development

          • Development Overview

            • Sophgo SDK Development
            • Sophgo Demo Introduction
          • Large Language Models

            • Deploying Llama3 Example
            • Sophon LLM_api_server Development
            • Deploying MiniCPM-V-2_6
            • Qwen-2-5-VL Image and Video Recognition Demo
            • Qwen3-chat Demo
            • Qwen3-Qwen Agent-MCP Development
            • Qwen3-langchain-AI Agent
          • Deep Learning

            • ResNet (Image Classification)
            • LPRNet (License Plate Recognition)
            • SAM (General Image Segmentation Foundation Model)
            • YOLOv5 (Object Detection)
            • OpenPose (Human Keypoint Detection)
            • PP-OCR (Optical Character Recognition)
        • Downloads

          • Downloads
      • 1684X-416T

        • Introduction

          • AIBOX-1684X-416 Introduction
        • Demo Quick Guide

          • ShimeTai Intelligent Monitoring Demo Quick Usage Guide
      • RDK-X5

        • Introduction

          • RDK-X5 Hardware Introduction
        • Quick Start

          • RDK-X5 Quick Start
        • Application Development

          • AI Online Model Development

            • Experiment 01 - Access Volcengine Doubao AI
            • Experiment 02 - Image Analysis
            • Experiment 03 - Multimodal Visual Analysis & Localization
            • Experiment 04 - Multimodal Image-Text Comparison
            • Experiment 05 - Multimodal Document/Table Analysis
            • Experiment 06 - Camera-based AI Visual Analysis
          • Large Language Models

            • Experiment 01 - Speech Recognition
            • Experiment 02 - Voice Conversation
            • Experiment 03 - Multimodal Image Analysis - Voice
            • Experiment 04 - Multimodal Image Comparison - Voice
            • Experiment 05 - Multimodal Document Analysis - Voice
            • Experiment 06 - Multimodal Vision Application - Voice
          • ROS2 Basics

            • Experiment 01 - Environment Setup
            • Experiment 02 - Create & Build a Workspace Package
            • Experiment 03 - Run ROS2 Topic Communication Node
            • Experiment 04 - ROS2 Camera Application
          • 40-pin IO Development

            • Experiment 01 - GPIO Output (LED Blink)
            • Experiment 02 - GPIO Input
            • Experiment 03 - Button-controlled LED
            • Experiment 04 - PWM Output
            • Experiment 05 - Serial Output
            • Experiment 06 - I2C Experiment
            • Experiment 07 - SPI Experiment
          • USB Module Usage

            • Experiment 01 - USB Voice Module Usage
            • Experiment 02 - Sound Source Localization Module
          • Machine Vision Practice

            • Experiment 01 - Open USB Camera
            • Experiment 02 - Color Recognition
            • Experiment 03 - Gesture Recognition
            • Experiment 04 - YOLOv5 Object Detection
      • RDK-S100

        • Introduction

          • RDK-S100 Hardware Introduction
        • Quick Start

          • RDK-S100 Quick Start
        • Application Development

          • AI Online Model Development

            • Experiment 01 - Access Volcengine Doubao AI
            • Experiment 02 - Image Analysis
            • Experiment 03 - Multimodal Visual Analysis & Localization
            • Experiment 04 - Multimodal Image-Text Comparison
            • Experiment 05 - Multimodal Document/Table Analysis
            • Experiment 06 - Camera-based AI Visual Analysis
          • Large Language Models

            • Experiment 01 - Speech Recognition
            • Experiment 02 - Voice Conversation
            • Experiment 03 - Multimodal Image Analysis - Voice
            • Experiment 04 - Multimodal Image Comparison - Voice
            • Experiment 05 - Multimodal Document Analysis - Voice
            • Experiment 06 - Multimodal Vision Application - Voice
          • ROS2 Basics

            • Experiment 01 - Environment Setup
            • Experiment 02 - Create & Build a Workspace Package
            • Experiment 03 - Run ROS2 Topic Communication Node
            • Experiment 04 - ROS2 Camera Application
          • 40-pin IO Development

            • Experiment 01 - GPIO Output (LED Blink)
            • Experiment 02 - GPIO Input
            • Experiment 03 - Button-controlled LED
            • Experiment 04 - PWM Output
            • Experiment 05 - Serial Output
            • Experiment 06 - I2C Experiment
            • Experiment 07 - SPI Experiment
          • USB Module Usage

            • Experiment 01 - USB Voice Module Usage
            • Experiment 02 - Sound Source Localization Module
          • Machine Vision Practice

            • Experiment 01 - Open USB Camera
            • Experiment 02 - Image Processing Basics
            • Experiment 03 - Object Detection
            • Experiment 04 - Image Segmentation
      • RK1828

        • Introduction

          • M5-182X-A1 AI Edge Box - Product Introduction
          • M5-182X-A1 Hardware Specifications
          • M5-182X-A1 Usage & Safety
        • Quick Start

          • M5-182X-A1 Image Flashing
          • RK182X Hardware Installation & Verification
          • RK182X Development Environment Quick Setup
          • RK182X SDK Overview
          • RK182X Environment Setup in Detail
          • RK182X Quick Start
          • Vendor SDK Data Extraction Record
        • Development Guide

          • ClawChips Architecture and Principles
          • SKILL User Manual
          • RK182X Series LLM Inference (RK1828 Model)
          • RK182X Series CNN Inference (RK1828 Model)
          • Model Conversion
          • RK182X AI Agent Application Development Guide
          • RK182X Industrial Anomaly Detection Application
        • SDK Reference

          • RKNN3-SDK Overview

            • RKNN3 SDK Overview
          • RKNN3-Toolkit

            • RKNN3 Toolkit Installation and Usage
          • RKLLM

            • RKLLM On-Device LLM Inference
          • RK182X Series NPU Overview and Architecture (RK1828 Model)
          • RK182X INT8 Quantized Inference Deployment
          • RK182X MPP Multimedia Framework
          • MPP Details

            • RK182X Video Decoding
            • RK182X Video Encoding
          • NPU Details

            • RKNN Model Conversion
            • RK182X NPU INT8 Quantized Inference
            • RK182X Multi-Model Parallel Inference
          • RGA Details

            • RK182X RGA 2D Graphics Acceleration
          • VPU Details

            • RK182X VPU Codec
        • Hardware Reference

          • RK182X Series Hardware Architecture Overview (RK1828 Model)
          • RK182X Pin Definitions and Multiplexing Configuration
          • RK182X Pin Definitions
          • RK182X Power Management
          • RK182X Clock and PLL Configuration
          • RK182X Clock and Frequency Configuration
        • Tutorials

          • Hello World
          • Hello RK1828 - The First Program
          • RTSP Streaming
          • RTSP Streaming + AI Analysis
          • ShiMetaPi AI Lobster One-Click Deployment
          • PaddleOCR-VL Text Recognition
          • Qwen3-1.7B LLM Text Chat
          • AI Multi-View Inspection (Qwen3-VL Wrapper)
          • YOLOv5 Object Detection
        • Downloads

          • Downloads
        • FAQ

          • FAQ
    • Core-Board

      • C-3568BQ

        • Introduction

          • C-3568BQ Overview
      • C-3588LQ

        • Introduction

          • C-3588LQ Overview
      • GC-3568JBAF

        • Introduction

          • GC-3568JBAF Overview
      • C-K1BA

        • Introduction

          • C-K1BA Overview
    • Software Platform

      • ShiMetaPi Workbench

        • Introduction

          • Product Overview
          • Core Architecture
          • Feature Entries
          • Supported Hardware
          • Release Notes
        • Quick Start

          • Install & Login
          • Connect the Device
          • Set Up the Environment
          • Connect to AIHub
          • First Inference
        • User Guide

          • Workspace Overview
          • Device Manager
          • Model Market
          • One-Click Deploy
          • Vision — SVP
          • Vision - Custom Models
          • shimeta-py IDE
          • Terminal
          • Agent Debug Assistant
          • Settings and Resources
        • FAQ

          • Installation & Login
          • Device Connection
          • Models & Deployment
          • Vision & Runtime
          • Settings & Other
      • ShimetaPi Repository

        • Introduction

          • ShimetaPi Software Repository
        • Pico G1 (GK7206)

          • Quick Start

            • Installation & First Inference
            • shimeta_infer — Image Inference
            • shimeta_camera — Real-time Camera Inference
            • SVP Scene Detection
            • File Transfer & Built-in Model Reference
            • FAQ
          • HTTP API & Python SDK

            • HTTP API Reference
      • Model Fine-tuning Platform

        • Introduction

          • Model Training Platform
        • Quick Start

          • Register & Login
          • Create Your First Model (30-Minute Quick Experience)
        • Training Guide

          • Data Preparation & Annotation
          • Training Parameter Configuration
          • Start & Monitor Training
          • Model Evaluation & Testing
        • Model Deployment

          • Export Model
          • Deploy to Edge Device

Model Quantization

Introduction

TPU-MLIR is the compiler project for the Sophgo deep-learning processor. It provides a complete toolchain that converts pretrained neural networks from different frameworks into bmodel files that run efficiently on the Sophgo intelligent-vision deep-learning processor. The source code is open on GitHub: https://github.com/sophgo/tpu-mlir .

The paper https://arxiv.org/abs/2210.15016 describes the overall design of TPU-MLIR.

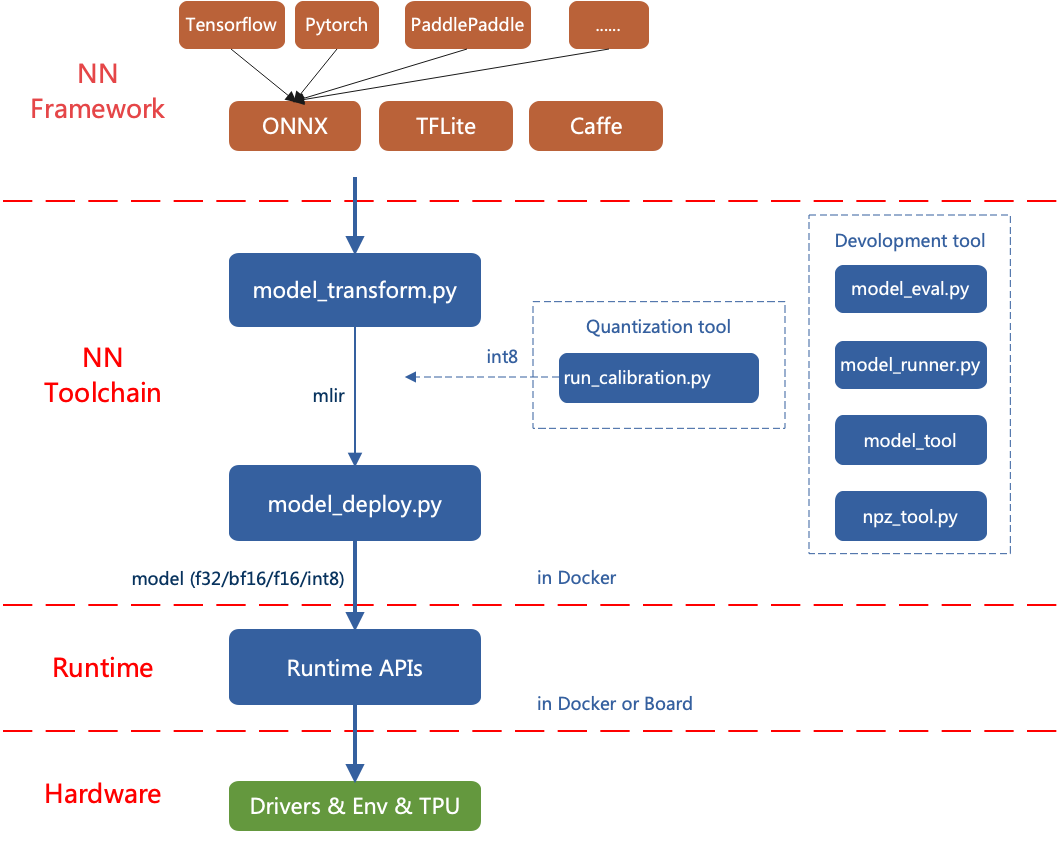
The overall TPU-MLIR architecture is shown below:
_images/framework.png

The currently directly supported frameworks are ONNX, Pytorch, Caffe, and TFLite. Models from other frameworks must first be converted to ONNX. For how to convert models from other deep-learning frameworks to ONNX, see the ONNX official site: https://github.com/onnx/tutorials.

Model conversion is performed inside a specific Docker container, mainly in two steps: first model_transform.py converts the original model to an MLIR file, then model_deploy.py converts the MLIR file to a bmodel.

To convert to an INT8 model, call run_calibration.py to generate a calibration table and pass it to model_deploy.py.

If the INT8 model does not meet accuracy requirements, you can call run_qtable.py to generate a quantization table that decides which layers use floating-point computation, and then pass it to model_deploy.py to produce a mixed-precision model.

1. Set Up the TPU-MLIR Environment

1.1 Base Environment

To relieve storage pressure on the board, use a non-BM1684X Linux system (here using WSL as an example) for model quantization and conversion. If your environment satisfies python >= 3.10 and ubuntu:22.04, you can skip the Docker environment configuration (this subsection).

Because the libc version affects model conversion and quantization, we use the official image to set up the environment. TPU-MLIR is developed inside Docker; once Docker is configured, it can be compiled and run.

If you are using Docker for the first time, run the following commands to install and configure it (only needed once):

sudo apt install docker.io
sudo systemctl start docker
sudo systemctl enable docker
sudo groupadd docker
sudo usermod -aG docker $USER
newgrp docker

Pull the required image from Docker Hub:

docker pull sophgo/tpuc_dev:latest

If the pull fails, you can download the image directly with wget:

#使用wget下载所需的镜像
wget https://sophon-assets.sophon.cn/sophon-prod-s3/drive/25/04/15/16/tpuc_dev_v3.4.tar.gz
#加载镜像
docker load -i tpuc_dev_v3.4.tar.gz

Start the image environment:

#首次创建tpumlir环境使用下面命令,--name tpumlir这里名字可自定义设置
docker run --privileged --name tpumlir -v $PWD:/workspace -it sophgo/tpuc_dev:latest
#非首次创建直接使用下面命令
docker run -v $PWD:/workspace -it sophgo/tpuc_dev:latest

1.2 Install TPU-MLIR

TPU-MLIR provides the following three installation methods.

(1) Download and install directly from PyPI (recommended):

pip install tpu_mlir -i https://pypi.tuna.tsinghua.edu.cn/simple

(2) Download the latest tpu_mlir-*-py3-none-any.whl from TPU-MLIR GitHub, then install with pip:

pip install tpu_mlir-*-py3-none-any.whl

Tips

TPU-MLIR requires different dependencies when processing models from different frameworks. For models generated by ONNX or Torch, install the additional dependency environment with:

pip install tpu_mlir[onnx] -i https://pypi.tuna.tsinghua.edu.cn/simple
pip install tpu_mlir[torch] -i https://pypi.tuna.tsinghua.edu.cn/simple

Five configurations are currently supported: onnx, torch, tensorflow, caffe, paddle. You can install multiple configurations with a single command, or install all dependencies:

pip install tpu_mlir[onnx,torch,caffe] -i https://pypi.tuna.tsinghua.edu.cn/simple
pip install tpu_mlir[all] -i https://pypi.tuna.tsinghua.edu.cn/simple

(3) If you obtained a release package of the form tpu-mlir_${version}-${hash}-${date}.tar.gz (this package can be obtained by downloading sophon-SDK and looking in its subdirectory, typically under SDK-23.09-LTS-SP4\tpu-mlir_20231116_054500), configure it as follows:

#可通过下面命令选择下载SDK
wget https://sophon-assets.sophon.cn/sophon-prod-s3/drive/24/12/31/10/SDK-23.09-LTS-SP4.zip
# 如果此前有通过pip安装过mlir,需要卸载掉
pip uninstall tpu_mlir
#解压安装发布包
tar xvf tpu-mlir_${version}-${hash}-${date}.tar.gz
cd tpu-mlir_${version}-${hash}-${date}
source envsetup.sh #配置环境变量

It is recommended to use the TPU-MLIR image only for compiling and quantizing models; program compilation and execution should be done in the development and runtime environments. For more TPU-MLIR tutorials, see the related page.

2. Compile the Model

This section uses yolov5s.onnx as an example to show how to compile and port an ONNX model to run on the BM1684X platform. Other models can refer to the related examples.

2.1 Configure the Project Directory

Download tpu-mlir-resource.tar from the Assets on GitHub and decompress it; after decompression, rename the folder to tpu_mlir_resource:

#可手动下载,也可通过下面命令使用wget下载,推荐手动
wget https://github.com/sophgo/tpu-mlir/releases/download/v1.20/tpu-mlir-resource.tar
#解压工程目录
tar -xvf tpu-mlir-resource.tar
#修改文件名称
mv regression/ tpu-mlir-resource/

Tips

tpu-mlir-resource.tar is a sample resource file. If you want to convert your own model, this file is not required; see the developer manual for the relevant configuration.

Create a model_yolov5s_onnx directory and put both the model file and image files into model_yolov5s_onnx.

Steps:

mkdir model_yolov5s_onnx && cd model_yolov5s_onnx
wget https://github.com/ultralytics/yolov5/releases/download/v6.0/yolov5s.onnx
cp -rf tpu_mlir_resource/dataset/COCO2017 .
cp -rf tpu_mlir_resource/image .
mkdir workspace && cd workspace

2.2 ONNX to MLIR

If the model takes an image as input, before converting the model we need to understand its preprocessing. If the model uses a preprocessed npz file as input, preprocessing is not a concern.

The preprocessing can be expressed by the following formula (where x is the input):

$$ y=(x-mean)*scale $$

The official YOLOv5 image is in RGB format; each value is multiplied by 1/255, corresponding to mean and scale of 0.0,0.0,0.0 and 0.0039216,0.0039216,0.0039216.

The model conversion command is as follows:

$ model_transform \
    --model_name yolov5s \
    --model_def ../yolov5s.onnx \
    --input_shapes [[1,3,640,640]] \
    --mean 0.0,0.0,0.0 \
    --scale 0.0039216,0.0039216,0.0039216 \
    --keep_aspect_ratio \
    --pixel_format rgb \
    --output_names 350,498,646 \
    --test_input ../image/dog.jpg \
    --test_result yolov5s_top_outputs.npz \
    --mlir yolov5s.mlir

The main parameters of model_transform are described below (for the full description, see the TPU-MLIR developer reference — User Interface chapter):

ParameterRequired?Description
model_nameYesModel name
model_defYesModel definition file, e.g. .onnx, .tflite, or .prototxt
input_shapesNoInput shape, e.g. [[1,3,640,640]]; a 2D array that supports multiple inputs
input_typesNoInput type, e.g. int32; separate multiple inputs with ,; defaults to float32
resize_dimsNoThe size to resize the original image to; if not specified, resized to the model input size
keep_aspect_ratioNoWhether to keep aspect ratio on resize; default false; when set, pads the shortfall with 0
meanNoPer-channel mean of the image; default 0.0,0.0,0.0
scaleNoPer-channel scale of the image; default 1.0,1.0,1.0
pixel_formatNoPixel format: rgb, bgr, gray, or rgbd; default bgr
channel_formatNoChannel format: nhwc or nchw for image input, none for non-image input; default nchw
output_namesNoOutput names; if not specified, the model's outputs are used; when specified, these names are used as outputs
test_inputNoInput file for validation; can be an image, npy, or npz; if not specified, no correctness validation is performed
test_resultNoOutput file after validation
exceptsNoNames of network layers to exclude from validation; multiple separated by ,
mlirYesOutput MLIR file name and path

After conversion to MLIR, a ${model_name}_in_f32.npz file is generated; this is the model's input file.

2.3 MLIR to F16 Model

Convert the MLIR file to an F16 bmodel as follows:

model_deploy \
    --mlir yolov5s.mlir \
    --quantize F16 \
    --processor bm1684x \
    --test_input yolov5s_in_f32.npz \
    --test_reference yolov5s_top_outputs.npz \
    --model yolov5s_1684x_f16.bmodel

After compilation, a file named yolov5s_1684x_f16.bmodel is generated.

The main parameters of model_deploy are described below (for the full description, see the TPU-MLIR developer reference — User Interface chapter):

ParameterRequired?Description
mlirYesThe MLIR file
quantizeYesDefault quantization type; supports F32/F16/BF16/INT8
processorYesTarget platform; supports bm1690, bm1688, bm1684x, bm1684, cv186x, cv183x, cv182x, cv181x, cv180x
calibration_tableNoCalibration table path; required when INT8 quantization is present
toleranceNoError tolerance between the MLIR quantized result and the MLIR fp32 inference result
test_inputNoInput file for validation; can be an image, npy, or npz; if not specified, no correctness validation is performed
test_referenceNoReference data for validating model correctness (npz format); the per-op computation results
compare_allNoWhether to compare all intermediate results during validation; by default intermediate results are not compared
exceptsNoNames of network layers to exclude from validation; multiple separated by ,
op_divideNocv183x/cv182x/cv181x/cv180x only; tries to split large ops into smaller ones to save ion memory; applies to a few specific models
modelYesOutput model file name and path
num_coreNoWhen target is bm1688, selects the number of TPU cores for parallel computation; default 1 TPU core
skip_validationNoSkip bmodel correctness validation to speed up deployment; validation runs by default

2.5 MLIR to INT8 Model

2.5.1 Generate the Calibration Table

Before converting to an INT8 model, run calibration to obtain a calibration table; prepare about 100–1000 input images as appropriate.

Then use the calibration table to generate a symmetric or asymmetric bmodel. If symmetric meets the requirement, asymmetric is generally not recommended because its performance is slightly worse than the symmetric model.

Here we use 100 existing images from COCO2017 as an example to run calibration:

run_calibration yolov5s.mlir \
    --dataset ../COCO2017 \
    --input_num 100 \
    -o yolov5s_cali_table

After running, a file named yolov5s_cali_table is generated; this file is the input for subsequent INT8 model compilation.

2.5.2. Compile to an INT8 Symmetric Quantization Model

To convert to an INT8 symmetric quantization model, run:

model_deploy \
    --mlir yolov5s.mlir \
    --quantize INT8 \
    --calibration_table yolov5s_cali_table \
    --processor bm1684x \
    --test_input yolov5s_in_f32.npz \
    --test_reference yolov5s_top_outputs.npz \
    --tolerance 0.85,0.45 \
    --model yolov5s_1684x_int8_sym.bmodel

After compilation, a file named yolov5s_1684x_int8_sym.bmodel is generated.

2.6 Result Comparison

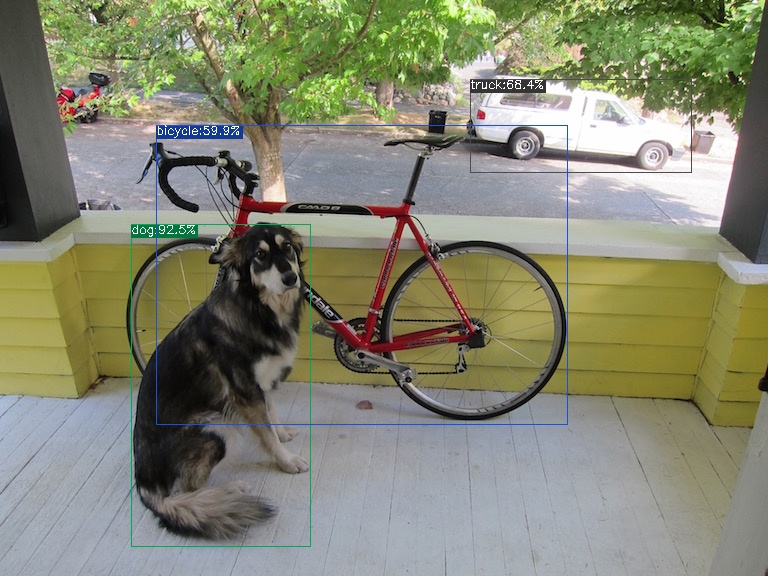
This release includes a YOLOv5 use case written in Python; use the detect_yolov5 command to perform object detection on an image.

The source path for this command is {package/path/to/tpu_mlir}/python/samples/detect_yolov5.py.

Reading that code shows how the model is used: first preprocess to get the model input, then inference to get the output, and finally post-process.

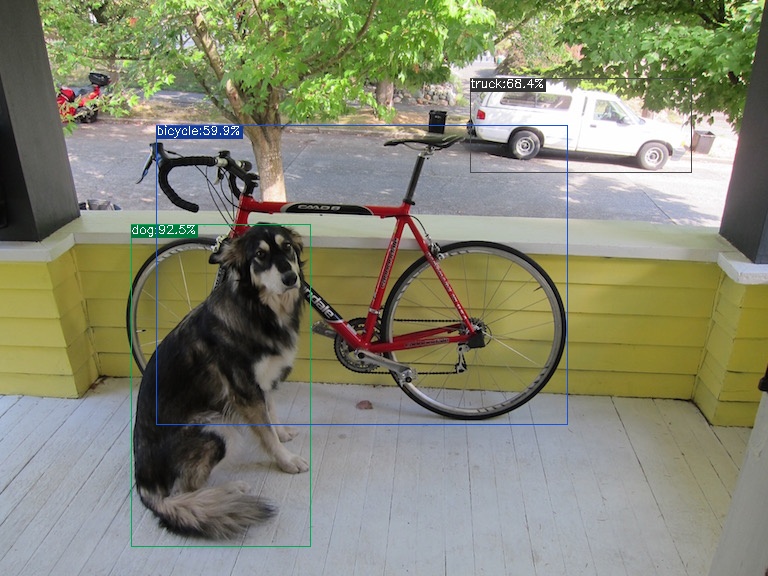
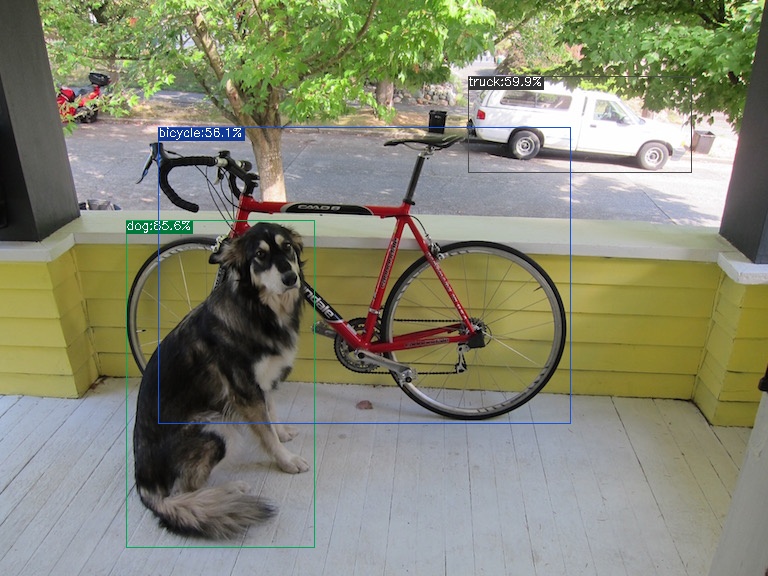
The following commands verify the ONNX/F16/INT8 results respectively.

Run the ONNX model as follows to get dog_onnx.jpg:

detect_yolov5 \
    --input ../image/dog.jpg \
    --model ../yolov5s.onnx \
    --output dog_onnx.jpg
onnx

Run the F16 bmodel as follows to get dog_f16.jpg:

detect_yolov5 \
    --input ../image/dog.jpg \
    --model yolov5s_1684x_f16.bmodel \
    --output dog_f16.jpg
f16 bmodel

Run the INT8 symmetric bmodel as follows to get dog_int8_sym.jpg:

detect_yolov5 \
    --input ../image/dog.jpg \
    --model yolov5s_1684x_int8_sym.bmodel \
    --output dog_int8_sym.jpg
onnx

Edit this page on GitHub
Prev
Cross Compilation