
First Inference
This chapter walks you through deploying the model chosen in ch04 to the Pico-G1 and viewing the camera's real-time detection feed in the Vision Tab.
Prerequisites
| Item | Status |
|---|---|
| Workbench logged in to AIHub | ✅ |
| Pico-G1 connected | ✅ |
| Model chosen | ✅ (ch04) |
Flow Overview
Pick a model in the Model Tab
       │
       ▼  Click "Deploy to Board"
The IDE automatically pushes the .xmm.zip to /mnt/models/xmm/ on the board via SSH
       │
       ▼
Switch to the Vision Tab → the model appears in the shimeta-xmm panel automatically
       │
       ▼  Pick a scenario or the custom model → click "Run"
The shimeta-svp or shimeta-xmm service starts
       │
       ▼
The "Object view" (物象) box on the right shows the real-time camera feed (with detections)
The whole flow takes about 1-3 minutes.
Step 1: Deploy the Model in the Model Tab
On the model card chosen in ch04 (e.g. yolov8n), click the "Deploy to Board" button at the bottom.
The IDE automatically:
- Pushes the
.xmm.zipto/mnt/models/xmm/on the board via SSH - Extracts it on the board
- Verifies the model integrity
After a successful deploy the button changes to "Deployed".
Step 2: Switch to the Vision Tab
Click the 6th tab at the top, "Vision":
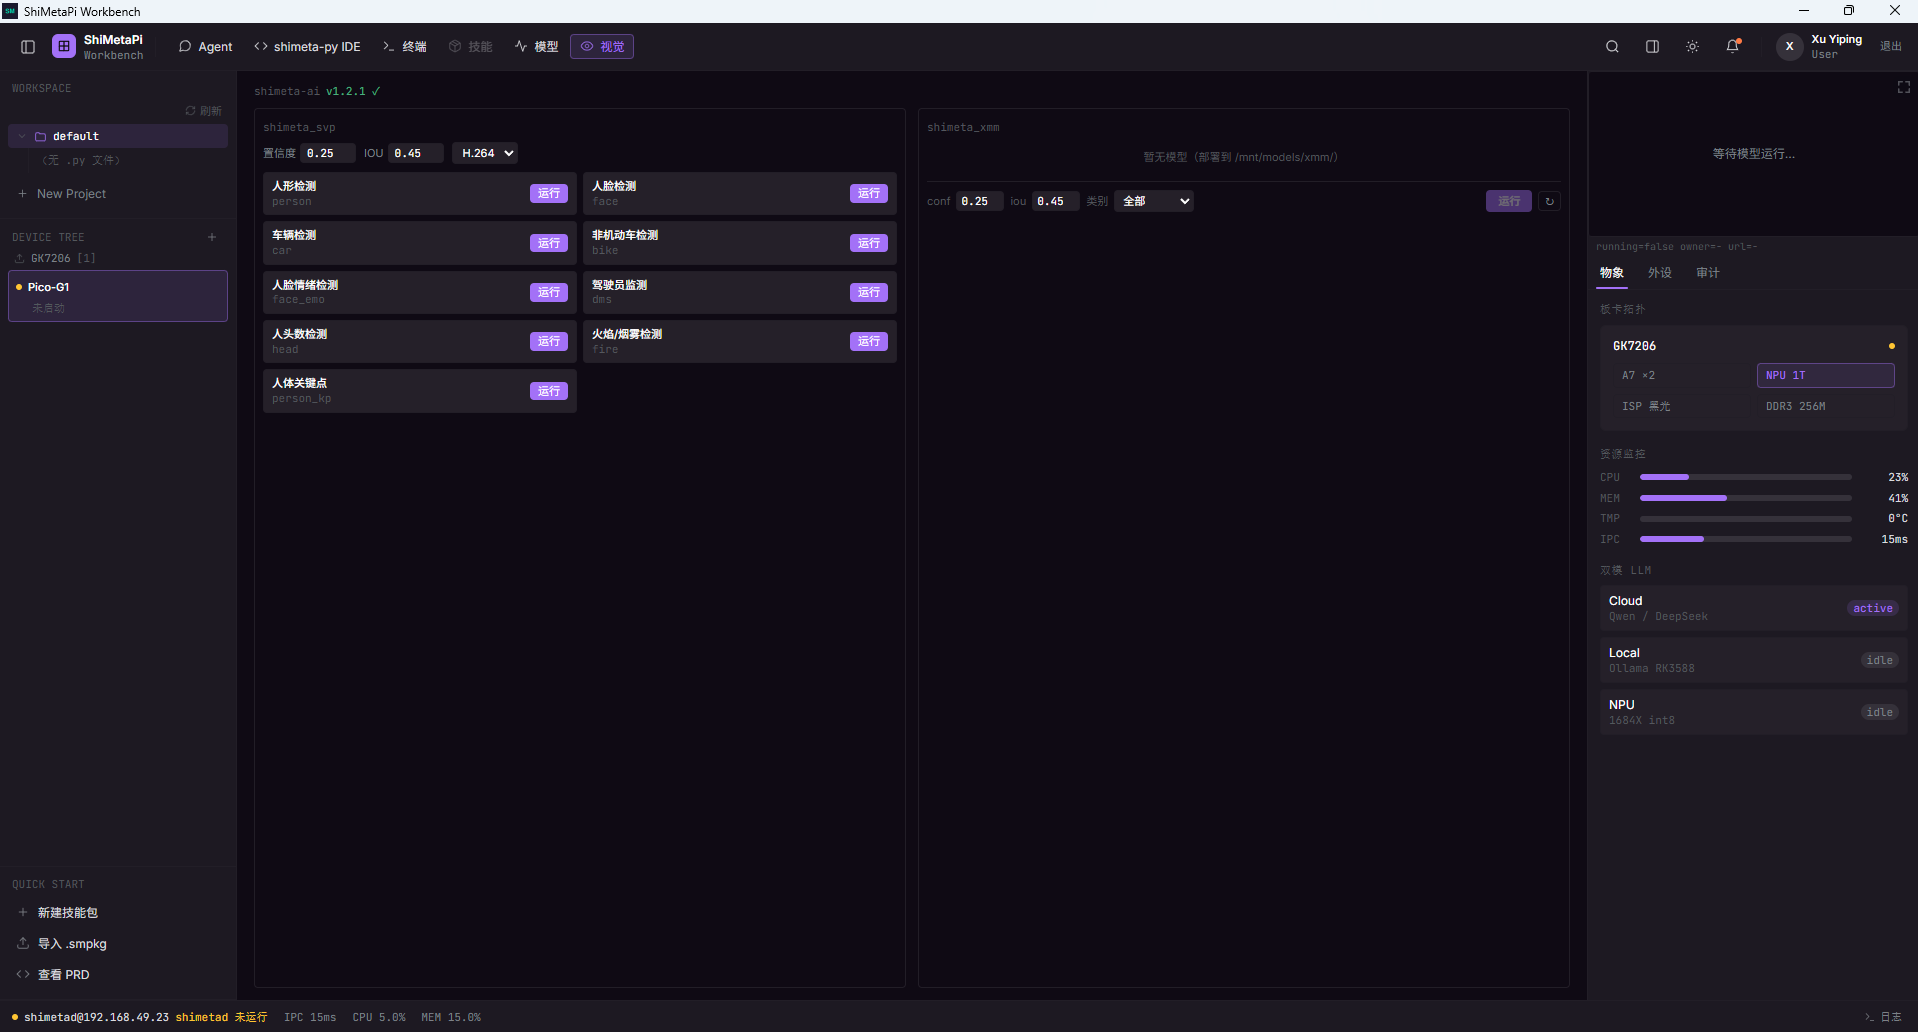
The Vision Tab has two panels:
Left: shimeta-svp (9 Scenario Detections)
| Scenario | Chinese Name |
|---|---|
| person | 人形检测 (person detection) |
| face | 人脸检测 (face detection) |
| car | 车辆检测 (vehicle detection) |
| bike | 非机动车检测 (non-motorized vehicle) |
| face_emo | 人脸情绪检测 (facial emotion) |
| dms | 驾驶员监测 (driver monitoring) |
| head | 人头数检测 (head count) |
| fire | 火焰/烟雾检测 (fire/smoke) |
| person_kp | 人体关键点 (body keypoints) |
Global parameters at the top: confidence 0.25 / IOU 0.45 / H.264
Right: shimeta-xmm (Custom Models)
The freshly deployed yolov8n appears in the right panel.
Parameters: conf 0.25 / iou 0.45 / classes (all)
Step 3: Start an SVP Scenario Detection (Recommended First)
In the svp panel on the left
- Pick a scenario button (e.g. "person detection")
- Click the "Run" button on the scenario card
The shimeta-svp service starts, and the "Object view" (物象) box on the right begins showing the real-time camera feed:
| State | Meaning |
|---|---|
| "Waiting for model to run..." | The service is starting |
| Camera feed + detection boxes | Inference succeeded |
| Black screen | Camera not connected or faulted |
Step 4: Observe the Inference Results
The "Object view" (物象) box on the right
- Real-time camera feed
- Overlaid detection boxes (a color per class)
- Class labels + confidence
Other Right-Side Panels
| Panel | Shows |
|---|---|
| Top status bar | running=true / owners=- / url=- |
| Board topology | GK7206 green dot |
| Resource monitor | CPU / MEM / TMP / IPC refreshing live |
| Dual-mode LLM |
Step 5: Tune Parameters (Optional)
If detections are too many/too few, adjust the confidence:
| Parameter | Default | Effect |
|---|---|---|
| Confidence threshold | 0.25 | Lower → more detections (and more noise) |
| IOU threshold | 0.45 | Higher → suppresses duplicate boxes |
Click "Run" again after changing to restart.
Step 6: Stop the Detection
Click the running scenario button to stop it; switching to another tab also stops it.
Multiple SVP scenarios cannot run at the same time — port conflict.
Step 7: Custom Model Inference (Alternative Flow)
If you chose a custom model in xmm format (e.g. yolov8n), use the right panel instead:
- Select the "All" classes
- Click the "Run" button
- The shimeta-xmm service starts and the "Object view" (物象) box on the right shows the feed
Note: shimeta-svp and shimeta-xmm share port 8080 and cannot run at the same time.
Step 8: Save a Snapshot (Optional)
If the Vision Tab has a "Screenshot" button at the top, click it to save the current frame as a JPEG locally:
~/Documents/ShiMetaPi Workbench/snapshots/FAQ
| Symptom | What to Check |
|---|---|
| Deploy button unresponsive | Board unreachable; go back to ch02 |
| Vision Tab "Object view" (物象) box shows black | Camera not connected / incompatible (SC465SL only) |
| Clicking "Run" does nothing | shimeta-svp/xmm not installed; go back to ch03 |
| All detection confidences < 5% | Model doesn't match the NPU; re-export from AIHub |
| "Deploy to Board" reports failure | Not enough disk space on the board; SSH in and clean /mnt/models/xmm/ |
Done!
At this point you have completed the full first-use flow of Workbench:
- ✅ Installed the IDE
- ✅ Logged in to AIHub
- ✅ Added the Pico-G1
- ✅ Verified the on-board environment
- ✅ Deployed a model to the board
- ✅ Viewed the camera detection feed in the Vision Tab
Next
- Want to go deeper into a feature → User Guide
- Want to understand how it works → Core Architecture