
Development Environment Setup
This chapter describes in detail how to set up a complete cross-compilation development environment for the ShiMetaPi-Pico-G1.
1 Development Environment Overview
Because the target (ShiMetaPi-Pico-G1) has limited resources and cannot run development and debugging tools, programs are compiled, linked, and located on a powerful host. After the executable is generated, it is flashed to the target to run — this is the "host + target (evaluation board)" cross-compilation model.
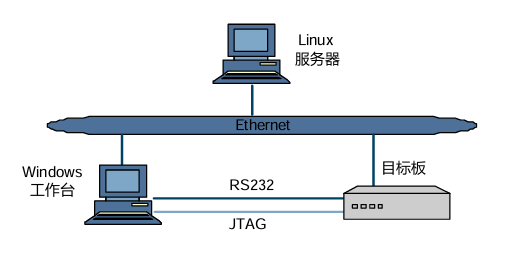
A typical development environment consists of the following parts, all on the same network:
- Linux server: the cross-compilation environment, used to compile and build the SDK.
- Windows workstation: connects to the Linux server remotely via SSH clients such as Mobaxterm for development, and connects to the target board via serial/Ethernet/USB for running debugging tools and flashing firmware.
- Target board (ShiMetaPi-Pico-G1): runs the final compiled system image and applications.
Note
The development environment uses a Windows workstation, but many tasks (such as using minicom instead of HyperTerminal) can also be done on the Linux server. Choose whichever you prefer.
2 Setting Up the Linux Server Build Environment
The following steps use the recommended 64-bit Ubuntu 18.04 as an example.
Note
A 64-bit Linux server is recommended. This development package may have unknown compatibility issues on 32-bit Linux servers, older Linux servers, or less common Linux servers.
2.1 Recommended Hardware and System Configuration
A 64-bit Linux server is recommended to ensure compatibility with the development package. Recommended configuration:
- CPU: Intel(R) Xeon(R) CPU E5-2450 0 @ 2.10 GHz or better
- Memory (DDR): >= 16 GB
- Disk: >= 600 GB
- Network: Gigabit Ethernet
- OS: Ubuntu 18.04 64-bit
This development package is compiled by default using the following Linux version:
Linux version 4.15.0-192-generic (gcc version 7.5.0 (Ubuntu 7.5.0-3ubuntu1~18.04)) #203-Ubuntu SMP Wed Aug 10 17:40:03 UTC 20222.2 Setting Up the Network Environment
Configure the network yourself and install network components such as NFS, Samba, and SSH:
sudo apt-get install nfs-kernel-server samba sshNote
After setting up the network, make sure the Linux server, the Windows workstation, and the target board are on the same LAN and can ping each other.
2.3 Installing Dependency Packages
After installing the OS and configuring the network, complete the installation of the relevant packages by following these steps.
Step 1: Configure the system to use bash by default
sudo dpkg-reconfigure dashSelect No in the dialog that appears to switch the default shell from dash to bash.
Step 2: Install the base packages
sudo apt-get install make libc6:i386 lib32z1 lib32stdc++6 zlib1g-dev libncurses5-dev ncurses-term libncursesw5-dev g++ u-boot-tools:i386 texinfo texlive gawk libssl-dev openssl bcStep 3: Resolve third-party library compilation issues on 64-bit systems
Create an empty /etc/ld.so.preload file to resolve compilation failures of some third-party libraries on 64-bit Linux servers:
sudo touch /etc/ld.so.preload
sudo bash -c 'echo "" > /etc/ld.so.preload'
Step 4: Install gperf
Install gperf to resolve eudev-3.2.7 compilation issues:
wget http://ftp.gnu.org/pub/gnu/gperf/gperf-3.1.tar.gz
tar -xzf gperf-3.1.tar.gz
cd gperf-3.1
./configure
make
sudo make install
Step 5: Install mtd-utils dependencies
mtd-utils 2.0.2 depends on the following libraries:
sudo apt-get install zlib1g-dev liblzo2-dev uuid-dev pkg-configSet the pkg-config search path:
export PKG_CONFIG_PATH="$PKG_CONFIG_PATH:/usr/lib/x86_64-linux-gnu/pkgconfig"Step 6: Install automake 1.15.1
mtd-utils 2.0.2 depends on automake 1.15.1, which must be installed manually:
1. Remove the existing automake version
sudo apt-get autoremove automake2. Download automake 1.15.1
wget ftp://ftp.gnu.org/gnu/automake/automake-1.15.1.tar.gz3. Build and install
tar zxvf automake-1.15.1.tar.gz
cd automake-1.15.1/
./configure
make
sudo make install
2.4 Obtaining the SDK
Note
Install git yourself according to your server's Linux distribution.
1. Clone the SDK
- github
git clone https://github.com/ShiMetaPi/shimetapi_pico_gx.git- gitee
git clone https://gitee.com/ShiMetaPi_0/shimetapi_pico_gx.git2. Configure the cross-compilation toolchain path
Note
Cross-compilation toolchains obtained from third-party sources may not match the kernel in use and can cause unexpected issues during development. Use the cross-compilation toolchain bundled with the SDK.
The SDK release package includes the build toolchain. From the SDK root directory, run the following command to add the toolchain path to the environment variables:
cd sdk
source ./build/env.sh
This command adds the compiler paths under sdk/tools/linux/toolchains to the PATH environment variable, making the compiler available within the SDK.
Tip
Every time you open a new terminal window before building, run source ./build/env.sh to load the environment variables, or use the run.sh script to build.
3. Verify the SDK
From the SDK root directory, perform a build and flash once to verify that the firmware can be flashed into the ShiMetaPi-Pico-G1 and run successfully.
See Image Build, Flash and Run, and System Login.