
WIFI
1 WIFI Module Overview
The MB-E30P development board integrates the RTL8723DU wireless network module, providing complete IEEE 802.11 b/g/n wireless network connectivity. This module connects to the main control chip via the USB interface and supports wireless communication on the 2.4GHz band, providing the development board with flexible wireless network access.
1.1 RTL8723DU Module Specifications
| Parameter | Specification |
|---|---|
| Chip Model | Realtek RTL8723DU |
| Interface Type | USB 2.0 |
| Wireless Standard | IEEE 802.11 b/g/n |
| Operating Frequency Band | 2.4GHz (2.412~2.484GHz) |
| Transfer Rate | Maximum 150Mbps (802.11n) |
| Modulation | OFDM, CCK, BPSK, QPSK, 16-QAM, 64-QAM |
| Antenna Configuration | 1T1R (single transmit, single receive) |
| Transmit Power | Maximum 20dBm |
| Receive Sensitivity | -70dBm @ 150Mbps |
| Encryption Support | WEP, WPA/WPA2-PSK, WPA/WPA2-Enterprise |
1.2 Performance Indicators
| Mode | Maximum Rate | Typical Range | Power Consumption |
|---|---|---|---|
| 802.11b | 11Mbps | 100m | Low |
| 802.11g | 54Mbps | 50m | Medium |
| 802.11n | 150Mbps | 30m | Medium-High |
2 WIFI Connection Configuration
The development board uses the RTL8723DU module; the system has already adapted the WIFI driver and related software components by default.
2.1 Connecting WIFI
As shown in the figure, find the network icon in the upper-right corner of the system and click it to connect to WIFI. 
Use the ifconfig command to view the IP address and other information.
root@linaro-alip:/# ifconfig
···
wlx78228877b4a5: flags=4163<UP,BROADCAST,RUNNING,MULTICAST>  mtu 1500
        inet 192.168.137.149  netmask 255.255.255.0  broadcast 192.168.137.255
        inet6 fe80::d175:3cd1:73ca:ecc8  prefixlen 64  scopeid 0x20<link>
        ether 78:22:88:77:b4:a5  txqueuelen 1000  (Ethernet)
        RX packets 69  bytes 954099 (931.7 KiB)
        RX errors 0  dropped 143  overruns 0  frame 0
        TX packets 72  bytes 116372 (113.6 KiB)
        TX errors 0  dropped 23 overruns 0  carrier 0  collisions 0
2.2 Connectivity Test
Execute the following command to view the obtained IP address, and use the ping command to test whether communication between the development board and the PC is normal. 192.168.49.85 is the actual IP address of the PC. Please ensure the development board and PC are in the same local area network.
root@linaro-alip:/# ping 192.168.49.85 -I wlx78228877b4a5 -c 8
ping 192.168.49.85 -I wlx78228877b4a5 -c 8
PING 192.168.49.85 (192.168.49.85) from 192.168.137.149 wlx78228877b4a5: 56(84) bytes of data.
64 bytes from 192.168.49.85: icmp_seq=1 ttl=127 time=5.14 ms
64 bytes from 192.168.49.85: icmp_seq=2 ttl=127 time=3.66 ms
64 bytes from 192.168.49.85: icmp_seq=3 ttl=127 time=2.83 ms
64 bytes from 192.168.49.85: icmp_seq=4 ttl=127 time=2.81 ms
64 bytes from 192.168.49.85: icmp_seq=5 ttl=127 time=9.44 ms
64 bytes from 192.168.49.85: icmp_seq=6 ttl=127 time=2.77 ms
64 bytes from 192.168.49.85: icmp_seq=7 ttl=127 time=3.46 ms
64 bytes from 192.168.49.85: icmp_seq=8 ttl=127 time=3.09 ms

--- 192.168.49.85 ping statistics ---
8 packets transmitted, 8 received, 0% packet loss, time 7011ms
rtt min/avg/max/mdev = 2.771/4.150/9.442/2.128 ms
2.3 TCP Bandwidth Test
The following uses the iperf3 tool to test the network communication bandwidth between the development board and the PC.
Server Side
Install the iperf3 tool on the development board with internet access, executing the following command:
root@linaro-alip:/# sudo apt update
root@linaro-alip:/# sudo apt install iperf3
The development board acts as the server; execute the following command:
root@linaro-alip:/# iperf3 -s
-----------------------------------------------------------
Server listening on 5201 (test #1)
-----------------------------------------------------------
Client Side
The iperf3 tool for Windows can be obtained from the test tool package.
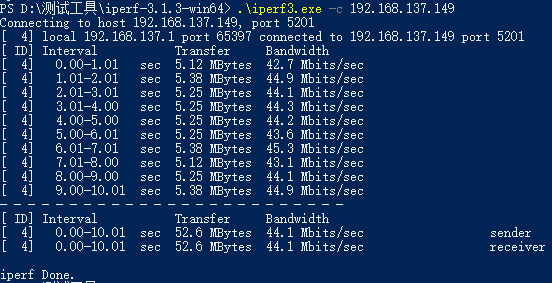
Open PowerShell on Windows, navigate to the directory where the iperf3 tool is located. Have Windows act as the client to send data, executing the following command:
.\iperf3.exe -c 192.168.137.149 // 192.168.137.149 为服务端 IP 地址2.4 Test Results
Server Side
root@linaro-alip:/# iperf3 -s
-----------------------------------------------------------
Server listening on 5201 (test #1)
-----------------------------------------------------------
Accepted connection from 192.168.137.1, port 65396
[  5] local 192.168.137.149 port 5201 connected to 192.168.137.1 port 65397
[ ID] Interval           Transfer     Bitrate
[  5]   0.00-1.00   sec  4.88 MBytes  40.9 Mbits/sec
[  5]   1.00-2.00   sec  5.40 MBytes  45.3 Mbits/sec
[  5]   2.00-3.00   sec  5.22 MBytes  43.8 Mbits/sec
[  5]   3.00-4.00   sec  5.36 MBytes  45.0 Mbits/sec
[  5]   4.00-5.00   sec  5.14 MBytes  43.1 Mbits/sec
[  5]   5.00-6.00   sec  5.22 MBytes  43.8 Mbits/sec
[  5]   6.00-7.00   sec  5.40 MBytes  45.3 Mbits/sec
[  5]   7.00-8.00   sec  5.12 MBytes  43.0 Mbits/sec
[  5]   8.00-9.00   sec  5.38 MBytes  45.1 Mbits/sec
[  5]   9.00-10.00  sec  5.24 MBytes  43.9 Mbits/sec
[  5]  10.00-10.05  sec   266 KBytes  45.9 Mbits/sec
- - - - - - - - - - - - - - - - - - - - - - - - -
[ ID] Interval           Transfer     Bitrate
[  5]   0.00-10.05  sec  52.6 MBytes  43.9 Mbits/sec                  receiver
-----------------------------------------------------------
Client Side
3 Command-Line WIFI Configuration
3.1 Connecting WIFI with wpa_supplicant
1) Scanning for Available Networks
# 启动 WIFI 接口
sudo ifconfig wlx78228877b4a5 up

# 扫描可用的 WIFI 网络
sudo iwlist wlx78228877b4a5 scan | grep ESSID

# 或使用 iw 命令
sudo iw dev wlx78228877b4a5 scan | grep SSID
2) Creating the wpa_supplicant Configuration File
# 创建配置文件
sudo nano /etc/wpa_supplicant/wpa_supplicant.conf

# 添加以下内容
ctrl_interface=/var/run/wpa_supplicant
ctrl_interface_group=0
update_config=1
country=CN

# WPA/WPA2-PSK 网络配置
network={
    ssid="YourWiFiName"
    psk="YourPassword"
    key_mgmt=WPA-PSK
    priority=1
}

# 开放网络配置
network={
    ssid="OpenWiFi"
    key_mgmt=NONE
    priority=2
}

# WEP 网络配置
network={
    ssid="WEPNetwork"
    wep_key0="your_wep_key"
    key_mgmt=NONE
    wep_tx_keyidx=0
}
3) Connecting to a WIFI Network
# 启动 wpa_supplicant
sudo wpa_supplicant -B -i wlx78228877b4a5 -c /etc/wpa_supplicant/wpa_supplicant.conf

# 获取 IP 地址
sudo dhclient wlx78228877b4a5

# 检查连接状态
wpa_cli -i wlx78228877b4a5 status
3.2 Managing WIFI with NetworkManager
Command-line tool nmcli
# 查看 WIFI 状态
nmcli radio wifi

# 扫描 WIFI 网络
nmcli dev wifi list

# 连接 WIFI 网络
nmcli dev wifi connect "SSID" password "PASSWORD"

# 查看已保存的连接
nmcli connection show

# 断开 WIFI 连接
nmcli dev disconnect wlx78228877b4a5

# 删除已保存的连接
nmcli connection delete "SSID"
4 WIFI Hotspot Mode (AP Mode)
4.1 Installing hostapd
sudo apt-get update
sudo apt-get install hostapd dnsmasq
4.2 Configuring hostapd
# 创建 hostapd 配置文件
sudo nano /etc/hostapd/hostapd.conf

# 添加以下内容
interface=wlx78228877b4a5
driver=nl80211
ssid=MB-E30P-AP
hw_mode=g
channel=7
wmm_enabled=0
macaddr_acl=0
auth_algs=1
ignore_broadcast_ssid=0
wpa=2
wpa_passphrase=12345678
wpa_key_mgmt=WPA-PSK
wpa_pairwise=TKIP
rsn_pairwise=CCMP
4.3 Configuring the DHCP Service
# 备份原配置
sudo cp /etc/dnsmasq.conf /etc/dnsmasq.conf.backup

# 编辑 dnsmasq 配置
sudo nano /etc/dnsmasq.conf

# 添加以下内容
interface=wlx78228877b4a5
dhcp-range=192.168.4.2,192.168.4.20,255.255.255.0,24h
4.4 Configuring the Network Interface
# 设置静态 IP
sudo ifconfig wlx78228877b4a5 192.168.4.1 netmask 255.255.255.0

# 启用 IP 转发
echo 1 | sudo tee /proc/sys/net/ipv4/ip_forward

# 配置 NAT 规则
sudo iptables -t nat -A POSTROUTING -o end0 -j MASQUERADE
sudo iptables -A FORWARD -i end0 -o wlx78228877b4a5 -m state --state RELATED,ESTABLISHED -j ACCEPT
sudo iptables -A FORWARD -i wlx78228877b4a5 -o end0 -j ACCEPT
4.5 Starting the Hotspot Service
# 启动 hostapd
sudo hostapd /etc/hostapd/hostapd.conf &

# 启动 dnsmasq
sudo systemctl start dnsmasq

# 检查服务状态
sudo systemctl status hostapd
sudo systemctl status dnsmasq
5 Troubleshooting
1) WIFI Module Cannot Be Recognized
Inspection Steps:
# 检查 USB 设备
lsusb | grep Realtek

# 检查内核模块
lsmod | grep rtl

# 手动加载驱动
sudo modprobe rtl8xxxu

# 检查固件文件
ls /lib/firmware/rtlwifi/
2) Unable to Connect to WIFI Network
Possible Causes and Solutions:
# 检查网络接口状态
ip link show wlx78228877b4a5

# 重启网络接口
sudo ifconfig wlx78228877b4a5 down
sudo ifconfig wlx78228877b4a5 up

# 检查 wpa_supplicant 日志
sudo journalctl -u wpa_supplicant

# 重新配置网络
sudo wpa_cli -i wlx78228877b4a5 reconfigure
3) Weak Signal or Unstable Connection
Optimization Suggestions:
# 检查信号强度
iwconfig wlx78228877b4a5 | grep "Signal level"

# 扫描信道使用情况
sudo iwlist wlx78228877b4a5 scan | grep Frequency

# 更换信道(AP 模式)
sudo iwconfig wlx78228877b4a5 channel 6

# 调整发射功率
sudo iwconfig wlx78228877b4a5 txpower 20
4) Slow Network Speed
Diagnosis and Optimization:
# 检查当前连接速率
iwconfig wlx78228877b4a5 | grep "Bit Rate"

# 检查网络拥塞
ping -c 10 8.8.8.8

# 使用 iperf3 测试带宽
iperf3 -c speedtest.server.com

# 优化 TCP 窗口大小
echo 'net.core.rmem_max = 16777216' >> /etc/sysctl.conf
echo 'net.core.wmem_max = 16777216' >> /etc/sysctl.conf
5) Hotspot Mode Issues
Common Solutions:
# 检查 hostapd 状态
sudo systemctl status hostapd

# 查看 hostapd 日志
sudo journalctl -u hostapd

# 检查防火墙设置
sudo iptables -L

# 重启相关服务
sudo systemctl restart hostapd
sudo systemctl restart dnsmasq