
SVP Video Processing
SVP (Smart Video Processing) is the core module for smart video processing, providing a complete set of API interfaces that support intelligent analysis algorithms such as person, face, vehicle, fire/smoke, and DMS (Driver Monitoring System).
This document uses YOLOv5 person detection as an example to walk through the complete smart vision pipeline of the NPU, from model loading to inference result output.
1. Overall Architecture Overview
The GK7206 chip integrates a dedicated NPU (Neural Processing Unit) that efficiently executes convolutional neural network inference. The overall data flow is:
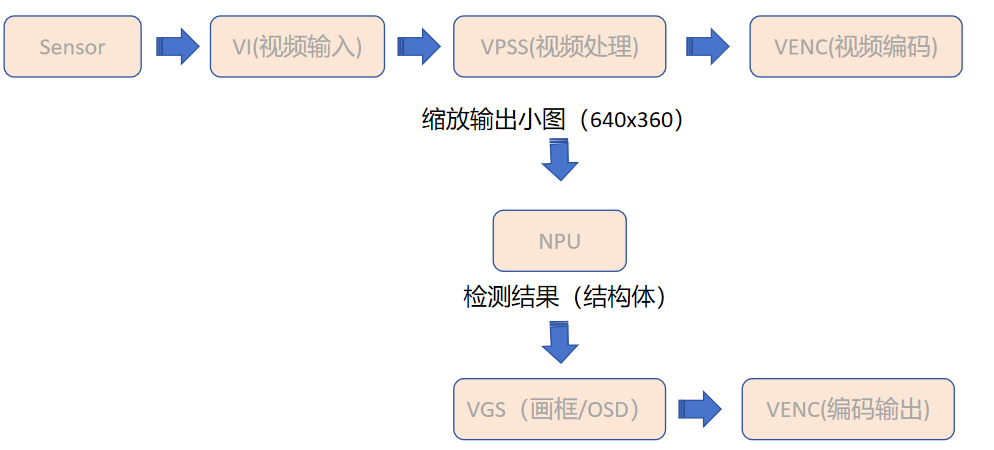
Key hardware modules:
| Module | Full name | Function |
|---|---|---|
| VI | Video Input | Receives the raw image captured by the sensor |
| VPSS | Video Processing Sub-System | Image scaling and cropping; outputs multiple resolutions |
| NPU | Neural Processing Unit | Neural network inference (convolution, pooling, activation, etc.) |
| VGS | Video Graphics Sub-System | Overlays OSD information such as rectangles and text on the image |
| VENC | Video Encoder | H.264 / H.265 video encoding |
| MMZ | Media Memory Zone | Media-dedicated physically contiguous memory management |
2. SVP Video Development Pipeline
Before the camera image reaches the NPU, it is processed by a series of hardware modules:
Sensor -> VI -> VPSS -> Channel 0: large image (1920x1080) -> VENC (main stream) / VO (display)
                  |-> Channel 1: small image (640x360)  -> NPU inference
                  |-> Channel 2: medium image (1280x720) -> VENC (sub stream) / NPU (large-image model)
Why scale?
- NPU models are trained at a fixed resolution (such as 640x360).
- VPSS hardware performs the scaling automatically, without CPU involvement.
- The scaled frames are passed to the NPU directly in physical memory, achieving zero copy.
Related code location: sample_svp_main.c:1108-1161
3. Complete SVP Video Processing Flow
3.1 Initialize the SVP Subsystem
SVP (Smart Vision Platform) is the GK7206 smart vision platform interface. It must be initialized before using the NPU:
// File: sample_svp_main.c -> sample_svp_start()

xmedia_s32 ret;

// Step 1: Initialize the SVP subsystem
ret = xmedia_svp_init();
if (ret != XMEDIA_SUCCESS) {
    printf("xmedia_svp_init error.\n");
    return XMEDIA_FAILURE;
}Note:
xmedia_svp_init()should be called only once during the application lifecycle.
3.2 Load the Model and Allocate Memory
The NPU requires dedicated physically contiguous memory to hold the model weights and intermediate computation results.
3.2.1 Configure the Model Information
Taking person detection as an example, configure the model parameters:
xmedia_svp_modules modules[8];  // Supports up to 8 models
xmedia_svp_task_cfg task_cfg;

// Configure model 0: person detection
modules[0].alg_type  = XMEDIA_SVP_ALG_TYPE_PERSON;           // Algorithm type
modules[0].load_mode = XMEDIA_SVP_MODEL_FILE;                 // Load from file
modules[0].format    = XMEDIA_SVP_INPUTDATA_FORMAT_RGB888;    // Input format
modules[0].pathname  = "./model/gnn_person_detect_640x360_rgb888hwc_v0103_20251203.bin";

task_cfg.module_num = 1;                     // This task uses 1 model
task_cfg.task_type  = XMEDIA_SVP_TASK_DETECT; // Detection task
task_cfg.modules    = modules;
Model configuration field descriptions:
| Field | Description | Optional values |
|---|---|---|
alg_type | Algorithm category | XMEDIA_SVP_ALG_TYPE_PERSON, XMEDIA_SVP_ALG_TYPE_FACE, XMEDIA_SVP_ALG_TYPE_CAR, etc. |
load_mode | Load method | XMEDIA_SVP_MODEL_FILE (from file), XMEDIA_SVP_MODEL_MEM (from memory) |
format | Input image format | XMEDIA_SVP_INPUTDATA_FORMAT_RGB888, XMEDIA_SVP_INPUTDATA_FORMAT_YUV420SP |
pathname | Model file path | A .bin NPU-specific model file |
3.2.2 Query Model Memory Requirements
// Query the memory sizes required by the model
xmedia_cl_mem_info model_mem_info;
ret = xmedia_cl_graph_query_model_info_from_file(
    modules[0].pathname,
    &model_mem_info,
    XMEDIA_CL_MEM_INFO
);

// model_mem_info contains:
//   worksize  - NPU workspace size (for intermediate computation)
//   inputsize - Input buffer size (to hold the input image)
//   outputsize- Output buffer size (to hold the raw inference result)
3.2.3 Allocate NPU-Private Memory
xmedia_svp_cfg svp_cfg;
xmedia_svp_get_config(&svp_cfg);

svp_cfg.reuse_type = XMEDIA_SVP_MEM_TYPE_BLOCK;  // Block reuse mode

// Allocate the workspace (used internally by the NPU; needs cache attribute)
sample_mmz_alloc_and_map_cache(
    XMEDIA_NULL, "npu_work_mem",
    &svp_cfg.workbuf_reuse_mem.phyaddr,   // Physical address
    &svp_cfg.workbuf_reuse_mem.viraddr,   // Virtual address
    svp_cfg.workbuf_reuse_mem.size         // Size
);

// Allocate the input buffer (to hold the input image data)
sample_mmz_alloc_and_map(
    XMEDIA_NULL, "npu_input_mem",
    &svp_cfg.input_reuse_mem.phyaddr,
    &svp_cfg.input_reuse_mem.viraddr,
    svp_cfg.input_reuse_mem.size
);

// Allocate the output buffer (to hold the raw inference result)
sample_mmz_alloc_and_map_cache(
    XMEDIA_NULL, "npu_output_mem",
    &svp_cfg.output_reuse_mem.phyaddr,
    &svp_cfg.output_reuse_mem.viraddr,
    svp_cfg.output_reuse_mem.size
);

// Set the memory configuration to SVP
xmedia_svp_set_config(&svp_cfg);
3.3 Create the Inference Task
With the model configuration and memory ready, create the SVP task (the model is actually loaded into the NPU at this point):
xmedia_s32 svp_handle;
ret = xmedia_svp_task_create(&svp_handle, task_cfg);
if (ret != XMEDIA_SUCCESS) {
    printf("xmedia_svp_task_create failed!\n");
    return XMEDIA_FAILURE;
}
// svp_handle is the handle for all subsequent inference operations
Core concept: A
svp_handlerepresents a complete inference flow, including all resources such as model loading and pre/post-processing.
3.4 Set Inference Parameters
After creating the task, you can tune the inference parameters (thresholds, tracking, etc.):
// YOLOv5 detection attributes
xmedia_svp_yolov5_attr yolov5_attr;

yolov5_attr.detect_threshold     = 0.65f;   // Detection confidence threshold (targets below this are discarded)
yolov5_attr.classifier_threshold = 0.8f;    // Classifier confidence threshold
yolov5_attr.iou_threshold        = 0.5f;    // NMS IoU threshold (overlapping-box filtering)
yolov5_attr.max_target_num       = 10;      // Maximum targets per frame (no more than 50)
yolov5_attr.bytetrack_enable     = XMEDIA_TRUE;  // Enable ByteTrack object tracking
yolov5_attr.motionless_filter_enable = XMEDIA_TRUE; // Enable motion-state detection
yolov5_attr.stillness_thres      = 0.9f;    // Stillness sensitivity
yolov5_attr.movement_fps_thres   = 5;       // Consecutive-frame threshold
yolov5_attr.smart_venc_enable    = XMEDIA_FALSE; // Smart encoding
yolov5_attr.smart_ae_enable      = XMEDIA_FALSE; // Smart exposure

ret = xmedia_svp_task_set_attr(svp_handle, &yolov5_attr);
Parameter tuning suggestions:
| Parameter | Suggested value | Effect of raising | Effect of lowering |
|---|---|---|---|
detect_threshold | 0.65 | More misses, fewer false positives | Fewer misses, more false positives |
iou_threshold | 0.5 | Keep more overlapping boxes | Merge more overlapping boxes |
max_target_num | 10 | Process more targets, slightly higher latency | Limit the target count, more stable performance |
bytetrack_enable | TRUE | Cross-frame tracking, outputs tracker_id | Single-frame detection only, no tracking |
3.5 Start the Inference Thread
After initialization, start an independent thread that enters the inference loop:
// The sample_svp_info structure holds all runtime information
sample_svp_info svp_info;
svp_info.detect_type = SAMPLE_SVP_ALG_TYPE_PERSON;
svp_info.svp_handle  = svp_handle;
svp_info.vpss_pipe   = vpss_pipe;
svp_info.vpss_ochn[1] = small_channel;  // Small-image channel
svp_info.venc_chn[1]  = venc_channel;    // Encoding channel
svp_info.big_stream   = XMEDIA_FALSE;

g_svp_start_flag = XMEDIA_TRUE;

// Create the inference thread
pthread_create(&g_svp_thread, NULL, sample_svp_proc, &svp_info);
4. Frame Acquisition and the Inference Loop
sample_svp_proc() is the main loop thread of the inference, continuously taking frames from VPSS, sending them to the NPU for inference, and processing the results.
4.1 Acquire a Camera Frame
// sample_svp_main.c -> sample_svp_proc()

while (g_svp_start_flag == XMEDIA_TRUE) {
    xmedia_video_frame_info video_frame;
    xmedia_s32 milli_sec = 20000;  // 20-second timeout

    // Acquire a small-image frame (640x360) from VPSS
    ret = xmedia_vpss_acquire_ochn_frame(
        svp_info->vpss_pipe,       // VPSS pipe
        svp_info->vpss_ochn[1],    // Output channel 1 (small image)
        &video_frame,              // Output frame info
        milli_sec                  // Timeout
    );
    if (ret != XMEDIA_SUCCESS) {
        printf("get vpss small frame failed!\n");
        continue;  // Frame acquisition failed, retry
    }
Key information in video_frame:
video_frame (xmedia_video_frame_info)
  |- frame.width            = 640
  |- frame.height           = 360
  |- frame.addr.y_phy_addr  -> Y component physical address
  |- frame.addr.uv_phy_addr -> UV component physical address
  |- frame.pixel_format     = YUV420SP
+- pool_id -> VB buffer pool IDNote: The frame data is in physical memory and does not need to be copied. The NPU accesses it directly via the physical address.
4.2 Submit NPU Inference
Package the frame as NPU input and submit the inference:
    // Package the input
    xmedia_svp_task_input task_input;
    xmedia_video_frame_info frame_info[2];

    frame_info[0] = video_frame;       // Frame 0 = small image
    task_input.frame_num = 1;           // Single-frame input
    task_input.frame = frame_info;

    // If a large image is needed (e.g. license-plate recognition needs 1920x1080)
    if (svp_info->big_stream == XMEDIA_TRUE) {
        xmedia_video_frame_info video_frame_big;
        ret = xmedia_vpss_acquire_ochn_frame(
            svp_info->vpss_pipe, svp_info->vpss_ochn[2],
            &video_frame_big, milli_sec
        );
        frame_info[1] = video_frame_big;  // Frame 1 = large image
        task_input.frame_num = 2;          // Dual-frame input
    }

    // *** Core: submit inference (synchronous blocking call) ***
    xmedia_svp_yolov5_output result = {0};
    ret = xmedia_svp_task_process(
        svp_info->svp_handle,   // SVP task handle
        &task_input,            // Input frame
        &result                 // Output detection result
    );
    if (ret != XMEDIA_SUCCESS) {
        printf("xmedia_svp_task_process failed!\n");
    }
4.3 Parse the Detection Result
After inference returns, result already contains the structured detection result:
    if (result.target_num > 0) {
        xmedia_video_rect target_rect[XMEDIA_SVP_MAX_TARGET_NUM];

        for (xmedia_s32 i = 0; i < result.target_num; i++) {
            // Target bounding box (floating-point coordinates, corresponding to the 640x360 image)
            xmedia_float x1 = result.targets[i].rect.x1;
            xmedia_float y1 = result.targets[i].rect.y1;
            xmedia_float x2 = result.targets[i].rect.x2;
            xmedia_float y2 = result.targets[i].rect.y2;

            // Align to even pixels (hardware requirement)
            xmedia_s32 px1 = (xmedia_s32)roundf(x1 / 2) * 2;
            xmedia_s32 py1 = (xmedia_s32)roundf(y1 / 2) * 2;
            xmedia_s32 px2 = (xmedia_s32)roundf(x2 / 2) * 2;
            xmedia_s32 py2 = (xmedia_s32)roundf(y2 / 2) * 2;

            // Target class
            xmedia_svp_class_type cls = result.targets[i].class_type;
            // For example: XMEDIA_SVP_CLASS_TYPE_PERSON

            // Confidence (0.0 ~ 1.0)
            xmedia_float score = result.targets[i].detect_score;

            // Tracker ID (valid when ByteTrack is enabled)
            xmedia_s32 tracker_id = result.targets[i].tracker_id;

            // Motion state
            xmedia_svp_motion_state motion = result.targets[i].motion_state;
            // XMEDIA_SVP_MOTION_STATE_STATIC  = static
            // XMEDIA_SVP_MOTION_STATE_MOVING  = moving

            // Build the rectangle for drawing
            target_rect[i].x      = px1;
            target_rect[i].y      = py1;
            target_rect[i].width  = ABS(px2 - px1);
            target_rect[i].height = ABS(py2 - py1);
        }
4.4 Draw Boxes and Send to the Encoder
        // Step 1: Use the VGS hardware to draw detection boxes on the frame (red rectangles)
        sample_svp_draw(&target_rect[0], &video_frame, result);

        // Step 2 (optional): overlay OSD text information
        // Requires USE_OSD to be defined at compile time
        #ifdef USE_OSD
        xmedia_char info_text[64];
        snprintf(info_text, sizeof(info_text),
            "id[%d]scr[%.2f]cls[%.2f]mv[%d]",
            result.targets[0].tracker_id,
            result.targets[0].detect_score,
            result.targets[0].classfier_score,
            result.targets[0].motion_state);
        sample_target_osd(&video_frame, px1, py1, info_text);
        #endif

    }  // end if (result.target_num > 0)

    // Step 3: Send the frame with boxes drawn to the video encoder
    ret = xmedia_venc_send_frame(
        svp_info->venc_chn[1],
        &video_frame,
        milli_sec
    );

    // Step 4: Release the frame buffer (return it to VPSS)
    ret = xmedia_vpss_release_ochn_frame(
        svp_info->vpss_pipe,
        svp_info->vpss_ochn[1],
        &video_frame
    );

}  // end while -> back to the top of the loop, take the next frame
5. Key Data Structures
5.1 Model Configuration
// Single-model configuration (xmedia_svp.h:173-180)
typedef struct {
    xmedia_svp_model_type      load_mode;    // Load method (file/memory)
    xmedia_svp_inputdata_format format;      // Input format (RGB888/YUV420SP)
    xmedia_char               *pathname;     // Model file path
    xmedia_u8                 *buf;          // Model data in memory mode
    xmedia_u32                 len;          // Model length in memory mode
    xmedia_svp_alg_type        alg_type;     // Algorithm type
    xmedia_void               *priv;         // Private data
} xmedia_svp_modules;

// Task configuration (xmedia_svp.h:182-187)
typedef struct {
    xmedia_svp_task_type  task_type;    // Task type
    xmedia_svp_modules   *modules;      // Model array
    xmedia_u8             module_num;   // Number of models
    xmedia_void          *priv;         // Private data
} xmedia_svp_task_cfg;
5.2 Inference Input
// Task input (xmedia_svp.h:167-170)
typedef struct {
    xmedia_video_frame_info *frame;    // Frame array
    xmedia_u8                frame_num; // Frame count (1=single, 2=dual)
} xmedia_svp_task_input;
5.3 Detection Result
// YOLOv5 detection output (xmedia_svp.h:239-242)
typedef struct {
    xmedia_u32  target_num;                                       // Number of detected targets
    xmedia_svp_detect_result targets[XMEDIA_SVP_MAX_TARGET_NUM];  // Target array (up to 50)
} xmedia_svp_yolov5_output;

// Single detection result (xmedia_svp.h:116-127)
typedef struct {
    xmedia_svp_alg_type    alg_type;        // Algorithm type
    xmedia_svp_class_type  class_type;      // Target class
    xmedia_float           detect_score;    // Detection confidence (0.0~1.0)
    xmedia_float           classfier_score; // Classifier confidence (0.0~1.0)
    xmedia_s32             tracker_id;      // Tracker ID
    xmedia_u32             tracker_age;     // Tracker age (alive frames)
    xmedia_svp_rect        rect;            // Bounding-box coordinates (x1,y1,x2,y2)
    xmedia_bool            special_target;  // Whether it is a special target
    xmedia_float           distance;        // Target distance
    xmedia_svp_motion_state motion_state;   // Motion state
} xmedia_svp_detect_result;

// Bounding-box coordinates (xmedia_svp.h:102-108)
typedef struct {
    xmedia_float x1;   // Top-left X
    xmedia_float y1;   // Top-left Y
    xmedia_float x2;   // Bottom-right X
    xmedia_float y2;   // Bottom-right Y
} xmedia_svp_rect;
5.4 Inference Parameters
// YOLOv5 detection parameters (xmedia_svp.h:225-237)
typedef struct {
    xmedia_float detect_threshold;           // Confidence threshold, suggested 0.65
    xmedia_float classifier_threshold;       // Classifier threshold, suggested 0.8
    xmedia_float iou_threshold;              // NMS IoU threshold, suggested 0.5
    xmedia_u32   max_target_num;             // Maximum number of targets, up to 50
    xmedia_bool  bytetrack_enable;           // Object tracking switch
    xmedia_bool  motionless_filter_enable;   // Motion-state detection switch
    xmedia_float stillness_thres;            // Stillness sensitivity, suggested 0.9
    xmedia_u8    movement_fps_thres;         // Consecutive-frame threshold, suggested 5
    xmedia_bool  smart_venc_enable;          // Smart encoding switch
    xmedia_bool  smart_ae_enable;            // Smart exposure switch
} xmedia_svp_yolov5_attr;
6. Supported Algorithm Types
6.1 Single-Model Detection
| Algorithm type | Enum value | Model file | Task type |
|---|---|---|---|
| Person detection | XMEDIA_SVP_ALG_TYPE_PERSON | gnn_person_detect_640x360_rgb888hwc.bin | XMEDIA_SVP_TASK_DETECT |
| Face detection | XMEDIA_SVP_ALG_TYPE_FACE | gnn_face_detect_640x360_rgb888hwc.bin | XMEDIA_SVP_TASK_DETECT |
| Vehicle detection | XMEDIA_SVP_ALG_TYPE_CAR | gnn_car_detect_640x360_rgb888hwc.bin | XMEDIA_SVP_TASK_DETECT |
| Pet detection | XMEDIA_SVP_ALG_TYPE_PET | gnn_pet_detect_640x360_rgb888hwc.bin | XMEDIA_SVP_TASK_DETECT |
| Head detection | XMEDIA_SVP_ALG_TYPE_HEAD | gnn_head_detect_640x360_rgb888hwc.bin | XMEDIA_SVP_TASK_DETECT |
| Non-motor vehicle | XMEDIA_SVP_ALG_TYPE_NON_MOTORIZED_VEHICLE | gnn_nocar_detect_640x360_rgb888hwc.bin | XMEDIA_SVP_TASK_DETECT |
| Fire/smoke detection | XMEDIA_SVP_ALG_TYPE_FIREWORKS | gnn_fireworks_detect_640x360_rgb888hwc.bin | XMEDIA_SVP_TASK_DETECT |
| Package detection | XMEDIA_SVP_ALG_TYPE_PACKAGE | gnn_package_detect_640x360_rgb888hwc.bin | XMEDIA_SVP_TASK_DETECT |
6.2 Multi-Model Cascade
| Algorithm type | Task type | Number of models | Description |
|---|---|---|---|
| Body key points | XMEDIA_SVP_TASK_DETECT_AND_KEYPOINT | 1 | Person detection + key points |
| Gesture recognition | XMEDIA_SVP_TASK_GESTURE | 2 | Hand detection + gesture classification |
| Facial expression | XMEDIA_SVP_TASK_EMOTION_CLASSIFITION | 3 | Face detection + key points + expression classification |
| Face recognition | XMEDIA_SVP_TASK_FACE_RECOGNITON | 3 | Face detection + key points + feature extraction |
| Two-stage detection | XMEDIA_SVP_TASK_RCNN | 2 | Initial detection + refinement |
| ADAS | XMEDIA_SVP_TASK_ADAS | 5 | Vehicle + person + non-motor vehicle + license plate + lane line |
| DMS | XMEDIA_SVP_TASK_DMS | multiple | Face + fatigue + phone + cigarette |
| License-plate recognition | XMEDIA_SVP_TASK_PLATE | multiple | License-plate detection + character recognition |
| Vehicle recognition | XMEDIA_SVP_TASK_VEHICLE | multiple | Vehicle detection + color/type recognition |
6.3 Output Classes
// Target class enum for detection results (xmedia_svp.h:62-89)
typedef enum {
    XMEDIA_SVP_CLASS_TYPE_PERSON,               // Person
    XMEDIA_SVP_CLASS_TYPE_FACE,                 // Face
    XMEDIA_SVP_CLASS_TYPE_CAR,                  // Vehicle
    XMEDIA_SVP_CLASS_TYPE_PET,                  // Pet
    XMEDIA_SVP_CLASS_TYPE_HEAD,                 // Head
    XMEDIA_SVP_CLASS_TYPE_ELECTRIC_BICYCLE,     // Electric bike
    XMEDIA_SVP_CLASS_TYPE_MASK,                 // Mask
    XMEDIA_SVP_CLASS_TYPE_BIKE,                 // Bicycle
    XMEDIA_SVP_CLASS_TYPE_BIKER,                // Cyclist
    XMEDIA_SVP_CLASS_TYPE_MOTOR,                // Motorcycle
    XMEDIA_SVP_CLASS_TYPE_MOTORER,              // Motorcyclist
    XMEDIA_SVP_CLASS_TYPE_TRICYCLE,             // Tricycle
    XMEDIA_SVP_CLASS_TYPE_TRICYCLER,            // Tricyclist
    XMEDIA_SVP_CLASS_TYPE_FIREWORKS_FIRE,       // Flame
    XMEDIA_SVP_CLASS_TYPE_FIREWORKS_SMOKE,      // Smoke
    XMEDIA_SVP_CLASS_TYPE_PACKAGE,              // Package
} xmedia_svp_class_type;
7. Model File Notes
7.1 Model File Format
The NPU uses .bin dedicated model files with the naming convention:
gnn_<algorithm>_<input-resolution>_<input-format>_<version>_<date>.binExample:
gnn_person_detect_640x360_rgb888hwc_v0103_20251203.bin
 |        |         |       |        |       |
 |        |         |       |        |       +- Date: 2025-12-03
 |        |         |       |        +- Version: v01.03
 |        |         |       +- Input format: RGB888 HWC layout
 |        |         +- Input resolution: 640x360
 |        +- Function: person detection
 +- Prefix: GNN (general neural network)
7.2 Model Conversion Flow
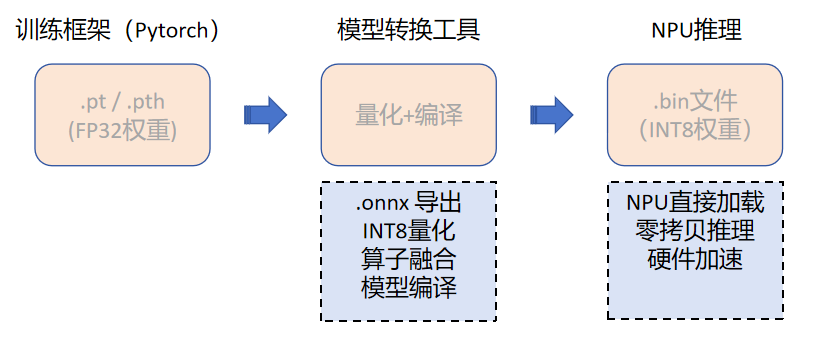
Note: The
.binfile is a quantized and compiled NPU-specific format; the original.ptor.onnxfiles cannot be used for inference directly.
8. Multi-Model Cascade Example
Taking face recognition as an example, this shows how to use multi-model cascade:
// Face recognition requires 3 cascaded models
xmedia_svp_modules modules[3];

// Model 1: face detection (locates the face)
modules[0].alg_type  = XMEDIA_SVP_ALG_TYPE_FACE;
modules[0].load_mode = XMEDIA_SVP_MODEL_FILE;
modules[0].format    = XMEDIA_SVP_INPUTDATA_FORMAT_RGB888;
modules[0].pathname  = "./model/gnn_face_detect_640x360_rgb888hwc_v0103_20251209.bin";

// Model 2: face key points (locates 5 facial feature points)
modules[1].load_mode = XMEDIA_SVP_MODEL_FILE;
modules[1].format    = XMEDIA_SVP_INPUTDATA_FORMAT_RGB888;
modules[1].pathname  = "./model/gnn_face_keypoint_48x48_rgb888hwc_v0101_20250818.bin";

// Model 3: face feature extraction (generates a 512-dimensional feature vector)
modules[2].load_mode = XMEDIA_SVP_MODEL_FILE;
modules[2].format    = XMEDIA_SVP_INPUTDATA_FORMAT_RGB888;
modules[2].pathname  = "./model/gnn_face_recognition_112x112_rgb888hwc_v0101_20250818.bin";

task_cfg.module_num = 3;
task_cfg.task_type  = XMEDIA_SVP_TASK_FACE_RECOGNITON;
task_cfg.modules    = modules;

// Create the task
xmedia_svp_task_create(&handle, task_cfg);
The inference call is the same; the SDK handles the cascade internally:
// The inference call is identical to a single model
xmedia_svp_fr_output fr_output = {0};
ret = xmedia_svp_task_process(handle, &task_input, &fr_output);

// fr_output.face_num     -> number of faces detected
// fr_output.fr_result[i] -> 512-dimensional feature vector + coordinates for each face
9. Memory Management Strategy
9.1 Memory Reuse Modes
The SDK supports three memory reuse modes to save memory:
typedef enum {
    XMEDIA_SVP_MEM_TYPE_BLOCK,       // Block reuse (recommended)
    XMEDIA_SVP_MEM_TYPE_AINR_SHARE,  // Shared with AINR
    XMEDIA_SVP_MEM_TYPE_COMPLETE,    // Fully independent
} xmedia_svp_mem_reuse_type;
9.2 Lifecycle Management
Application start
  |
  |- xmedia_svp_init()                   // Initialize SVP
  |- xmedia_cl_graph_query_model_info()  // Query memory requirements
  |- MMZ allocation (work/input/output)        // Allocate physically contiguous memory
  |- xmedia_svp_set_config()             // Configure memory
  |- xmedia_svp_task_create()            // Create task (load model)
  |
  |   +-- while loop -------------------+
  |   |  acquire_frame -> task_process  |  // Inference loop
  |   |  -> draw -> venc -> release_frame |
  |   +----------------------------------+
  |
  |- xmedia_svp_task_destroy()           // Destroy task (unload model)
  |- MMZ free (work/input/output)        // Free memory
  +- xmedia_svp_uninit()                 // De-initialize SVP
9.3 MMZ Memory Operations
// Allocate physically contiguous memory
xmedia_u64 phy_addr = xmedia_mmz_alloc("mmz_name", "buf_name", size);

// Map to a user-space virtual address
void *virt_addr = xmedia_mmz_map(phy_addr, size, cache_enabled);

// Access the memory (read/write)
memcpy(virt_addr, src, size);

// Unmap
xmedia_mmz_unmap(virt_addr);

// Free physical memory
xmedia_mmz_free(phy_addr);
10. Common Issues and Debugging
10.1 Inference Returns Failure
| Symptom | Possible cause | Solution |
|---|---|---|
xmedia_svp_task_process returns non-zero | Model file corrupted or missing | Check the .bin file path and permissions |
| Intermittent inference failure | Frame acquisition timeout | Increase the milli_sec timeout |
| Memory allocation failed | Insufficient MMZ space | Check the mmz configuration and reduce the buffer size |
| Zero targets | Confidence threshold too high | Lower detect_threshold |
10.2 Performance Tuning
// Enable timing statistics (define SAMPLE_TIME_DEBUG at compile time)
#define SAMPLE_TIME_DEBUG 1

// Inference time print
TIME_COST_START();
xmedia_svp_task_process(handle, &input, &result);
TIME_COST_END();
TIME_COST_PRINT("svp process all");
// Example output: svp process all cost time: 25000 us
10.3 Offline YUV File Testing
When no camera is available, you can use a YUV file as input for offline testing:
// Define READ_YUV at compile time
#define READ_YUV

// The inference thread automatically reads .yuv files from the ./yuv_dir/ directory
// The file resolution must match the model input (e.g. 640x360 YUV420SP)
10.4 OSD Text Overlay
You need to define the USE_OSD macro at compile time and link the canvas and canvas_font libraries:
#ifdef USE_OSD
xmedia_char text[64];
snprintf(text, sizeof(text), "id[%d] score[%.2f]", id, score);
sample_target_osd(&video_frame, x, y, text);
#endif
11. API Quick Reference
11.1 SVP Lifecycle API
| API | Function | When to call |
|---|---|---|
xmedia_svp_init() | Initialize the SVP subsystem | At application start, only once |
xmedia_svp_uninit() | De-initialize SVP | At application exit |
xmedia_svp_set_config() | Set SVP memory configuration | Before creating a task |
xmedia_svp_get_config() | Get SVP memory configuration | Before allocating memory |
xmedia_svp_task_create() | Create an inference task | Load the model |
xmedia_svp_task_destroy() | Destroy an inference task | Unload the model |
xmedia_svp_task_set_attr() | Set task attributes | Any time after creation |
xmedia_svp_task_get_attr() | Get task attributes | Any time |
xmedia_svp_task_process() | Run inference | In the loop |
xmedia_svp_get_version() | Get the SVP version | Any time |
11.2 Frame Management API
| API | Function |
|---|---|
xmedia_vpss_acquire_ochn_frame() | Acquire a frame from VPSS (blocking wait) |
xmedia_vpss_release_ochn_frame() | Release a frame (return it to the buffer pool) |
xmedia_venc_send_frame() | Send a frame to the encoder |
11.3 Drawing API
| API | Function |
|---|---|
xmedia_vgs_init() | Initialize VGS |
xmedia_vgs_create_job() | Create a VGS task |
xmedia_vgs_add_task_cover() | Add a draw-rectangle task |
xmedia_vgs_add_task_line() | Add a draw-line task |
xmedia_vgs_add_task_osd() | Add an OSD overlay task |
xmedia_vgs_add_task_scale() | Add a scaling task |
xmedia_vgs_submit_job() | Submit a VGS task |
xmedia_vgs_wait_job() | Wait for VGS to finish |
xmedia_vgs_cancel_job() | Cancel a VGS task |
11.4 Memory Management API
| API | Function |
|---|---|
xmedia_mmz_alloc() | Allocate physically contiguous memory |
xmedia_mmz_map() | Map to a virtual address |
xmedia_mmz_unmap() | Unmap the virtual address |
xmedia_mmz_free() | Free physical memory |
Appendix: Key Source File Index
| File path | Description |
|---|---|
source/gmp/include/xmedia_svp.h | SVP API definitions (all structures and function declarations) |
sample/npu/demo_ai/sample_svp_main.c | Complete SVP video development sample (main flow) |
sample/npu/demo_ai/sample_svp_main.h | Sample header file (type definitions) |
source/gmp/usr/svp/src/post_process/yolov5.c | YOLOv5 post-processing implementation |
source/gmp/usr/svp/src/post_process/yolov5.h | YOLOv5 post-processing header |
sample/npu/demo_ai/model/ | Model file directory |
source/gmp/include/xmedia_mmz.h | MMZ memory management API |
source/gmp/include/xmedia_vgs.h | VGS graphics drawing API |