HOME
Shop
  • English
  • 简体中文
HOME
Shop
  • English
  • 简体中文
  • Product Series

    • FPGA+ARM

      • GM-3568JHF

        • Introduction

          • GM-3568JHF Introduction
        • Quick Start

          • Preface
          • Environment Setup
          • Compilation Notes
          • Flashing Guide
          • Debugging Tools
          • Software Update
          • Viewing System Information
          • Test Commands
          • Application Compilation
          • Source Code Access
        • Peripherals & Interfaces

          • USB
          • Display and Touch
          • Ethernet
          • WIFI
          • Bluetooth
          • TF-Card
          • Audio
          • Serial Port
          • CAN
          • RTC
        • Application Development

          • UART Read/Write Demo
          • Key Detection Demo
          • LED Blink Demo
          • MIPI Screen Detection Demo
          • Read USB Device Information Demo
          • FAN Detection Demo
          • FPGA FSPI Communication Demo
          • FPGA DMA Read/Write Demo
          • GPS Debugging Demo
          • Ethernet Test Demo
          • RS485 Read/Write Demo
          • FPGA I2C Read/Write Demo
          • PN532 NFC Card-Reading Demo
          • TF Card Read/Write Demo
        • QT Development

          • ARM64 Cross-Compiler Environment Setup
          • Adding a QT Program to Boot Auto-Start
        • RKNN_NPU Development

          • RK3568 NPU Overview
          • Development Environment Setup
          • Run the Official YOLOv5 Example
        • FPGA Development

          • ARM and FPGA Communication
          • FPGA Development Manual
        • Others

          • Modifying the Root Filesystem
          • System Auto-Start Services
        • Downloads

          • Downloads
      • MB-E30P

        • Introduction

          • MB-E30P Introduction
        • Quick Start

          • Preface
          • Environment Setup
          • Compilation Instructions
          • Flashing Guide
          • Debugging Tools
          • Software Update
          • Viewing Information
          • Test Commands
          • Application Compilation
          • Source Code Acquisition
        • Peripherals & Interfaces

          • USB
          • Display and Touch
          • Ethernet
          • WIFI
          • Bluetooth
          • TF-Card
          • Audio
          • RTC
        • Application Development

          • Key Detection Demo
          • LED Blink Demo
          • MIPI Screen Detection Demo
          • Read USB Device Information Demo
          • FAN Detection Demo
          • FPGA FSPI Communication Demo
          • FPGA DMA Read/Write Demo
          • Ethernet Test Demo
          • FPGA IIC Read/Write Demo
          • PN532 NFC Card Reading Demo
          • TF Card Read/Write Demo
        • QT Development

          • ARM64 Cross-Compiler Environment Setup
          • Adding a QT Program to the Boot Auto-Start Service
        • RKNN_NPU Development

          • RK3568 NPU Overview
          • Development Environment Setup
          • Run the Official YOLOv5 Example
          • Model Conversion In Detail
          • Run Custom Models on the Board
        • FPGA Development

          • ARM and FPGA Communication
          • FPGA Development Manual
        • Others

          • Modifying the Root Filesystem
          • System Auto-Start Service
        • Downloads

          • Downloads
    • ShimetaPi

      • M4-R1

        • Introduction

          • M4-R1 Introduction
        • Quick Start

          • OpenHarmony Overview
          • Image Burning
          • Application Development Quick Start
          • Device Development Quick Start
        • Application Development

          • ArkUI

            • ArkTS Language Overview
            • UI Components - Row Container Introduction
            • UI Components - Column Container Introduction
            • UI Components - Text Component
            • UI Components - Toggle Component
            • UI Components - Slider Component
            • UI Components - Animation Component & Transition Component
          • Documentation

            • OpenHarmony Official Materials
          • Development Notes

            • Full-SDK Replacement Tutorial
            • Introducing and Using Third-Party Libraries
            • HDC Debugging
            • Restore Factory Mode via Command Line
            • Upgrade App to System Permission
          • First App

            • Build Your First ArkTS Application - HelloWorld
          • Demos

            • Serial-Debug-Assistant Application Demo
            • Writing-Board Application Demo
            • Digital Clock Application Demo
            • Wi-Fi Information Acquisition Application Demo
        • Device Development

          • Ubuntu Development

            • Environment Setup
            • Download Source Code
            • Compile Source Code
          • DevEco Device Tool

            • Tool Introduction
            • Development Environment Construction
            • Import the SDK
            • HUAWEI DevEco Tool Function Introduction
        • Kernel Peripherals & Interfaces

          • Guide
          • Device Tree Introduction
          • NAPI Introduction
          • ArkTS Introduction
          • NAPI Development Hands-on Demo
          • GPIO Introduction
          • I2C Communication
          • SPI Communication
          • PWM Control
          • UART Communication
          • TF Card (MicroSD)
          • Screen (Display)
          • Touch
          • Ethernet
          • M.2 SSD
          • Audio
          • WIFI & BT
          • Camera
        • Downloads

          • Downloads
      • M5-R1

        • Introduction

          • M5-R1 Development Docs
        • Quick Start

          • Image Burning
          • Environment Setup
          • Download Source Code
        • Peripherals & Interfaces

          • Raspberry Pi Interfaces
          • GPIO Interface
          • I2C Interface
          • SPI Communication
          • PWM Control
          • Serial Port Communication
          • TF Card
          • Display
          • Touch
          • Audio
          • RTC
          • Ethernet
          • M.2
          • MINI-PCIE
          • Camera
          • WIFI & BT
        • Downloads

          • Downloads
      • Pico-G1

        • Product Overview

          • Product Introduction
          • SDK Version Information
        • Quick Start

          • Development Environment Setup
          • Image Build
          • Image Flashing
          • System Login
          • Network Configuration
          • File Transfer
          • SDK Directory Structure
          • Deploying Your First Application
          • Deploying Your First Driver
          • Mounting an SD Card
        • Peripherals & Interfaces

          • GPIO Control
          • UART Serial Communication
          • I2C Communication
          • SPI Communication
        • MPP Media Development

          • MPP Media Processing Software
          • Image Processing Chain
          • Video Input
          • Image Encoding
        • NPU & AI

          • NPU Driver and Runtime Library Architecture
          • .xmm Model Loading
          • SVP Video Processing
          • AI Noise Reduction (AI_NR)
        • Application Samples

          • Encryption/Decryption Application
          • ADC Acquisition Application
          • Low-Power Application
          • Audio Processing Application
          • Video Encoding Application
          • Video Input Application
          • Video Graphics Subsystem (VGS) Application
          • 08 Region Overlay Application
          • 09 Intelligent Video Engine Application
          • 10 UVC Webcam Application
          • 11 All-in-One Quickstart Application
          • 12 FPN Correction Application
          • 13 Regional Motion Detection Application
          • 14 MTCNN Face Detection Application
        • Expansion Board Peripheral Examples

          • 00 - Pico Expansion Board Peripheral Examples Overview
          • 01 - OLED Display Application
          • 02 - TFT Display Application
          • 03 - MPU6050 Gyroscope Application
          • 04 - ADC Acquisition Application
          • 05 - Passive Buzzer Application
          • 06 - MQ Gas Sensor Application
          • 07 - GPS Positioning Application
          • 08 - SHT20 Temperature & Humidity Application
          • 09 - Ultrasonic Ranging Application
          • 10 - SpO2 Sensor Application
          • 11 - DC Motor Control Application
          • 12 - Servo Control Application
    • OpenHarmony

      • SC-3568HA

        • Introduction

          • SC-3568HA Overview
        • Quick Start Guide

          • OpenHarmony Overview
          • Image Flashing
          • Setting Up the Development Environment
          • Hello World Application and Deployment
        • Application Development

          • ArkUI

            • Introduction to ArkTS Language
            • Introduction to UI Components and Practical Applications (Part 1)
            • Introduction to UI Components and Practical Applications (Part 2)
            • Introduction to UI Components and Practical Applications (Part 3)
          • Expand

            • Getting Started Guide
            • Referencing and Using Third-Party Libraries
            • Application Compilation and Deployment
            • Command-Line Factory Reset
            • System Debugging -- HDC Debugging
            • APP Stability Testing
            • Chapter 7 Application Testing
        • Device Development

          • Environment Setup
          • Download Source Code
          • Compiling Source Code
        • Peripheral And Interface

          • Raspberry Pi interface
          • GPIO Interface
          • I2C Interface
          • SPI communication
          • PWM (Pulse Width Modulation) control
          • Serial port communication
          • TF Card
          • Display Screen
          • Touch
          • Audio
          • RTC
          • Ethernet
          • M.2
          • MINI-PCIE
          • Camera
          • WIFI&BT
          • Raspberry Pi expansion board
        • Downloads

          • Downloads
      • M-K1HSE

        • Introduction

          • M-K1HSE Introduction
        • Quick Start

          • Development environment construction
          • Source code acquisition
          • Compilation Notes
          • Burning Guide
        • Application Development

          • Application Development Environment Setup
          • First Application - Hello World
        • Peripherals and interfaces

          • 01 Audio
          • 02 RS485
          • 03 Display
        • System customization development

          • System transplant
          • System customization
          • Driver Development
          • System Debugging
          • OTA Update
        • Downloads

          • Downloads
    • HVS Camera

      • Quick Start

        • SDK Overview
        • Downloads
        • Your First C++ Program
        • Python Data Analysis
        • MultiVision Studio
      • Development

        • Programming Guides

          • Open Camera
          • Read Events
          • Recording & Replay
          • Event Processing (Denoising)
          • Display & Visualization
          • Tuning
          • Capture APS Image
        • Toolkit SDK

          • Hybrid Vision Toolkit
          • Quick Start
          • C++ API
          • Python API
        • Algorithm

          • Hybrid Vision Algo
          • Hybrid Vision Algo API
          • Windows Algo SDK
        • Samples Overview
        • Applications
      • Fundamentals

        • Event Camera Fundamentals
        • HVS Hybrid Vision
        • Event Visualization
        • Data Formats Reference
        • Glossary
        • Bias & Tuning
        • Video Tutorials
      • USB Cameras

        • HVS Camera Quick Start
        • Networking Capabilities

          • HVS Camera System Architecture
          • EVS Network Server
          • EVS Time Sync
          • Web Window
        • HVS Camera Compatibility Matrix
        • FAQ & Troubleshooting Guide
        • Products

          • CF-NRS1 (Lingguang No.1 Hybrid Vision Camera)
      • MIPI Modules

        • MIPI Module Quick Start
        • Carrier Boards

          • RDK X5 Carrier Board Adaptation
          • Raspberry Pi Carrier Board Adaptation
          • Digua Pi Carrier Board Adaptation
          • ShimeTai Board Carrier Board Adaptation
        • MIPI Module Compatibility Matrix
        • Products

          • EVS_003 Sensor Module
    • AI-model

      • 1684XB-32T

        • Introduction

          • AIBOX-1684XB-32 Introduction
        • Quick Start

          • First Use
          • Network Configuration
          • Disk Usage
          • Memory Allocation
          • Fan Control Strategy
          • Firmware Upgrade
          • Cross Compilation
          • Model Quantization
        • Application Development

          • Development Overview

            • Sophgo SDK Development
            • Sophgo Demo Introduction
          • Large Language Models

            • Deploying Llama3 Example
            • Sophon LLM_api_server Development
            • Deploying MiniCPM-V-2_6
            • Qwen-2-5-VL Image and Video Recognition Demo
            • Qwen3-chat Demo
            • Qwen3-Qwen Agent-MCP Development
            • Qwen3-langchain-AI Agent
          • Deep Learning

            • ResNet (Image Classification)
            • LPRNet (License Plate Recognition)
            • SAM (General Image Segmentation Foundation Model)
            • YOLOv5 (Object Detection)
            • OpenPose (Human Keypoint Detection)
            • PP-OCR (Optical Character Recognition)
        • Downloads

          • Downloads
      • 1684X-416T

        • Introduction

          • AIBOX-1684X-416 Introduction
        • Demo Quick Guide

          • ShimeTai Intelligent Monitoring Demo Quick Usage Guide
      • RDK-X5

        • Introduction

          • RDK-X5 Hardware Introduction
        • Quick Start

          • RDK-X5 Quick Start
        • Application Development

          • AI Online Model Development

            • Experiment 01 - Access Volcengine Doubao AI
            • Experiment 02 - Image Analysis
            • Experiment 03 - Multimodal Visual Analysis & Localization
            • Experiment 04 - Multimodal Image-Text Comparison
            • Experiment 05 - Multimodal Document/Table Analysis
            • Experiment 06 - Camera-based AI Visual Analysis
          • Large Language Models

            • Experiment 01 - Speech Recognition
            • Experiment 02 - Voice Conversation
            • Experiment 03 - Multimodal Image Analysis - Voice
            • Experiment 04 - Multimodal Image Comparison - Voice
            • Experiment 05 - Multimodal Document Analysis - Voice
            • Experiment 06 - Multimodal Vision Application - Voice
          • ROS2 Basics

            • Experiment 01 - Environment Setup
            • Experiment 02 - Create & Build a Workspace Package
            • Experiment 03 - Run ROS2 Topic Communication Node
            • Experiment 04 - ROS2 Camera Application
          • 40-pin IO Development

            • Experiment 01 - GPIO Output (LED Blink)
            • Experiment 02 - GPIO Input
            • Experiment 03 - Button-controlled LED
            • Experiment 04 - PWM Output
            • Experiment 05 - Serial Output
            • Experiment 06 - I2C Experiment
            • Experiment 07 - SPI Experiment
          • USB Module Usage

            • Experiment 01 - USB Voice Module Usage
            • Experiment 02 - Sound Source Localization Module
          • Machine Vision Practice

            • Experiment 01 - Open USB Camera
            • Experiment 02 - Color Recognition
            • Experiment 03 - Gesture Recognition
            • Experiment 04 - YOLOv5 Object Detection
      • RDK-S100

        • Introduction

          • RDK-S100 Hardware Introduction
        • Quick Start

          • RDK-S100 Quick Start
        • Application Development

          • AI Online Model Development

            • Experiment 01 - Access Volcengine Doubao AI
            • Experiment 02 - Image Analysis
            • Experiment 03 - Multimodal Visual Analysis & Localization
            • Experiment 04 - Multimodal Image-Text Comparison
            • Experiment 05 - Multimodal Document/Table Analysis
            • Experiment 06 - Camera-based AI Visual Analysis
          • Large Language Models

            • Experiment 01 - Speech Recognition
            • Experiment 02 - Voice Conversation
            • Experiment 03 - Multimodal Image Analysis - Voice
            • Experiment 04 - Multimodal Image Comparison - Voice
            • Experiment 05 - Multimodal Document Analysis - Voice
            • Experiment 06 - Multimodal Vision Application - Voice
          • ROS2 Basics

            • Experiment 01 - Environment Setup
            • Experiment 02 - Create & Build a Workspace Package
            • Experiment 03 - Run ROS2 Topic Communication Node
            • Experiment 04 - ROS2 Camera Application
          • 40-pin IO Development

            • Experiment 01 - GPIO Output (LED Blink)
            • Experiment 02 - GPIO Input
            • Experiment 03 - Button-controlled LED
            • Experiment 04 - PWM Output
            • Experiment 05 - Serial Output
            • Experiment 06 - I2C Experiment
            • Experiment 07 - SPI Experiment
          • USB Module Usage

            • Experiment 01 - USB Voice Module Usage
            • Experiment 02 - Sound Source Localization Module
          • Machine Vision Practice

            • Experiment 01 - Open USB Camera
            • Experiment 02 - Image Processing Basics
            • Experiment 03 - Object Detection
            • Experiment 04 - Image Segmentation
      • RK1828

        • Introduction

          • M5-182X-A1 AI Edge Box - Product Introduction
          • M5-182X-A1 Hardware Specifications
          • M5-182X-A1 Usage & Safety
        • Quick Start

          • M5-182X-A1 Image Flashing
          • RK182X Hardware Installation & Verification
          • RK182X Development Environment Quick Setup
          • RK182X SDK Overview
          • RK182X Environment Setup in Detail
          • RK182X Quick Start
          • Vendor SDK Data Extraction Record
        • Development Guide

          • ClawChips Architecture and Principles
          • SKILL User Manual
          • RK182X Series LLM Inference (RK1828 Model)
          • RK182X Series CNN Inference (RK1828 Model)
          • Model Conversion
          • RK182X AI Agent Application Development Guide
          • RK182X Industrial Anomaly Detection Application
        • SDK Reference

          • RKNN3-SDK Overview

            • RKNN3 SDK Overview
          • RKNN3-Toolkit

            • RKNN3 Toolkit Installation and Usage
          • RKLLM

            • RKLLM On-Device LLM Inference
          • RK182X Series NPU Overview and Architecture (RK1828 Model)
          • RK182X INT8 Quantized Inference Deployment
          • RK182X MPP Multimedia Framework
          • MPP Details

            • RK182X Video Decoding
            • RK182X Video Encoding
          • NPU Details

            • RKNN Model Conversion
            • RK182X NPU INT8 Quantized Inference
            • RK182X Multi-Model Parallel Inference
          • RGA Details

            • RK182X RGA 2D Graphics Acceleration
          • VPU Details

            • RK182X VPU Codec
        • Hardware Reference

          • RK182X Series Hardware Architecture Overview (RK1828 Model)
          • RK182X Pin Definitions and Multiplexing Configuration
          • RK182X Pin Definitions
          • RK182X Power Management
          • RK182X Clock and PLL Configuration
          • RK182X Clock and Frequency Configuration
        • Tutorials

          • Hello World
          • Hello RK1828 - The First Program
          • RTSP Streaming
          • RTSP Streaming + AI Analysis
          • ShiMetaPi AI Lobster One-Click Deployment
          • PaddleOCR-VL Text Recognition
          • Qwen3-1.7B LLM Text Chat
          • AI Multi-View Inspection (Qwen3-VL Wrapper)
          • YOLOv5 Object Detection
        • Downloads

          • Downloads
        • FAQ

          • FAQ
    • Core-Board

      • C-3568BQ

        • Introduction

          • C-3568BQ Overview
      • C-3588LQ

        • Introduction

          • C-3588LQ Overview
      • GC-3568JBAF

        • Introduction

          • GC-3568JBAF Overview
      • C-K1BA

        • Introduction

          • C-K1BA Overview
    • Software Platform

      • ShiMetaPi Workbench

        • Introduction

          • Product Overview
          • Core Architecture
          • Feature Entries
          • Supported Hardware
          • Release Notes
        • Quick Start

          • Install & Login
          • Connect the Device
          • Set Up the Environment
          • Connect to AIHub
          • First Inference
        • User Guide

          • Workspace Overview
          • Device Manager
          • Model Market
          • One-Click Deploy
          • Vision — SVP
          • Vision - Custom Models
          • shimeta-py IDE
          • Terminal
          • Agent Debug Assistant
          • Settings and Resources
        • FAQ

          • Installation & Login
          • Device Connection
          • Models & Deployment
          • Vision & Runtime
          • Settings & Other
      • ShimetaPi Repository

        • Introduction

          • ShimetaPi Software Repository
        • Pico G1 (GK7206)

          • Quick Start

            • Installation & First Inference
            • shimeta_infer — Image Inference
            • shimeta_camera — Real-time Camera Inference
            • SVP Scene Detection
            • File Transfer & Built-in Model Reference
            • FAQ
          • HTTP API & Python SDK

            • HTTP API Reference
      • Model Fine-tuning Platform

        • Introduction

          • Model Training Platform
        • Quick Start

          • Register & Login
          • Create Your First Model (30-Minute Quick Experience)
        • Training Guide

          • Data Preparation & Annotation
          • Training Parameter Configuration
          • Start & Monitor Training
          • Model Evaluation & Testing
        • Model Deployment

          • Export Model
          • Deploy to Edge Device

ShiMetaPi AI Lobster One-Click Deployment

One-click deployment of OpenClaw + QQ Bot + cloud DeepSeek + local VLM/OCR on the RK182X + RK3588 platform.

Overall block diagram:

QQ user
    ↓
OpenClaw Gateway (port 18789)
    ↓
┌──────────────────┬────────────────────┐
│ Cloud DeepSeek   │ Local RK182X NPU   │
│ (chat/inference) │ (image recognition/VLM) │
└──────────────────┴────────────────────┘
    ↓
Skills: morning-briefing / rk-remind / rk-vl / rk-ocr

Prerequisite: Hardware Installation and Verification is complete and the RK182X NPU service is running normally.

1. Verify prerequisites

systemctl is-active rknn3.service        # → active
ls -l /dev/pcie-rkep-*                   # → /dev/pcie-rkep-0004:41:00.0
ps -ef | grep rknn3_transfer_proxy       # → process is present

NPU service

systemctl is-active rknn3.service

Output:

active

PCIe device

ls -l /dev/pcie-rkep-*

Output:

crw------- 1 root root 10, 123  8月20日 16:56 /dev/pcie-rkep-0004:41:00.0

Running processes

ps -ef | grep rknn3_transfer_proxy | grep -v grep

Output (example):

linaro    1790     1  0.2 01:18:53 ?      00:00:30 /bin/rknn3_transfer_proxy
linaro    1803  1790 25.0 01:18:53 ?      00:31:09 rknn3_transfer_proxy_c36211b1 -s 0004:41:00.0

The actual BDF varies with the board's PCIe topology; the proxy process name may carry a hash suffix (e.g. rknn3_transfer_proxy_c36211b1), hence matching with ps -ef | grep.

2. One-click deployment in 30 minutes

ShiMetaPi's in-house setup.sh script automates the entire deployment, from the system environment to the QQ bot.
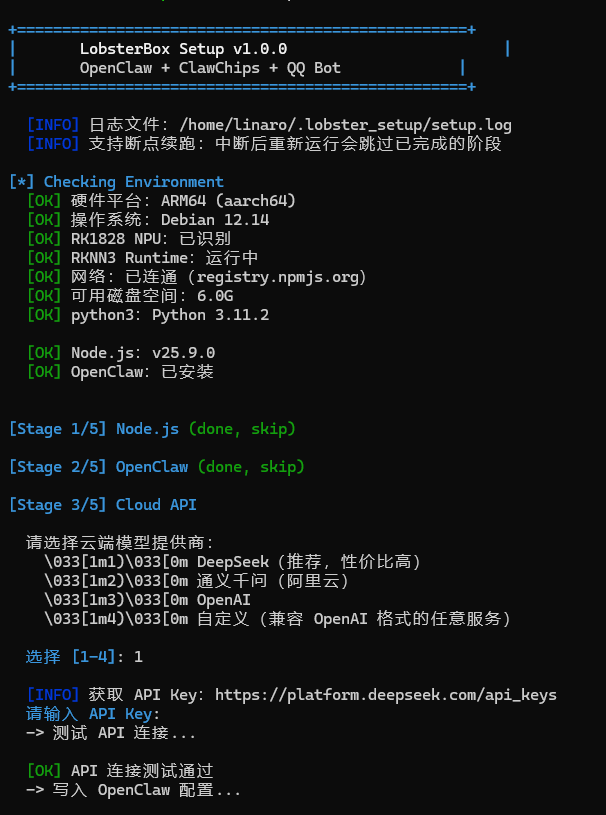
Deployment platform

2.1 Download the deployment script

curl -sL https://raw.githubusercontent.com/.../setup.sh -o setup.sh
chmod +x setup.sh

Mirror acceleration for mainland China:

curl -sL https://cdn.jsdelivr.net/gh/.../setup.sh -o setup.sh

2.2 Run the script

bash setup.sh

Verify the locally deployed script:

ls -la /home/linaro/lobster-pkg/setup.sh

Output:

-rw-rw---- 1 linaro linaro 74024  8月20日 14:05 /home/linaro/lobster-pkg/setup.sh

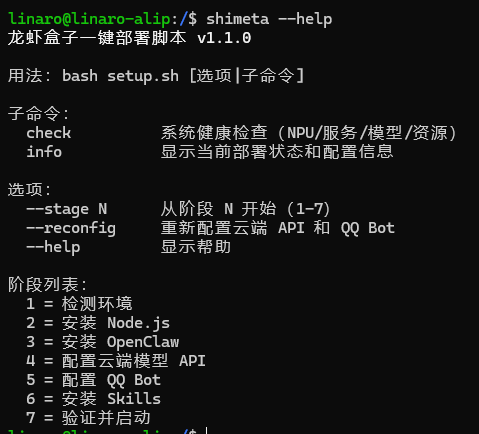
setup.sh has two built-in query subcommands (recommended to use first):

bash setup.sh info     # deployment status (no changes)
bash setup.sh check    # health check (14 items)

The full flow runs automatically:

StepContentDuration
1Detect hardware and system environment<5s
2Install Node.js (mainland mirror)~1min
3Install the OpenClaw framework~2min
4Configure cloud model API (DeepSeek)Enter Key manually
5Configure the QQ botEnter AppID/Token manually
6Install Skills (reminders/morning briefing/VLM/OCR)~3min
7Verify and start<10s

The API Key / QQ AppID are entered manually.

2.3 Prepare the VLM model (optional)

Image recognition requires downloading the Qwen3-VL-2B model. Place it in /userdata/models/Qwen3-VL-2B/:

ls -la /userdata/models/

Output:

总计 40
drwxr-xr-x 5 linaro linaro 4096  8月 6日 16:56 .
drwxr-xr-x 6 root   root   4096  8月17日 14:28 ..
drwxr-xr-x 2 linaro linaro 4096  8月20日 11:34 Qwen3-1.7B
drwxr-xr-x 2 linaro linaro 4096  6月 8日 10:45 Qwen3-4B
drwxr-xr-x 4 linaro linaro 4096  8月17日 15:24 Qwen3-VL-2B
-rwxr-xr-x 1 linaro  linaro   372  8月 6日 16:56 run.sh
-rwxr-xr-x 1 linaro  linaro   373  8月 5日 17:21 run.sh.bak.1.7B
-rwxr-xr-x 1 linaro  linaro   356  8月 6日 14:56 run.sh.bak.4b
-rwxr-xr-x 1 linaro  linaro   373  8月 5日 17:27 run.sh.bak.test

VLM model files:

ls -lh /userdata/models/Qwen3-VL-2B/

Output:

总计 1.9G
-rwxr-xr-x 1 root   root   8.1K  8月10日 14:34 inspect.sh
-rw-r--r-- 1 linaro linaro 20M  8月17日 13:51 llm_Qwen3-VL-2B.rknn
-rw-r--r-- 1 linaro linaro 1.1G 8月17日 13:52 llm_Qwen3-VL-2B.weight
-rw-r--r-- 1 linaro linaro 3.0K 8月11日 22:53 OCRBench.py
-rw-r----- 1 root   root    11K 8月17日 15:24 ocr_server.py
-rwxr-xr-x 1 root   root   1.1K 8月10日 14:34 ocr.sh
drwxr-xr-x 4 linaro linaro 4.0K 8月17日 15:22 PaddleOCR-VL
-rw-r--r-- 1 linaro linaro 594M 8月17日 13:55 Qwen3-VL-2B.embed.bin
-rwxr-xr-x 1 linaro linaro 240K 8月20日 14:00 test.jpg
drwxr-xr-x 2 linaro linaro 4.0K  8月 5日 17:04 tokenizer
-rw-r--r-- 1 linaro linaro 4.2M 8月17日 13:50 vision_Qwen3-VL-2B.rknn
-rw-r--r-- 1 linaro linaro 229M 8月17日 13:54 vision_Qwen3-VL-2B.weight
-rw-r--r-- 1 linaro linaro  11K 8月17日 14:01 vlm_server.py
-rwxr-xr-x 1 root   root    913 8月10日 14:34 vl.sh

Tokenizer:

ls -lh /userdata/models/Qwen3-VL-2B/tokenizer/

Output:

总计 9.4M
-rw-r--r-- 1 linaro linaro 5.4K  8月 5日 17:04 chat_template.json
-rw-r--r-- 1 linaro linaro  11K  8月 5日 17:04 tokenizer_config.json
-rw-r--r-- 1 linaro linaro 6.8M  8月 5日 17:04 tokenizer.json
-rw-r--r-- 1 linaro linaro 2.7M  8月 5日 17:04 vocab.json

2.4 Test in QQ

Send /new to start a conversation:

  • Chat → cloud DeepSeek
  • Send an image → local NPU (VLM)
  • Reminder → creates a scheduled task automatically
  • Good morning → creates a recurring task automatically
  • Extract text → image + "extract text" → OCR
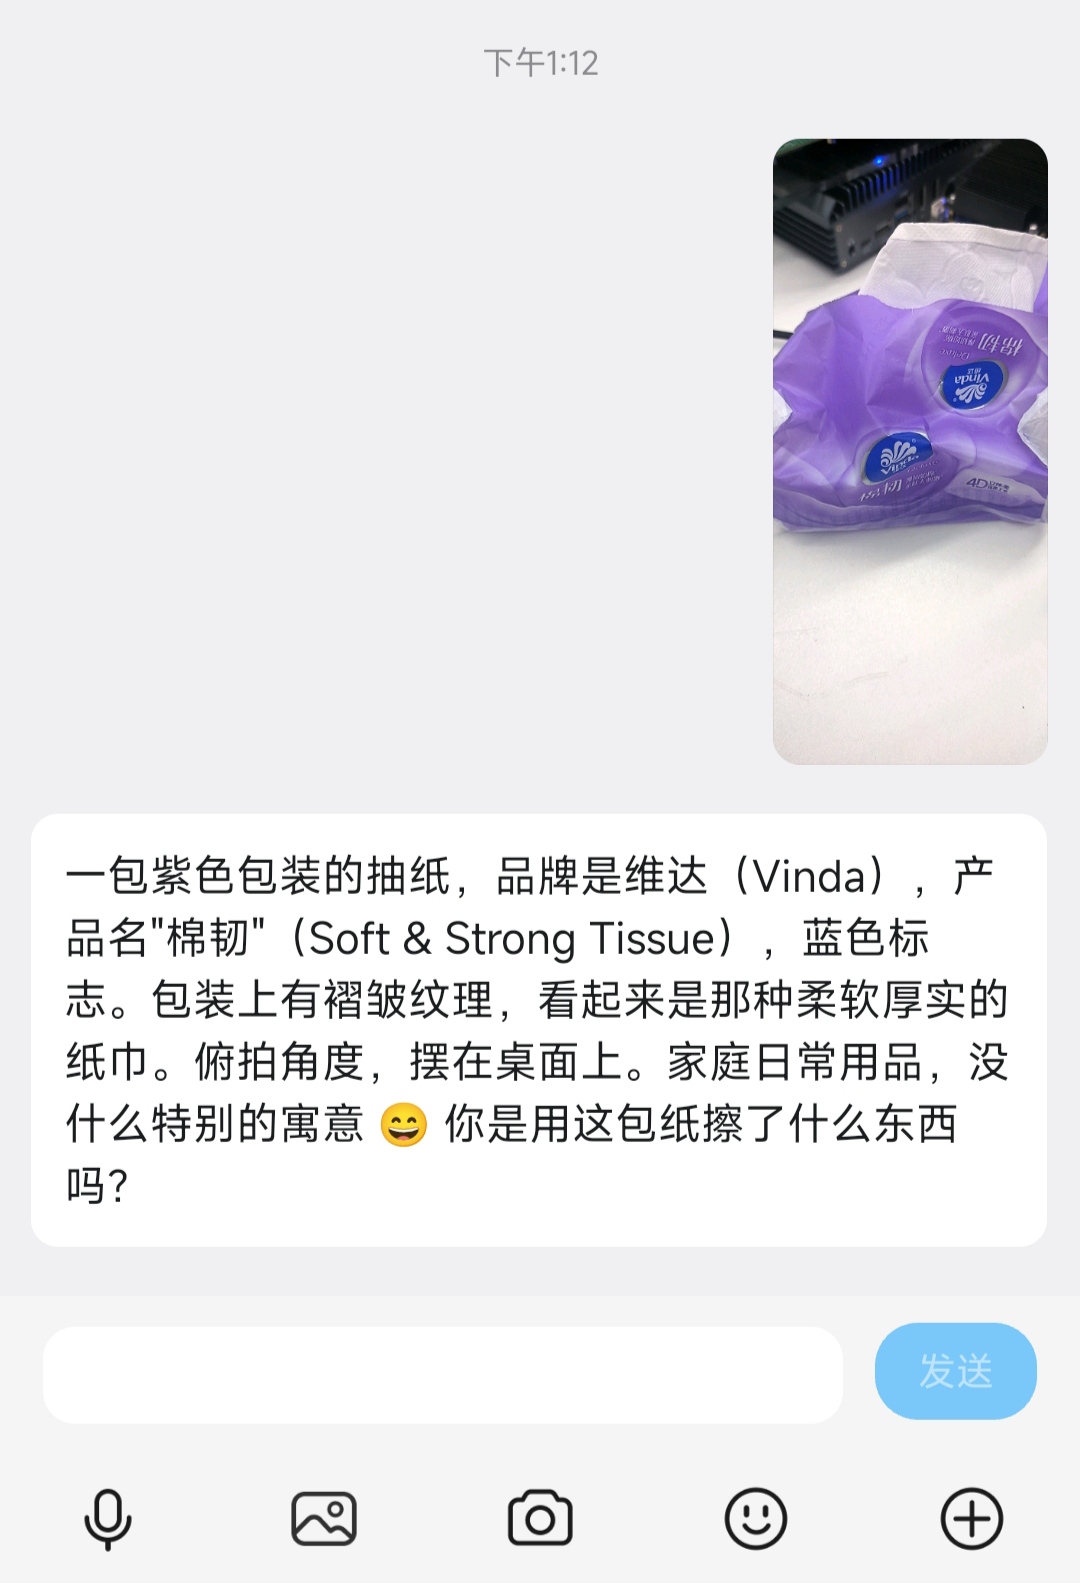
QQ image recognition

Script capabilities at a glance

bash setup.sh              # full deployment
bash setup.sh --stage 4    # resume from step 4 (checkpoint resume)
bash setup.sh --reconfig   # reconfigure the API / QQ Bot
bash setup.sh info         # deployment status
bash setup.sh check        # health check
bash setup.sh --help       # help

3. Technical architecture

The cloud API is the "brain"; the local NPU is the "eyes".

┌──────────────────────────────────────────┐
│     ShiMetaPi AI Lobster platform        │
├──────────────────────────────────────────┤
│  QQ user                                 │
│    ↓                                     │
│  OpenClaw Gateway                        │
│    ↓                                     │
│  ┌──────────────────┬────────────────────┐   │
│  │ Cloud DeepSeek   │ Local RK182X NPU   │   │
│  │ (chat/inference) │ (image recognition/VLM) │ │
│  └──────────────────┴────────────────────┘   │
│    ↓                                     │
│  ShiMetaPi in-house Skills               │
│  · morning-briefing  morning briefing    │
│  · rk-remind  scheduled reminders        │
│  · rk-vl  image recognition (VLM)        │
│  · rk-ocr  text extraction (OCR)         │
└──────────────────────────────────────────┘
Cloud-edge collaboration architecture

4. Verification checklist

① NPU service

systemctl is-active rknn3.service        # active
ls -l /dev/pcie-rkep-*                   # /dev/pcie-rkep-0004:41:00.0
ps -ef | grep rknn3_transfer_proxy       # process is present

② OpenClaw status

which openclaw

Output:

/home/linaro/.nvm/versions/node/v25.9.0/bin/openclaw
openclaw gateway status 2>&1 | head -15

Output:

Service: systemd user (enabled)
File logs: /tmp/openclaw/openclaw-2026-08-20.log
Command: /home/linaro/.nvm/versions/node/v25.9.0/bin/node /home/linaro/.nvm/versions/node/v25.9.0/lib/node_modules/openclaw/dist/index.js gateway --port 18789
Service file: ~/.config/systemd/user/openclaw-gateway.service
Service env: OPENCLAW_GATEWAY_PORT=18789
...
Gateway: bind=lan (0.0.0.0), port=18789 (service args)

③ End-to-end QQ test

Send /new in QQ; receiving a bot reply means it passes.

5. System management commands

After setup.sh deployment, the shimeta command lives in /home/linaro/lobster-pkg/scripts/ and must be added to PATH.

5.1 Verify the shimeta command

which shimeta

Output:

shimeta not found in PATH
ls -la /home/linaro/lobster-pkg/scripts/shimeta

Output:

-rw-rw---- 1 linaro linaro 38  8月 5日 21:42 /home/linaro/lobster-pkg/scripts/shimeta
cat /home/linaro/lobster-pkg/scripts/shimeta

Output:

#!/bin/bash
exec bash ~/setup.sh "$@"

Inside the script, ~/setup.sh expands to /home/linaro/setup.sh. If the deployment package was extracted under ~/lobster-pkg/, this path does not hold and must be changed to an absolute path:

# Change the content
exec bash /home/linaro/lobster-pkg/setup.sh "$@"

# Or add a symlink in home
ln -s ~/lobster-pkg/setup.sh ~/setup.sh

5.2 Register in PATH

One-time (recommended):

echo 'export PATH=/home/linaro/lobster-pkg/scripts:$PATH' >> ~/.bashrc
source ~/.bashrc

Or a symlink (system-wide):

sudo ln -sf /home/linaro/lobster-pkg/scripts/shimeta /usr/local/bin/shimeta

Command reference

CommandFunctionStatus
shimeta infoSystem statusWorking
shimeta checkHealth check (14 items)Working
setup.sh --helpDeployment helpWorking
shimetaRe-run the deployment flowWorking
shimeta --stage NResume from a given stageWorking
shimeta --reconfigReconfigure the API / QQ BotWorking

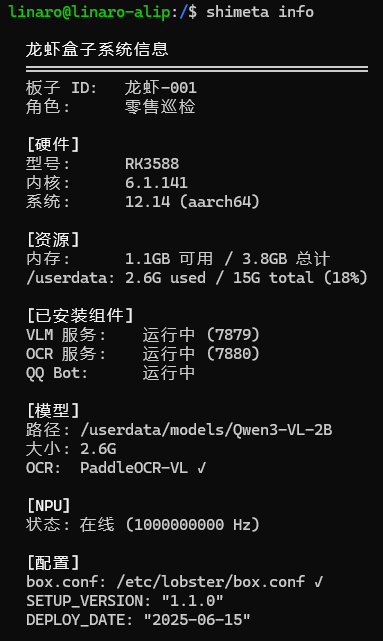
shimeta info

shimeta info

shimeta check

shimeta check

6. Configuration file

All service ports, API keys, and model paths are centralized in /home/linaro/lobster-pkg/config/box.conf.

6.1 Verify the configuration

ls -la /home/linaro/lobster-pkg/config/

Output:

总计 12
drwxrwx--- 2 linaro linaro 4096  8月 5日 21:42 .
drwxr-xr-x 7 linaro linaro 4096  8月 6日 11:13 ..
-rw-rw---- 1 linaro linaro  555  8月 5日 21:42 box.conf
-rw-r----- 1 linaro linaro  555  8月20日 13:23 box.conf.bak

box.conf.bak is a backup generated automatically when setup.sh modifies box.conf.

cat /home/linaro/lobster-pkg/config/box.conf

Output:

# 龙虾盒子配置文件
# 由 setup.sh 自动生成,也可手动编辑
# 所有脚本通过 source 此文件获取统一配置

# ── 板子身份 ──
BOARD_ID="龙虾-001"
BOARD_ROLE="零售巡检"

# ── 服务端口 ──
VLM_PORT=7879
OCR_PORT=7880

# ── 云端 API ──
MINIMAX_KEY="sk-xxx"
MINIMAX_URL="https://api.minimax.chat/v1/chat/completions"
MINIMAX_MODEL="MiniMax-Text-01"

# ── QQ 机器人 ──
QQ_BOT_ID="123456789"
QQ_BOT_SECRET="xxx"

# ── 模型路径 ──
MODEL_DIR="/userdata/models/Qwen3-VL-2B"

# ── 部署信息 ──
SETUP_VERSION="1.1.0"
DEPLOY_DATE="2026-08-20"

The above is an example. Cloud API field names vary with the chosen provider — e.g. DeepSeek uses DEEPSEEK_KEY / DEEPSEEK_URL, while MiniMax uses MINIMAX_KEY / MINIMAX_URL / MINIMAX_MODEL. The actually generated box.conf is authoritative.

6.2 Symlink the configuration file

For compatibility with setup.sh's lookup path, create a symlink:

sudo mkdir -p /etc/lobster
sudo ln -sf /home/linaro/lobster-pkg/config/box.conf /etc/lobster/box.conf

6.3 Configuration example

# 板子身份
BOARD_ID="龙虾-001"
BOARD_ROLE="零售巡检"

# 服务端口
VLM_PORT=7879
OCR_PORT=7880

# 云端 API
DEEPSEEK_KEY="sk-xxx"
DEEPSEEK_URL="https://api.deepseek.com/v1/chat/completions"

# 模型路径
MODEL_DIR="/userdata/models/Qwen3-VL-2B"

VLM_PORT=7879 does not clash with port 7878 used by rkllm3-server by default, but if other services use nearby ports, offset them manually.

Multi-board deployment: change BOARD_ID / BOARD_ROLE on each board.

7. Manual installation

This subsection is for users who need a custom deployment path or to skip setup.sh automation. Regular users should return to the main path above, "One-click deployment in 30 minutes".

Install OpenClaw

su linaro
openclaw onboard --install-daemon

Follow the wizard:

StepConfiguration
1QuickStart → Use existing values
2Provider: Custom Provider
3API Base URL: https://api.deepseek.com/v1
4API Key: sk-xxxxxxxx
5Model ID: deepseek-chat
6Skip for now for the remaining steps
7Restart OpenClaw

Install the QQ Bot plugin

openclaw plugins install @tencent-connect/openclaw-qqbot@latest
openclaw channels add --channel qqbot --token "your-appid:your-appsecret"
openclaw gateway restart

Key directory structure

~/.openclaw/
├── openclaw.json              # main configuration
├── clawchips.yaml             # routing configuration
├── workspace/
│   ├── skills/                # SKILL definitions
│   └── TOOLS.md               # tool guidance
├── extensions/
│   ├── clawchips/
│   └── openclaw-qqbot/
└── agents/main/
    ├── agent/models.json
    └── sessions/

8. FAQ

SymptomCauseFix
which shimeta finds nothingNot registered in PATHecho 'export PATH=/home/linaro/lobster-pkg/scripts:$PATH' >> ~/.bashrc && source ~/.bashrc
shimeta doesn't run (setup.sh not found)Path ~/setup.sh doesn't exist under ~/lobster-pkg/Change the content to an absolute path or ln -s ~/lobster-pkg/setup.sh ~/setup.sh
openclaw gateway status reports PATH includes version managersStarted with nvm nodeRepair with openclaw doctor --repair
openclaw Node version not in 22/24 LTSInstalled a non-LTS via nvmnvm install 22 then restart
QQ /new gets no replyBot not started / wrong Tokenopenclaw gateway status + reconfigure with --reconfig
VLM errors, model not foundWrong MODEL_DIR pathcat box.conf | grep MODEL_DIR

9. Next steps

  • Hardware Installation and Verification — card insertion + health check
  • Environment Setup — 30-second overview
  • Application Development → SKILL Manual — write custom Skills
Edit this page on GitHub
Prev
RTSP Streaming + AI Analysis
Next
PaddleOCR-VL Text Recognition