
13 Regional Motion Detection Application
This chapter describes a GK7206-based regional motion detection application example — rpi-detector. The application captures the camera picture through the on-board MPP video pipeline, pushes it to the browser as an MJPEG stream, and implements interactive ROI (Region of Interest) motion detection on the browser side — the user can drag and resize the detection region to monitor picture changes in real time. The board side also performs auxiliary motion detection based on frame size changes.
The application source code is located in the SDK directory app_sample/rpi-detector/. It covers the complete chain of video capture, dual-channel encoding (JPEG snapshot + MJPEG stream), an on-demand start/stop video pipeline, and browser-side pixel-level motion detection, making it a reference template for pure-software vision applications that do not rely on the NPU.
1 Application Overview
1.1 Features
- Real-time MJPEG video stream: view the live camera picture directly in a browser
- Browser-side ROI motion detection: the user can drag and resize the detection region (green rectangle) and compare pixel changes between frames in real time
- Board-side auxiliary motion detection: server-side motion event detection based on MJPEG frame size changes, with dynamic baseline calibration
- JPEG snapshot capture: the latest frame is cached in real time; the current snapshot can be fetched via API or URL
- Adjustable detection threshold: motion detection sensitivity can be adjusted in real time via a Web UI slider (1%~80%)
- On-demand pipeline start/stop: the video pipeline starts only when a browser connects, and hardware resources are released automatically after disconnection
- Sensor GPIO control: the sensor power GPIO is configured automatically at startup
1.2 Technical Parameters
| Parameter | Value |
|---|---|
Sensor resolution | Depends on the actual sensor model (e.g. 2560 × 1440) |
MJPEG stream resolution | 640 × 480 |
JPEG snapshot resolution | Same as the sensor's native resolution |
Video frame rate | 30 FPS (determined by the sensor) |
Web service port | 80 |
Detection sampling resolution | 160 × 120 (downsampled in the browser) |
Default detection threshold | 20% (adjustable 1%~80%) |
Default ROI | Center 50% × 50% of the picture |
NPU usage | Not used (pure software solution) |
1.3 Directory Structure
app_sample/rpi-detector/
├── Makefile                      # Build script
├── src/
│   ├── main.c                   # Main program (web routing, GPIO init)
│   └── rpi_detector_mjpeg.c     # Pipeline management, MJPEG streaming, motion detection
└── web/
    ├── index.html                # Web frontend page
    ├── app.js                    # Frontend logic (ROI control, pixel-level motion detection)
    └── style.css                 # Page style
1.4 Differences from the Face Detection Application
| Feature | rpi-detector | face_recognize |
|---|---|---|
| AI/NPU inference | Not used | MTCNN three-stage network |
| Motion detection method | Inter-frame pixel difference + frame size change | NPU face detection |
| VENC channels | 2 (JPEG snapshot + MJPEG stream) | 1 (MJPEG stream) |
| Detection location | Browser side (Canvas pixel comparison) | Board side (NPU inference thread) |
| Pipeline lifecycle | On-demand start/stop (follows browser connections) | Created at startup, destroyed at exit |
| Use cases | Intrusion detection, security monitoring, picture change alerts | Face detection, landmark localization |
2 Build and Deployment
2.1 Prerequisites
Before building this application, make sure the following preparations are complete:
- SDK environment ready: set up the cross-compilation toolchain and SDK configuration by following SDK Build
- SDK fully built once: the application depends on the SDK's common libraries and headers, so a full build must be executed first to generate the
out/directory
2.2 Build the Application
Enter the application directory and build with the SDK build system:
# Enter the application directory
cd <SDK_PATH>/app_sample/rpi-detector

# Build (the SDK Makefile automatically uses the cross-compilation toolchain)
make clean && make
How the Build Works
The Makefile includes the SDK build rules via include $(SDK_DIR)/build/base.mk and include $(SAMPLE_DIR)/sample_base.mk, which automatically configure the cross compiler, header file paths, and linked libraries. There is no need to set up the toolchain manually.
After a successful build, the executable rpi_detector is generated in the current directory.
2.3 Deploy to the Board
Info
The application binary is fairly large, so mount an SD card before running it.
mkdir -p /sd_card
mount /dev/mmcblk1p1 /sd_card
Transfer the following files to the development board via SCP:
# Execute on the development host

# 1. Transfer the executable
scp rpi_detector root@<board IP>:/sd_card/

# 2. Transfer the web frontend files
scp web/* root@<board IP>:/www/
Frontend File Deployment
The web frontend files must be placed in the static file root directory of the board's web server (/www/ by default). Deploy them with:
ssh root@<board IP> "mkdir -p /www"
scp web/* root@<board IP>:/www/
2.4 Run the Application
Log in to the development board over SSH and run:
# Log in to the development board
ssh root@<board IP>

# Enter the application directory
cd /sd_card/

# Add execute permission (first time)
chmod +x rpi_detector

# Run (default threshold 20)
./rpi_detector

# Or specify the initial motion detection threshold (1~80)
./rpi_detector 30
After startup, the terminal prints the following log:
=== rpi-detector: Motion Detector for GK7206 ===
Web UI available at http://<board-ip>/
Motion threshold: 20
Starting web server... Camera pipeline will start when browser opens /mjpeg.
2.5 Browser Access
Open http://<board IP>/ in a desktop browser to see the motion detection UI:
- Left side: live camera preview (MJPEG stream) with a green rectangular ROI detection box overlaid
- ROI box operations:
- Drag the center of the box → move the detection region
- Drag the circular handles at the four corners → resize the detection region
- Click the "Reset detection box" button → restore the default position and size
- Right control panel:
- Threshold slider (1%~80%): adjust motion detection sensitivity
- Current change percentage: shows the pixel change rate within the ROI in real time
- Trigger count: cumulative number of motion alerts
- Recent alerts: shows the alert history
- Detection trigger: when the pixel change within the ROI exceeds the threshold, the detection box flashes red briefly and an alert is recorded
2.6 Stop the Application
Press Ctrl+C in the terminal to send the SIGINT signal and exit gracefully. The application waits for all MJPEG stream connections to close before releasing the video pipeline resources.
3 System Architecture
3.1 Overall Data Flow
The overall architecture follows the pipeline of "video capture → dual-channel encoding → web display + browser-side motion detection":
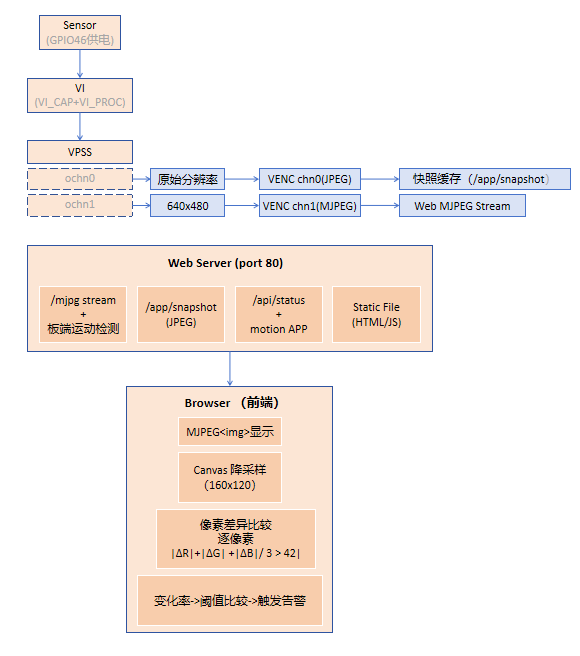
3.2 Two-Layer Motion Detection Mechanism
The application adopts a two-layer motion detection architecture — board side + browser side:
| Layer | Location | Method | Characteristics |
|---|---|---|---|
| Board-side detection | MJPEG streaming loop | Frame size change + dynamic baseline calibration | Coarse granularity, robust to JPEG encoding jitter, requires 3 consecutive abnormal frames |
| Browser-side detection | Canvas pixel comparison | Per-pixel RGB difference within the ROI | Fine granularity, user-defined ROI, 250ms sampling period |
The advantage of this design: zero resource usage when nobody is watching, instant startup when someone connects.
4 Internal Execution Logic
4.1 Startup Flow
The main() function starts in 4 stages:
// Stage 1: configure the sensor power GPIO
enable_sensor_gpio();     // xmmm register config + GPIO46 export, output, pull high

// Stage 2: set the motion detection threshold (can come from a command-line argument)
detector_set_motion_threshold(initial_threshold);

// Stage 3: register the MJPEG handler
web_server_set_mjpeg_handler(rpi_detector_mjpeg_send_stream,
                              rpi_detector_mjpeg_request_stop);

// Stage 4: start the web server (blocking, waits for browser connections)
web_server_run(rpi_detector_route_get);

// Cleanup at exit
rpi_detector_mjpeg_shutdown();  // waits for all connections to close, releases the pipeline
Sensor GPIO Initialization
The enable_sensor_gpio() function performs two steps:
- Uses the
xmmmtool to configure the sensor power management register (0x100C0044 = 0x00001000) - Exports GPIO46 via sysfs, sets it to output mode and pulls it high to power the sensor
4.2 Video Pipeline Initialization
When the first browser requests /mjpeg, rpi_detector_mjpeg_init_pipeline() initializes the pipeline in the following order:
System initialization: configure the VB memory pools
- Pool 0: VI capture buffers (sensor native resolution)
- Pool 1: VPSS full-resolution / VENC encoding buffers
- Pool 2: VPSS sub-stream buffers (640 × 480)
Module initialization: initialize the VI, VPSS, and VENC modules in order
ISP initialization: configure image signal processing parameters
VI + ISP start: start video input
VPSS configuration: configure two output channels
ochn0: native resolution → JPEG snapshot encodingochn1: scaled to 640 × 480 → MJPEG stream encoding
VENC configuration: dual-channel encoding
chn0: JPEG mode (full resolution, for snapshots)chn1: MJPEG CBR mode (640 × 480, for streaming)
Binding:
VI(pipe=0, chn=0) ──bind──→ VPSS(pipe=0, ichn=0)
                              ├→ ochn0 ──bind──→ VENC chn0 (JPEG snapshot)
                              └→ ochn1 ──bind──→ VENC chn1 (MJPEG stream)
4.3 MJPEG Streaming
rpi_detector_mjpeg_send_stream() is the core MJPEG streaming function, invoked when a browser requests /mjpeg:
void rpi_detector_mjpeg_send_stream(int client_fd)
{
    // 1. Initialize the pipeline on demand (starts on the first connection)
    rpi_detector_mjpeg_init_pipeline();
    g_stream_ref_count++;

    // 2. Send the MJPEG multipart header
    send("HTTP/1.1 200 OK\r\nContent-Type: multipart/x-mixed-replace; boundary=frame\r\n...");

    // 3. Acquire VENC frames in a loop
    while (!g_stream_stop_requested) {
        // 3.1 Wait for VENC encoding to finish
        xmedia_venc_select(venc_mask, &timeout);
        xmedia_venc_query_status(g_venc_chn, &stat);
        xmedia_venc_get_stream(g_venc_chn, &stream, -1);

        // 3.2 Board-side motion detection (frame size change analysis)
        update_motion_stats(&stream, frame_len);

        // 3.3 Update the snapshot cache
        update_snapshot_cache(&stream, frame_len);

        // 3.4 Push the JPEG frame to the browser
        send("--frame\r\nContent-Type: image/jpeg\r\nContent-Length: ...\r\n\r\n");
        send(jpeg_data);
        send("\r\n");

        // 3.5 Release the frame
        xmedia_venc_release_stream(g_venc_chn, &stream);
    }

    // 4. Decrement the reference count; destroy the pipeline when the last connection exits
    g_stream_ref_count--;
    if (g_stream_ref_count == 0) rpi_detector_mjpeg_deinit_pipeline();
}
4.4 Board-Side Motion Detection Algorithm
The board-side motion detection runs in the MJPEG streaming loop (update_motion_stats()) and analyzes frame size changes:
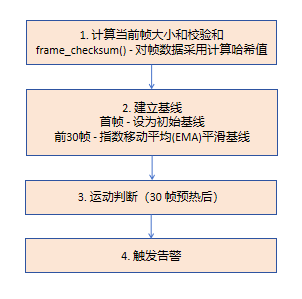
Design highlights:
- Frame size as the motion signal: with MJPEG encoding, changes in picture content significantly alter the compressed frame size — a lightweight detection method that requires no decoding
- Dual-condition filtering: requires the frame size to deviate from the baseline and to jump between adjacent frames, avoiding false triggers on gradual scenes
- Consecutive-frame confirmation: 3 consecutive abnormal frames are required to raise an alert, avoiding occasional noise
- Dynamic baseline: the baseline is continuously and slowly updated via EMA, adapting to slow scene changes such as lighting shifts
4.5 Browser-Side ROI Motion Detection
Browser-side motion detection is implemented in app.js, which downsamples the MJPEG stream onto a Canvas and compares it pixel by pixel:
function detectMotionFrame() {
    // 1. Draw the MJPEG image onto a 160×120 Canvas (downsampling)
    ctx.drawImage(img, 0, 0, 160, 120);
    const frame = ctx.getImageData(0, 0, 160, 120).data;

    // 2. Get the ROI position in downsampled coordinates
    const sampleRoi = getRoiSampleRect(img);

    // 3. Compare RGB differences pixel by pixel within the ROI
    for (y, x in ROI) {
        dr = |frame[i].R - prev[i].R|
        dg = |frame[i].G - prev[i].G|
        db = |frame[i].B - prev[i].B|
        if ((dr + dg + db) / 3 > 42)  // per-pixel change threshold
            changed++
    }

    // 4. Compute the change ratio
    ratio = (changed / total_pixels) * 100

    // 5. Compare against the user threshold and report if exceeded
    if (ratio >= motionThreshold)
        reportMotion(ratio)  // POST /api/motion/trigger
}
Key parameters:
| Parameter | Value | Description |
|---|---|---|
SAMPLE_WIDTH × SAMPLE_HEIGHT | 160 × 120 | Downsampled resolution, balancing accuracy and performance |
PIXEL_DIFF_THRESHOLD | 42 | Per-pixel average RGB difference threshold |
DETECTION_INTERVAL_MS | 250 | Detection period (milliseconds) |
TRIGGER_COOLDOWN_MS | 1200 | Trigger cooldown, preventing duplicate alerts |
DEFAULT_ROI | Center 50% × 50% | Default detection region |
4.6 ROI Interaction Control
The browser-side ROI detection box supports the following interactions:
- Drag the whole box: hold and drag the center of the box to move the detection region
- Corner resizing: drag the circular handles at the four corners (nw/ne/sw/se) to adjust the size of the detection region
- Position persistence: the ROI position and size are automatically saved to
localStorageand restored after a page refresh - Minimum size limit: the ROI is at least 8% × 8%, preventing accidental resizing to invisibility
4.7 Snapshot Feature
The application continuously caches the latest JPEG frame in memory, available at the following URLs:
/api/snapshot      → returns the currently cached JPEG snapshot
/snapshot.jpg      → same as above (alias)
/api/frame.jpg     → same as above (alias)
The snapshot cache is protected by a mutex (g_snapshot_lock) for read/write safety.
4.8 Web API
The application registers the following custom API routes via rpi_detector_route_get():
| Route | Method | Function | Parameters |
|---|---|---|---|
/api/status | GET | Get the current status (running state, FPS, threshold, alert count, etc.) | — |
/api/motion/threshold?val=N | GET | Set the motion detection threshold | val: 1~80 |
/api/motion/trigger?ratio=N | GET | Manually record a browser-side motion alert | ratio: change ratio |
/api/motion/reset | GET | Reset the alert counter | — |
/api/alerts | GET | Get a summary of the alert list | — |
/api/snapshot | GET | Get the current JPEG snapshot | — |
/snapshot.jpg | GET | Snapshot alias | — |
JSON format returned by /api/status:
{
  "running": true,
  "fps": 30,
  "motion_threshold": 20,
  "motion_count": 5,
  "last_motion_time": "2026-06-08 14:30:25",
  "last_frame_time": "2026-06-08 14:31:02",
  "stream_url": "/mjpeg",
  "has_frame": true,
  "frame_size": 15384,
  "frame_mtime": 1749354662
}
5 How to Write a Similar Application
This section uses rpi-detector as a reference template to explain how to develop a GK7206-based video capture + web display application (without the NPU).
5.1 Development Steps Overview
Step 1: Create the project → copy the Makefile template → write the source code
Step 2: GPIO/hardware init → sensor power, pin configuration
Step 3: Initialize the video pipeline → VI + VPSS + VENC configuration
Step 4: Implement MJPEG streaming → get VENC frames → HTTP multipart push
Step 5: Implement business logic → motion detection, snapshot caching, etc.
Step 6: Web frontend → HTML/JS/CSS UI
5.2 Step 1: Create the Project
Create a new project following the rpi-detector directory structure:
mkdir -p my_app/src my_app/webWrite the Makefile (can be copied and modified directly):
ifeq ($(CFG_SDK_EXPORT_FLAG),)
        SDK_DIR := $(shell cd $(CURDIR)/../.. && /bin/pwd)
endif

include $(SDK_DIR)/build/base.mk
include $(SAMPLE_DIR)/sample_base.mk

TARGET := my_app                    # Change to your application name

# Choose libraries as needed:
# - Video capture: no extra libraries (already in SAMPLE_LIBS)
# - IVE/MD:  -lxmedia_ive -lxmedia_md (hardware motion detection / image processing)
# - NPU:     -lxmedia_svp -lxmedia_npu
LIBS := $(SAMPLE_LIBS) $(SAMPLE_COMMON_LIB) -lpthread

INCLUDES := $(SAMPLE_INCLUDES)
INCLUDES += -I$(SDK_DIR)/project/common    # If using web_server.c

CFLAGS := $(SAMPLE_CFLAGS) $(LIBS) $(INCLUDES)

SRCS := $(wildcard src/*.c) $(SDK_DIR)/project/common/web_server.c
OBJS := $(patsubst %.c, %.o, $(SRCS))

.PHONY: all clean

all: $(OBJS)
	$(AT)$(CC) -o $(TARGET) $^ $(CFLAGS)

%.o : %.c
	$(AT)$(CC) -c -o $@ $< $(CFLAGS)

clean:
	$(AT)rm -rf $(OBJS) $(TARGET)
5.3 Step 2: Video Pipeline Configuration Points
Following the initialization flow of rpi_detector_mjpeg_init_pipeline(), the key configuration items:
// 1. Video parameters
video_param.pixel_fmt = XMEDIA_VIDEO_PIXEL_FMT_YVU_SEMIPLANAR_420;  // NV21
video_param.data_width = XMEDIA_VIDEO_DATA_WIDTH_8;                  // 8-bit

// 2. Working mode (fully offline mode, the most stable)
sys_config.sys_conf.pipe_mode[0].vicap_viproc_mode = XMEDIA_WORK_MODE_OFFLINE;
sys_config.sys_conf.pipe_mode[0].viproc_vpss_mode = XMEDIA_WORK_MODE_OFFLINE;
sys_config.sys_conf.pipe_mode[0].gdc_vpss_mode = XMEDIA_WORK_MODE_OFFLINE;

// 3. VPSS output channels (configure 1~N as needed)
// ochn0: full resolution → JPEG snapshot
// ochn1: scaled resolution → MJPEG stream

// 4. VENC channel configuration
// JPEG mode (snapshot):
g_venc_cfg.chn_info[0].payload_type = PT_JPEG;
g_venc_cfg.chn_info[0].support_dcf = XMEDIA_TRUE;  // supports EXIF

// MJPEG mode (stream):
g_venc_cfg.chn_info[1].payload_type = PT_MJPEG;
g_venc_cfg.chn_info[1].rc_mode = VENC_RC_MODE_MJPEGCBR;  // constant bitrate
5.4 Step 3: Implement On-Demand Pipeline Management
The on-demand start/stop pattern of rpi-detector is a practical design pattern. Core logic:
static volatile int g_stream_ref_count = 0;
static pthread_mutex_t g_stream_lock = PTHREAD_MUTEX_INITIALIZER;

// Called when a client connects
void mjpeg_send_stream(int client_fd) {
    pthread_mutex_lock(&g_stream_lock);

    if (g_stream_ref_count == 0) {
        // First connection → initialize the pipeline
        init_pipeline();
    }
    g_stream_ref_count++;
    pthread_mutex_unlock(&g_stream_lock);

    // ... MJPEG streaming loop ...

    pthread_mutex_lock(&g_stream_lock);
    g_stream_ref_count--;
    if (g_stream_ref_count == 0) {
        // Last connection disconnected → release the pipeline
        deinit_pipeline();
    }
    pthread_mutex_unlock(&g_stream_lock);
}
5.5 Step 4: MJPEG Streaming Template
The standard MJPEG streaming pattern (HTTP multipart/x-mixed-replace):
// 1. Send the HTTP response header
send(client_fd,
    "HTTP/1.1 200 OK\r\n"
    "Content-Type: multipart/x-mixed-replace; boundary=frame\r\n"
    "Cache-Control: no-store\r\n"
    "Connection: close\r\n\r\n");

// 2. Acquire encoded frames and push them in a loop
while (!stop_requested) {
    // Wait for VENC encoding to finish
    xmedia_venc_select(venc_mask, &timeout);
    xmedia_venc_query_status(venc_chn, &stat);
    xmedia_venc_get_stream(venc_chn, &stream, -1);

    // Compute the total frame length
    size_t frame_len = 0;
    for (i = 0; i < stream.pack_count; i++)
        frame_len += stream.pack[i].len - stream.pack[i].offset;

    // Send the frame header
    char header[256];
    snprintf(header, sizeof(header),
        "--frame\r\nContent-Type: image/jpeg\r\nContent-Length: %zu\r\n\r\n",
        frame_len);
    send(client_fd, header, strlen(header), 0);

    // Send the frame data
    for (i = 0; i < stream.pack_count; i++)
        send(client_fd, stream.pack[i].vir_addr + stream.pack[i].offset,
             stream.pack[i].len - stream.pack[i].offset, 0);

    send(client_fd, "\r\n", 2, 0);

    // Release the frame
    xmedia_venc_release_stream(venc_chn, &stream);
    free(stream.pack);
}
5.6 Step 5: Custom API Routes
Register a custom route handler via web_server_run():
static int my_route_handler(int client_fd, const char *path)
{
    char json_buf[512];

    if (strcmp(path, "/api/my-endpoint") == 0) {
        snprintf(json_buf, sizeof(json_buf),
            "{\"status\":\"ok\",\"data\":%d}\n", my_data);
        web_send_json_ok(client_fd, json_buf);
        return 0;  // handled
    }

    return -1;  // not handled; fall through to the default static file service
}
5.7 Key Programming Points
Mutex Protection of Shared State
Multiple MJPEG clients may access shared data concurrently, which requires mutex protection:
// Pipeline start/stop lock
pthread_mutex_lock(&g_mjpeg_lock);
// operate on g_stream_ref_count, g_inited, etc.
pthread_mutex_unlock(&g_mjpeg_lock);

// Snapshot cache lock
pthread_mutex_lock(&g_snapshot_lock);
// read/write g_snapshot_buf, g_snapshot_size
pthread_mutex_unlock(&g_snapshot_lock);
Limitations of Frame-Size Motion Detection
This application uses frame size changes as the board-side motion detection signal — lightweight but coarse-grained. Developers should note:
- Advantages: no JPEG decoding, no extra memory, minimal computation
- Limitations: cannot localize the motion region, sensitive to slow lighting changes, JPEG encoding parameter fluctuations may cause false triggers
- Improvement direction: for more accurate board-side motion detection, use the SDK's MD (Motion Detect) module (
-lxmedia_md) or IVE module (-lxmedia_ive) for hardware-accelerated frame difference analysis
Error Handling and Resource Release
Pipeline initialization uses chained goto error handling to ensure that any failing step releases the resources already allocated:
ret = sample_comm_isp_init(...);    if (ret) goto exit0;
ret = sample_comm_vi_start(...);    if (ret) goto exit1;
ret = sample_comm_vpss_start(...);  if (ret) goto exit2;
ret = sample_comm_venc_start(...);  if (ret) goto exit3;
// ...
return XMEDIA_SUCCESS;

exit3: sample_comm_vpss_stop(...);
exit2: sample_comm_vi_stop(...);
exit1: sample_comm_isp_stop(...);
exit0: sample_comm_isp_exit(...);
       rpi_detector_mjpeg_sys_exit();
       return ret;
5.8 Troubleshooting
| Problem | Possible Cause | Solution |
|---|---|---|
| Black screen in the browser | Sensor GPIO not initialized correctly | Check the return value of enable_sensor_gpio(), confirm GPIO46 is available |
| MJPEG stream disconnects after connecting | VENC encoding failure or timeout | Check VENC configuration parameters, whether VB pool sizes and counts are sufficient |
| Snapshot returns 404 | No snapshot before the first MJPEG connection | Open /mjpeg first to start the pipeline, then request a snapshot after a few frames |
| Frequent false motion triggers | JPEG encoding jitter causes frame size fluctuation | Increase the threshold (e.g. 30~50), or raise the trigger_delta minimum |
| Motion detection never triggers | Threshold too high or ROI too small | Lower the threshold, enlarge the ROI, check that the picture is changing |
| Pipeline misbehaves with multiple browsers | Concurrent pipeline state access without locking | Follow the mutex protection of g_mjpeg_lock and g_stream_ref_count |
| Pipeline initialization fails (non-zero error code) | Insufficient VB memory or module conflict | Check whether another program is using VI/VPSS/VENC resources |
| Browser ROI box cannot be dragged | CSS z-index conflict or JS not loaded | Check browser console errors, confirm app.js loads correctly |