
Connect the Device
This chapter describes how to add the Pico-G1 development board in Workbench, establish the SSH connection, and verify the board is reachable.
Prerequisites
| Item | Status |
|---|---|
| Pico-G1 board | Powered on, Ethernet cable plugged in |
| Board IP | Default 192.168.49.10 (factory default) |
| PC and board | Same LAN; the PC can ping the board |
| Workbench | Logged in, see ch01 |
Step 1: Open Device Management
Left navigation → the DEVICE TREE area:
DEVICE TREE +Click the + button in the upper-right corner to add a new device.
Step 2: Configure the Device
The device configuration dialog pops up:
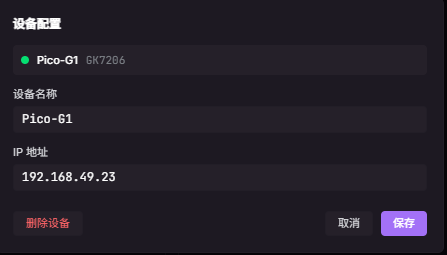
| Field | Default | Description |
|---|---|---|
| Device Name | Pico-G1 / GK7206 | Friendly name shown in the device tree |
| IP Address | 192.168.49.10 | The board's current IP |
Click Save when done.
Step 3: Wait for the Connection
After the device is added, the IDE automatically tries the SSH connection:
- Success → the device card shows a green dot
- Failure → the device card shows a red "Reconnect" button
Disconnected Interface
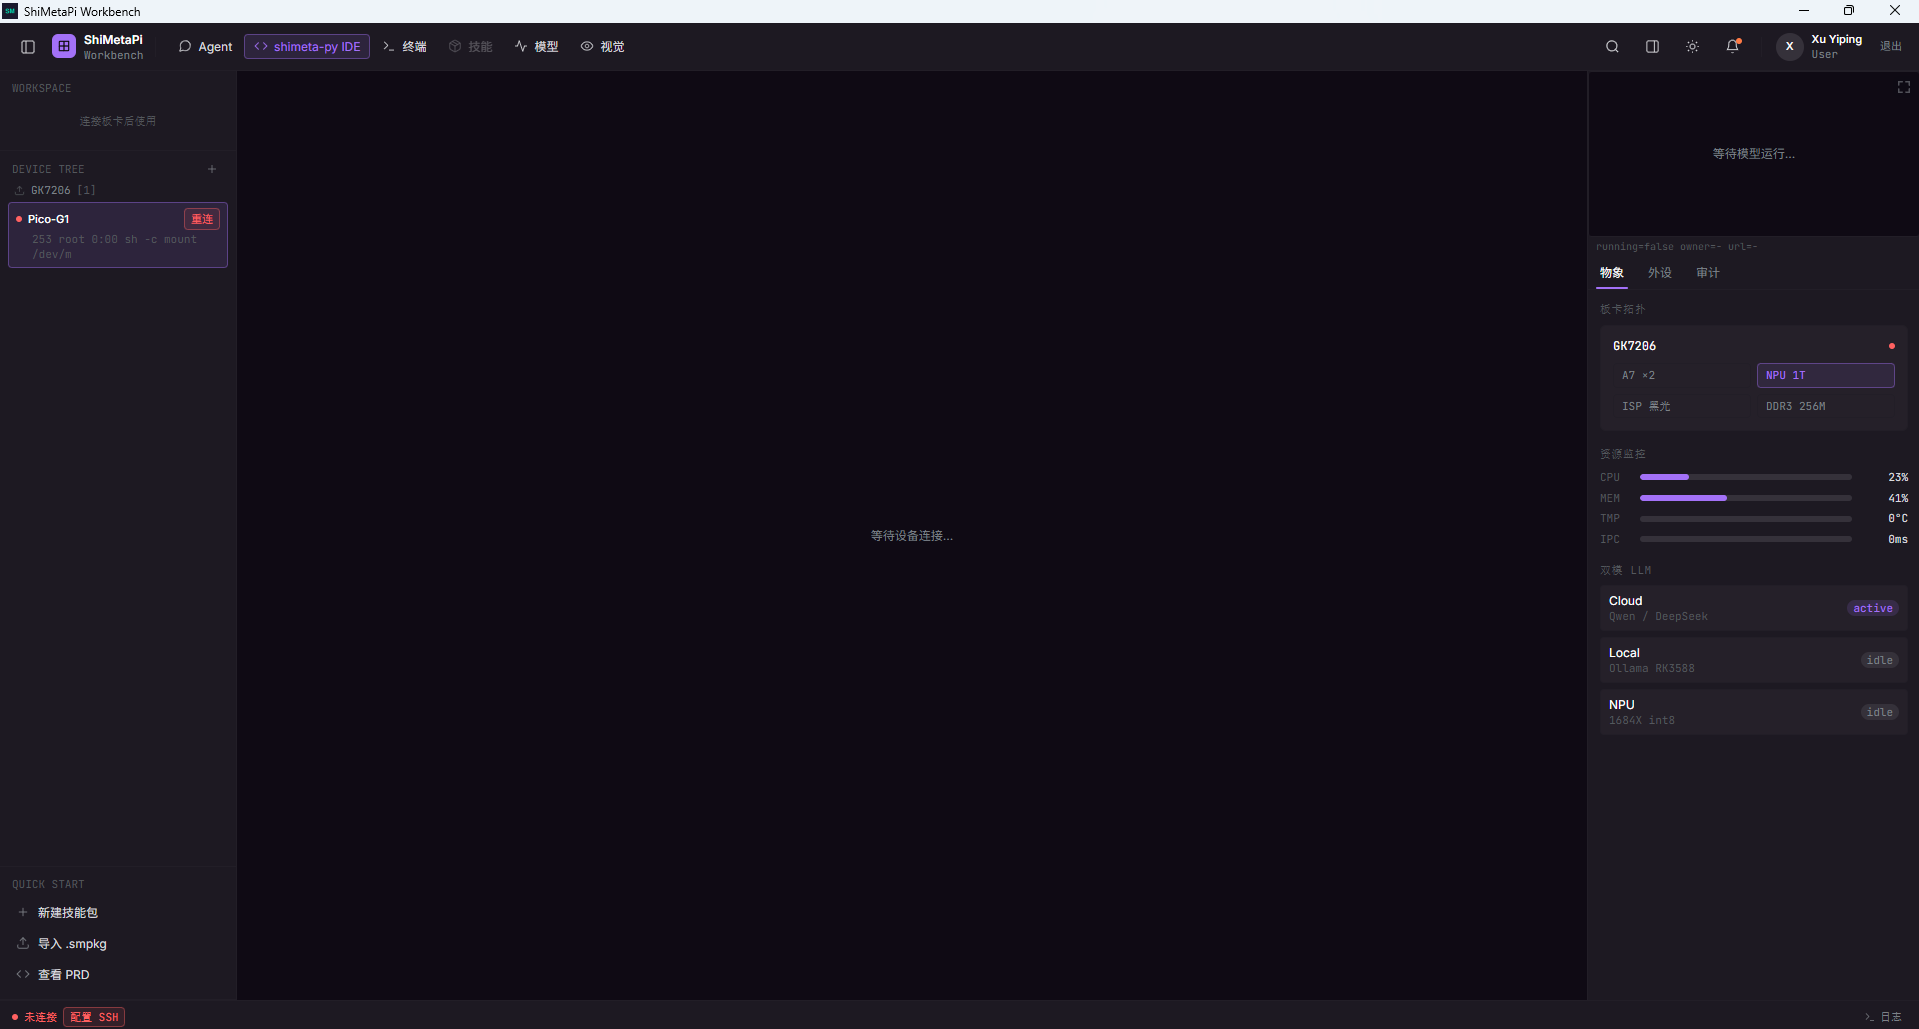
When the device is not connected you will see:
| Symptom | Meaning |
|---|---|
| The Pico-G1 card on the left has a red "Reconnect" button | SSH connection failed |
| The central Agent says "Please connect the board first (board context needed)" | The Agent waits for board context |
| The "Object view" (物象) box on the right is blank | The camera service depends on the board |
| Bottom status bar shows "Not connected — configure SSH" | The SSH channel is not established |
| "Board Topology" on the right shows GK7206 with a red dot | The board is unreachable |
Step 4: Reconnect Manually (If Auto-Connect Fails)
Click the "Reconnect" button on the device card.
If reconnection still fails, troubleshoot in this order:
4.1 Check the Network
# On the PC (PowerShell)
ping 192.168.49.10- Replies → network is fine, keep troubleshooting
- No reply → check the cable, IP, and whether you are in the same subnet
4.2 Check the Board's SSH Service
The board must have the SSH service enabled (port 22). If not:
# Log in to the board via serial or other means
/etc/init.d/sshd start
4.3 Check the IDE Credentials
The IP in the device configuration must match the board's actual IP. If the board moved to another network:
- Find the board's new IP (router admin page or serial console)
- In DEVICE TREE, click the device → Edit → update the IP
4.4 Check the Board User
The board has two users; the IDE uses shimetad (passwordless) by default. If a different board firmware lacks the shimetad user, log in as root first to investigate:
ssh root@192.168.49.10
# Password 123456
Step 5: Verify the Connection
Once connected, verify the following:
| Check | Where to Look | Expected |
|---|---|---|
| Device card shows a green dot | Left DEVICE TREE | ✅ |
| Board topology shows a green dot | Right side | ✅ |
| IPC shows a concrete value (ms) | Right resource monitor | > 0 |
| CPU / MEM show percentages | Right resource monitor | > 0 |
| Central Agent shows the "Board Debug" title | Center | ✅ |
Common Connection Problems
| Symptom | What to Check |
|---|---|
| Auto-discovery can't find the board | Check cable, IP, subnet; temporarily disable the Windows firewall |
| Connection test times out | Board not powered / loose cable / wrong IP |
| "Wrong password" error | Wrong board username; check it is the shimetad user |
| Board moved networks and is lost | Find the new IP via serial or router admin page, update the device config |
Next
- ch03 Set Up the Environment: verify shimeta-py/svp/xmm on the board
- User Guide → Device Management: multi-board management, device configuration details