
Development Environment Setup
1 Environment Setup Overview
Before we begin, let's first understand the architecture of the entire development environment:
┌─────────────────┐    网络连接    ┌─────────────────┐
│   主机开发端     │ ←----------→  │  GM-3568JHF     │
│                 │               │   开发板         │
│ • RKNN-Toolkit2 │               │ • RKNN Runtime  │
│ • Python        │               │ • NPU 驱动      │
│ • 开发工具       │               │ • Linux 系统    │
└─────────────────┘               └─────────────────┘
Development workflow:
- Use RKNN-Toolkit2 on the PC side to convert models
- Transfer the converted model to the development board
- Run the model on the development board using RKNN Runtime
2 Development Board Environment Preparation
2.1 Install Python and Conda
# 下载并安装 Anaconda 或 Miniconda
# 创建名为 ‘rknn’ 的 Python 3.9 环境(RKNN-Toolkit2 通常兼容 Python 3.6-3.9)
conda create -n rknn python=3.9 -y
conda activate rknn

When (rknn) appears in front of the command line, the rknn environment has been successfully activated.
2.2 Install PyTorch and YOLOv5 Dependencies
Installing the CPU version of PyTorch is sufficient (model conversion does not need a GPU):
pip install torch torchvision torchaudio --index-url https://download.pytorch.org/whl/cpu
Clone the YOLOv5 repository and install its dependencies:
git clone https://github.com/ultralytics/yolov5.git
cd yolov5
pip install -r requirements.txt
Install other necessary libraries:
pip install opencv-python numpy onnx onnxsim onnxruntime
2.3 Install RKNN-Toolkit2
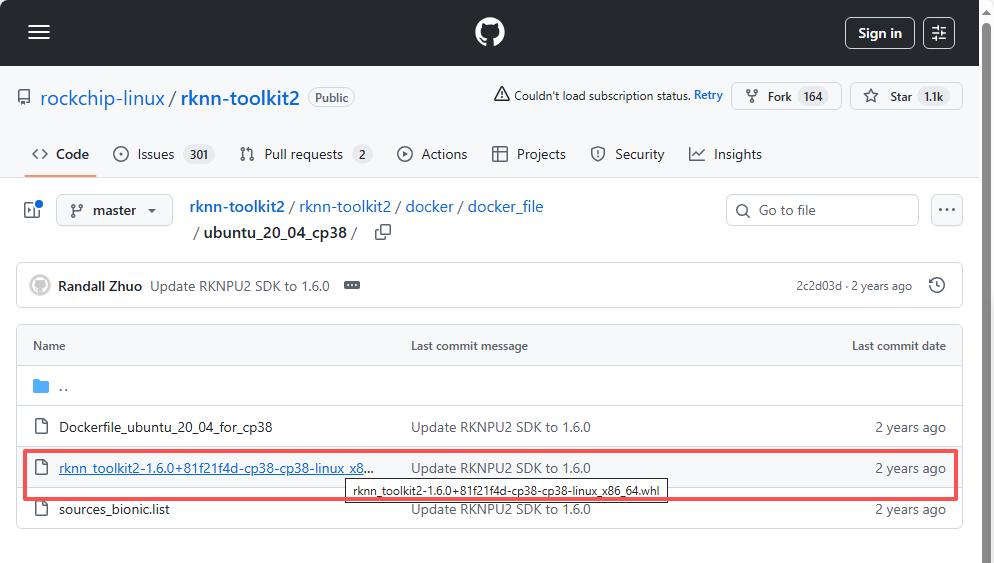
Step 1: Get the installation package
Visit https://github.com/rockchip-linux/rknn-toolkit2. Under rknn-toolkit2 / docker / docker_file / ubuntu_20_04_cp38, download the wheel file for Linux x86_64 (rknn_toolkit2-1.6.0+81f21f4d-cp38-cp38-linux_x86_64.whl).
pip install rknn-toolkit2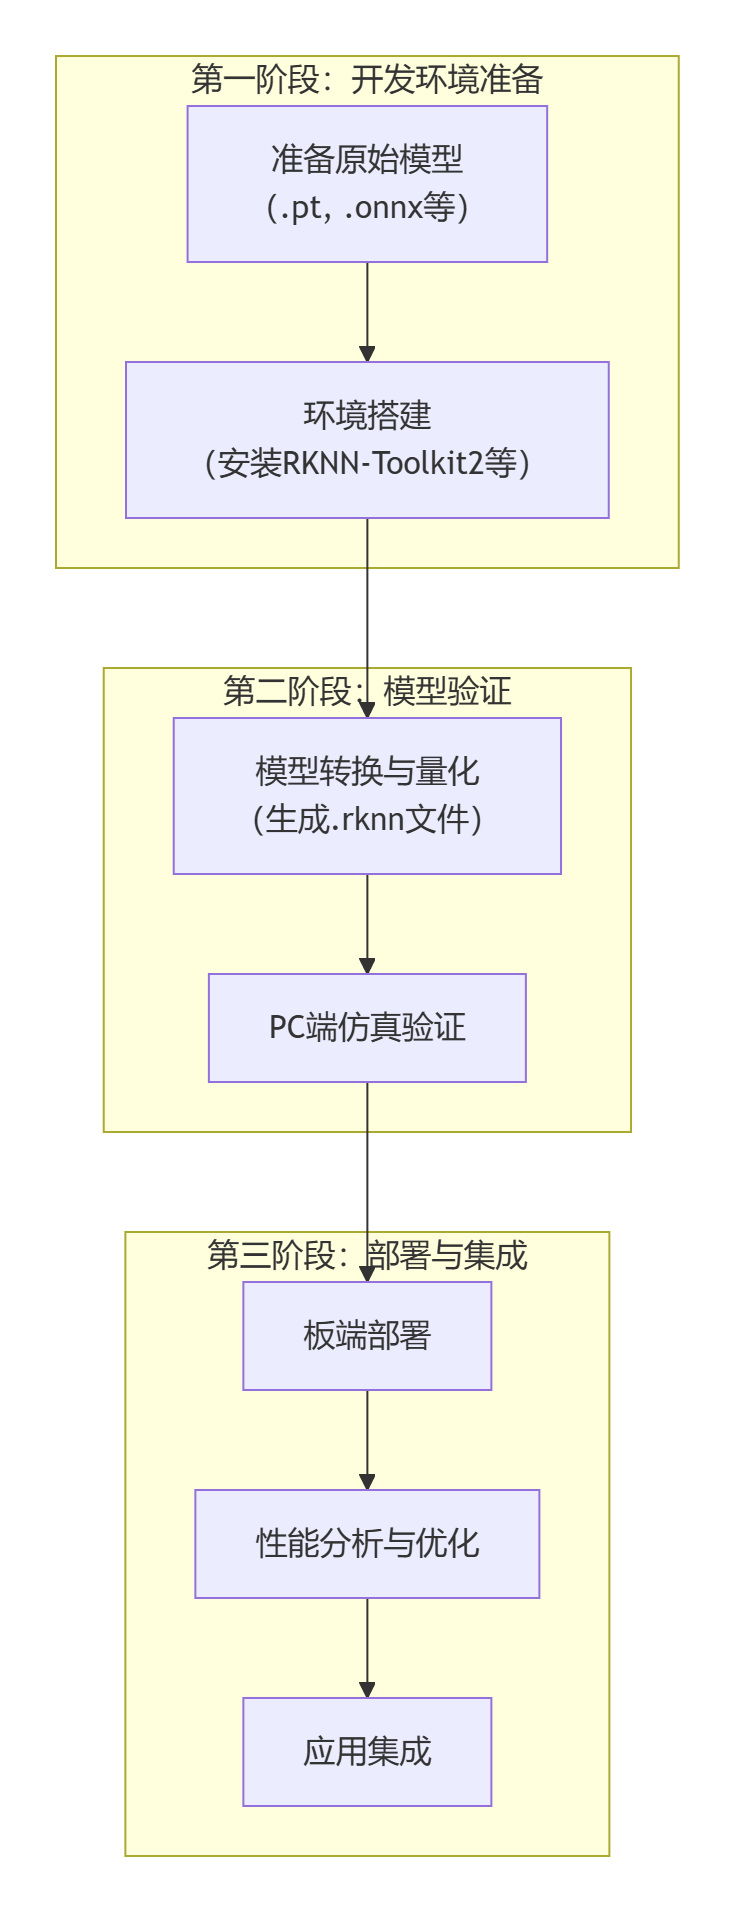
2.4 System Optimization Configuration
Why system optimization?
Optimizing the system configuration can improve NPU performance, reduce inference latency, and ensure stable model execution.
Memory optimization
Step 1: Check current memory usage
# 查看内存使用情况
free -h

# 查看详细内存信息
cat /proc/meminfo | head -10
Step 2: Create swap space (if memory is insufficient)
# 检查是否已有 swap
swapon --show

# 如果内存小于 4GB,建议创建 2GB swap
sudo fallocate -l 2G /swapfile

# 设置正确的权限
sudo chmod 600 /swapfile

# 创建 swap 文件系统
sudo mkswap /swapfile

# 启用 swap
sudo swapon /swapfile

# 验证 swap 已启用
free -h
Step 3: Permanently enable swap
# 添加到 fstab 以便开机自动挂载
echo '/swapfile none swap sw 0 0' | sudo tee -a /etc/fstab

# 验证 fstab 配置
cat /etc/fstab | grep swap
Step 4: Tune memory parameters
# 调整 swap 使用倾向 (降低 swap 使用频率)
echo 'vm.swappiness=10' | sudo tee -a /etc/sysctl.conf

# 调整缓存压力
echo 'vm.vfs_cache_pressure=50' | sudo tee -a /etc/sysctl.conf

# 应用配置 (重启后自动生效)
sudo sysctl -p
NPU performance optimization
Step 1: Check the current NPU status
# 查看 NPU 当前频率
cat /sys/class/devfreq/fdab0000.npu/cur_freq

# 查看 NPU 调频策略
cat /sys/class/devfreq/fdab0000.npu/governor

# 查看可用频率列表
cat /sys/class/devfreq/fdab0000.npu/available_frequencies
Step 2: Set the NPU to performance mode
# 设置为性能模式 (最高性能)
echo performance | sudo tee /sys/class/devfreq/fdab0000.npu/governor

# 验证设置
cat /sys/class/devfreq/fdab0000.npu/governor
Step 3: Create a performance-optimization script
# 创建优化脚本
sudo nano /usr/local/bin/npu_performance.sh
Enter the following content:
#!/bin/bash
# NPU 性能优化脚本

echo "正在优化 NPU 性能..."

# 设置 NPU 为性能模式
echo performance > /sys/class/devfreq/fdab0000.npu/governor

# 设置 CPU 为性能模式 (可选)
echo performance > /sys/devices/system/cpu/cpufreq/policy0/scaling_governor

# 禁用 CPU 空闲状态 (可选,会增加功耗)
# echo 1 > /sys/devices/system/cpu/cpu0/cpuidle/state1/disable

echo "NPU 性能优化完成"
echo "当前 NPU 频率: $(cat /sys/class/devfreq/fdab0000.npu/cur_freq)"
# 设置执行权限
sudo chmod +x /usr/local/bin/npu_performance.sh
# 测试脚本
sudo /usr/local/bin/npu_performance.sh3 PC-Side Environment Setup
3.1 Confirm PC System Requirements
System compatibility check
Supported operating systems (in order of recommendation):
Ubuntu 20.04/22.04 LTS
- Best compatibility
- Official primary test platform
- Simple package management
Windows 10/11 (x64)
- Most users
- Rich development tools
- Requires extra configuration
macOS 10.15+
- Good development experience
- Some features may be limited
Hardware requirements check
Minimum configuration:
- CPU: Intel i5 or AMD Ryzen 5
- RAM: 8GB
- Storage: 20GB free space
- Network: Stable internet connection
Recommended configuration:
- CPU: Intel i7 or AMD Ryzen 7
- RAM: 16GB+
- Storage: 50GB+ SSD
- GPU: Dedicated GPU (for large-model training)
3.2 Install the Python Environment
Why Python?
Python is the primary language for RKNN development, with a rich ecosystem of machine-learning libraries, a low learning curve, and suitability for rapid prototyping.
Windows environment installation
Step 1: Download Python
- Visit the Python official site
- Download Python 3.9.x (recommended version, best compatibility)
- Important: During installation, check "Add Python to PATH"
Step 2: Verify the installation
# 打开命令提示符 (Win+R, 输入 cmd)
python --version
pip --version

# 如果显示版本号,说明安装成功
Step 3: Upgrade pip
# 升级 pip 到最新版本
python -m pip install --upgrade pip
Step 4: Create a virtual environment
# 创建项目目录
mkdir C:\rknn_project
cd C:\rknn_project

# 创建虚拟环境
python -m venv rknn_env

# 激活虚拟环境
rknn_env\Scripts\activate

# 激活后,命令提示符前会显示 (rknn_env)
Linux (Ubuntu) environment installation
Step 1: Update the system
# 更新包列表
sudo apt update
sudo apt upgrade -y
Step 2: Install Python
# 安装 Python 3.9 和相关工具
sudo apt install -y python3.9 python3.9-venv python3.9-dev python3-pip

# 设置 Python 3.9 为默认 python3
sudo update-alternatives --install /usr/bin/python3 python3 /usr/bin/python3.9 1
Step 3: Create a virtual environment
# 创建项目目录
mkdir ~/rknn_project
cd ~/rknn_project

# 创建虚拟环境
python3 -m venv rknn_env

# 激活虚拟环境
source rknn_env/bin/activate

# 升级 pip
pip install --upgrade pip
3.3 Install RKNN-Toolkit2
What is RKNN-Toolkit2?
RKNN-Toolkit2 is a model-conversion tool provided by Rockchip. It can convert models in formats such as TensorFlow, PyTorch, and ONNX into RKNN format so they can run on the NPU of RK chips.
Installing RKNN-Toolkit2
Step 1: Make sure the virtual environment is activated
# Linux/macOS
source rknn_env/bin/activate

# Windows
rknn_env\Scripts\activate

# 确认虚拟环境已激活 (命令提示符前应显示 (rknn_env))
Step 2: Install RKNN-Toolkit2
# 安装 RKNN-Toolkit2
pip install rknn-toolkit2

# 如果网络较慢,使用国内镜像
pip install -i https://pypi.tuna.tsinghua.edu.cn/simple rknn-toolkit2
Step 3: Install dependencies
# 安装必要的依赖包
pip install numpy>=1.19.0
pip install opencv-python>=4.5.0
pip install pillow>=8.0.0
pip install matplotlib>=3.3.0

# 安装深度学习框架 (可选)
pip install torch>=1.8.0 torchvision>=0.9.0
pip install onnx>=1.8.0

# 安装其他有用的工具
pip install tqdm  # 进度条
pip install paramiko  # SSH 连接
Step 4: Verify the installation
# 创建测试脚本
cat > test_rknn_toolkit.py << 'EOF'
#!/usr/bin/env python3
"""
RKNN-Toolkit2 安装验证脚本
"""

print("RKNN-Toolkit2 环境检测")
print("=" * 40)

# 测试 RKNN-Toolkit2 导入
try:
    from rknn.api import RKNN
    print("RKNN-Toolkit2: 导入成功")

    # 创建 RKNN 对象
    rknn = RKNN(verbose=False)
    print("RKNN 对象: 创建成功")

    # 显示支持的目标平台
    print("支持的目标平台:")
    platforms = ['rk3566', 'rk3568', 'rk3588']
    for platform in platforms:
        print(f" - {platform}")

except ImportError as e:
    print(f"RKNN-Toolkit2: 导入失败 - {e}")
except Exception as e:
    print(f"RKNN 对象: 创建失败 - {e}")

# 测试其他依赖包
print("\n依赖包检查:")
packages = {
    'numpy': 'NumPy',
    'cv2': 'OpenCV',
    'PIL': 'Pillow',
    'matplotlib': 'Matplotlib'
}

for module, name in packages.items():
    try:
        if module == 'cv2':
            import cv2
            print(f"{name}: {cv2.__version__}")
        elif module == 'PIL':
            import PIL
            print(f"{name}: {PIL.__version__}")
        else:
            imported = __import__(module)
            version = getattr(imported, '__version__', '已安装')
            print(f"{name}: {version}")
    except ImportError:
        print(f"{name}: 未安装")

print("\n环境检测完成!")
EOF

# 运行测试
python test_rknn_toolkit.py
3.4 Configure the Development Board Connection
Why configure the connection?
After configuring the PC-to-board connection, you can:
- Transfer files remotely
- Execute commands remotely
- Debug programs remotely
- View runtime results in real time
Test the connection
# 安装 paramiko (如果还没安装)
pip install paramiko pyyaml

# 运行连接测试
python src/utils/board_connection.py
Common Issues and Solutions
Python environment issues
Issue 1: pip install is slow
# 解决方案: 使用国内镜像源
pip install -i https://pypi.tuna.tsinghua.edu.cn/simple rknn-toolkit2

# 永久配置镜像源
pip config set global.index-url https://pypi.tuna.tsinghua.edu.cn/simple
Issue 2: Permission issues (Linux/macOS)
# 解决方案: 使用用户安装模式
pip install --user rknn-toolkit2

# 或者修复 pip 权限
sudo chown -R $(whoami) ~/.local
Issue 3: Virtual environment issues
# 删除旧的虚拟环境
rm -rf rknn_env

# 重新创建
python3 -m venv rknn_env
source rknn_env/bin/activate
pip install --upgrade pip
RKNN tool issues
Issue 1: Importing RKNN fails
# 检查 Python 版本兼容性
python --version

# 确保使用正确的 Python 版本 (3.8-3.10)
# 重新安装 RKNN-Toolkit2
pip uninstall rknn-toolkit2
pip install rknn-toolkit2
Issue 2: Model conversion fails
# 检查模型格式和版本
# 确保模型文件完整且格式正确
# 更新到最新版本的 RKNN-Toolkit2
pip install --upgrade rknn-toolkit2
Issue 3: Out of memory
# 增加虚拟内存
sudo fallocate -l 4G /swapfile
sudo chmod 600 /swapfile
sudo mkswap /swapfile
sudo swapon /swapfile

# 或者使用更小的 batch size 进行转换
NPU driver issues
Issue 1: NPU device does not exist
# 检查内核模块
lsmod | grep rknpu

# 手动加载驱动
sudo modprobe rknpu

# 检查设备树配置
cat /proc/device-tree/npu*/status
Issue 2: Insufficient permissions
# 检查设备权限
ls -la /dev/rknpu*

# 修复权限
sudo chmod 666 /dev/rknpu*

# 或者将用户添加到 video 组
sudo usermod -a -G video $USER
Beginner reminder: If you run into problems while setting up the environment, don't worry. Read the error messages carefully, consult the troubleshooting section, or ask for help in the community. RKNN development has a learning curve, but once you master it you will be able to fully unleash the NPU's powerful performance!
The next chapter runs the official YOLOv5 example to verify that the environment is configured correctly and to start your first RKNN project.