
FPGA IIC Read/Write Demo
1 Demo Introduction
Demo function description: this demo mainly demonstrates how to perform read/write operations on FPGA registers from the ARM side via the IIC communication protocol. Based on the standard IIC tools in the Linux system (such as i2cset, i2cget, i2cdetect, etc.), a custom test program is provided, which offers a complete IIC communication test flow and verifies the correctness of IIC communication.
2. Standard IIC Tool Read/Write of FPGA
In IIC communication, the FPGA acts as the slave. You can view the slave address via the following command. As shown in the figure, its device address is 0x66.
i2cdetect -r -y -a 0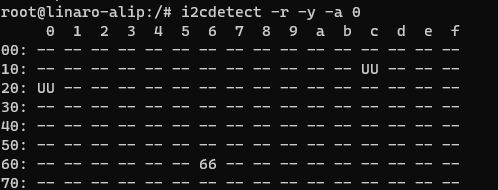
Currently, three register addresses are defined in the code: 0x00, 0x01, and 0x02. Among them, 0x02 is a read-only register. For the 0x00 register, you can test whether the read and written data are correct. For example, if you write 1, reading it back should also return 1, which means the communication is normal.
Run the following command to write the value 0X40 to the 0X00 register.
i2cset -r -y -a 0 0x66 0x00 0x40
Run the following command to read the value of register 0x00. As you can see, it reads back 0x40, which is consistent with the written value.
i2cget -f -y -a 0 0x66 0x00
You can also run the following command to view the values of all registers of the device.
i2cdump -f -y -a 0 0x66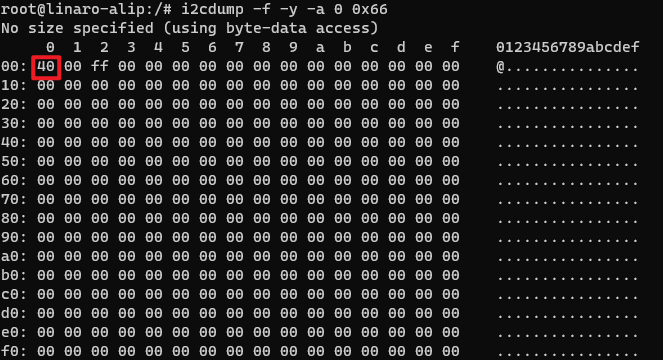
Among them, the 0x01 register can control the state of the LED on the carrier board. You can write a value to the 0X01 register to control the LED state.
#点亮
i2cset -f -y -a 0 0x66 0x01 0x01
#熄灭
i2cset -f -y -a 0 0x66 0x01 0x01
3 Demo Procedure
This demo optimizes the command design based on the standard IIC tools of the Linux system to make it more intuitive and user-friendly. Users can modify the source program according to their needs.
Open a terminal and copy the executable smdt_fpga_i2c from the bin directory of this demo (05-开发资料\软件开发资料\linux_demo\smdt_fpga_i2c_demo\bin) to the development board's filesystem (the source code can be found in the src directory).
#修改 Linux 内核日志的显示级别,内核的日志级别被设置为只显示紧急或更高级别的消息
echo 1 4 1 7 > /proc/sys/kernel/printk
In the terminal, run the following commands to switch to the directory containing the smdt_fpga_i2c executable.
#切换到 smdt_fpga_i2c 可执行程序所在目录
cd ‘可执行文件所在目录’

#查看 smdt_fpga_i2c 是否在该目录下
ls
If the executable smdt_fpga_i2c is in the current directory, modify the executable's permissions.
#修改文件权限
chmod 777 smdt_fpga_i2c

#查询是否修改成功
ls -ld smdt_fpga_i2c
After confirming that the file permissions have been successfully modified, run ./smdt_fpga_i2c -h to view the program's help information.
./smdt_fpga_i2c -hThe execution result is shown in the figure below:

Run the following command to perform read/write operations on device register 0X00.
#写操作
 ./smdt_fpga_i2c -write 0x00 0x11
 #读操作
  ./smdt_fpga_i2c -read 0x00
Run the following command to perform write operations on device register 0X01 to control the LED on the carrier board.
#点亮
  ./smdt_fpga_i2c -led ON
  #熄灭
  ./smdt_fpga_i2c -led OFF