
HOME
Shop
  • English
  • 简体中文
HOME
Shop
  • English
  • 简体中文
  • Product Series

    • FPGA+ARM

      • GM-3568JHF

        • Introduction

          • GM-3568JHF Introduction
        • Quick Start

          • Preface
          • Environment Setup
          • Compilation Notes
          • Flashing Guide
          • Debugging Tools
          • Software Update
          • Viewing System Information
          • Test Commands
          • Application Compilation
          • Source Code Access
        • Peripherals & Interfaces

          • USB
          • Display and Touch
          • Ethernet
          • WIFI
          • Bluetooth
          • TF-Card
          • Audio
          • Serial Port
          • CAN
          • RTC
        • Application Development

          • UART Read/Write Demo
          • Key Detection Demo
          • LED Blink Demo
          • MIPI Screen Detection Demo
          • Read USB Device Information Demo
          • FAN Detection Demo
          • FPGA FSPI Communication Demo
          • FPGA DMA Read/Write Demo
          • GPS Debugging Demo
          • Ethernet Test Demo
          • RS485 Read/Write Demo
          • FPGA I2C Read/Write Demo
          • PN532 NFC Card-Reading Demo
          • TF Card Read/Write Demo
        • QT Development

          • ARM64 Cross-Compiler Environment Setup
          • Adding a QT Program to Boot Auto-Start
        • RKNN_NPU Development

          • RK3568 NPU Overview
          • Development Environment Setup
          • Run the Official YOLOv5 Example
        • FPGA Development

          • ARM and FPGA Communication
          • FPGA Development Manual
        • Others

          • Modifying the Root Filesystem
          • System Auto-Start Services
        • Downloads

          • Downloads
      • MB-E30P

        • Introduction

          • MB-E30P Introduction
        • Quick Start

          • Preface
          • Environment Setup
          • Compilation Instructions
          • Flashing Guide
          • Debugging Tools
          • Software Update
          • Viewing Information
          • Test Commands
          • Application Compilation
          • Source Code Acquisition
        • Peripherals & Interfaces

          • USB
          • Display and Touch
          • Ethernet
          • WIFI
          • Bluetooth
          • TF-Card
          • Audio
          • RTC
        • Application Development

          • Key Detection Demo
          • LED Blink Demo
          • MIPI Screen Detection Demo
          • Read USB Device Information Demo
          • FAN Detection Demo
          • FPGA FSPI Communication Demo
          • FPGA DMA Read/Write Demo
          • Ethernet Test Demo
          • FPGA IIC Read/Write Demo
          • PN532 NFC Card Reading Demo
          • TF Card Read/Write Demo
        • QT Development

          • ARM64 Cross-Compiler Environment Setup
          • Adding a QT Program to the Boot Auto-Start Service
        • RKNN_NPU Development

          • RK3568 NPU Overview
          • Development Environment Setup
          • Run the Official YOLOv5 Example
          • Model Conversion In Detail
          • Run Custom Models on the Board
        • FPGA Development

          • ARM and FPGA Communication
          • FPGA Development Manual
        • Others

          • Modifying the Root Filesystem
          • System Auto-Start Service
        • Downloads

          • Downloads
    • ShimetaPi

      • M4-R1

        • Introduction

          • M4-R1 Introduction
        • Quick Start

          • OpenHarmony Overview
          • Image Burning
          • Application Development Quick Start
          • Device Development Quick Start
        • Application Development

          • ArkUI

            • ArkTS Language Overview
            • UI Components - Row Container Introduction
            • UI Components - Column Container Introduction
            • UI Components - Text Component
            • UI Components - Toggle Component
            • UI Components - Slider Component
            • UI Components - Animation Component & Transition Component
          • Documentation

            • OpenHarmony Official Materials
          • Development Notes

            • Full-SDK Replacement Tutorial
            • Introducing and Using Third-Party Libraries
            • HDC Debugging
            • Restore Factory Mode via Command Line
            • Upgrade App to System Permission
          • First App

            • Build Your First ArkTS Application - HelloWorld
          • Demos

            • Serial-Debug-Assistant Application Demo
            • Writing-Board Application Demo
            • Digital Clock Application Demo
            • Wi-Fi Information Acquisition Application Demo
        • Device Development

          • Ubuntu Development

            • Environment Setup
            • Download Source Code
            • Compile Source Code
          • DevEco Device Tool

            • Tool Introduction
            • Development Environment Construction
            • Import the SDK
            • HUAWEI DevEco Tool Function Introduction
        • Kernel Peripherals & Interfaces

          • Guide
          • Device Tree Introduction
          • NAPI Introduction
          • ArkTS Introduction
          • NAPI Development Hands-on Demo
          • GPIO Introduction
          • I2C Communication
          • SPI Communication
          • PWM Control
          • UART Communication
          • TF Card (MicroSD)
          • Screen (Display)
          • Touch
          • Ethernet
          • M.2 SSD
          • Audio
          • WIFI & BT
          • Camera
        • Downloads

          • Downloads
      • M5-R1

        • Introduction

          • M5-R1 Development Docs
        • Quick Start

          • Image Burning
          • Environment Setup
          • Download Source Code
        • Peripherals & Interfaces

          • Raspberry Pi Interfaces
          • GPIO Interface
          • I2C Interface
          • SPI Communication
          • PWM Control
          • Serial Port Communication
          • TF Card
          • Display
          • Touch
          • Audio
          • RTC
          • Ethernet
          • M.2
          • MINI-PCIE
          • Camera
          • WIFI & BT
        • Downloads

          • Downloads
      • Pico-G1

        • Product Overview

          • Product Introduction
          • SDK Version Information
        • Quick Start

          • Development Environment Setup
          • Image Build
          • Image Flashing
          • System Login
          • Network Configuration
          • File Transfer
          • SDK Directory Structure
          • Deploying Your First Application
          • Deploying Your First Driver
          • Mounting an SD Card
        • Peripherals & Interfaces

          • GPIO Control
          • UART Serial Communication
          • I2C Communication
          • SPI Communication
        • MPP Media Development

          • MPP Media Processing Software
          • Image Processing Chain
          • Video Input
          • Image Encoding
        • NPU & AI

          • NPU Driver and Runtime Library Architecture
          • .xmm Model Loading
          • SVP Video Processing
          • AI Noise Reduction (AI_NR)
        • Application Samples

          • Encryption/Decryption Application
          • ADC Acquisition Application
          • Low-Power Application
          • Audio Processing Application
          • Video Encoding Application
          • Video Input Application
          • Video Graphics Subsystem (VGS) Application
          • 08 Region Overlay Application
          • 09 Intelligent Video Engine Application
          • 10 UVC Webcam Application
          • 11 All-in-One Quickstart Application
          • 12 FPN Correction Application
          • 13 Regional Motion Detection Application
          • 14 MTCNN Face Detection Application
        • Expansion Board Peripheral Examples

          • 00 - Pico Expansion Board Peripheral Examples Overview
          • 01 - OLED Display Application
          • 02 - TFT Display Application
          • 03 - MPU6050 Gyroscope Application
          • 04 - ADC Acquisition Application
          • 05 - Passive Buzzer Application
          • 06 - MQ Gas Sensor Application
          • 07 - GPS Positioning Application
          • 08 - SHT20 Temperature & Humidity Application
          • 09 - Ultrasonic Ranging Application
          • 10 - SpO2 Sensor Application
          • 11 - DC Motor Control Application
          • 12 - Servo Control Application
    • OpenHarmony

      • SC-3568HA

        • Introduction

          • SC-3568HA Overview
        • Quick Start Guide

          • OpenHarmony Overview
          • Image Flashing
          • Setting Up the Development Environment
          • Hello World Application and Deployment
        • Application Development

          • ArkUI

            • Introduction to ArkTS Language
            • Introduction to UI Components and Practical Applications (Part 1)
            • Introduction to UI Components and Practical Applications (Part 2)
            • Introduction to UI Components and Practical Applications (Part 3)
          • Expand

            • Getting Started Guide
            • Referencing and Using Third-Party Libraries
            • Application Compilation and Deployment
            • Command-Line Factory Reset
            • System Debugging -- HDC Debugging
            • APP Stability Testing
            • Chapter 7 Application Testing
        • Device Development

          • Environment Setup
          • Download Source Code
          • Compiling Source Code
        • Peripheral And Interface

          • Raspberry Pi interface
          • GPIO Interface
          • I2C Interface
          • SPI communication
          • PWM (Pulse Width Modulation) control
          • Serial port communication
          • TF Card
          • Display Screen
          • Touch
          • Audio
          • RTC
          • Ethernet
          • M.2
          • MINI-PCIE
          • Camera
          • WIFI&BT
          • Raspberry Pi expansion board
        • Downloads

          • Downloads
      • M-K1HSE

        • Introduction

          • M-K1HSE Introduction
        • Quick Start

          • Development environment construction
          • Source code acquisition
          • Compilation Notes
          • Burning Guide
        • Application Development

          • Application Development Environment Setup
          • First Application - Hello World
        • Peripherals and interfaces

          • 01 Audio
          • 02 RS485
          • 03 Display
        • System customization development

          • System transplant
          • System customization
          • Driver Development
          • System Debugging
          • OTA Update
        • Downloads

          • Downloads
    • HVS Camera

      • Quick Start

        • SDK Overview
        • Downloads
        • Your First C++ Program
        • Python Data Analysis
        • MultiVision Studio
      • Development

        • Programming Guides

          • Open Camera
          • Read Events
          • Recording & Replay
          • Event Processing (Denoising)
          • Display & Visualization
          • Tuning
          • Capture APS Image
        • Toolkit SDK

          • Hybrid Vision Toolkit
          • Quick Start
          • C++ API
          • Python API
        • Algorithm

          • Hybrid Vision Algo
          • Hybrid Vision Algo API
          • Windows Algo SDK
        • Samples Overview
        • Applications
      • Fundamentals

        • Event Camera Fundamentals
        • HVS Hybrid Vision
        • Event Visualization
        • Data Formats Reference
        • Glossary
        • Bias & Tuning
        • Video Tutorials
      • USB Cameras

        • HVS Camera Quick Start
        • Networking Capabilities

          • HVS Camera System Architecture
          • EVS Network Server
          • EVS Time Sync
          • Web Window
        • HVS Camera Compatibility Matrix
        • FAQ & Troubleshooting Guide
        • Products

          • CF-NRS1 (Lingguang No.1 Hybrid Vision Camera)
      • MIPI Modules

        • MIPI Module Quick Start
        • Carrier Boards

          • RDK X5 Carrier Board Adaptation
          • Raspberry Pi Carrier Board Adaptation
          • Digua Pi Carrier Board Adaptation
          • ShimeTai Board Carrier Board Adaptation
        • MIPI Module Compatibility Matrix
        • Products

          • EVS_003 Sensor Module
    • AI-model

      • 1684XB-32T

        • Introduction

          • AIBOX-1684XB-32 Introduction
        • Quick Start

          • First Use
          • Network Configuration
          • Disk Usage
          • Memory Allocation
          • Fan Control Strategy
          • Firmware Upgrade
          • Cross Compilation
          • Model Quantization
        • Application Development

          • Development Overview

            • Sophgo SDK Development
            • Sophgo Demo Introduction
          • Large Language Models

            • Deploying Llama3 Example
            • Sophon LLM_api_server Development
            • Deploying MiniCPM-V-2_6
            • Qwen-2-5-VL Image and Video Recognition Demo
            • Qwen3-chat Demo
            • Qwen3-Qwen Agent-MCP Development
            • Qwen3-langchain-AI Agent
          • Deep Learning

            • ResNet (Image Classification)
            • LPRNet (License Plate Recognition)
            • SAM (General Image Segmentation Foundation Model)
            • YOLOv5 (Object Detection)
            • OpenPose (Human Keypoint Detection)
            • PP-OCR (Optical Character Recognition)
        • Downloads

          • Downloads
      • 1684X-416T

        • Introduction

          • AIBOX-1684X-416 Introduction
        • Demo Quick Guide

          • ShimeTai Intelligent Monitoring Demo Quick Usage Guide
      • RDK-X5

        • Introduction

          • RDK-X5 Hardware Introduction
        • Quick Start

          • RDK-X5 Quick Start
        • Application Development

          • AI Online Model Development

            • Experiment 01 - Access Volcengine Doubao AI
            • Experiment 02 - Image Analysis
            • Experiment 03 - Multimodal Visual Analysis & Localization
            • Experiment 04 - Multimodal Image-Text Comparison
            • Experiment 05 - Multimodal Document/Table Analysis
            • Experiment 06 - Camera-based AI Visual Analysis
          • Large Language Models

            • Experiment 01 - Speech Recognition
            • Experiment 02 - Voice Conversation
            • Experiment 03 - Multimodal Image Analysis - Voice
            • Experiment 04 - Multimodal Image Comparison - Voice
            • Experiment 05 - Multimodal Document Analysis - Voice
            • Experiment 06 - Multimodal Vision Application - Voice
          • ROS2 Basics

            • Experiment 01 - Environment Setup
            • Experiment 02 - Create & Build a Workspace Package
            • Experiment 03 - Run ROS2 Topic Communication Node
            • Experiment 04 - ROS2 Camera Application
          • 40-pin IO Development

            • Experiment 01 - GPIO Output (LED Blink)
            • Experiment 02 - GPIO Input
            • Experiment 03 - Button-controlled LED
            • Experiment 04 - PWM Output
            • Experiment 05 - Serial Output
            • Experiment 06 - I2C Experiment
            • Experiment 07 - SPI Experiment
          • USB Module Usage

            • Experiment 01 - USB Voice Module Usage
            • Experiment 02 - Sound Source Localization Module
          • Machine Vision Practice

            • Experiment 01 - Open USB Camera
            • Experiment 02 - Color Recognition
            • Experiment 03 - Gesture Recognition
            • Experiment 04 - YOLOv5 Object Detection
      • RDK-S100

        • Introduction

          • RDK-S100 Hardware Introduction
        • Quick Start

          • RDK-S100 Quick Start
        • Application Development

          • AI Online Model Development

            • Experiment 01 - Access Volcengine Doubao AI
            • Experiment 02 - Image Analysis
            • Experiment 03 - Multimodal Visual Analysis & Localization
            • Experiment 04 - Multimodal Image-Text Comparison
            • Experiment 05 - Multimodal Document/Table Analysis
            • Experiment 06 - Camera-based AI Visual Analysis
          • Large Language Models

            • Experiment 01 - Speech Recognition
            • Experiment 02 - Voice Conversation
            • Experiment 03 - Multimodal Image Analysis - Voice
            • Experiment 04 - Multimodal Image Comparison - Voice
            • Experiment 05 - Multimodal Document Analysis - Voice
            • Experiment 06 - Multimodal Vision Application - Voice
          • ROS2 Basics

            • Experiment 01 - Environment Setup
            • Experiment 02 - Create & Build a Workspace Package
            • Experiment 03 - Run ROS2 Topic Communication Node
            • Experiment 04 - ROS2 Camera Application
          • 40-pin IO Development

            • Experiment 01 - GPIO Output (LED Blink)
            • Experiment 02 - GPIO Input
            • Experiment 03 - Button-controlled LED
            • Experiment 04 - PWM Output
            • Experiment 05 - Serial Output
            • Experiment 06 - I2C Experiment
            • Experiment 07 - SPI Experiment
          • USB Module Usage

            • Experiment 01 - USB Voice Module Usage
            • Experiment 02 - Sound Source Localization Module
          • Machine Vision Practice

            • Experiment 01 - Open USB Camera
            • Experiment 02 - Image Processing Basics
            • Experiment 03 - Object Detection
            • Experiment 04 - Image Segmentation
      • RK1828

        • Introduction

          • M5-182X-A1 AI Edge Box - Product Introduction
          • M5-182X-A1 Hardware Specifications
          • M5-182X-A1 Usage & Safety
        • Quick Start

          • M5-182X-A1 Image Flashing
          • RK182X Hardware Installation & Verification
          • RK182X Development Environment Quick Setup
          • RK182X SDK Overview
          • RK182X Environment Setup in Detail
          • RK182X Quick Start
          • Vendor SDK Data Extraction Record
        • Development Guide

          • ClawChips Architecture and Principles
          • SKILL User Manual
          • RK182X Series LLM Inference (RK1828 Model)
          • RK182X Series CNN Inference (RK1828 Model)
          • Model Conversion
          • RK182X AI Agent Application Development Guide
          • RK182X Industrial Anomaly Detection Application
        • SDK Reference

          • RKNN3-SDK Overview

            • RKNN3 SDK Overview
          • RKNN3-Toolkit

            • RKNN3 Toolkit Installation and Usage
          • RKLLM

            • RKLLM On-Device LLM Inference
          • RK182X Series NPU Overview and Architecture (RK1828 Model)
          • RK182X INT8 Quantized Inference Deployment
          • RK182X MPP Multimedia Framework
          • MPP Details

            • RK182X Video Decoding
            • RK182X Video Encoding
          • NPU Details

            • RKNN Model Conversion
            • RK182X NPU INT8 Quantized Inference
            • RK182X Multi-Model Parallel Inference
          • RGA Details

            • RK182X RGA 2D Graphics Acceleration
          • VPU Details

            • RK182X VPU Codec
        • Hardware Reference

          • RK182X Series Hardware Architecture Overview (RK1828 Model)
          • RK182X Pin Definitions and Multiplexing Configuration
          • RK182X Pin Definitions
          • RK182X Power Management
          • RK182X Clock and PLL Configuration
          • RK182X Clock and Frequency Configuration
        • Tutorials

          • Hello World
          • Hello RK1828 - The First Program
          • RTSP Streaming
          • RTSP Streaming + AI Analysis
          • ShiMetaPi AI Lobster One-Click Deployment
          • PaddleOCR-VL Text Recognition
          • Qwen3-1.7B LLM Text Chat
          • AI Multi-View Inspection (Qwen3-VL Wrapper)
          • YOLOv5 Object Detection
        • Downloads

          • Downloads
        • FAQ

          • FAQ
    • Core-Board

      • C-3568BQ

        • Introduction

          • C-3568BQ Overview
      • C-3588LQ

        • Introduction

          • C-3588LQ Overview
      • GC-3568JBAF

        • Introduction

          • GC-3568JBAF Overview
      • C-K1BA

        • Introduction

          • C-K1BA Overview
    • Software Platform

      • ShiMetaPi Workbench

        • Introduction

          • Product Overview
          • Core Architecture
          • Feature Entries
          • Supported Hardware
          • Release Notes
        • Quick Start

          • Install & Login
          • Connect the Device
          • Set Up the Environment
          • Connect to AIHub
          • First Inference
        • User Guide

          • Workspace Overview
          • Device Manager
          • Model Market
          • One-Click Deploy
          • Vision — SVP
          • Vision - Custom Models
          • shimeta-py IDE
          • Terminal
          • Agent Debug Assistant
          • Settings and Resources
        • FAQ

          • Installation & Login
          • Device Connection
          • Models & Deployment
          • Vision & Runtime
          • Settings & Other
      • ShimetaPi Repository

        • Introduction

          • ShimetaPi Software Repository
        • Pico G1 (GK7206)

          • Quick Start

            • Installation & First Inference
            • shimeta_infer — Image Inference
            • shimeta_camera — Real-time Camera Inference
            • SVP Scene Detection
            • File Transfer & Built-in Model Reference
            • FAQ
          • HTTP API & Python SDK

            • HTTP API Reference
      • Model Fine-tuning Platform

        • Introduction

          • Model Training Platform
        • Quick Start

          • Register & Login
          • Create Your First Model (30-Minute Quick Experience)
        • Training Guide

          • Data Preparation & Annotation
          • Training Parameter Configuration
          • Start & Monitor Training
          • Model Evaluation & Testing
        • Model Deployment

          • Export Model
          • Deploy to Edge Device

NPU Driver and Runtime Library Architecture

An NPU (Neural Processing Unit) is a processor dedicated to AI computation, optimized at the hardware level for neural networks and deep-learning algorithms. Compared with traditional CPUs and GPUs, an NPU has higher computational efficiency and lower power consumption for AI-related tasks such as matrix operations and convolutions. It is widely used in image recognition, speech recognition, object detection, smart security, and large-model inference.

The NPU software stack of the GK7206 platform uses a layered design to provide developers with an efficient and flexible deep neural network application development environment. This architecture covers the entire path from low-level hardware drivers to upper-level runtime libraries and supports the development of various AI applications such as object recognition and image classification.

1 Software Stack Layers

The NPU software stack mainly includes the following layers from top to bottom:

  • Application layer and algorithm model library (ALG SDK): provides ready-to-use algorithm applications such as object detection and image classification for specific service scenarios. Typical examples are in sample/npu/demo_ai/, covering 21 AI functions including person detection, vehicle detection, and face recognition.
  • Runtime layer (XMEDIA_CL): an heterogeneous programming framework designed for the NPU. It provides a C-language API library to upper-layer applications, responsible for model loading, resource management, and task scheduling, and hides underlying hardware differences. The core headers are xmedia_cl.h and xmedia_cl_common.h, and the shared library is libxmedia_npu.so.
  • User-mode driver (NPU UMD): encapsulates the concrete driver invocation logic and works with the runtime layer to dispatch commands and exchange data.
  • Kernel-mode driver (NPU KMD): runs in Linux kernel space, responsible for NPU hardware initialization, power management, interrupt handling, memory mapping, and hardware-level scheduling of task queues. The kernel module is xm_npu.ko, loaded with the command ./load xm7206v11a -i.
  • Hardware: the NPU compute unit that executes specific neural network operator instructions.
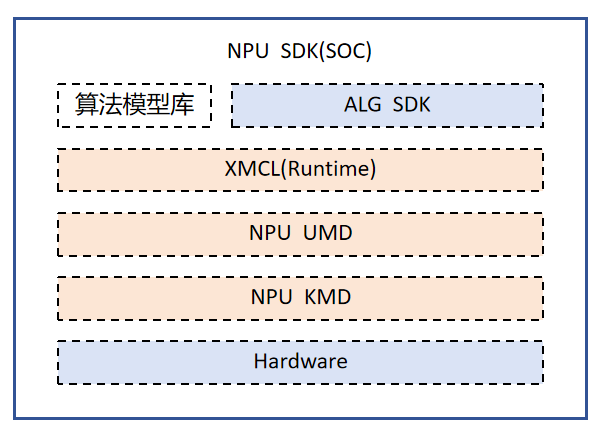
Software stack layers

2 Core Architecture Features

The XMEDIA_CL framework provides the following key features by design to ensure efficient NPU utilization:

  • Zero-copy and Ping-Pong Buffer: supports a zero-copy mode to reduce memory copy overhead, and a Ping-Pong Buffer mechanism to overlap data flow and computation, improving throughput.
  • Sync/async modes: supports both synchronous and asynchronous invocation modes. Asynchronous mode allows the CPU and NPU to work in parallel, improving overall efficiency.
  • JIT and AOT support: supports both Just-In-Time (JIT) and Ahead-Of-Time (AOT) compilation, balancing flexibility with maximum performance.
  • Heterogeneous device extension: supports unified management and scheduling of heterogeneous devices such as CPU, NPU, and DSP.
  • Low memory footprint: the internal bufferless design has no extra memory footprint, suitable for resource-constrained embedded scenarios.

3 NPU Hardware Specifications

3.1 Supported Data Types

The NPU compute unit supports the following data types (defined in xmedia_cl_common.h):

Data typeEnum valueDescription
INT8XMEDIA_CL_INT88-bit signed integer; the most common type for quantized inference
UINT8XMEDIA_CL_UINT88-bit unsigned integer
INT16XMEDIA_CL_INT1616-bit signed integer
UINT16XMEDIA_CL_UINT1616-bit unsigned integer
FP16XMEDIA_CL_FP16Half-precision floating point; balances accuracy and performance
INT32XMEDIA_CL_INT3232-bit signed integer
FP32XMEDIA_CL_FP32Single-precision floating point; used for high-precision scenarios
INT4XMEDIA_CL_INT44-bit signed integer; for maximum quantization compression
UINT10XMEDIA_CL_UINT1010-bit unsigned integer; suitable for RAW image data
UINT12XMEDIA_CL_UINT1212-bit unsigned integer; suitable for RAW image data

Tip

In real deployments, most models use INT8 quantization, achieving the best inference performance with minimal accuracy loss. FP16 is suitable for scenarios that require higher accuracy.

3.2 Supported Data Formats

FormatEnum valueDescription
RGBXMEDIA_CL_FORMAT_RGBStandard 3-channel RGB
RGrGbBXMEDIA_CL_FORMAT_RGrGbBBayer format
BGbGrRXMEDIA_CL_FORMAT_BGbGrRBayer format
GrRBGbXMEDIA_CL_FORMAT_GrRBGbBayer format
GbBRGrXMEDIA_CL_FORMAT_GbBRGrBayer format
YUVXMEDIA_CL_FORMAT_YUVYUV color space
YVUXMEDIA_CL_FORMAT_YVUYVU color space

3.3 NPU Management Interface

The NPU provides the following management interfaces (defined in xmedia_npu.h):

APIDescription
xmedia_npu_set_quick_start_flag(flag)Set the quick-start flag; when enabled, it speeds up NPU initialization
xmedia_npu_get_quick_start_flag(&flag)Get the current quick-start flag
xmedia_npu_get_proc_info(&proc)Get NPU memory mapping information (physical address and buffer length)
xmedia_npu_get_usage_rate(&usage)Get the NPU utilization (percent) for performance monitoring

The following example shows how to query NPU utilization:

#include "xmedia_npu.h"

xmedia_float usage = 0.0f;
xmedia_s32 ret = xmedia_npu_get_usage_rate(&usage);
if (ret == XMEDIA_SUCCESS) {
    printf("NPU usage rate: %.2f%%\n", usage);
}

4 Core Data Types

The XMEDIA_CL framework defines a set of core data structures to describe the input/output tensor information of a model.

4.1 Tensor Shape (tensor_shape)

Describes the dimension information of a tensor:

typedef struct _xmedia_cl_tensor_shape {
    xmedia_cl_u32 ndims;                      // Number of dimensions (max XMEDIA_CL_MAX_DIMS_NUM=8)
    xmedia_cl_u32 dims[XMEDIA_CL_MAX_DIMS_NUM]; // Size of each dimension
    xmedia_cl_u32 pch[XMEDIA_CL_MAX_DIMS_NUM]; // Stride (pitch) of each dimension
    xmedia_cl_data_type type;                  // Data type
} xmedia_cl_tensor_shape;

For example, for an NHWC input tensor [1, 640, 640, 3], ndims=4, dims={1,640,640,3}.

4.2 Tensor Quantization Parameters (tensor_quant)

Describes the scale factor and zero point required for quantized inference:

typedef struct _xmedia_cl_tensor_quant {
    xmedia_cl_float scale;  // Scale factor
    xmedia_cl_s32 zp;       // Zero point
} xmedia_cl_tensor_quant;

The dequantization formula is: real_value = (int8_value - zp) * scale

4.3 Tensor (tensor)

The complete tensor description structure:

typedef struct _xmedia_cl_tensor {
    xmedia_cl_u32 tensor_id;       // Unique tensor identifier
    void *addr;                    // Data buffer address
    xmedia_cl_tensor_shape shape;  // Tensor shape
    xmedia_cl_tensor_quant quant;  // Quantization parameters
    xmedia_cl_u32 size;            // Total data size (bytes)
    xmedia_cl_s8 *name;            // Tensor name
} xmedia_cl_tensor;

4.4 Input/Output Tensor Info (tensor_info_inout)

Used by the xmedia_cl_graph_get_input/get_output interface to return tensor information:

typedef struct _xmedia_cl_tensor_info_inout {
    xmedia_cl_u32 num;                        // Number of tensors
    xmedia_cl_tensor *tensor;                  // Tensor array
    xmedia_cl_tensor_batch *tensor_batch;      // Batch information (used in dynamic batching)
    xmedia_cl_u32 *current_batch;             // Current batch size
} xmedia_cl_tensor_info_inout;

4.5 Model Memory Information (mem_info)

Describes the various memory sizes required to run a model, obtained through xmedia_cl_graph_query_model_info_from_file:

typedef struct _xmedia_cl_mem_info {
    xmedia_cl_u32 worksize;           // Workspace size
    xmedia_cl_u32 weightsize;         // Model weight size
    xmedia_cl_u32 inputsize;          // Input buffer size
    xmedia_cl_u32 outputsize;         // Output buffer size
    xmedia_cl_u32 codesize;           // Model code segment size
    xmedia_cl_u32 memory_reuse_type;  // Memory reuse mode (see Section 3.6)
    xmedia_cl_u32 private_data_size;  // Private data size
} xmedia_cl_mem_info;

Usage example:

#include "xmedia_cl.h"

xmedia_cl_mem_info mem_info;
xmedia_cl_s32 ret = xmedia_cl_graph_query_model_info_from_file(
    "model.xmm", &mem_info, XMEDIA_CL_MEM_INFO);
if (ret == XMEDIA_CL_SUCCESS) {
    printf("workspace: %u bytes\n", mem_info.worksize);
    printf("weight:    %u bytes\n", mem_info.weightsize);
    printf("input:     %u bytes\n", mem_info.inputsize);
    printf("output:    %u bytes\n", mem_info.outputsize);
}

4.6 Memory Reuse Modes

The NPU supports four memory reuse modes, which effectively reduce memory usage in multi-model scenarios:

ModeEnum valueReused content
Workspace onlyXMEDIA_CL_WORKSPACEworkspace
Workspace + inputXMEDIA_CL_WORKSPACE_INPUTworkspace + input
Workspace + outputXMEDIA_CL_WORKSPACE_OUTPUTworkspace + output
AllXMEDIA_CL_WORKSPACE_INPUT_OUTPUTworkspace + input + output

You can query the reuse mode supported by a model via xmedia_cl_graph_get_memory_reuse_type(). For details, see XMM Model Loading.

5 Device and Context Management

5.1 Device Types

The XMEDIA_CL framework supports the following heterogeneous device types:

Device typeEnum valueDescription
CPUXMEDIA_CL_DEVICE_CPUUse the CPU for inference
NPUXMEDIA_CL_DEVICE_NPUUse the NPU for accelerated inference
ALLXMEDIA_CL_DEVICE_ALLQuery all available devices

5.2 Context Lifecycle

The Context is the core object that manages all resources in the XMEDIA_CL framework. A typical lifecycle is as follows:

#include "xmedia_cl.h"

// 1. Initialize the CL framework
xmedia_cl_s32 ret = xmedia_cl_init();
if (ret != XMEDIA_CL_SUCCESS) {
    printf("CL init failed: %d\n", ret);
    return -1;
}

// 2. Get NPU device IDs
xmedia_cl_device_id devices = NULL;
xmedia_cl_u32 num_devices = 0;
ret = xmedia_cl_get_device_ids(XMEDIA_CL_DEVICE_NPU, &devices, &num_devices);

// 3. Create a context
xmedia_cl_s32 err_code = 0;
xmedia_cl_context context = xmedia_cl_create_context(
    num_devices, &devices, &err_code);
if (context == NULL) {
    printf("Create context failed: %d\n", err_code);
    return -1;
}

// 4. Use the context for model loading and inference...
// (See ch03-xmm-model-loading.md)

// 5. Release resources
xmedia_cl_release_context(context);
xmedia_cl_release_device_ids(&devices, &num_devices);
xmedia_cl_uninit();

Note

Before destroying a context, ensure that all model graphs (Graphs) using that context have been unloaded via xmedia_cl_graph_unload().

6 Error Code Reference

The XMEDIA_CL framework defines detailed error codes (in xmedia_cl_common.h) to help quickly locate problems during development.

6.1 General Errors

Error codeValueDescription
XMEDIA_CL_SUCCESS0Operation succeeded
XMEDIA_CL_OUT_OF_HOST_MEMORY-6Insufficient host memory
XMEDIA_CL_INVALID_VALUE-30Invalid parameter value
XMEDIA_CL_INVALID_BUFFER_SIZE-61Invalid buffer size

6.2 Device and Context Errors

Error codeValueDescription
XMEDIA_CL_INVALID_DEVICE_TYPE-31Invalid device type
XMEDIA_CL_INVALID_PLATFORM-32Invalid platform
XMEDIA_CL_INVALID_DEVICE-33Invalid device
XMEDIA_CL_INVALID_CONTEXT-34Invalid context
XMEDIA_CL_INVALID_COMMAND_QUEUE-36Invalid command queue

6.3 Model Loading Errors

Error codeValueDescription
XMEDIA_CL_INVALID_MODEL-64Invalid model file or unsupported format
XMEDIA_CL_READ_MODEL_FAIL-65Failed to read the model file
XMEDIA_CL_INVALID_BINARY-42Invalid binary data
XMEDIA_CL_INVALID_PROGRAM-44Invalid program object
XMEDIA_CL_ERROR_MODEL_TYPE-68Model type error
XMEDIA_CL_MODEL_DECOMPRESS_FAIL-71Model decompression failed
XMEDIA_CL_NOT_FIND_FILE-75Model file not found

6.4 Memory and Address Errors

Error codeValueDescription
XMEDIA_CL_INVALID_HOST_PTR-37Invalid host pointer
XMEDIA_CL_INVALID_MEM_OBJECT-38Invalid memory object
XMEDIA_CL_INSUFFICIENT_SIZE-66Insufficient memory size
XMEDIA_CL_ERROR_ADDR_ALIGN-69Address not aligned (must be 8-byte aligned)

6.5 Runtime Errors

Error codeValueDescription
XMEDIA_CL_INVALID_KERNEL-48Invalid kernel function
XMEDIA_CL_INVALID_KERNEL_ARGS-52Invalid kernel arguments
XMEDIA_CL_INVALID_OPERATION-59Invalid operation
XMEDIA_CL_INVALID_UNINIT-60CL framework not initialized
XMEDIA_CL_ALREADY_INIT-63CL framework already initialized (duplicate initialization)
XMEDIA_CL_OUT_OF_MAX_BATCH-74Exceeded maximum batch size

6.6 Event Errors

Error codeValueDescription
XMEDIA_CL_WAIT_EVENT_FAILED-56Wait event failed
XMEDIA_CL_INVALID_EVENT_WAIT_LIST-57Invalid event wait list
XMEDIA_CL_INVALID_EVENT-58Invalid event

7 Core Concepts and Resource Management

The XMEDIA_CL architecture uses the "context" to uniformly manage all device resources. The core concepts are as follows:

  • Device: a hardware compute unit such as NPU, CPU, or DSP. Task queues queue commands onto a specific device for execution.
  • Context: the resource manager. It manages each device, the memory accessible to each device, the task queue for each device, the program, and each kernel function.
  • Model graph file: a binary file (.xmm format) generated by the compiler from an AI model, supporting heterogeneous instructions.
  • Task queue: used to queue kernel-function commands for execution.
  • Event: used to indicate the execution status of a task, and to explicitly establish dependency constraints between tasks.

8 Task Scheduling Flow

The context is responsible for unified device resource management. During execution, the user first loads the model file, and XMEDIA_CL automatically creates the program object and kernel functions based on the Graph structure. Once created, XMEDIA_CL places the kernel functions into the task queue and generates corresponding events.

Asynchronous execution mechanism: kernel-function execution in this architecture always uses asynchronous mode. After a user submits a command to the task queue, the CPU can do other work without waiting for the NPU command to complete; if you must wait for a command to complete, you can explicitly establish this constraint through an event, maximizing CPU and NPU parallelism.

8.1 Event Status

The execution status after a task is submitted is as follows:

StatusEnum valueDescription
QUEUEDXMEDIA_CL_QUEUED (0)Queued, waiting for execution
SUBMITTEDXMEDIA_CL_SUBMITTED (1)Submitted to the device
RUNNINGXMEDIA_CL_RUNNING (2)Running
COMPLETEDXMEDIA_CL_COMPLETED (3)Execution completed
FAILEDXMEDIA_CL_FAILED (4)Execution failed

You can query the current status via xmedia_cl_query_event_status() or block-wait for completion via xmedia_cl_wait_for_events().

8.2 Task Priority

XMEDIA_CL supports 4 levels of task priority, set via xmedia_cl_graph_set_schedule_prio():

PriorityMacroValue
LowestXMEDIA_CL_JOB_SCHEDULE_PRIO_MIN0
MediumXMEDIA_CL_JOB_SCHEDULE_PRIO_MEDIUM1
HighXMEDIA_CL_JOB_SCHEDULE_PRIO_HIGH2
HighestXMEDIA_CL_JOB_SCHEDULE_PRIO_MAX3
// Set high priority
xmedia_cl_graph_set_schedule_prio(graph, XMEDIA_CL_JOB_SCHEDULE_PRIO_HIGH);

Edit this page on GitHub
Next
.xmm Model Loading