
HOME
Shop
  • English
  • 简体中文
HOME
Shop
  • English
  • 简体中文
  • Product Series

    • FPGA+ARM

      • GM-3568JHF

        • Introduction

          • GM-3568JHF Introduction
        • Quick Start

          • Preface
          • Environment Setup
          • Compilation Notes
          • Flashing Guide
          • Debugging Tools
          • Software Update
          • Viewing System Information
          • Test Commands
          • Application Compilation
          • Source Code Access
        • Peripherals & Interfaces

          • USB
          • Display and Touch
          • Ethernet
          • WIFI
          • Bluetooth
          • TF-Card
          • Audio
          • Serial Port
          • CAN
          • RTC
        • Application Development

          • UART Read/Write Demo
          • Key Detection Demo
          • LED Blink Demo
          • MIPI Screen Detection Demo
          • Read USB Device Information Demo
          • FAN Detection Demo
          • FPGA FSPI Communication Demo
          • FPGA DMA Read/Write Demo
          • GPS Debugging Demo
          • Ethernet Test Demo
          • RS485 Read/Write Demo
          • FPGA I2C Read/Write Demo
          • PN532 NFC Card-Reading Demo
          • TF Card Read/Write Demo
        • QT Development

          • ARM64 Cross-Compiler Environment Setup
          • Adding a QT Program to Boot Auto-Start
        • RKNN_NPU Development

          • RK3568 NPU Overview
          • Development Environment Setup
          • Run the Official YOLOv5 Example
        • FPGA Development

          • ARM and FPGA Communication
          • FPGA Development Manual
        • Others

          • Modifying the Root Filesystem
          • System Auto-Start Services
        • Downloads

          • Downloads
      • MB-E30P

        • Introduction

          • MB-E30P Introduction
        • Quick Start

          • Preface
          • Environment Setup
          • Compilation Instructions
          • Flashing Guide
          • Debugging Tools
          • Software Update
          • Viewing Information
          • Test Commands
          • Application Compilation
          • Source Code Acquisition
        • Peripherals & Interfaces

          • USB
          • Display and Touch
          • Ethernet
          • WIFI
          • Bluetooth
          • TF-Card
          • Audio
          • RTC
        • Application Development

          • Key Detection Demo
          • LED Blink Demo
          • MIPI Screen Detection Demo
          • Read USB Device Information Demo
          • FAN Detection Demo
          • FPGA FSPI Communication Demo
          • FPGA DMA Read/Write Demo
          • Ethernet Test Demo
          • FPGA IIC Read/Write Demo
          • PN532 NFC Card Reading Demo
          • TF Card Read/Write Demo
        • QT Development

          • ARM64 Cross-Compiler Environment Setup
          • Adding a QT Program to the Boot Auto-Start Service
        • RKNN_NPU Development

          • RK3568 NPU Overview
          • Development Environment Setup
          • Run the Official YOLOv5 Example
          • Model Conversion In Detail
          • Run Custom Models on the Board
        • FPGA Development

          • ARM and FPGA Communication
          • FPGA Development Manual
        • Others

          • Modifying the Root Filesystem
          • System Auto-Start Service
        • Downloads

          • Downloads
    • ShimetaPi

      • M4-R1

        • Introduction

          • M4-R1 Introduction
        • Quick Start

          • OpenHarmony Overview
          • Image Burning
          • Application Development Quick Start
          • Device Development Quick Start
        • Application Development

          • ArkUI

            • ArkTS Language Overview
            • UI Components - Row Container Introduction
            • UI Components - Column Container Introduction
            • UI Components - Text Component
            • UI Components - Toggle Component
            • UI Components - Slider Component
            • UI Components - Animation Component & Transition Component
          • Documentation

            • OpenHarmony Official Materials
          • Development Notes

            • Full-SDK Replacement Tutorial
            • Introducing and Using Third-Party Libraries
            • HDC Debugging
            • Restore Factory Mode via Command Line
            • Upgrade App to System Permission
          • First App

            • Build Your First ArkTS Application - HelloWorld
          • Demos

            • Serial-Debug-Assistant Application Demo
            • Writing-Board Application Demo
            • Digital Clock Application Demo
            • Wi-Fi Information Acquisition Application Demo
        • Device Development

          • Ubuntu Development

            • Environment Setup
            • Download Source Code
            • Compile Source Code
          • DevEco Device Tool

            • Tool Introduction
            • Development Environment Construction
            • Import the SDK
            • HUAWEI DevEco Tool Function Introduction
        • Kernel Peripherals & Interfaces

          • Guide
          • Device Tree Introduction
          • NAPI Introduction
          • ArkTS Introduction
          • NAPI Development Hands-on Demo
          • GPIO Introduction
          • I2C Communication
          • SPI Communication
          • PWM Control
          • UART Communication
          • TF Card (MicroSD)
          • Screen (Display)
          • Touch
          • Ethernet
          • M.2 SSD
          • Audio
          • WIFI & BT
          • Camera
        • Downloads

          • Downloads
      • M5-R1

        • Introduction

          • M5-R1 Development Docs
        • Quick Start

          • Image Burning
          • Environment Setup
          • Download Source Code
        • Peripherals & Interfaces

          • Raspberry Pi Interfaces
          • GPIO Interface
          • I2C Interface
          • SPI Communication
          • PWM Control
          • Serial Port Communication
          • TF Card
          • Display
          • Touch
          • Audio
          • RTC
          • Ethernet
          • M.2
          • MINI-PCIE
          • Camera
          • WIFI & BT
        • Downloads

          • Downloads
      • Pico-G1

        • Product Overview

          • Product Introduction
          • SDK Version Information
        • Quick Start

          • Development Environment Setup
          • Image Build
          • Image Flashing
          • System Login
          • Network Configuration
          • File Transfer
          • SDK Directory Structure
          • Deploying Your First Application
          • Deploying Your First Driver
          • Mounting an SD Card
        • Peripherals & Interfaces

          • GPIO Control
          • UART Serial Communication
          • I2C Communication
          • SPI Communication
        • MPP Media Development

          • MPP Media Processing Software
          • Image Processing Chain
          • Video Input
          • Image Encoding
        • NPU & AI

          • NPU Driver and Runtime Library Architecture
          • .xmm Model Loading
          • SVP Video Processing
          • AI Noise Reduction (AI_NR)
        • Application Samples

          • Encryption/Decryption Application
          • ADC Acquisition Application
          • Low-Power Application
          • Audio Processing Application
          • Video Encoding Application
          • Video Input Application
          • Video Graphics Subsystem (VGS) Application
          • 08 Region Overlay Application
          • 09 Intelligent Video Engine Application
          • 10 UVC Webcam Application
          • 11 All-in-One Quickstart Application
          • 12 FPN Correction Application
          • 13 Regional Motion Detection Application
          • 14 MTCNN Face Detection Application
        • Expansion Board Peripheral Examples

          • 00 - Pico Expansion Board Peripheral Examples Overview
          • 01 - OLED Display Application
          • 02 - TFT Display Application
          • 03 - MPU6050 Gyroscope Application
          • 04 - ADC Acquisition Application
          • 05 - Passive Buzzer Application
          • 06 - MQ Gas Sensor Application
          • 07 - GPS Positioning Application
          • 08 - SHT20 Temperature & Humidity Application
          • 09 - Ultrasonic Ranging Application
          • 10 - SpO2 Sensor Application
          • 11 - DC Motor Control Application
          • 12 - Servo Control Application
    • OpenHarmony

      • SC-3568HA

        • Introduction

          • SC-3568HA Overview
        • Quick Start Guide

          • OpenHarmony Overview
          • Image Flashing
          • Setting Up the Development Environment
          • Hello World Application and Deployment
        • Application Development

          • ArkUI

            • Introduction to ArkTS Language
            • Introduction to UI Components and Practical Applications (Part 1)
            • Introduction to UI Components and Practical Applications (Part 2)
            • Introduction to UI Components and Practical Applications (Part 3)
          • Expand

            • Getting Started Guide
            • Referencing and Using Third-Party Libraries
            • Application Compilation and Deployment
            • Command-Line Factory Reset
            • System Debugging -- HDC Debugging
            • APP Stability Testing
            • Chapter 7 Application Testing
        • Device Development

          • Environment Setup
          • Download Source Code
          • Compiling Source Code
        • Peripheral And Interface

          • Raspberry Pi interface
          • GPIO Interface
          • I2C Interface
          • SPI communication
          • PWM (Pulse Width Modulation) control
          • Serial port communication
          • TF Card
          • Display Screen
          • Touch
          • Audio
          • RTC
          • Ethernet
          • M.2
          • MINI-PCIE
          • Camera
          • WIFI&BT
          • Raspberry Pi expansion board
        • Downloads

          • Downloads
      • M-K1HSE

        • Introduction

          • M-K1HSE Introduction
        • Quick Start

          • Development environment construction
          • Source code acquisition
          • Compilation Notes
          • Burning Guide
        • Application Development

          • Application Development Environment Setup
          • First Application - Hello World
        • Peripherals and interfaces

          • 01 Audio
          • 02 RS485
          • 03 Display
        • System customization development

          • System transplant
          • System customization
          • Driver Development
          • System Debugging
          • OTA Update
        • Downloads

          • Downloads
    • HVS Camera

      • Quick Start

        • SDK Overview
        • Downloads
        • Your First C++ Program
        • Python Data Analysis
        • MultiVision Studio
      • Development

        • Programming Guides

          • Open Camera
          • Read Events
          • Recording & Replay
          • Event Processing (Denoising)
          • Display & Visualization
          • Tuning
          • Capture APS Image
        • Toolkit SDK

          • Hybrid Vision Toolkit
          • Quick Start
          • C++ API
          • Python API
        • Algorithm

          • Hybrid Vision Algo
          • Hybrid Vision Algo API
          • Windows Algo SDK
        • Samples Overview
        • Applications
      • Fundamentals

        • Event Camera Fundamentals
        • HVS Hybrid Vision
        • Event Visualization
        • Data Formats Reference
        • Glossary
        • Bias & Tuning
        • Video Tutorials
      • USB Cameras

        • HVS Camera Quick Start
        • Networking Capabilities

          • HVS Camera System Architecture
          • EVS Network Server
          • EVS Time Sync
          • Web Window
        • HVS Camera Compatibility Matrix
        • FAQ & Troubleshooting Guide
        • Products

          • CF-NRS1 (Lingguang No.1 Hybrid Vision Camera)
      • MIPI Modules

        • MIPI Module Quick Start
        • Carrier Boards

          • RDK X5 Carrier Board Adaptation
          • Raspberry Pi Carrier Board Adaptation
          • Digua Pi Carrier Board Adaptation
          • ShimeTai Board Carrier Board Adaptation
        • MIPI Module Compatibility Matrix
        • Products

          • EVS_003 Sensor Module
    • AI-model

      • 1684XB-32T

        • Introduction

          • AIBOX-1684XB-32 Introduction
        • Quick Start

          • First Use
          • Network Configuration
          • Disk Usage
          • Memory Allocation
          • Fan Control Strategy
          • Firmware Upgrade
          • Cross Compilation
          • Model Quantization
        • Application Development

          • Development Overview

            • Sophgo SDK Development
            • Sophgo Demo Introduction
          • Large Language Models

            • Deploying Llama3 Example
            • Sophon LLM_api_server Development
            • Deploying MiniCPM-V-2_6
            • Qwen-2-5-VL Image and Video Recognition Demo
            • Qwen3-chat Demo
            • Qwen3-Qwen Agent-MCP Development
            • Qwen3-langchain-AI Agent
          • Deep Learning

            • ResNet (Image Classification)
            • LPRNet (License Plate Recognition)
            • SAM (General Image Segmentation Foundation Model)
            • YOLOv5 (Object Detection)
            • OpenPose (Human Keypoint Detection)
            • PP-OCR (Optical Character Recognition)
        • Downloads

          • Downloads
      • 1684X-416T

        • Introduction

          • AIBOX-1684X-416 Introduction
        • Demo Quick Guide

          • ShimeTai Intelligent Monitoring Demo Quick Usage Guide
      • RDK-X5

        • Introduction

          • RDK-X5 Hardware Introduction
        • Quick Start

          • RDK-X5 Quick Start
        • Application Development

          • AI Online Model Development

            • Experiment 01 - Access Volcengine Doubao AI
            • Experiment 02 - Image Analysis
            • Experiment 03 - Multimodal Visual Analysis & Localization
            • Experiment 04 - Multimodal Image-Text Comparison
            • Experiment 05 - Multimodal Document/Table Analysis
            • Experiment 06 - Camera-based AI Visual Analysis
          • Large Language Models

            • Experiment 01 - Speech Recognition
            • Experiment 02 - Voice Conversation
            • Experiment 03 - Multimodal Image Analysis - Voice
            • Experiment 04 - Multimodal Image Comparison - Voice
            • Experiment 05 - Multimodal Document Analysis - Voice
            • Experiment 06 - Multimodal Vision Application - Voice
          • ROS2 Basics

            • Experiment 01 - Environment Setup
            • Experiment 02 - Create & Build a Workspace Package
            • Experiment 03 - Run ROS2 Topic Communication Node
            • Experiment 04 - ROS2 Camera Application
          • 40-pin IO Development

            • Experiment 01 - GPIO Output (LED Blink)
            • Experiment 02 - GPIO Input
            • Experiment 03 - Button-controlled LED
            • Experiment 04 - PWM Output
            • Experiment 05 - Serial Output
            • Experiment 06 - I2C Experiment
            • Experiment 07 - SPI Experiment
          • USB Module Usage

            • Experiment 01 - USB Voice Module Usage
            • Experiment 02 - Sound Source Localization Module
          • Machine Vision Practice

            • Experiment 01 - Open USB Camera
            • Experiment 02 - Color Recognition
            • Experiment 03 - Gesture Recognition
            • Experiment 04 - YOLOv5 Object Detection
      • RDK-S100

        • Introduction

          • RDK-S100 Hardware Introduction
        • Quick Start

          • RDK-S100 Quick Start
        • Application Development

          • AI Online Model Development

            • Experiment 01 - Access Volcengine Doubao AI
            • Experiment 02 - Image Analysis
            • Experiment 03 - Multimodal Visual Analysis & Localization
            • Experiment 04 - Multimodal Image-Text Comparison
            • Experiment 05 - Multimodal Document/Table Analysis
            • Experiment 06 - Camera-based AI Visual Analysis
          • Large Language Models

            • Experiment 01 - Speech Recognition
            • Experiment 02 - Voice Conversation
            • Experiment 03 - Multimodal Image Analysis - Voice
            • Experiment 04 - Multimodal Image Comparison - Voice
            • Experiment 05 - Multimodal Document Analysis - Voice
            • Experiment 06 - Multimodal Vision Application - Voice
          • ROS2 Basics

            • Experiment 01 - Environment Setup
            • Experiment 02 - Create & Build a Workspace Package
            • Experiment 03 - Run ROS2 Topic Communication Node
            • Experiment 04 - ROS2 Camera Application
          • 40-pin IO Development

            • Experiment 01 - GPIO Output (LED Blink)
            • Experiment 02 - GPIO Input
            • Experiment 03 - Button-controlled LED
            • Experiment 04 - PWM Output
            • Experiment 05 - Serial Output
            • Experiment 06 - I2C Experiment
            • Experiment 07 - SPI Experiment
          • USB Module Usage

            • Experiment 01 - USB Voice Module Usage
            • Experiment 02 - Sound Source Localization Module
          • Machine Vision Practice

            • Experiment 01 - Open USB Camera
            • Experiment 02 - Image Processing Basics
            • Experiment 03 - Object Detection
            • Experiment 04 - Image Segmentation
      • RK1828

        • Introduction

          • M5-182X-A1 AI Edge Box - Product Introduction
          • M5-182X-A1 Hardware Specifications
          • M5-182X-A1 Usage & Safety
        • Quick Start

          • M5-182X-A1 Image Flashing
          • RK182X Hardware Installation & Verification
          • RK182X Development Environment Quick Setup
          • RK182X SDK Overview
          • RK182X Environment Setup in Detail
          • RK182X Quick Start
          • Vendor SDK Data Extraction Record
        • Development Guide

          • ClawChips Architecture and Principles
          • SKILL User Manual
          • RK182X Series LLM Inference (RK1828 Model)
          • RK182X Series CNN Inference (RK1828 Model)
          • Model Conversion
          • RK182X AI Agent Application Development Guide
          • RK182X Industrial Anomaly Detection Application
        • SDK Reference

          • RKNN3-SDK Overview

            • RKNN3 SDK Overview
          • RKNN3-Toolkit

            • RKNN3 Toolkit Installation and Usage
          • RKLLM

            • RKLLM On-Device LLM Inference
          • RK182X Series NPU Overview and Architecture (RK1828 Model)
          • RK182X INT8 Quantized Inference Deployment
          • RK182X MPP Multimedia Framework
          • MPP Details

            • RK182X Video Decoding
            • RK182X Video Encoding
          • NPU Details

            • RKNN Model Conversion
            • RK182X NPU INT8 Quantized Inference
            • RK182X Multi-Model Parallel Inference
          • RGA Details

            • RK182X RGA 2D Graphics Acceleration
          • VPU Details

            • RK182X VPU Codec
        • Hardware Reference

          • RK182X Series Hardware Architecture Overview (RK1828 Model)
          • RK182X Pin Definitions and Multiplexing Configuration
          • RK182X Pin Definitions
          • RK182X Power Management
          • RK182X Clock and PLL Configuration
          • RK182X Clock and Frequency Configuration
        • Tutorials

          • Hello World
          • Hello RK1828 - The First Program
          • RTSP Streaming
          • RTSP Streaming + AI Analysis
          • ShiMetaPi AI Lobster One-Click Deployment
          • PaddleOCR-VL Text Recognition
          • Qwen3-1.7B LLM Text Chat
          • AI Multi-View Inspection (Qwen3-VL Wrapper)
          • YOLOv5 Object Detection
        • Downloads

          • Downloads
        • FAQ

          • FAQ
    • Core-Board

      • C-3568BQ

        • Introduction

          • C-3568BQ Overview
      • C-3588LQ

        • Introduction

          • C-3588LQ Overview
      • GC-3568JBAF

        • Introduction

          • GC-3568JBAF Overview
      • C-K1BA

        • Introduction

          • C-K1BA Overview
    • Software Platform

      • ShiMetaPi Workbench

        • Introduction

          • Product Overview
          • Core Architecture
          • Feature Entries
          • Supported Hardware
          • Release Notes
        • Quick Start

          • Install & Login
          • Connect the Device
          • Set Up the Environment
          • Connect to AIHub
          • First Inference
        • User Guide

          • Workspace Overview
          • Device Manager
          • Model Market
          • One-Click Deploy
          • Vision — SVP
          • Vision - Custom Models
          • shimeta-py IDE
          • Terminal
          • Agent Debug Assistant
          • Settings and Resources
        • FAQ

          • Installation & Login
          • Device Connection
          • Models & Deployment
          • Vision & Runtime
          • Settings & Other
      • ShimetaPi Repository

        • Introduction

          • ShimetaPi Software Repository
        • Pico G1 (GK7206)

          • Quick Start

            • Installation & First Inference
            • shimeta_infer — Image Inference
            • shimeta_camera — Real-time Camera Inference
            • SVP Scene Detection
            • File Transfer & Built-in Model Reference
            • FAQ
          • HTTP API & Python SDK

            • HTTP API Reference
      • Model Fine-tuning Platform

        • Introduction

          • Model Training Platform
        • Quick Start

          • Register & Login
          • Create Your First Model (30-Minute Quick Experience)
        • Training Guide

          • Data Preparation & Annotation
          • Training Parameter Configuration
          • Start & Monitor Training
          • Model Evaluation & Testing
        • Model Deployment

          • Export Model
          • Deploy to Edge Device

Device Tree Introduction

The device tree is an essential skill for embedded Linux developers, because in current Linux versions almost all ARM-related drivers are developed using the device-tree approach, including the RK3568 Linux kernel used in this tutorial. You could say that the device tree is a detailed representation of the development board's hardware schematic at the software layer. Whether it is OpenHarmony or Linux development, this is a board-level description file you must be able to understand — just like an MCU development software engineer must be able to read schematics! That is why we put the device tree in the first learning chapter. However, as the first chapter it may be somewhat difficult; if you find you cannot understand it all at once, you might as well start from GPIO later and come back to the device tree when you need it later~

No matter what peripheral driver, GPIO drivers are basically essential, and the pinctrl and gpio subsystems are required for GPIO drivers, so pinctrl is also covered in this chapter. I believe that once you understand the principles of the device tree, these two parts will be a piece of cake.

1 Device Tree Introduction

The description file of the Device Tree is called DTS (Device Tree Source). A DTS file uses a tree structure to describe board-level information, with the system bus as the center, branching out level by level, as shown in the figure below:
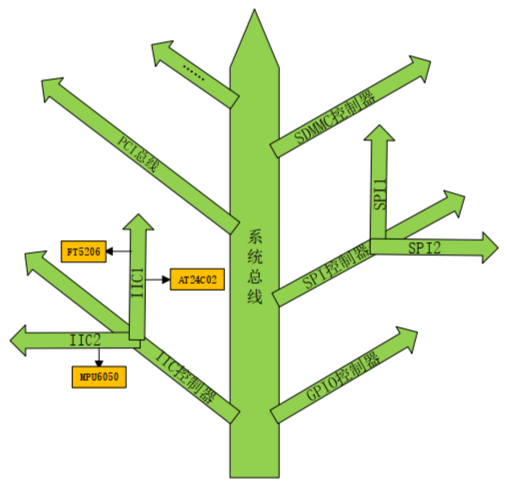
设备树结构图

With the development of embedded devices such as smartphones, dozens or even hundreds of new ARM-architecture chips are released every year, and the board-level information files under the Linux kernel will grow exponentially! These board-level information files are all .c or .h files. If they were all hard-coded into the Linux kernel, the Linux kernel would be filled with a lot of useless information.

Later, the ARM community separated all this content describing board-level hardware information from the Linux kernel and used a dedicated file format to describe it. This dedicated file is called the device tree, with the file extension .dts. One SOC can be used to make many different boards; these different boards definitely have common information. This common information is extracted as a generic file, and other .dts files directly reference this generic file. This generic file is the .dtsi file, similar to a header file in C. Generally, .dtsi describes SOC-level information (that is, how many CPUs the SOC has, what the main frequency is, information about each peripheral controller, etc.), and .dts describes board-level information (that is, what I2C devices, SPI devices, etc. are on the board).

Tips

In this tutorial, for some relatively simple peripherals, the author will take you to view the node information in the device tree and provide a simple analysis of the DTS code, so as to learn some basic information about the peripheral. This will help everyone gradually gain a further understanding of the syntax and structure of the device tree.

2 Device Tree Syntax

Even Linux driver developers would not, after getting an SOC, write a new .dts file from scratch; instead, they directly modify the .dts file provided by the semiconductor vendor to achieve adaptation to their own board.

2.1 .dtsi Header Files

Generally, .dtsi files are used to describe the SOC's internal peripheral information, such as CPU architecture, main frequency, peripheral register address ranges, such as UART, I2C, and so on. They are referenced via "#include". For example, rk3568.dtsi describes the peripheral information of the RK3568 chip itself. An excerpt is as follows:

Note

Because OpenHarmony, in order to keep the source code clean, has chip-vendor modifications applied uniformly via patches. Therefore there are two methods to obtain the complete rk3568.dtsi. Method 1: compile the source code once. You can obtain it in the out/kernel/src_tmp/linux-5.10/arch/arm64/boot/dts/rockchip directory. Method 2: apply the patch file directly into the source code via a command, but this approach will pollute the original OpenHarmony code.

Info

rk3568.dtsi path: out/kernel/src_tmp/linux-5.10/arch/arm64/boot/dts/rockchip

// SPDX-License-Identifier: (GPL-2.0+ OR MIT)
/*
 * Copyright (c) 2020 Rockchip Electronics Co., Ltd.
 */

#include <dt-bindings/clock/rk3568-cru.h>
#include <dt-bindings/interrupt-controller/arm-gic.h>
#include <dt-bindings/interrupt-controller/irq.h>
#include <dt-bindings/pinctrl/rockchip.h>
#include <dt-bindings/soc/rockchip,boot-mode.h>
#include <dt-bindings/phy/phy.h>
#include <dt-bindings/power/rk3568-power.h>
#include <dt-bindings/soc/rockchip-system-status.h>
#include <dt-bindings/suspend/rockchip-rk3568.h>
#include <dt-bindings/thermal/thermal.h>
#include "rk3568-dram-default-timing.dtsi"

/ {
	compatible = "rockchip,rk3568";

	interrupt-parent = <&gic>;
	#address-cells = <2>;
	#size-cells = <2>;

	aliases {
		csi2dphy0 = &csi2_dphy0;
		csi2dphy1 = &csi2_dphy1;
		csi2dphy2 = &csi2_dphy2;
		dsi0 = &dsi0;
		dsi1 = &dsi1;
		ethernet0 = &gmac0;
		ethernet1 = &gmac1;
		gpio0 = &gpio0;
		gpio1 = &gpio1;
		gpio2 = &gpio2;
		gpio3 = &gpio3;
		gpio4 = &gpio4;
		i2c0 = &i2c0;
		i2c1 = &i2c1;
		i2c2 = &i2c2;
		i2c3 = &i2c3;
		i2c4 = &i2c4;
		i2c5 = &i2c5;
		mmc0 = &sdhci;
		mmc1 = &sdmmc0;
		mmc2 = &sdmmc1;
		mmc3 = &sdmmc2;
		serial0 = &uart0;
		serial1 = &uart1;
		serial2 = &uart2;
		serial3 = &uart3;
		serial4 = &uart4;
		serial5 = &uart5;
		serial6 = &uart6;
		serial7 = &uart7;
		serial8 = &uart8;
		serial9 = &uart9;
		spi0 = &spi0;
		spi1 = &spi1;
		spi2 = &spi2;
		spi3 = &spi3;
	};

	cpus {
		#address-cells = <2>;
		#size-cells = <0>;

		cpu0: cpu@0 {
			device_type = "cpu";
			compatible = "arm,cortex-a55";
			reg = <0x0 0x0>;
			enable-method = "psci";
			clocks = <&scmi_clk 0>;
			operating-points-v2 = <&cpu0_opp_table>;
			cpu-idle-states = <&CPU_SLEEP>;
			#cooling-cells = <2>;
			dynamic-power-coefficient = <187>;
		};

		cpu1: cpu@100 {
			device_type = "cpu";
			compatible = "arm,cortex-a55";
			reg = <0x0 0x100>;
			enable-method = "psci";
			clocks = <&scmi_clk 0>;
			operating-points-v2 = <&cpu0_opp_table>;
			cpu-idle-states = <&CPU_SLEEP>;
		};

		cpu2: cpu@200 {
			device_type = "cpu";
			compatible = "arm,cortex-a55";
			reg = <0x0 0x200>;
			enable-method = "psci";
			clocks = <&scmi_clk 0>;
			operating-points-v2 = <&cpu0_opp_table>;
			cpu-idle-states = <&CPU_SLEEP>;
		};

		cpu3: cpu@300 {
			device_type = "cpu";
			compatible = "arm,cortex-a55";
			reg = <0x0 0x300>;
			enable-method = "psci";
			clocks = <&scmi_clk 0>;
			operating-points-v2 = <&cpu0_opp_table>;
			cpu-idle-states = <&CPU_SLEEP>;
		};

		idle-states {
			entry-method = "psci";
			CPU_SLEEP: cpu-sleep {
				compatible = "arm,idle-state";
				local-timer-stop;
				arm,psci-suspend-param = <0x0010000>;
				entry-latency-us = <100>;
				exit-latency-us = <120>;
				min-residency-us = <1000>;
			};
		};
	};
    ...
    ...
};

For example, the above excerpt mainly describes the system configuration, peripheral-interface alias mapping, and CPU configuration. The detailed information is as follows:

  • System Configuration

    • compatible: identifies this as the RK3568 chip
    • interrupt-parent: specifies the interrupt controller as GIC
    • #address-cells and #size-cells: define a 64-bit address space
  • Peripheral Interface Alias Definition The file defines a rich set of peripheral alias mappings to facilitate referencing various hardware interfaces, including:

    Interface
    Camera Interface• 3 CSI2 DPHY interfaces
    Display Interface• 2 DSI interfaces
    Network Interface• 2 Ethernet interfaces (GMAC)
    GPIO• 5 GPIO groups (gpio0-gpio4)
    I2C Bus• 6 I2C interfaces (i2c0-i2c5)
    Storage Interface• 4 MMC/SD card interfaces
    Serial Communication• 10 UART serial ports (serial0-serial9)
    SPI Bus• 4 SPI interfaces (spi0-spi3)
  • CPU Configuration

    • CPU architecture: ARM Cortex-A55 quad-core processor
    • CPU cores: 4 CPU cores (cpu0-cpu3)
    • Address mapping: each core has an independent register address
    • Power management: supports PSCI (Power State Coordination Interface)
    • Clock management: uses the SCMI clock framework
    • Power-consumption management: supports CPU sleep states, including entry/exit latency configuration
    • Thermal management: CPU0 supports dynamic-power coefficient and cooling units

The complete code corresponding to rk3568.dtsi and its description information should be studied by the developer on their own. This tutorial will only teach the information for part of the code.

2.2 Device Nodes

The device tree is a file that uses a tree structure to describe the device information on the board. Each device is a node, called a device node. Each node describes the node information through some attribute information; attributes are key-value pairs.

Still using the code excerpt from 2.1 as an explanation, the "/" on line 5 is the root node. Each device tree has only one root node. aliases and cpus are child nodes of the root node, and cpu0, cpu1, cpu2, and cpu3 are child nodes of cpus.

A common naming convention for nodes is:

label: node-name@unit-address
  • label is the node label, which can be accessed directly via &label
  • node-name is the node name; ASCII-encoded, used to clearly describe the node's function
  • unit-address is the device's address or the first register address

Taking the node cpu2: cpu@200 as an example, the label cpu2 indicates the third CPU. The full device name is cpu@200, indicating the CPU whose unit address is @200.

2.3 Standard Attributes

Nodes are concrete devices; each device has its own properties. In addition to user-defined properties, the most commonly used are standard properties. These are introduced one by one below:

1. compatible Property

It is a string list. The compatible property is used to bind a device with a driver, selecting the driver program the device should use. The common format is:

compatible = "manufacturer,model";

The property value is the manufacturer name plus the corresponding driver-module name. For example:

compatible = "sony,imx415";
// 日本sony 公司生产的imx415相机传感器模块

2. model Property

It is a string describing the board's name or device-module information. For example:

model = "Rockchip rk3568 EVB DDR4 V10 Board";
// 由瑞芯微推出的,基于 RK3568 芯片,搭载DDR4 内存,硬件版本为V1.0的板子

3. status Property

It is a string used to describe device-status information. Common status values include:

Status ValueDescription
"okay" or "ok"Device is operable
"disabled"Device is currently not operable, but may become operable in the future
"fail"Device is not operable; a serious error was detected in the device
"fail-sss"Device is not operable; a serious error was detected in the device; the sss portion is additional information specific to the device

4. #address-cells and #size-cells Properties

uint32 type, used to describe the address information of child nodes:

Property NameDescription
#address-cellsDefines how many 32-bit integers (cells) are needed to represent the address part
#size-cellsDefines how many 32-bit integers (cells) are needed to represent the size part

5. reg Property

Used to describe device address-space resource information or device address information. The value of the reg property is generally an (address, length) pair, that is, (address, size).

Take the description of uart5 in rk3568.dtsi as an example:

uart5: serial@fe690000 {
    xxxxxx
    reg = <0x0 0xfe690000 0x0 0x100>;
    xxxxxx
}
  • The first 0x0: high 32-bit address (0 in a 64-bit system)
  • 0xfe690000: low 32-bit base address
  • The third 0x0: high 32-bit size (0 in a 64-bit system)
  • 0x100: low 32-bit size (256 bytes)

6. name Property

A string used to record the node name; not common.

2.4 Modifying Node Content

During product development, you may face frequent requirement changes. Once the hardware is modified, we have to synchronously modify the device-tree file; after all, the device tree is the file that describes the board's hardware information. But this introduces a problem — for example, if I add an ICM45686 child node to the i2c5 node in the .dtsi file, other boards do not need this content. So here we also introduce the way to append content in a .dtsi file.

Taking adding an ICM45686 child node to the i2c5 node as an example

&i2c5 {
    status = "okay";
    clock-frequency = <400000>;

    ICM45686@1e {
        compatible = "TDK,ICM45686";
        reg = <0x1e>;
    };
};

&i2c5 indicates accessing the node corresponding to the i2c5 label, such as "i2c5: i2c@fe5e0000" in rk3568.dtsi. Describing the relevant information of the ICM45686 chip inside the child node ICM45686 under i2c5 will not affect other boards of this SOC.

3 Viewing the Device Tree in the Kernel

Under Linux everything is a file. Use HDC to enter the development board's terminal, and going to the path /proc/device-tree you can see that all the properties and child nodes under the root node exist in the form of files.
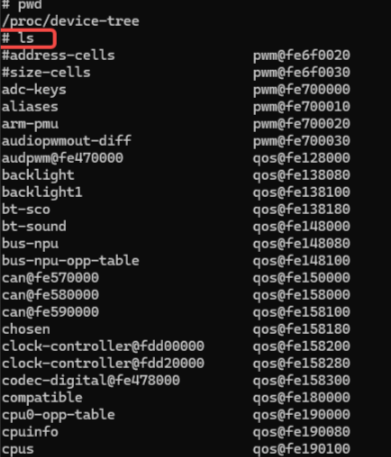
设备树根节点

Each node appears as a file. The content contained in the file is the node's properties, which can be viewed via cat, vim, and so on.

For example, entering the cpus child node under the root node, you can see the cpus node's properties and child nodes:
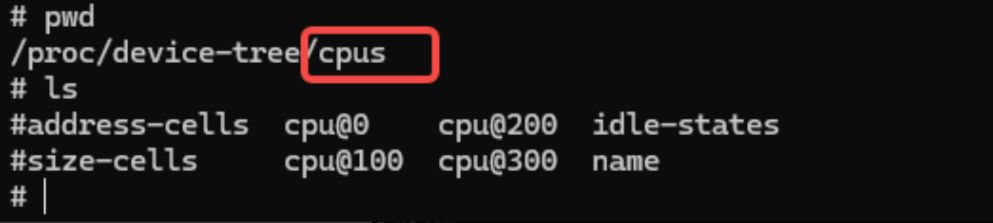
cpus子节点

Entering the cpu@100 node again, you can view its properties:

cpu@100节点

4 Pinctrl Subsystem

4.1 Pinctrl Subsystem Introduction

With the continuous improvement of peripheral resources in modern chips, not only is the number of pins very large, but the functions that pins can be multiplexed to are also very many. The pinctrl subsystem is the tool used to uniformly manage this pin multiplexing and configuration.

4.2 Pinctrl in the Device Tree

The description of pinctrl in the device tree is usually divided into two parts: one part writes some multiplexing options, and the other part uses one of the multiplexing options.

Define "states" in the Pinctrl node:

In the SoC's .dtsi file, there will be a pinctrl node in which a variety of available pin-function combinations, called "states", are defined.

// 在soc的.dtsi文件中
&pinctrl {
    // 定义一种状态:i2c1_default,表示I2C1的默认引脚配置
    i2c1_default: i2c1-default-state {
        // 配置这两组引脚的功能为I2C1,并设置上拉
        pins = "GPIO0_5", "GPIO0_6";
        function = "i2c1";
        bias-pull-up;
    };

    // 定义另一种状态:gpio5_state,将GPIO0_5配置为GPIO输入
    gpio5_state: gpio5-state {
        pins = "GPIO0_5";
        function = "gpio";
        input-enable;
    };
};

Reference states in a device node:

In your board-level .dts file, when defining a device (such as an I2C controller) node, you need to specify which state to use via the pinctrl-names and pinctrl-0 properties.

&i2c1 { // 引用i2c1节点
    status = "okay";
    pinctrl-names = "default";         // 状态名为"default"
    pinctrl-0 = <&i2c1_default>;       // 使用之前定义的i2c1_default状态
    clock-frequency = <100000>;
};

4.3 Pinctrl Usage Example

Below is an example of adding an LED pinctrl on the rk3568 platform:

Suppose you want to use GPIO0_D5 to control an LED. First consult the manual to confirm the multiplexing options of GPIO0_D5, and from the pre-defined multiplexing functions choose to multiplex it as GPIO (RK_FUNC_GPIO), then set its corresponding electrical property, such as no pull-up or pull-down (&pcfg_pull_none).

// 1. 定义LED的pinctrl配置集

&pinctrl {
    led_pin: led-pin {
        rockchip,pins = <0 RK_PD5 RK_FUNC_GPIO &pcfg_pull_none>;
    };
};

Then reference this multiplexing definition in the board-level file .dts:

// 2. 在LED节点中引用(假设使用gpio-leds驱动)

/ {
    leds {
        compatible = "gpio-leds";
        pinctrl-names = "default";
        pinctrl-0 = <&led_pin>; // 引用上面定义的配置

        my_led: led@0 {
            label = "my_led";
            gpios = <&gpio0 RK_PD5 GPIO_ACTIVE_HIGH>; // 注意:这里也要和pinctrl定义的引脚一致
            default-state = "off";
        };
    };
};
Edit this page on GitHub
Prev
Guide
Next
NAPI Introduction